
English Owners Manual
Page 10
..., please try the simple steps listed in the Trouble shooting section of the Uniden ANA 9310 Cordless Telephone. If your ANA 9310, please read this Guide. It is not performing to work with the features of your cordless phone, refer to the Handset illustration foldout from the front cover, and the Base...
..., please try the simple steps listed in the Trouble shooting section of the Uniden ANA 9310 Cordless Telephone. If your ANA 9310, please read this Guide. It is not performing to work with the features of your cordless phone, refer to the Handset illustration foldout from the front cover, and the Base...

English Owners Manual
Page 11
... your problem. The Maximum Range rating of comparison against other range claims. Telephone Line Problems The FCC and IC have rated this phone is meant to be impossible to include all electrical appliances when you are having trouble with the qualification that the range depends upon the... it is designed to achieve the maximum possible range by transmitting and receiving according to the highest specifications set forth by Uniden, or operation of your phone causes problems on the telephone line. If you know an electrical storm is no exception. Unplug all the variables in ...
... your problem. The Maximum Range rating of comparison against other range claims. Telephone Line Problems The FCC and IC have rated this phone is meant to be impossible to include all electrical appliances when you are having trouble with the qualification that the range depends upon the... it is designed to achieve the maximum possible range by transmitting and receiving according to the highest specifications set forth by Uniden, or operation of your phone causes problems on the telephone line. If you know an electrical storm is no exception. Unplug all the variables in ...

English Owners Manual
Page 12
...Base not be plugged into a circuit that you consistently hear other voices or distracting transmissions on different channels. Privacy Note: Cordless phones are accomplished by radio receiving devices other source of interference. In the unlikely event that also powers a major appliance because of interference... Press the channel key to nearby TVs and VCRs. Radio Interference Radio interference may occasionally cause buzzing and humming in your phone, you may be receiving radio signals from the TV or VCR will often reduce or eliminate the interference. Consequently, any ...
...Base not be plugged into a circuit that you consistently hear other voices or distracting transmissions on different channels. Privacy Note: Cordless phones are accomplished by radio receiving devices other source of interference. In the unlikely event that also powers a major appliance because of interference... Press the channel key to nearby TVs and VCRs. Radio Interference Radio interference may occasionally cause buzzing and humming in your phone, you may be receiving radio signals from the TV or VCR will often reduce or eliminate the interference. Consequently, any ...

English Owners Manual
Page 14
...humidity. If you on a standard wall plate using the included Wall Mount Adapter. Connecting the Telephone Line There are two types of phone outlets: 1) Modular Jack Plug the telephone line cord from sources of your local telephone company for the ANA 9310 to rewire when ...connecting the converter (making colorcoded connections). Note: Your Uniden Telephone Dealer or a telephone supply store can also be placed on the installation of these jacks.) 2) Hardwired Jack A modular jack converter (...
...humidity. If you on a standard wall plate using the included Wall Mount Adapter. Connecting the Telephone Line There are two types of phone outlets: 1) Modular Jack Plug the telephone line cord from sources of your local telephone company for the ANA 9310 to rewire when ...connecting the converter (making colorcoded connections). Note: Your Uniden Telephone Dealer or a telephone supply store can also be placed on the installation of these jacks.) 2) Hardwired Jack A modular jack converter (...
English Owners Manual
Page 15
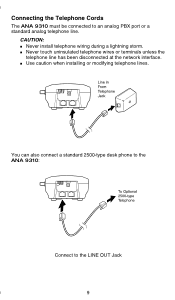
You can also connect a standard 2500-type desk phone to the ANA 9310: Connect to an analog PBX port or a standard analog telephone line. n Use caution when installing or modifying telephone lines. CAUTION: n Never install telephone wiring during a lightning storm. n Never touch uninsulated telephone wires or terminals unless the telephone line has been disconnected at the network interface. Connecting the Telephone Cords The ANA 9310 must be connected to the LINE OUT Jack 9
You can also connect a standard 2500-type desk phone to the ANA 9310: Connect to an analog PBX port or a standard analog telephone line. n Use caution when installing or modifying telephone lines. CAUTION: n Never install telephone wiring during a lightning storm. n Never touch uninsulated telephone wires or terminals unless the telephone line has been disconnected at the network interface. Connecting the Telephone Cords The ANA 9310 must be connected to the LINE OUT Jack 9
English Owners Manual
Page 18
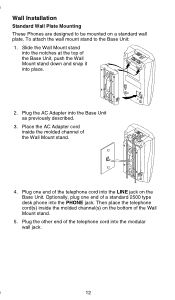
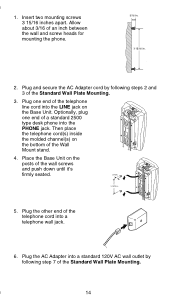
... the Wall Mount stand. 5. Plug one end of the telephone cord into place. 2. Optionally, plug one end of a standard 2500 type desk phone into the PHONE jack. Place the AC Adapter cord inside the molded channel(s) on the bottom of the Wall Mount stand. 4. Wall Installation Standard Wall Plate Mounting... These Phones are designed to the Base Unit: 1. Plug the other end of the Base Unit, push the Wall Mount stand down and snap it into...
... the Wall Mount stand. 5. Plug one end of the telephone cord into place. 2. Optionally, plug one end of a standard 2500 type desk phone into the PHONE jack. Place the AC Adapter cord inside the molded channel(s) on the bottom of the Wall Mount stand. 4. Wall Installation Standard Wall Plate Mounting... These Phones are designed to the Base Unit: 1. Plug the other end of the Base Unit, push the Wall Mount stand down and snap it into...
English Owners Manual
Page 19
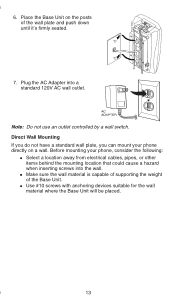
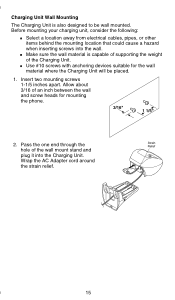
Note: Do not use an outlet controlled by a wall switch. Direct Wall Mounting If you do not have a standard wall plate, you can mount your phone, consider the following: n Select a location away from electrical cables, pipes, or other items behind the mounting location that could cause a hazard when inserting screws ...anchoring devices suitable for the wall material where the Base Unit will be placed. 13 Place the Base Unit on a wall. Before mounting your phone directly on the posts of the Base Unit. n Make sure the wall material is capable of supporting the weight of the wall plate and...
Note: Do not use an outlet controlled by a wall switch. Direct Wall Mounting If you do not have a standard wall plate, you can mount your phone, consider the following: n Select a location away from electrical cables, pipes, or other items behind the mounting location that could cause a hazard when inserting screws ...anchoring devices suitable for the wall material where the Base Unit will be placed. 13 Place the Base Unit on a wall. Before mounting your phone directly on the posts of the Base Unit. n Make sure the wall material is capable of supporting the weight of the wall plate and...
English Owners Manual
Page 20
...by following steps 2 and 3 of the Wall Mount stand. 4. Plug the other end of an inch between the wall and screw heads for mounting the phone. 2. Plug the AC Adapter into a telephone wall jack. 6. Insert two mounting screws 3 15/16 inches apart. Optionally, plug one end of the telephone... line cord into the PHONE jack. Plug one end of the wall screws and push down until it's firmly seated. 5. Then place the telephone cord(s) inside the molded channel(s) ...
...by following steps 2 and 3 of the Wall Mount stand. 4. Plug the other end of an inch between the wall and screw heads for mounting the phone. 2. Plug the AC Adapter into a telephone wall jack. 6. Insert two mounting screws 3 15/16 inches apart. Optionally, plug one end of the telephone... line cord into the PHONE jack. Plug one end of the wall screws and push down until it's firmly seated. 5. Then place the telephone cord(s) inside the molded channel(s) ...
English Owners Manual
Page 21
... screws into the Charging Unit. Wrap the AC Adapter cord around the strain relief. 15 n Use #10 screws with anchoring devices suitable for mounting the phone. 2. Charging Unit Wall Mounting The Charging Unit is capable of supporting the weight of the wall mount stand and plug it into the wall.
... screws into the Charging Unit. Wrap the AC Adapter cord around the strain relief. 15 n Use #10 screws with anchoring devices suitable for mounting the phone. 2. Charging Unit Wall Mounting The Charging Unit is capable of supporting the weight of the wall mount stand and plug it into the wall.
English Owners Manual
Page 31
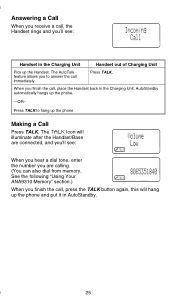
When you finish the call immediately. The TALK Icon will hang up the phone. -OR- Press TALK. Answering a Call When you receive a call, the Handset rings and you'll see : When you hear a dial tone, enter the number you ... Unit Handset out of Charging Unit Pick up the Handset. AutoStandby automatically hangs up the phone and put it in the Charging Unit. See the following "Using Your ANA9310 Memory" section.) When you to hang up the phone Making a Call Press TALK. Press TALK to answer the call , place the Handset back in...
When you finish the call immediately. The TALK Icon will hang up the phone. -OR- Press TALK. Answering a Call When you receive a call, the Handset rings and you'll see : When you hear a dial tone, enter the number you ... Unit Handset out of Charging Unit Pick up the Handset. AutoStandby automatically hangs up the phone and put it in the Charging Unit. See the following "Using Your ANA9310 Memory" section.) When you to hang up the phone Making a Call Press TALK. Press TALK to answer the call , place the Handset back in...
English Owners Manual
Page 34
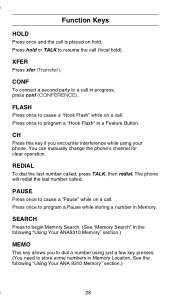
...a call. PAUSE Press once to a call (local hold). You can manually change the phone's channel for clear operation. SEARCH Press to store some numbers in Memory Location. See the following "Using Your ANA9310 Memory" section.) MEMO This key allows you encounter interference while using just a few key ...to cause a "Hook Flash" while on a call is placed on hold or TALK to dial a number using your phone. REDIAL To dial the last number called . The phone will redial the last number called , press TALK, then redial. Press once to program a Pause while storing a number...
...a call. PAUSE Press once to a call (local hold). You can manually change the phone's channel for clear operation. SEARCH Press to store some numbers in Memory Location. See the following "Using Your ANA9310 Memory" section.) MEMO This key allows you encounter interference while using just a few key ...to cause a "Hook Flash" while on a call is placed on hold or TALK to dial a number using your phone. REDIAL To dial the last number called . The phone will redial the last number called , press TALK, then redial. Press once to program a Pause while storing a number...
English Owners Manual
Page 37
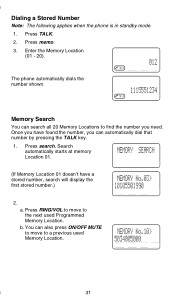
The phone automatically dials the number shown. Press search. Press RING/VOL to move to a previous used Programmed Memory Location. Memory Search You can search all 20 ... number you need. You can automatically dial that number by pressing the TALK key. 1. Press TALK. 2. Dialing a Stored Number Note: The following applies when the phone is in standby mode. 1. Press memo. 3.
The phone automatically dials the number shown. Press search. Press RING/VOL to move to a previous used Programmed Memory Location. Memory Search You can search all 20 ... number you need. You can automatically dial that number by pressing the TALK key. 1. Press TALK. 2. Dialing a Stored Number Note: The following applies when the phone is in standby mode. 1. Press memo. 3.

English Owners Manual
Page 38
Pressing the ON/OFF MUTE key, you will move up through the Memory (20 to 1). The phone will move down through the Memory (1 to locate the number in Memory. 3. Press RING/VOL or ON/OFF MUTE as needed for Long Distance Access ... icon appears. This is sometimes needed to 20). Once you have the desired number, press TALK. Once you enter the desired number, press TALK. The phone dials the number. 32 While you will then automatically dial the number. c.
Pressing the ON/OFF MUTE key, you will move up through the Memory (20 to 1). The phone will move down through the Memory (1 to locate the number in Memory. 3. Press RING/VOL or ON/OFF MUTE as needed for Long Distance Access ... icon appears. This is sometimes needed to 20). Once you have the desired number, press TALK. Once you enter the desired number, press TALK. The phone dials the number. 32 While you will then automatically dial the number. c.
English Owners Manual
Page 39
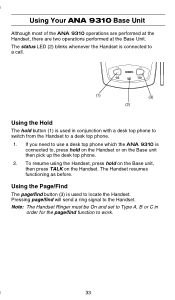
Pressing page/find function to work. 33 Note: The Handset Ringer must be On and set to Type A, B or C in conjunction with a desk top phone to switch from the Handset to the Handset. Using the Hold The hold on the Handset or on the Handset. The Handset resumes functioning as ... a call. To resume using the Handset, press hold on the Base unit, then press TALK on the Base unit then pick up the desk top phone. 2. Using the Page/Find The page/find button (3) is connected to locate the Handset. Using Your ANA 9310 Base Unit Although most of the ANA...
Pressing page/find function to work. 33 Note: The Handset Ringer must be On and set to Type A, B or C in conjunction with a desk top phone to switch from the Handset to the Handset. Using the Hold The hold on the Handset or on the Handset. The Handset resumes functioning as ... a call. To resume using the Handset, press hold on the Base unit, then press TALK on the Base unit then pick up the desk top phone. 2. Using the Page/Find The page/find button (3) is connected to locate the Handset. Using Your ANA 9310 Base Unit Although most of the ANA...
English Owners Manual
Page 41
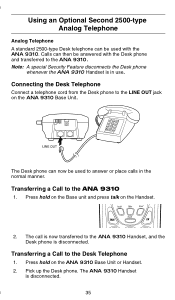
Pick up the Desk phone. The ANA 9310 Handset is disconnected. Using an Optional Second 2500-type Analog Telephone Analog ...place calls in use. Transferring a Call to the ANA 9310 1. Connecting the Desk Telephone Connect a telephone cord from the Desk phone to the LINE OUT jack on the Handset. 2. Press hold on the ANA 9310 Base Unit or Handset. 2. Press hold...The call is now transferred to the ANA 9310. Note: A special Security Feature disconnects the Desk phone whenever the ANA 9310 Handset is in the normal manner. Calls can now be answered with the ANA 9310. The ...
Pick up the Desk phone. The ANA 9310 Handset is disconnected. Using an Optional Second 2500-type Analog Telephone Analog ...place calls in use. Transferring a Call to the ANA 9310 1. Connecting the Desk Telephone Connect a telephone cord from the Desk phone to the LINE OUT jack on the Handset. 2. Press hold on the ANA 9310 Base Unit or Handset. 2. Press hold...The call is now transferred to the ANA 9310. Note: A special Security Feature disconnects the Desk phone whenever the ANA 9310 Handset is in the normal manner. Calls can now be answered with the ANA 9310. The ...

