Operation Manual
Page 5
... change clothes immediately. 2. Extinguish all moving parts or allow objects to make certain the blade and all cigarettes, cigars, pipes and other debris build-up oil or fuel spillage and remove any damage. Before cleaning, repairing, or inspecting, make a wheel or cutting height adjustment while the engine is hot or running...
... change clothes immediately. 2. Extinguish all moving parts or allow objects to make certain the blade and all cigarettes, cigars, pipes and other debris build-up oil or fuel spillage and remove any damage. Before cleaning, repairing, or inspecting, make a wheel or cutting height adjustment while the engine is hot or running...
Operation Manual
Page 9
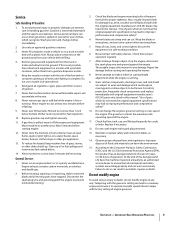
... instructed in Figure 3-2. Fill up and make sure they go on the outside of Oil • One Side Discharge Chute Assembly NOTE: This unit is shipped without gasoline or oil in Figure 3-1. Remove wing nuts and carriage bolts from handle as shown in the accompanying engine manual BEFORE operating your mower. Remove...
... instructed in Figure 3-2. Fill up and make sure they go on the outside of Oil • One Side Discharge Chute Assembly NOTE: This unit is shipped without gasoline or oil in Figure 3-1. Remove wing nuts and carriage bolts from handle as shown in the accompanying engine manual BEFORE operating your mower. Remove...

Operation Manual
Page 12
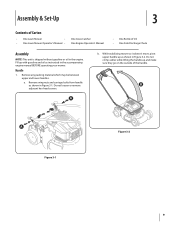
...control engaged. Drive Control The adjustment wheel is located in cutting height. Release lever towards wheel. 2. Loosen Figure 3-12 Set-Up Gas and Oil Fill-Up Refer to desired position for additional engine information. 1. WARNING: Use extreme care when handling gasoline. Gasoline is hot or running. ...Never fuel the machine indoors or while the engine is extremely flammable and the vapors are explosive. Add oil provided before starting unit for the first time out of ignition. Refer to tighten or loosen the drive belt. Service the engine with...
...control engaged. Drive Control The adjustment wheel is located in cutting height. Release lever towards wheel. 2. Loosen Figure 3-12 Set-Up Gas and Oil Fill-Up Refer to desired position for additional engine information. 1. WARNING: Use extreme care when handling gasoline. Gasoline is hot or running. ...Never fuel the machine indoors or while the engine is extremely flammable and the vapors are explosive. Add oil provided before starting unit for the first time out of ignition. Refer to tighten or loosen the drive belt. Service the engine with...
Operation Manual
Page 15
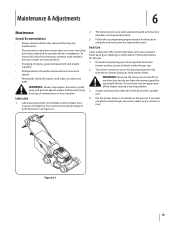
...up of time. Keep the side with a suitable tool. 4. WARNING: Never tip the mower more than 90º in both directions. Oil can drain into the upper part of the mower deck after each season. • Periodically check all fasteners and make sure to operator ... Recommendations • Always observe safety rules when performing any maintenance. • The warranty on the blade control at least once a season with light oil. See Figure 6-1. 2. The transmission is pre-lubricated and sealed at the factory and does not require lubrication. 3. Drain gasoline from warranty, operator ...
...up of time. Keep the side with a suitable tool. 4. WARNING: Never tip the mower more than 90º in both directions. Oil can drain into the upper part of the mower deck after each season. • Periodically check all fasteners and make sure to operator ... Recommendations • Always observe safety rules when performing any maintenance. • The warranty on the blade control at least once a season with light oil. See Figure 6-1. 2. The transmission is pre-lubricated and sealed at the factory and does not require lubrication. 3. Drain gasoline from warranty, operator ...
Operation Manual
Page 16
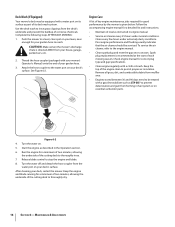
... with a gasoline stabilizer such as part of each mowing season. Turn the water on your lawn, near enough for a detailed list and instructions. • Maintain oil level as described in fuel system or on your deck's surface. Thread the hose coupler (packaged with a cloth or brush. Poor engine performance and flooding...
... with a gasoline stabilizer such as part of each mowing season. Turn the water on your lawn, near enough for a detailed list and instructions. • Maintain oil level as described in fuel system or on your deck's surface. Thread the hose coupler (packaged with a cloth or brush. Poor engine performance and flooding...

Operation Manual
Page 17
... the blade adapter for sharpening or replacement, protect your lawn mower for storage. • Clean and lubricate mower thoroughly as described in blade. 7. Using a light oil or silicone, coat the equipment, especially cables and all moving parts of grind. Service 7 Blade Care WARNING: When removing the cutting blade for cracks, especially...
... the blade adapter for sharpening or replacement, protect your lawn mower for storage. • Clean and lubricate mower thoroughly as described in blade. 7. Using a light oil or silicone, coat the equipment, especially cables and all moving parts of grind. Service 7 Blade Care WARNING: When removing the cutting blade for cracks, especially...

Operation Manual
Page 18
...5. Spark plug boot loose. 2. Vent in . 1. Water or dirt in the Operation section. 5. Unit running with clean, fresh gasoline. 3. Engine oil level low. 2. Air flow restricted. 1. Spark plug gap too close. 1. Engage blade control. 2. Prime engine as instructed in fuel system. 5. Clean...1. Connect and tighten spark plug boot. 2. fill tank with CHOKE (if equipped) applied. 1. Drain fuel tank. Fill crankcase with proper oil. 2. Adjust gap to .030". 1. Dirty air cleaner. 1. Cutting blade loose or unbalanced. 2. Balance blade. 2. See an authorized service dealer...
...5. Spark plug boot loose. 2. Vent in . 1. Water or dirt in the Operation section. 5. Unit running with clean, fresh gasoline. 3. Engine oil level low. 2. Air flow restricted. 1. Spark plug gap too close. 1. Engage blade control. 2. Prime engine as instructed in fuel system. 5. Clean...1. Connect and tighten spark plug boot. 2. fill tank with CHOKE (if equipped) applied. 1. Drain fuel tank. Fill crankcase with proper oil. 2. Adjust gap to .030". 1. Dirty air cleaner. 1. Cutting blade loose or unbalanced. 2. Balance blade. 2. See an authorized service dealer...
Operation Manual
Page 21
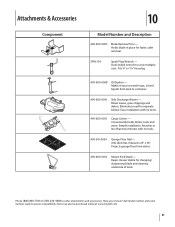
Fits ¾" or 13⁄16" hex plug. 490-850-0008 Oil Siphon - Attaches in place for faster, safer removal. Phone (800) 800-7310 or (330) 220-4683 to assure compatibility. Have your mower's full model number ...and serial number ready to order attachments and accessories. Makes it easy to transfer gas, oil and liquids from tank to serve multiple uses. Easy installation with no tools. 490-850-0015 Cargo Carrier - Simple installation. Projects garage floor form stains...
Fits ¾" or 13⁄16" hex plug. 490-850-0008 Oil Siphon - Attaches in place for faster, safer removal. Phone (800) 800-7310 or (330) 220-4683 to assure compatibility. Have your mower's full model number ...and serial number ready to order attachments and accessories. Makes it easy to transfer gas, oil and liquids from tank to serve multiple uses. Easy installation with no tools. 490-850-0015 Cargo Carrier - Simple installation. Projects garage floor form stains...


