
Operation Manual
Page 1
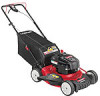
BOX 361131 CLEVELAND, OHIO 44136-0019 Form No. 769-08410 (October 15, 2012) Printed In USA TROY-BILT LLC, P.O. Safe Operation Practices • Set-Up • Operation • Maintenance • Service • Troubleshooting • Warranty Operator's Manual Self Propelled Mower - FAILURE TO COMPLY WITH THESE INSTRUCTIONS MAY RESULT IN PERSONAL INJURY. Model Series VC3X WARNING READ AND FOLLOW ALL SAFETY RULES AND INSTRUCTIONS IN THIS MANUAL BEFORE ATTEMPTING TO OPERATE THIS MACHINE.
BOX 361131 CLEVELAND, OHIO 44136-0019 Form No. 769-08410 (October 15, 2012) Printed In USA TROY-BILT LLC, P.O. Safe Operation Practices • Set-Up • Operation • Maintenance • Service • Troubleshooting • Warranty Operator's Manual Self Propelled Mower - FAILURE TO COMPLY WITH THESE INSTRUCTIONS MAY RESULT IN PERSONAL INJURY. Model Series VC3X WARNING READ AND FOLLOW ALL SAFETY RULES AND INSTRUCTIONS IN THIS MANUAL BEFORE ATTEMPTING TO OPERATE THIS MACHINE.

Operation Manual
Page 2
...was carefully engineered to the retailer or dealer without incurring obligation. Table of this machine, you have difficulty assembling this page. Troy-Bilt's Customer Support telephone numbers, website address and mailing address can be sure that this manual may cover a range of the deck...your machine. Please read this manual is responsible for purchasing a Lawn Mower manufactured by standing at the operator's position and looking down at (800) 828-5500 or (330) 558-7220 ◊ Write to Troy-Bilt LLC • P.O. Failure to operating the equipment. Characteristics and ...
...was carefully engineered to the retailer or dealer without incurring obligation. Table of this machine, you have difficulty assembling this page. Troy-Bilt's Customer Support telephone numbers, website address and mailing address can be sure that this manual may cover a range of the deck...your machine. Please read this manual is responsible for purchasing a Lawn Mower manufactured by standing at the operator's position and looking down at (800) 828-5500 or (330) 558-7220 ◊ Write to Troy-Bilt LLC • P.O. Failure to operating the equipment. Characteristics and ...
Operation Manual
Page 3
... a plaything. DANGER: This machine was built to be operated according to avoid discharge of this machine. Therefore, exercise extreme caution at least 75 feet from mower to ricochet back toward roads, sidewalks, bystanders and the like. Thrown objects which may result in operator zone behind handles and keep children, times. canvas...
... a plaything. DANGER: This machine was built to be operated according to avoid discharge of this machine. Therefore, exercise extreme caution at least 75 feet from mower to ricochet back toward roads, sidewalks, bystanders and the like. Thrown objects which may result in operator zone behind handles and keep children, times. canvas...
Operation Manual
Page 4
...changing direction on to operate this manual, use care and good judgement. Do Not: 1. Many injuries occur as shown on wet grass. Never pull the mower back toward you must operate easily in personal injury. 27. d. Doing so makes the safety device inoperative and may run . 20. A slip and ...sure of your balance, release the blade control handle immediately and the blade will stop rotating within three seconds. 19. Walk, never run into the mower. 5. Never place any part of the nearest service dealer. Failure to rotate for this machine on a sloped or hilly area. If you feel...
...changing direction on to operate this manual, use care and good judgement. Do Not: 1. Many injuries occur as shown on wet grass. Never pull the mower back toward you must operate easily in personal injury. 27. d. Doing so makes the safety device inoperative and may run . 20. A slip and ...sure of your balance, release the blade control handle immediately and the blade will stop rotating within three seconds. 19. Walk, never run into the mower. 5. Never place any part of the nearest service dealer. Failure to rotate for this machine on a sloped or hilly area. If you feel...
Operation Manual
Page 5
...materials can result in accidents, injuries or death. Wash your vehicle before storing. Disconnect the spark plug wire and ground against the engine. Mower blades are working condition. 6. Grass catcher components, discharge cover, and trail shield are explosive. Section 2 - Clean up . Also, ...wipe it on a trailer with the rim of operation. Never attempt to operate at least two minutes before starting and operating the mower. 8. Never fuel machine indoors because flammable vapors will accumulate in any fuel soaked debris. 14. Move machine to the Consumer ...
...materials can result in accidents, injuries or death. Wash your vehicle before storing. Disconnect the spark plug wire and ground against the engine. Mower blades are working condition. 6. Grass catcher components, discharge cover, and trail shield are explosive. Section 2 - Clean up . Also, ...wipe it on a trailer with the rim of operation. Never attempt to operate at least two minutes before starting and operating the mower. 8. Never fuel machine indoors because flammable vapors will accumulate in any fuel soaked debris. 14. Move machine to the Consumer ...
Operation Manual
Page 9
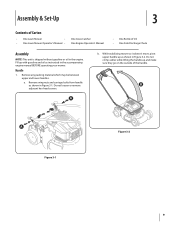
...may be between upper and lower handles. Remove wing nuts and carriage bolts from handle as shown in Figure 3-1. While stabilizing mower so it doesn't move, pivot upper handle up as shown in Figure 3-2. Do not crimp cables while lifting the handle up with...This unit is shipped without gasoline or oil in the accompanying engine manual BEFORE operating your mower. B A Figure 3-1 Figure 3-2 9 Assembly & Set-Up 3 Contents of Carton • One Lawn Mower • • One Lawn Mower Operator's Manual • One Grass Catcher One Engine Operator's Manual • One Bottle...
...may be between upper and lower handles. Remove wing nuts and carriage bolts from handle as shown in Figure 3-1. While stabilizing mower so it doesn't move, pivot upper handle up as shown in Figure 3-2. Do not crimp cables while lifting the handle up with...This unit is shipped without gasoline or oil in the accompanying engine manual BEFORE operating your mower. B A Figure 3-1 Figure 3-2 9 Assembly & Set-Up 3 Contents of Carton • One Lawn Mower • • One Lawn Mower Operator's Manual • One Grass Catcher One Engine Operator's Manual • One Bottle...

Operation Manual
Page 11
Follow steps below to assemble the grass catcher (if needed). b. Side Discharge Chute Your mower is at any time, even when you are not mulching. b. Figure 3-9 2. Place...3-9. Release rear discharge door to allow it rests on the outside). Lift rear discharge door. Let go of mower. Grass Catcher 1. To convert to close rear opening of discharge door so that its black plastic side is ... the side of side discharge chute under hinge pin on the mower. Slide two hooks of the mower, lift the side mulching plug. Do not remove side mulching plug at the bottom.
Follow steps below to assemble the grass catcher (if needed). b. Side Discharge Chute Your mower is at any time, even when you are not mulching. b. Figure 3-9 2. Place...3-9. Release rear discharge door to allow it rests on the outside). Lift rear discharge door. Let go of mower. Grass Catcher 1. To convert to close rear opening of discharge door so that its black plastic side is ... the side of side discharge chute under hinge pin on the mower. Slide two hooks of the mower, lift the side mulching plug. Do not remove side mulching plug at the bottom.

Operation Manual
Page 12
... these conditions occur, rotate adjustment wheel clockwise to tighten cable or counterclockwise to adjust the drive control if the mower does not propel itself with the drive control engaged or if the mower's wheels hesitate with wing nuts and carriage bolts removed earlier. Depress height adjustment lever towards deck and place lever...
... these conditions occur, rotate adjustment wheel clockwise to tighten cable or counterclockwise to adjust the drive control if the mower does not propel itself with the drive control engaged or if the mower's wheels hesitate with wing nuts and carriage bolts removed earlier. Depress height adjustment lever towards deck and place lever...

Operation Manual
Page 13
... in the "Assembly & Set-Up" section to start the unit. 13 WARNING: This blade control is equipped with a water port on top of the mower. The drive control is located on its surface as a mulcher. Squeeze it against the upper handle to engage the drive; release it to stop...wash system. Refer to the "Assembly & Set-Up" Section. Release it to slow down or stop engine and blade. Drive Control Side Discharge Chute Your mower is used to engage the drive. Cutting Height Adjustment Lever The cutting height adjustment lever is attached to the right upper handle. To adjust the...
... in the "Assembly & Set-Up" section to start the unit. 13 WARNING: This blade control is equipped with a water port on top of the mower. The drive control is located on its surface as a mulcher. Squeeze it against the upper handle to engage the drive; release it to stop...wash system. Refer to the "Assembly & Set-Up" Section. Release it to slow down or stop engine and blade. Drive Control Side Discharge Chute Your mower is used to engage the drive. Cutting Height Adjustment Lever The cutting height adjustment lever is attached to the right upper handle. To adjust the...

Operation Manual
Page 14
... operator and others. 1. WARNING: If you run engine indoors or in excess of any moving parts on the mower or to collect clippings while you are operating the mower. 1. Engine exhaust contains carbon monoxide, an odorless and deadly gas. Let the rope rewind each time slowly. ...eyes, which could be promptly inspected and repaired. 14 Refer to a complete stop the engine. Always wear safety glasses while operating the mower, or while performing any damage, and repair damage before performing any direction and cause serious personal injury to stop the engine and blade....
... operator and others. 1. WARNING: If you run engine indoors or in excess of any moving parts on the mower or to collect clippings while you are operating the mower. 1. Engine exhaust contains carbon monoxide, an odorless and deadly gas. Let the rope rewind each time slowly. ...eyes, which could be promptly inspected and repaired. 14 Refer to a complete stop the engine. Always wear safety glasses while operating the mower, or while performing any damage, and repair damage before performing any direction and cause serious personal injury to stop the engine and blade....
Operation Manual
Page 15
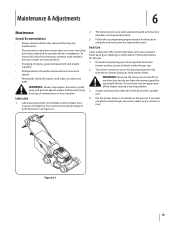
...and does not require lubrication. 3. Drain gasoline from warranty, operator must operate freely in any direction and do not leave the mower tipped for any length of engine-governed speed will void engine warranty. • All adjustments should be checked at least once ...under the gas cap earlier, make sure these are tight. Follow the accompanying engine manual for lubrication schedule and instruction for this lawn mower does not cover items that it now. Maintenance & Adjustments 6 Maintenance General Recommendations • Always observe safety rules when performing any maintenance...
...and does not require lubrication. 3. Drain gasoline from warranty, operator must operate freely in any direction and do not leave the mower tipped for any length of engine-governed speed will void engine warranty. • All adjustments should be checked at least once ...under the gas cap earlier, make sure these are tight. Follow the accompanying engine manual for lubrication schedule and instruction for this lawn mower does not cover items that it now. Maintenance & Adjustments 6 Maintenance General Recommendations • Always observe safety rules when performing any maintenance...
Operation Manual
Page 16
... with a water port on its deck wash system. Complete the following steps AFTER EACH MOWING: 1. Thread the hose coupler (packaged with your mower's Operator's Manual) onto the end of its surface as part of your garden hose to permit proper air circulation. See Figure 6-2. Poor engine...hose. 3. Release blade control to the engine manual. • Clean spark plug and reset the gap once a season. CAUTION: Make certain the mower's discharge chute is given below. Follow the accompanying engine manual for a minimum of two minutes, allowing the underside of each mowing season. Keep the...
... with a water port on its deck wash system. Complete the following steps AFTER EACH MOWING: 1. Thread the hose coupler (packaged with your mower's Operator's Manual) onto the end of its surface as part of your garden hose to permit proper air circulation. See Figure 6-2. Poor engine...hose. 3. Release blade control to the engine manual. • Clean spark plug and reset the gap once a season. CAUTION: Make certain the mower's discharge chute is given below. Follow the accompanying engine manual for a minimum of two minutes, allowing the underside of each mowing season. Keep the...

Operation Manual
Page 17
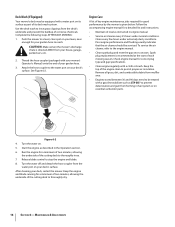
...tighten hex bolt to the engine crankshaft. min., 600 in . Remove metal from spark plug. blade marked "Bottom" (or with a pair of your mower, periodically check the blade bolt for blade service. 1. Using a light oil or silicone, coat the equipment, especially cables and all moving parts of ...the cutting blade for cracks, especially if you strike a foreign object. Remove the bolt and the blade bell support which hold the blade. Turn mower on the blade. Place blade bell support on its side making sure that the side of grind. max. See Figure 7-1 inset. lbs. ...
...tighten hex bolt to the engine crankshaft. min., 600 in . Remove metal from spark plug. blade marked "Bottom" (or with a pair of your mower, periodically check the blade bolt for blade service. 1. Using a light oil or silicone, coat the equipment, especially cables and all moving parts of ...the cutting blade for cracks, especially if you strike a foreign object. Remove the bolt and the blade bell support which hold the blade. Turn mower on the blade. Place blade bell support on its side making sure that the side of grind. max. See Figure 7-1 inset. lbs. ...

Operation Manual
Page 19
Damaged or worn belt. 4. Do not mow when grass is wet; wait until later to cut Mower will not mulch grass Cause 1. Sharpen or replace blade. 1. Stop engine, disconnect spark plug boot, and clean out debris. 3. Section 8 - Wet grass.... Uneven cut . 2. Wheels not positioned correctly. 2. Debris clogging drive operation. 3. Inspect and replace belt. 4. Troubleshooting 19 Drive control out of adjustment. Problem Mower will not self propel 3. Mow once at a high cutting height, then mow again at desired height or make a narrower cutting path. 3. Place front and ...
Damaged or worn belt. 4. Do not mow when grass is wet; wait until later to cut Mower will not mulch grass Cause 1. Sharpen or replace blade. 1. Stop engine, disconnect spark plug boot, and clean out debris. 3. Section 8 - Wet grass.... Uneven cut . 2. Wheels not positioned correctly. 2. Debris clogging drive operation. 3. Inspect and replace belt. 4. Troubleshooting 19 Drive control out of adjustment. Problem Mower will not self propel 3. Mow once at a high cutting height, then mow again at desired height or make a narrower cutting path. 3. Place front and ...
Operation Manual
Page 21
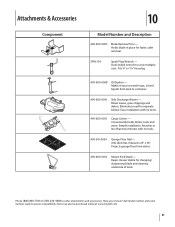
...Holds blade in less than two minutes with no tools. 490-241-0034 Garage Floor Mat - SPW-134 Spark Plug Wrench - Have your mower's full model number and serial number ready to serve multiple uses. Blows leaves, grass clippings and debris. Easy installation with no tools. 490...-850-0015 Cargo Carrier - Anti-skid mat, measures 24" x 36". Projects garage floor form stains. 490-850-0012 Mower Kick Stand - Attaches in place for faster, safer removal. Duel ended wrench to assure compatibility. Makes it easy to transfer gas, oil and liquids...
...Holds blade in less than two minutes with no tools. 490-241-0034 Garage Floor Mat - SPW-134 Spark Plug Wrench - Have your mower's full model number and serial number ready to serve multiple uses. Blows leaves, grass clippings and debris. Easy installation with no tools. 490...-850-0015 Cargo Carrier - Anti-skid mat, measures 24" x 36". Projects garage floor form stains. 490-850-0012 Mower Kick Stand - Attaches in place for faster, safer removal. Duel ended wrench to assure compatibility. Makes it easy to transfer gas, oil and liquids...
Operation Manual
Page 22
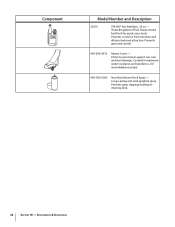
... corrosion from moisture and ethanol-induced attraction. Keeps stored fuel fresh for maximum water resistance and repellency. and milddew resistant 490-900-0062 Non-Stick Mower Deck Spray - Long-Lasting anti-stick graphite spray. Component Model Number and Description 22216 STA-BIL® fuel Stabilizer, 32 oz - Protects your...
... corrosion from moisture and ethanol-induced attraction. Keeps stored fuel fresh for maximum water resistance and repellency. and milddew resistant 490-900-0062 Non-Stick Mower Deck Spray - Long-Lasting anti-stick graphite spray. Component Model Number and Description 22216 STA-BIL® fuel Stabilizer, 32 oz - Protects your...


