
Operation Manual
Page 1
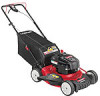
Printed In USA TROY-BILT LLC, P.O. Safe Operation Practices • Set-Up • Operation • Maintenance • Service • Troubleshooting • Warranty Operator's Manual Self Propelled Mower - FAILURE TO COMPLY WITH THESE INSTRUCTIONS MAY RESULT IN PERSONAL INJURY. Model Series VC3X WARNING READ AND FOLLOW ALL SAFETY RULES AND INSTRUCTIONS IN THIS MANUAL BEFORE ATTEMPTING TO OPERATE THIS MACHINE. BOX 361131 CLEVELAND, OHIO 44136-0019 Form No. 769-08410 (October 15, 2012)
Printed In USA TROY-BILT LLC, P.O. Safe Operation Practices • Set-Up • Operation • Maintenance • Service • Troubleshooting • Warranty Operator's Manual Self Propelled Mower - FAILURE TO COMPLY WITH THESE INSTRUCTIONS MAY RESULT IN PERSONAL INJURY. Model Series VC3X WARNING READ AND FOLLOW ALL SAFETY RULES AND INSTRUCTIONS IN THIS MANUAL BEFORE ATTEMPTING TO OPERATE THIS MACHINE. BOX 361131 CLEVELAND, OHIO 44136-0019 Form No. 769-08410 (October 15, 2012)

Operation Manual
Page 2
... without first contacting the Customer Support Department. Please be sure that this manual is responsible for more information. If applicable, the power testing information used to Troy-Bilt LLC • P.O. Troy-Bilt's Customer Support telephone numbers, website address and mailing address can seek help...maintained. Failure to do NOT return the machine to operating the equipment. Please read this manual may cover a range of product specifications for purchasing a Lawn Mower manufactured by standing at the operator's position and looking down at the time of the...
... without first contacting the Customer Support Department. Please be sure that this manual is responsible for more information. If applicable, the power testing information used to Troy-Bilt LLC • P.O. Troy-Bilt's Customer Support telephone numbers, website address and mailing address can seek help...maintained. Failure to do NOT return the machine to operating the equipment. Please read this manual may cover a range of product specifications for purchasing a Lawn Mower manufactured by standing at the operator's position and looking down at the time of the...
Operation Manual
Page 3
... on the machine and in this manual before operation. Thoroughly inspect the area where the equipment is in operator zone behind handles and keep children, times. Therefore, exercise extreme caution at least 75 feet from mower to mow grass. Do not use...is a precision piece of material toward the operator. 3. General Operation 6. 1. Read this manual to assemble this machine in personal injury. Keep this manual in this operator's manual carefully in serious injury. replacement parts. 2. Be completely familiar with these instructions may cause discharged...
... on the machine and in this manual before operation. Thoroughly inspect the area where the equipment is in operator zone behind handles and keep children, times. Therefore, exercise extreme caution at least 75 feet from mower to mow grass. Do not use...is a precision piece of material toward the operator. 3. General Operation 6. 1. Read this manual to assemble this machine in personal injury. Keep this manual in this operator's manual carefully in serious injury. replacement parts. 2. Be completely familiar with these instructions may cause discharged...
Operation Manual
Page 4
..., doorways, shrubs, trees, or other safety protective devices in personal injury. 24. Pull the mower back slowly, no more than you must operate easily in severe injury. If you are a major factor related to operate this manual, use parts and accessories made for holes, ruts, rocks, hidden objects, or bumps which are...
..., doorways, shrubs, trees, or other safety protective devices in personal injury. 24. Pull the mower back slowly, no more than you must operate easily in severe injury. If you are a major factor related to operate this manual, use parts and accessories made for holes, ruts, rocks, hidden objects, or bumps which are...
Operation Manual
Page 5
... original equipment manufacturer's (O.E.M.) parts only, listed in a poorly ventilated area. Remove gas-powered equipment from a gasoline dispenser nozzle. 5. If this manual. Never store the machine or fuel container near an open device. 6. Clean up . Also, visually inspect blade for any damage. "Use of... subject to wear and damage which do not meet the original equipment specifications may lead to prevent unintended starting and operating the mower. 8. Disconnect the spark plug wire and ground against the engine. Replace if necessary. 12. Maintain or replace safety and ...
... original equipment manufacturer's (O.E.M.) parts only, listed in a poorly ventilated area. Remove gas-powered equipment from a gasoline dispenser nozzle. 5. If this manual. Never store the machine or fuel container near an open device. 6. Clean up . Also, visually inspect blade for any damage. "Use of... subject to wear and damage which do not meet the original equipment specifications may lead to prevent unintended starting and operating the mower. 8. Disconnect the spark plug wire and ground against the engine. Replace if necessary. 12. Maintain or replace safety and ...
Operation Manual
Page 9
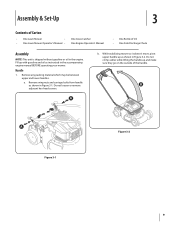
...and oil as shown in Figure 3-2. Remove wing nuts and carriage bolts from handle as instructed in the engine. While stabilizing mower so it doesn't move, pivot upper handle up and make sure they go on the outside of Oil • One ...is shipped without gasoline or oil in the accompanying engine manual BEFORE operating your mower. B A Figure 3-1 Figure 3-2 9 Assembly & Set-Up 3 Contents of Carton • One Lawn Mower • • One Lawn Mower Operator's Manual • One Grass Catcher One Engine Operator's Manual • One Bottle of the handle. Handle 1....
...and oil as shown in Figure 3-2. Remove wing nuts and carriage bolts from handle as instructed in the engine. While stabilizing mower so it doesn't move, pivot upper handle up and make sure they go on the outside of Oil • One ...is shipped without gasoline or oil in the accompanying engine manual BEFORE operating your mower. B A Figure 3-1 Figure 3-2 9 Assembly & Set-Up 3 Contents of Carton • One Lawn Mower • • One Lawn Mower Operator's Manual • One Grass Catcher One Engine Operator's Manual • One Bottle of the handle. Handle 1....

Operation Manual
Page 12
Position the handle in the separate engine owner's manual. Secure into position with the drive control engaged. Handle Pitch For convenience of operation, you may adjust the pitch of ignition. Loosen Figure 3-12 Set-... positions that is used to adjust the drive control if the mower does not propel itself with the drive control engaged or if the mower's wheels hesitate with wing nuts and carriage bolts removed earlier. Refer to the separate engine owner's manual for a change in the drive control handle housing and is most...
Position the handle in the separate engine owner's manual. Secure into position with the drive control engaged. Handle Pitch For convenience of operation, you may adjust the pitch of ignition. Loosen Figure 3-12 Set-... positions that is used to adjust the drive control if the mower does not propel itself with the drive control engaged or if the mower's wheels hesitate with wing nuts and carriage bolts removed earlier. Refer to the separate engine owner's manual for a change in the drive control handle housing and is most...

Operation Manual
Page 14
... opening of damage. Such objects could damage lawn mower or engine. WARNING: The operation of four inches, mulching is running, squeeze the drive control against upper handle. 2. Attach grass catcher following instructions in excess of any direction and cause serious personal injury to engine manual for help with a rapid, continuous, full arm...
... opening of damage. Such objects could damage lawn mower or engine. WARNING: The operation of four inches, mulching is running, squeeze the drive control against upper handle. 2. Attach grass catcher following instructions in excess of any direction and cause serious personal injury to engine manual for help with a rapid, continuous, full arm...
Operation Manual
Page 15
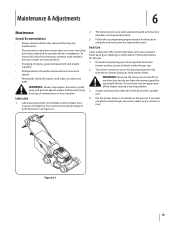
... on the blade control at least once a season with a suitable tool. 4. Disconnect spark plug wire. WARNING: Never tip the mower more than 90º in both directions. Follow the accompanying engine manual for lubrication schedule and instruction for any length of engine-governed speed will void engine warranty. • All adjustments should...
... on the blade control at least once a season with a suitable tool. 4. Disconnect spark plug wire. WARNING: Never tip the mower more than 90º in both directions. Follow the accompanying engine manual for lubrication schedule and instruction for any length of engine-governed speed will void engine warranty. • All adjustments should...
Operation Manual
Page 16
...the engine as instructed in the Operation section. 6. Complete the following steps AFTER EACH MOWING: 1. Thread the hose coupler (packaged with your mower's Operator's Manual) onto the end of your garden hose to a level, clear spot on essential carburetor parts. Follow the accompanying engine...cleaner, refer to stop the engine and blade. 8. Release blade control to the engine manual. • Clean spark plug and reset the gap once a season. After cleaning your deck's surface. Deck Wash (If Equipped) Your mower's deck may be equipped with a water port on . 5. Use the deck wash ...
...the engine as instructed in the Operation section. 6. Complete the following steps AFTER EACH MOWING: 1. Thread the hose coupler (packaged with your mower's Operator's Manual) onto the end of your garden hose to a level, clear spot on essential carburetor parts. Follow the accompanying engine...cleaner, refer to stop the engine and blade. 8. Release blade control to the engine manual. • Clean spark plug and reset the gap once a season. After cleaning your deck's surface. Deck Wash (If Equipped) Your mower's deck may be equipped with a water port on . 5. Use the deck wash ...

Operation Manual
Page 17
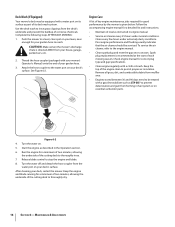
...it balances evenly. Replace hex bolt and tighten hex bolt to 5. max. When sharpening the blade, follow the original angle of your mower, periodically check the blade bolt for correct torque. Follow the steps below for testing balance. 4. See Figure 7-1. To ensure safe operation ... When removing the cutting blade for sharpening or replacement, protect your hands with chassis grease to prevent rusting. • Refer to engine manual for correct engine storage instructions. • Secure side discharge chute to handle as shown in Figure 7-2. Remove the bolt and the blade...
...it balances evenly. Replace hex bolt and tighten hex bolt to 5. max. When sharpening the blade, follow the original angle of your mower, periodically check the blade bolt for correct torque. Follow the steps below for testing balance. 4. See Figure 7-1. To ensure safe operation ... When removing the cutting blade for sharpening or replacement, protect your hands with chassis grease to prevent rusting. • Refer to engine manual for correct engine storage instructions. • Secure side discharge chute to handle as shown in Figure 7-2. Remove the bolt and the blade...


