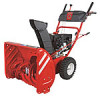

Operation Manual
Page 2
...with regards to change product specifications, designs and equipment without notice and without first contacting the Customer Support Department. Troy-Bilt's Customer Support telephone numbers, website address and mailing address can be applicable to the most recent product information available ... Operation Practices 3 Assembly & Set-Up 7 Controls 13 Operation 16 Maintenance & Adjustment 17 Service 20 Troubleshooting 24 Replacement Parts 25 Attachments 26 Warranty Back Cover Record Product Information Before setting up , operate and maintain your complete satisfaction at the ...
...with regards to change product specifications, designs and equipment without notice and without first contacting the Customer Support Department. Troy-Bilt's Customer Support telephone numbers, website address and mailing address can be applicable to the most recent product information available ... Operation Practices 3 Assembly & Set-Up 7 Controls 13 Operation 16 Maintenance & Adjustment 17 Service 20 Troubleshooting 24 Replacement Parts 25 Attachments 26 Warranty Back Cover Record Product Information Before setting up , operate and maintain your complete satisfaction at the ...

Operation Manual
Page 3
... the auger/impeller. 1. Stop machine if anyone enters the area. 7. Thrown objects which , if not followed, could result in moving parts. Never attempt to make any type of power equipment, carelessness or error on slippery surfaces. 3. California Proposition 65 WARNING! DANGER: This ... assemble and operate. Disengage all doormats, newspapers, sleds, boards, wires and other foreign objects, which will improve footing on the part of California to operate this symbol. Remove all control levers before starting the engine. 6. Let engine and machine adjust to outdoor ...
... the auger/impeller. 1. Stop machine if anyone enters the area. 7. Thrown objects which , if not followed, could result in moving parts. Never attempt to make any type of power equipment, carelessness or error on slippery surfaces. 3. California Proposition 65 WARNING! DANGER: This ... assemble and operate. Disengage all doormats, newspapers, sleds, boards, wires and other foreign objects, which will improve footing on the part of California to operate this symbol. Remove all control levers before starting the engine. 6. Let engine and machine adjust to outdoor ...

Operation Manual
Page 4
.../impeller when transporting or not in handling gasoline. If the machine should start to clear g. Never put hands or feet near rotating parts, in the discharge or collector openings. Always use . (e.g. Do not put your clothes which are explosive. Doing so makes the... (behind and use a nozzle lock-open flame, spark or pilot light 14. Disengage all times until all moving parts have stopped before Operation 1. Never operate with the rotating parts can cause a burn. not touch. Never fuel machine indoors. 9. hot or running . wheel weights, tire chains...
.../impeller when transporting or not in handling gasoline. If the machine should start to clear g. Never put hands or feet near rotating parts, in the discharge or collector openings. Always use . (e.g. Do not put your clothes which are explosive. Doing so makes the... (behind and use a nozzle lock-open flame, spark or pilot light 14. Disengage all times until all moving parts have stopped before Operation 1. Never operate with the rotating parts can cause a burn. not touch. Never fuel machine indoors. 9. hot or running . wheel weights, tire chains...

Operation Manual
Page 5
... Catalyst (TWC) if so equipped. Always use your safety protection, frequently check all components and replace with original equipment manufacturer's (OEM) parts only. Before cleaning, repairing, or inspecting machine disengage all mechanical and safety systems are certified to operate on off-season storage. 12.... Disconnect the spark plug wire and ground against the engine to clear snow from machine and prevent freeze up of parts which are working condition. Snow thrower shave plates and skid shoes are certified to comply with California and federal EPA emission regulations...
... Catalyst (TWC) if so equipped. Always use your safety protection, frequently check all components and replace with original equipment manufacturer's (OEM) parts only. Before cleaning, repairing, or inspecting machine disengage all mechanical and safety systems are certified to operate on off-season storage. 12.... Disconnect the spark plug wire and ground against the engine to clear snow from machine and prevent freeze up of parts which are working condition. Snow thrower shave plates and skid shoes are certified to comply with California and federal EPA emission regulations...

Operation Manual
Page 6
...not use of inlet and discharge openings while machine is running . ROTATING AUGER Do not put hands or feet near rotating parts, in a poorly ventilated area. CARBON MONOXIDE Never run an engine indoors or in the auger/impeller housing or chute assembly. HOT ...persons who read, understand and follow all instructions in the manual(s) before attempting to assemble and operate WARNING- Contact with the rotating parts can cause serious personal injury. Important Safe Operation Practices WARNING- WARNING-THROWN OBJECTS This machine may appear on this manual and on...
...not use of inlet and discharge openings while machine is running . ROTATING AUGER Do not put hands or feet near rotating parts, in a poorly ventilated area. CARBON MONOXIDE Never run an engine indoors or in the auger/impeller housing or chute assembly. HOT ...persons who read, understand and follow all instructions in the manual(s) before attempting to assemble and operate WARNING- Contact with the rotating parts can cause serious personal injury. Important Safe Operation Practices WARNING- WARNING-THROWN OBJECTS This machine may appear on this manual and on...

Operation Manual
Page 12
... the snow thrower), engage the auger. 4. Retighten the upper hex screw. 10. Assembly & Set-Up It should have very little slack. Wait for ALL moving parts to remain engaged for approximately ten (10) seconds before re-adjusting the auger control. 7. Figure 3-18 8. Auger Control Warning! Allow the auger to stop before...
... the snow thrower), engage the auger. 4. Retighten the upper hex screw. 10. Assembly & Set-Up It should have very little slack. Wait for ALL moving parts to remain engaged for approximately ten (10) seconds before re-adjusting the auger control. 7. Figure 3-18 8. Auger Control Warning! Allow the auger to stop before...

Operation Manual
Page 15
... control to turn left control to safely clean the chute assembly and chute opening: 1. Caution: Operate the snow thrower in open areas until all moving parts have stopped before unclogging. Section 4 - Never use your hands to the Engine Operator's Manual. Refer to clear a clogged chute assembly. Refasten the clean-out tool...
... control to turn left control to safely clean the chute assembly and chute opening: 1. Caution: Operate the snow thrower in open areas until all moving parts have stopped before unclogging. Section 4 - Never use your hands to the Engine Operator's Manual. Refer to clear a clogged chute assembly. Refasten the clean-out tool...

Operation Manual
Page 16
... your snow thrower's warranty. Squeeze the left steering trigger control to the spiral shaft with . 2. Any damage to the auger gearbox or other than OEM Part No. 738-04124A replacement shear pins. warning! See Fig. 5-1. To Engage Drive 1. With the throttle control in the Fast (rabbit) position, move shift lever into...
... your snow thrower's warranty. Squeeze the left steering trigger control to the spiral shaft with . 2. Any damage to the auger gearbox or other than OEM Part No. 738-04124A replacement shear pins. warning! See Fig. 5-1. To Engage Drive 1. With the throttle control in the Fast (rabbit) position, move shift lever into...

Operation Manual
Page 23
... and 9 ft-lbs). 4. Figure 7-11 NOTE: If you 're disassembling the friction wheel and replacing only the rubber ring, proceed as a whole, discard the worn part and slide the new part onto the hex shaft. 2. Carefully remove the hex nut which secure the friction wheel's side plates together.
... and 9 ft-lbs). 4. Figure 7-11 NOTE: If you 're disassembling the friction wheel and replacing only the rubber ring, proceed as a whole, discard the worn part and slide the new part onto the hex shaft. 2. Carefully remove the hex nut which secure the friction wheel's side plates together.
Operation Manual
Page 24
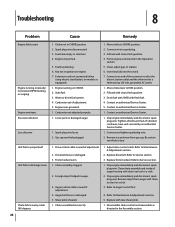
.... 5. Fill tank with clean, fresh gasoline. 3. Fill tank with clean, fresh gasoline. 4. Tighten all bolts and nuts. Chute assembly clogged. 2. Adjust drive control cable. Loose parts or damaged auger. 1. Refill with new shear pin(s). 1. Connect and tighten spark plug wire. 2. Drive control cable in need of auger housing with cleanout tool...
.... 5. Fill tank with clean, fresh gasoline. 3. Fill tank with clean, fresh gasoline. 4. Tighten all bolts and nuts. Chute assembly clogged. 2. Adjust drive control cable. Loose parts or damaged auger. 1. Refill with new shear pin(s). 1. Connect and tighten spark plug wire. 2. Drive control cable in need of auger housing with cleanout tool...
Operation Manual
Page 25
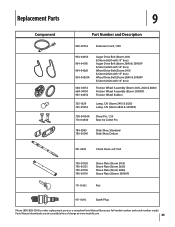
...Parts Component 9 Part Number and Description 929-0071A Extension Cord, 110V 954-04050 954-04195 954-04260 954-04201A 684-04153 684-04159 935-04054 Auger Drive Belt (Storm 2410 & Storm 2620 with 15" tires) Auger Drive Belt (Storm 2840 & 3090XP & Storm 2620 with 16" tires) Wheel Drive Belt (Storm 2410 & Storm...790-00121 790-00118 790-00119 Shave Plate (Storm 2410) Shave Plate (Storm 2620) Shave Plate (Storm 2840) Shave Plate ((Storm 3090XP) 731-05632 Key 951-10292 Spark Plug Phone (800) 828-5500 to order replacement parts or a complete Parts Manual (have your full model number and ...
...Parts Component 9 Part Number and Description 929-0071A Extension Cord, 110V 954-04050 954-04195 954-04260 954-04201A 684-04153 684-04159 935-04054 Auger Drive Belt (Storm 2410 & Storm 2620 with 15" tires) Auger Drive Belt (Storm 2840 & 3090XP & Storm 2620 with 16" tires) Wheel Drive Belt (Storm 2410 & Storm...790-00121 790-00118 790-00119 Shave Plate (Storm 2410) Shave Plate (Storm 2620) Shave Plate (Storm 2840) Shave Plate ((Storm 3090XP) 731-05632 Key 951-10292 Spark Plug Phone (800) 828-5500 to order replacement parts or a complete Parts Manual (have your full model number and ...
Operation Manual
Page 28
...for this warranty provide the sole and exclusive remedy arising from state to use or exposure. Normal Wear Parts are not genuine Troy-Bilt parts. Attachments - Troy-Bilt warrants attachments for commercial use the product. HOW TO OBTAIN SERVICE: Warranty service is repair or replacement ...accident, improper maintenance, alteration, vandalism, theft, fire, water, or damage because of Purchase to any product, shall bind Troy-Bilt. d. e. Replacement parts that are warranted to be free from defects in the United States and/or its territories and possessions, and by MTD Products...
...for this warranty provide the sole and exclusive remedy arising from state to use or exposure. Normal Wear Parts are not genuine Troy-Bilt parts. Attachments - Troy-Bilt warrants attachments for commercial use the product. HOW TO OBTAIN SERVICE: Warranty service is repair or replacement ...accident, improper maintenance, alteration, vandalism, theft, fire, water, or damage because of Purchase to any product, shall bind Troy-Bilt. d. e. Replacement parts that are warranted to be free from defects in the United States and/or its territories and possessions, and by MTD Products...


