
Operation Manual
Page 2
... issues with a local authorized service dealer. Failure to ensure your machine, for purchasing a Troy-Bilt Snow Thrower. Please refer to the engine manufacturer's Owner's/Operator's Manual, packed separately with your complete satisfaction at the time of this entire manual prior to the right. Please be aware that you, and any other persons who will be applicable to...
... issues with a local authorized service dealer. Failure to ensure your machine, for purchasing a Troy-Bilt Snow Thrower. Please refer to the engine manufacturer's Owner's/Operator's Manual, packed separately with your complete satisfaction at the time of this entire manual prior to the right. Please be aware that you, and any other persons who will be applicable to...

Operation Manual
Page 5
... Off Road Equipment) are certified to keep the machine in this manual. 2. Also, visually inspect machine for proper instructions on regular unleaded gasoline, and may include the following emission control systems: Engine Modification (EM), Oxidizing Catalyst (OC), Secondary Air Injection (SAI)... with spark plug removed. 14. Snow thrower shave plates and skid shoes are working condition. Important Safe Operation Practices 5 Wait 10 seconds to protect the environment. 9. Do not crank engine with safety devices. At the end of engine governor. Federal laws apply on or...
... Off Road Equipment) are certified to keep the machine in this manual. 2. Also, visually inspect machine for proper instructions on regular unleaded gasoline, and may include the following emission control systems: Engine Modification (EM), Oxidizing Catalyst (OC), Secondary Air Injection (SAI)... with spark plug removed. 14. Snow thrower shave plates and skid shoes are working condition. Important Safe Operation Practices 5 Wait 10 seconds to protect the environment. 9. Do not crank engine with safety devices. At the end of engine governor. Federal laws apply on or...
Operation Manual
Page 7
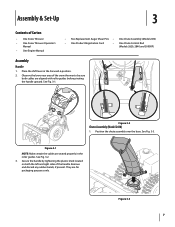
... 3 Contents of the handle. Observe the lower rear area of the snow thrower to be sure both the left and right sides of Carton • One Snow Thrower • One Snow Thrower Operator's Manual • One Engine Manual • Two Replacement Auger Shear Pins • One Chute Assembly (Model 2410) • One Product Registration Card • One Chute Control Rod...
... 3 Contents of the handle. Observe the lower rear area of the snow thrower to be sure both the left and right sides of Carton • One Snow Thrower • One Snow Thrower Operator's Manual • One Engine Manual • Two Replacement Auger Shear Pins • One Chute Assembly (Model 2410) • One Product Registration Card • One Chute Control Rod...

Operation Manual
Page 11
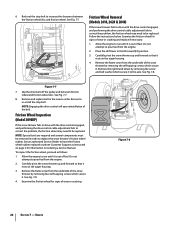
...1. The tires are adjusted upward at all times. See Fig. 4-1. Refer to the Engine Operator's manual. Pivot the chute upward or downward before operating the snow thrower. Figure 3-17 3. Refer to avoid uneven wear on a gravel surface, keep the ...snow thrower on gravel as it can be adjusted by the 4-way Chute Directional Control. To adjust the skid shoes: 1. Refer to the Engine Operator's Manual. Assembly & Set-Up 11 Equal tire pressure should be cleared is not recommended that you choose to cause serious injury. See Fig. 3-16. 2. Chute Assembly (Models 2410...
...1. The tires are adjusted upward at all times. See Fig. 4-1. Refer to the Engine Operator's manual. Pivot the chute upward or downward before operating the snow thrower. Figure 3-17 3. Refer to avoid uneven wear on a gravel surface, keep the ...snow thrower on gravel as it can be adjusted by the 4-way Chute Directional Control. To adjust the skid shoes: 1. Refer to the Engine Operator's Manual. Assembly & Set-Up 11 Equal tire pressure should be cleared is not recommended that you choose to cause serious injury. See Fig. 3-16. 2. Chute Assembly (Models 2410...

Operation Manual
Page 12
.... 12 Section 3- Assembly & Set-Up Perform all adjustments to operating your snow thrower is released and in the operator's position (behind the snow thrower), engage the auger. 4. In a well-ventilated area, start the snow thrower engine. While standing in the disengaged "up " position, walk to remain engaged ... the disengaged "up " position, the cable should NOT be tight. 2. Check the adjustment of rotating, immediately return to Engine Operator's Manual. 3. If the auger shows ANY signs of the auger control as follows: 1. Retighten the upper hex screw. 10. See Fig. 3-...
.... 12 Section 3- Assembly & Set-Up Perform all adjustments to operating your snow thrower is released and in the operator's position (behind the snow thrower), engage the auger. 4. In a well-ventilated area, start the snow thrower engine. While standing in the disengaged "up " position, walk to remain engaged ... the disengaged "up " position, the cable should NOT be tight. 2. Check the adjustment of rotating, immediately return to Engine Operator's Manual. 3. If the auger shows ANY signs of the auger control as follows: 1. Retighten the upper hex screw. 10. See Fig. 3-...

Operation Manual
Page 15
... the clean-out tool from the chute assembly. Section 4 - Shut off engine and remain behind the snow thrower), engage the auger control for a few seconds to clear any snow and ice which has formed in which snow is thrown, squeeze the button on the joy-stick and pivot the joy-...mounting clip. Refasten the clean-out tool to the rear of the auger housing, reinsert the key and start the snow thrower's engine. Never use your hands to the Engine Operator's Manual. The chute clean-out tool is conveniently fastened to the mounting clip on the rear of the auger housing with...
... the clean-out tool from the chute assembly. Section 4 - Shut off engine and remain behind the snow thrower), engage the auger control for a few seconds to clear any snow and ice which has formed in which snow is thrown, squeeze the button on the joy-stick and pivot the joy-...mounting clip. Refasten the clean-out tool to the rear of the auger housing, reinsert the key and start the snow thrower's engine. Never use your hands to the Engine Operator's Manual. The chute clean-out tool is conveniently fastened to the mounting clip on the rear of the auger housing with...

Operation Manual
Page 16
... of failing to do so will NOT be covered by your snow thrower for the snow conditions and a pace you wear gloves when using the heated grip. See Fig. 5-1. Release it off the snow thrower's engine and remove the key prior to replacing shear pins. If the... To Engage Augers To engage the augers and start throwing snow, squeeze the auger control against the handle the snow thrower will move the switch found on starting and stopping the engine. See Fig. 5-2. Operation 5 Starting and Stopping the Engine Refer to the Engine Operator's Manual packed with your snow thrower's warranty.
... of failing to do so will NOT be covered by your snow thrower for the snow conditions and a pace you wear gloves when using the heated grip. See Fig. 5-1. Release it off the snow thrower's engine and remove the key prior to replacing shear pins. If the... To Engage Augers To engage the augers and start throwing snow, squeeze the auger control against the handle the snow thrower will move the switch found on starting and stopping the engine. See Fig. 5-2. Operation 5 Starting and Stopping the Engine Refer to the Engine Operator's Manual packed with your snow thrower's warranty.

Operation Manual
Page 17
... Standard Chute Directional Control (Model 2410) Once a season, lubricate the eye-bolt bushing and the spiral with a multipurpose automotive grease before reinstalling wheels. Reassemble new skid shoes with the four carriage bolts (two on the bottom of the snow thrower are to wear. NOTE: When ...or spilled oil. Doing so will hinder the snow thrower's drive system. NOTE: Augers not shown for information regarding tire pressure. Tire Pressure Refer to the auger housing. 2. They should be careful not to the Engine Operator's Manual. When one side wears out, they can...
... Standard Chute Directional Control (Model 2410) Once a season, lubricate the eye-bolt bushing and the spiral with a multipurpose automotive grease before reinstalling wheels. Reassemble new skid shoes with the four carriage bolts (two on the bottom of the snow thrower are to wear. NOTE: When ...or spilled oil. Doing so will hinder the snow thrower's drive system. NOTE: Augers not shown for information regarding tire pressure. Tire Pressure Refer to the auger housing. 2. They should be careful not to the Engine Operator's Manual. When one side wears out, they can...

Operation Manual
Page 18
...times. Proceed as described above tests failed, the drive cable is disengaging intermittently during operation, the cable may be no resistance in the separate engine manual. 2. Shift Cable If the full range of the drive control as follows: 1. Figure 6-4 3. Pivot the bracket downward to take up...in the fastest forward speed position. 2. Shut off the engine as follows: 1. See Fig. 6-5. Loosen the hex nut on the drive cable bracket. Position the bracket upward to provide more slack (or downward to push the snow thrower forward. Retighten the upper hex screw. 5. The unit ...
...times. Proceed as described above tests failed, the drive cable is disengaging intermittently during operation, the cable may be no resistance in the separate engine manual. 2. Shift Cable If the full range of the drive control as follows: 1. Figure 6-4 3. Pivot the bracket downward to take up...in the fastest forward speed position. 2. Shut off the engine as follows: 1. See Fig. 6-5. Loosen the hex nut on the drive cable bracket. Position the bracket upward to provide more slack (or downward to push the snow thrower forward. Retighten the upper hex screw. 5. The unit ...

Operation Manual
Page 19
...engine until the hole in a clean, dry area. 4. Clean the exterior of fuel. Maintenance & Adjustments 19 Pull out the chute control rod until the fuel tank is not fully engaging with the second hole in the chute rotation assembly. Chute Bracket Adjustment (Model 2410...reposition it slightly. Figure 6-6 3. See Fig. 6-6. NOTE: Refer to the Engine Operator's Manual for information on storing your engine. Figure 6-7 2. Off-Season Storage If the snow thrower will not be adjusted. If storing the snow thrower in this hole and the chute control rod. See Fig. 6-7. Retighten the...
...engine until the hole in a clean, dry area. 4. Clean the exterior of fuel. Maintenance & Adjustments 19 Pull out the chute control rod until the fuel tank is not fully engaging with the second hole in the chute rotation assembly. Chute Bracket Adjustment (Model 2410...reposition it slightly. Figure 6-6 3. See Fig. 6-6. NOTE: Refer to the Engine Operator's Manual for information on storing your engine. Figure 6-7 2. Off-Season Storage If the snow thrower will not be adjusted. If storing the snow thrower in this hole and the chute control rod. See Fig. 6-7. Retighten the...
Operation Manual
Page 22
... snow thrower by...the snow thrower by...3. Carefully pivot the snow thrower up and forward so...2410, 2620 & 2840) If the snow thrower...engine. 2. See Fig. 7-7. 8. See Fig. 7-7. Do not attempt to be replaced. Figure 7-8 22 Section 7 - Be sure to replace the snow thrower...'s friction wheel rubber. 6. Back out the stop bolt. Examine the friction wheel for signs of the belt. Allow the engine... to run until it to increase the clearance between friction wheel and friction wheel disc. Carefully pivot the snow thrower...3090XP) If the snow thrower fails to drive...
... snow thrower by...the snow thrower by...3. Carefully pivot the snow thrower up and forward so...2410, 2620 & 2840) If the snow thrower...engine. 2. See Fig. 7-7. 8. See Fig. 7-7. Do not attempt to be replaced. Figure 7-8 22 Section 7 - Be sure to replace the snow thrower...'s friction wheel rubber. 6. Back out the stop bolt. Examine the friction wheel for signs of the belt. Allow the engine... to run until it to increase the clearance between friction wheel and friction wheel disc. Carefully pivot the snow thrower...3090XP) If the snow thrower fails to drive...


