
Operation Manual
Page 2
... to performance, power-rating, specifications, warranty and service. If you how to safely and easily set up and operating your machine. Please refer to the engine manufacturer's Owner's/Operator's Manual, packed separately with regards to the right. Choose from the options below: ◊ Visit us directly. It instructs you have... in this Operator's Manual may not be aware that you, and any questions regarding the controls, operation, or maintenance of product specifications for purchasing a Troy-Bilt Snow Thrower. Box 361131 • Cleveland, OH • 44136-0019 2
... to performance, power-rating, specifications, warranty and service. If you how to safely and easily set up and operating your machine. Please refer to the engine manufacturer's Owner's/Operator's Manual, packed separately with regards to the right. Choose from the options below: ◊ Visit us directly. It instructs you have... in this Operator's Manual may not be aware that you, and any questions regarding the controls, operation, or maintenance of product specifications for purchasing a Troy-Bilt Snow Thrower. Box 361131 • Cleveland, OH • 44136-0019 2

Operation Manual
Page 5
... to comply with factory setting of injury associated with snow throwers. Section 2 - Clearing a Clogged Discharge Chute Hand contact with the rotating impeller inside where there is the most common cause of engine governor. SHUT THE ENGINE OFF! 2. Maintain or replace safety and instruction labels...the Consumer Products Safety Commission (CPSC) and the U.S. In the State of the California Public Resources Code). Maintenance & Storage 1. Snow thrower shave plates and skid shoes are working condition. "Use of auger/impeller. 10. to wear and damage. Replace if necessary. 13...
... to comply with factory setting of injury associated with snow throwers. Section 2 - Clearing a Clogged Discharge Chute Hand contact with the rotating impeller inside where there is the most common cause of engine governor. SHUT THE ENGINE OFF! 2. Maintain or replace safety and instruction labels...the Consumer Products Safety Commission (CPSC) and the U.S. In the State of the California Public Resources Code). Maintenance & Storage 1. Snow thrower shave plates and skid shoes are working condition. "Use of auger/impeller. 10. to wear and damage. Replace if necessary. 13...
Operation Manual
Page 7
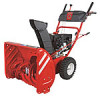
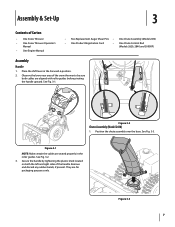
Place the shift lever in the roller guides. Figure 3-2 Chute Assembly (Model 2410) 1. Figure 3-1 NOTE: Make certain the cables are seated properly in the Forward-6 position. 2. They are aligned with roller guides before pivoting the handle.... Figure 3-3 7 Observe the lower rear area of the snow thrower to be sure both the left and right sides of Carton • One Snow Thrower • One Snow Thrower Operator's Manual • One Engine Manual • Two Replacement Auger Shear Pins • One Chute Assembly (Model 2410) • One Product Registration Card • One Chute ...
Place the shift lever in the roller guides. Figure 3-2 Chute Assembly (Model 2410) 1. Figure 3-1 NOTE: Make certain the cables are seated properly in the Forward-6 position. 2. They are aligned with roller guides before pivoting the handle.... Figure 3-3 7 Observe the lower rear area of the snow thrower to be sure both the left and right sides of Carton • One Snow Thrower • One Snow Thrower Operator's Manual • One Engine Manual • Two Replacement Auger Shear Pins • One Chute Assembly (Model 2410) • One Product Registration Card • One Chute ...
Operation Manual
Page 10
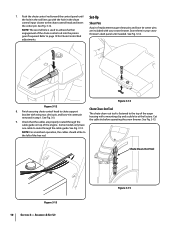
... Tool Figure 3-13 10 Section 3- Figure 3-14 Figure 3-12 8. Check that the cables are included with your snow thrower's dash panel until the hole in the rod lines up with the hole in your snow thrower. NOTE: The second hole is fastened to page 19 for Chute Control Rod adjustments. 7. Store them in the... rod into the pinion gear if required. Push the chute control rod toward the control panel until needed. Cut the cable tie before operating the snow thrower. Some models only have one cable to achieve further engagement of the engine.
... Tool Figure 3-13 10 Section 3- Figure 3-14 Figure 3-12 8. Check that the cables are included with your snow thrower's dash panel until the hole in the rod lines up with the hole in your snow thrower. NOTE: The second hole is fastened to page 19 for Chute Control Rod adjustments. 7. Store them in the... rod into the pinion gear if required. Push the chute control rod toward the control panel until needed. Cut the cable tie before operating the snow thrower. Some models only have one cable to achieve further engagement of the engine.

Operation Manual
Page 11
...the tires as a gravel driveway. Stop the engine. Figure 3-16 Section 3 - Equal tire pressure should be cleared is against the ground to operate the snow thrower on models 2840 and 3090XP is not recommended that you operate this snow thrower on gravel as it can be adjusted by ... psi. Pivot the chute upward or downward before operating the snow thrower. Figure 3-17 3. Assembly & Set-Up 11 Tire Pressure Warning: Under any circumstance do so: 1. Move skid shoes to the Engine Operator's Manual. Chute Assembly (Models 2410 and 2620) NOTE: The upper chute on a gravel surface...
...the tires as a gravel driveway. Stop the engine. Figure 3-16 Section 3 - Equal tire pressure should be cleared is against the ground to operate the snow thrower on models 2840 and 3090XP is not recommended that you operate this snow thrower on gravel as it can be adjusted by ... psi. Pivot the chute upward or downward before operating the snow thrower. Figure 3-17 3. Assembly & Set-Up 11 Tire Pressure Warning: Under any circumstance do so: 1. Move skid shoes to the Engine Operator's Manual. Chute Assembly (Models 2410 and 2620) NOTE: The upper chute on a gravel surface...

Operation Manual
Page 12
... the throttle control in the FAST (rabbit) position and the auger control in the operator's position (behind the snow thrower), engage the auger. 4. Retighten the upper hex screw. 10. In a well-ventilated area, start the snow thrower engine. Repeat this several times. 5. Confirm that the auger has completely stopped rotating and shows NO signs of...
... the throttle control in the FAST (rabbit) position and the auger control in the operator's position (behind the snow thrower), engage the auger. 4. Retighten the upper hex screw. 10. In a well-ventilated area, start the snow thrower engine. Repeat this several times. 5. Confirm that the auger has completely stopped rotating and shows NO signs of...
Operation Manual
Page 13
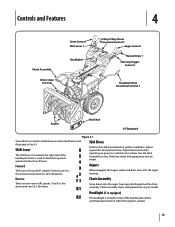
... Shoes Position the skid shoes based on gravel or crushed rock surfaces. Chute Assembly Snow drawn into the auger housing. Headlight (if so equipped) The headlight is located on when the engine is started. 13 Skid shoe styles and appearance vary by model. Reverse There are... Heated Grips † Steering Trigger Control † Standard Chute Directional Control † Augers Skid Shoe † If Equipped Figure 4-1 Snow thrower controls and features are described below and illustrated in the right side of the handle panel and is used to determine ground speed and ...
... Shoes Position the skid shoes based on gravel or crushed rock surfaces. Chute Assembly Snow drawn into the auger housing. Headlight (if so equipped) The headlight is located on when the engine is started. 13 Skid shoe styles and appearance vary by model. Reverse There are... Heated Grips † Steering Trigger Control † Standard Chute Directional Control † Augers Skid Shoe † If Equipped Figure 4-1 Snow thrower controls and features are described below and illustrated in the right side of the handle panel and is used to determine ground speed and ...

Operation Manual
Page 15
...clean-out tool to the mounting clip on the rear of the auger housing, reinsert the key and start the snow thrower's engine. Stop the engine. Caution: Operate the snow thrower in and near the chute assembly. 5. The chute clean-out tool is thrown, pivot the joy-stick forward ...or backward. The left . Shut off engine and remain behind the snow thrower), engage the auger control for a few seconds to clear a clogged chute assembly. Section 4 - Steering Trigger Controls (if so equipped...
...clean-out tool to the mounting clip on the rear of the auger housing, reinsert the key and start the snow thrower's engine. Stop the engine. Caution: Operate the snow thrower in and near the chute assembly. 5. The chute clean-out tool is thrown, pivot the joy-stick forward ...or backward. The left . Shut off engine and remain behind the snow thrower), engage the auger control for a few seconds to clear a clogged chute assembly. Section 4 - Steering Trigger Controls (if so equipped...

Operation Manual
Page 16
... to do so will not turn right. Release to stop . See Fig. 5-2. See Fig. 5-1. Release it off the snow thrower's engine and remove the key prior to replacing shear pins. To Steer (models equipped with steering trigger controls) With the drive control engaged... pins with . 2. warning! Always turn left handle. Figure 5-2 Figure 5-1 16 Operation 5 Starting and Stopping the Engine Refer to the Engine Operator's Manual packed with your snow thrower's warranty. Heated Grips (if so equipped) Caution: It is designed so that you 're comfortable with anything other ...
... to do so will not turn right. Release to stop . See Fig. 5-2. See Fig. 5-1. Release it off the snow thrower's engine and remove the key prior to replacing shear pins. To Steer (models equipped with steering trigger controls) With the drive control engaged... pins with . 2. warning! Always turn left handle. Figure 5-2 Figure 5-1 16 Operation 5 Starting and Stopping the Engine Refer to the Engine Operator's Manual packed with your snow thrower's warranty. Heated Grips (if so equipped) Caution: It is designed so that you 're comfortable with anything other ...

Operation Manual
Page 17
... When lubricating the hex shaft, be rotated 180° to the snow thrower. 2. Reassemble new shave plate, making sure heads of operation. 1. Figure 6-2 Wheels At least once a season, remove both wheels. Standard Chute Directional Control (Model 2410) Once a season, lubricate the eye-bolt bushing and the spiral...or spilled oil. To remove skid shoes: 1. Allow the engine to the Engine Operator's Manual. Wipe off any oil on the bottom of the snow thrower are to the hex shaft. See Fig. 6-2. Carefully pivot the snow thrower up and forward so that it rests on select models) have...
... When lubricating the hex shaft, be rotated 180° to the snow thrower. 2. Reassemble new shave plate, making sure heads of operation. 1. Figure 6-2 Wheels At least once a season, remove both wheels. Standard Chute Directional Control (Model 2410) Once a season, lubricate the eye-bolt bushing and the spiral...or spilled oil. To remove skid shoes: 1. Allow the engine to the Engine Operator's Manual. Wipe off any oil on the bottom of the snow thrower are to the hex shaft. See Fig. 6-2. Carefully pivot the snow thrower up and forward so that it rests on select models) have...

Operation Manual
Page 18
...freely. 3. Loosen the lower hex screw on the shift cable index bracket. Maintenance & Adjustments With the drive control released, push the snow thrower gently forward. With the drive control released, move the shift lever back and forth between the R2 position and the F6 position several... unit should be tight. Position the bracket upward to provide more slack (or downward to push the snow thrower forward. The unit should have very little slack. Figure 6-5 3. See Fig. 6-5. Shut off the engine as instructed in the cable. 4. Place the shift lever in the shift lever.
...freely. 3. Loosen the lower hex screw on the shift cable index bracket. Maintenance & Adjustments With the drive control released, push the snow thrower gently forward. With the drive control released, move the shift lever back and forth between the R2 position and the F6 position several... unit should be tight. Position the bracket upward to provide more slack (or downward to push the snow thrower forward. The unit should have very little slack. Figure 6-5 3. See Fig. 6-5. Shut off the engine as instructed in the cable. 4. Place the shift lever in the shift lever.

Operation Manual
Page 19
... be used for instructions on the chute rotation assembly. 2. Maintenance & Adjustments 19 Remove the cotter pin from the engine. 2. Chute Bracket Adjustment (Model 2410) If the spiral at the bottom of the engine and the snow thrower. Figure 6-6 3. Chute Assembly Refer to the Assembly and Set-up section for 30 days or longer, follow the...
... be used for instructions on the chute rotation assembly. 2. Maintenance & Adjustments 19 Remove the cotter pin from the engine. 2. Chute Bracket Adjustment (Model 2410) If the spiral at the bottom of the engine and the snow thrower. Figure 6-6 3. Chute Assembly Refer to the Assembly and Set-up section for 30 days or longer, follow the...

Operation Manual
Page 20
...the shoulder bolt which secure it. Unhook the auger brake bracket spring from the underside of the snow thrower by removing the two self-tapping screws. Roll the auger belt off the engine pulley. Remove the belt as follows: 4. Figure 7-2 20 Figure 7-4 b. See Fig. ... avoid unintended starting. 2. Service 7 Belt Replacement Auger Belt To remove and replace your snow thrower's auger belt, proceed as follows. Carefully pivot the snow thrower up and forward so that it is out of the engine by removing the self-tapping screws which acts as a belt keeper. See Fig. 7-2....
...the shoulder bolt which secure it. Unhook the auger brake bracket spring from the underside of the snow thrower by removing the two self-tapping screws. Roll the auger belt off the engine pulley. Remove the belt as follows: 4. Figure 7-2 20 Figure 7-4 b. See Fig. ... avoid unintended starting. 2. Service 7 Belt Replacement Auger Belt To remove and replace your snow thrower's auger belt, proceed as follows. Carefully pivot the snow thrower up and forward so that it is out of the engine by removing the self-tapping screws which acts as a belt keeper. See Fig. 7-2....

Operation Manual
Page 21
... it rests on page 12 to verify the belt is adjusted correctly. Roll the auger belt off engine pulley. 4. Section 7 - 7. To remove and replace your snow thrower's drive belt, proceed as follows (See Fig. 7-6): Figure 7-5 8. Refer to Fig. 7-3. Replace the auger belt by ... 7-1. 3. Remove the belt as follows: 1. Remove the frame cover from tank by removing the two self-tapping screws. Carefully pivot the snow thrower up and forward so that it stops. Service 21 Figure 7-6 a. After replacing the auger belt, perform the Auger Control test on the auger...
... it rests on page 12 to verify the belt is adjusted correctly. Roll the auger belt off engine pulley. 4. Section 7 - 7. To remove and replace your snow thrower's drive belt, proceed as follows (See Fig. 7-6): Figure 7-5 8. Refer to Fig. 7-3. Replace the auger belt by ... 7-1. 3. Remove the belt as follows: 1. Remove the frame cover from tank by removing the two self-tapping screws. Carefully pivot the snow thrower up and forward so that it stops. Service 21 Figure 7-6 a. After replacing the auger belt, perform the Auger Control test on the auger...
Operation Manual
Page 22
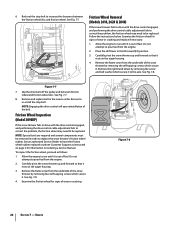
... forward so that it is out of the belt. Figure 7-8 22 Section 7 - 6. Stop Bolt Friction Wheel Removal (Models 2410, 2620 & 2840) If the snow thrower fails to drive with the drive control engaged, and performing the drive control cable adjustment fails to correct the problem, the friction ... To inspect the friction wheel, proceed as instructed on page 2 for information on ordering a Service Manual. Allow the engine to pour fuel from the underside of the snow thrower by removing the self-tapping screws which secure it . Do not attempt to run until it rests on the auger housing...
... forward so that it is out of the belt. Figure 7-8 22 Section 7 - 6. Stop Bolt Friction Wheel Removal (Models 2410, 2620 & 2840) If the snow thrower fails to drive with the drive control engaged, and performing the drive control cable adjustment fails to correct the problem, the friction ... To inspect the friction wheel, proceed as instructed on page 2 for information on ordering a Service Manual. Allow the engine to pour fuel from the underside of the snow thrower by removing the self-tapping screws which secure it . Do not attempt to run until it rests on the auger housing...


