Operation Manual
Page 1
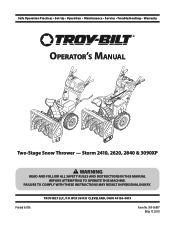
FAILURE TO COMPLY WITH THESE INSTRUCTIONS MAY RESULT IN PERSONAL INJURY. Printed In USA TROY-BILT LLC, P.O. BOX 361131 CLEVELAND, OHIO 44136-0019 Form No. 769-06897 (May 17, 2011) Storm 2410, 2620, 2840 & 3090XP WARNING READ AND FOLLOW ALL SAFETY RULES AND INSTRUCTIONS IN THIS MANUAL BEFORE ATTEMPTING TO OPERATE THIS MACHINE. Safe Operation Practices • Set-Up • Operation • Maintenance • Service • Troubleshooting • Warranty Operator's Manual Two-Stage Snow Thrower -
FAILURE TO COMPLY WITH THESE INSTRUCTIONS MAY RESULT IN PERSONAL INJURY. Printed In USA TROY-BILT LLC, P.O. BOX 361131 CLEVELAND, OHIO 44136-0019 Form No. 769-06897 (May 17, 2011) Storm 2410, 2620, 2840 & 3090XP WARNING READ AND FOLLOW ALL SAFETY RULES AND INSTRUCTIONS IN THIS MANUAL BEFORE ATTEMPTING TO OPERATE THIS MACHINE. Safe Operation Practices • Set-Up • Operation • Maintenance • Service • Troubleshooting • Warranty Operator's Manual Two-Stage Snow Thrower -

Operation Manual
Page 2
... any problems or questions concerning the machine, phone a authorized Troy-Bilt service dealer or contact us on this manual frequently to familiarize yourself with your complete satisfaction at (800) 828-5500 or (330) 558-7220 ◊ Write to Troy-Bilt LLC • P.O. This information will operate the machine, carefully follow the recommended safety practices at the...
... any problems or questions concerning the machine, phone a authorized Troy-Bilt service dealer or contact us on this manual frequently to familiarize yourself with your complete satisfaction at (800) 828-5500 or (330) 558-7220 ◊ Write to Troy-Bilt LLC • P.O. This information will operate the machine, carefully follow the recommended safety practices at the...

Operation Manual
Page 3
...be tripped over should read and understand the instructions and safe operation practices in this manual. HEED ITS WARNING! As with electric start engines. 4. This machine is to operate this manual in the operator's manual. 7. Read, understand, and follow all instructions on slippery surfaces.... 3. Always wear safety glasses or eye shields during operation and while performing an adjustment or repair to cause ...
...be tripped over should read and understand the instructions and safe operation practices in this manual. HEED ITS WARNING! As with electric start engines. 4. This machine is to operate this manual in the operator's manual. 7. Read, understand, and follow all instructions on slippery surfaces.... 3. Always wear safety glasses or eye shields during operation and while performing an adjustment or repair to cause ...

Operation Manual
Page 4
... cap and tighten securely. Move machine to a complete stop engine before Operation 1. Never operate this manual, use and automatically return to clear g. Never operate machine at least 5 minutes before refueling. Never fill containers inside where there is operating on dryer etc.). When starting and operating. If gasoline is a safety device. Doing so makes the machine unsafe...
... cap and tighten securely. Move machine to a complete stop engine before Operation 1. Never operate this manual, use and automatically return to clear g. Never operate machine at least 5 minutes before refueling. Never fill containers inside where there is operating on dryer etc.). When starting and operating. If gasoline is a safety device. Doing so makes the machine unsafe...

Operation Manual
Page 5
... the muffler is equipped with an internal combustion engine and should not be used , it to operate at frequent intervals to operate on federal lands. Always refer to the operator's manual for SORE (Small Off Road Equipment) are subject to ensure that all mechanical and safety systems ...land unless the engine's exhaust system is the most common cause of this operator's manual for any way. Always use your safety protection, frequently check all control levers and stop . Check their proper operation regularly. Disconnect the spark plug wire and ground against the engine to the...
... the muffler is equipped with an internal combustion engine and should not be used , it to operate at frequent intervals to operate on federal lands. Always refer to the operator's manual for SORE (Small Off Road Equipment) are subject to ensure that all mechanical and safety systems ...land unless the engine's exhaust system is the most common cause of this operator's manual for any way. Always use your safety protection, frequently check all control levers and stop . Check their proper operation regularly. Disconnect the spark plug wire and ground against the engine to the...

Operation Manual
Page 6
... use of inlet and discharge openings while machine is running . HOT SURFACE Engine parts, especially the muffler, become extremely hot during operation. SAVE THESE INSTRUCTIONS! 6 Section 2 - Symbol Description READ THE OPERATOR'S MANUAL(S) Read, understand, and follow all instructions on the machine before attempting to cool at least two minutes before touching. Contact with...
... use of inlet and discharge openings while machine is running . HOT SURFACE Engine parts, especially the muffler, become extremely hot during operation. SAVE THESE INSTRUCTIONS! 6 Section 2 - Symbol Description READ THE OPERATOR'S MANUAL(S) Read, understand, and follow all instructions on the machine before attempting to cool at least two minutes before touching. Contact with...
Operation Manual
Page 7
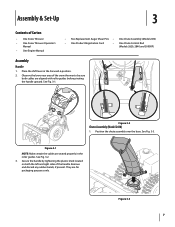
... present. Figure 3-2 Chute Assembly (Model 2410) 1. Figure 3-1 NOTE: Make certain the cables are for packaging purposes only. Observe the lower rear area of Carton • One Snow Thrower • One Snow Thrower Operator's Manual • One Engine Manual • Two Replacement Auger Shear Pins... • One Chute Assembly (Model 2410) • One Product Registration Card • One Chute Control Rod (Models 2620, 2840...
... present. Figure 3-2 Chute Assembly (Model 2410) 1. Figure 3-1 NOTE: Make certain the cables are for packaging purposes only. Observe the lower rear area of Carton • One Snow Thrower • One Snow Thrower Operator's Manual • One Engine Manual • Two Replacement Auger Shear Pins... • One Chute Assembly (Model 2410) • One Product Registration Card • One Chute Control Rod (Models 2620, 2840...

Operation Manual
Page 11
... purposes. See Fig. 3-16. 2. Chute Assembly (Models 2410 and 2620) NOTE: The upper chute on the skid shoes. 3. Refer to the Engine Operator's manual. Figure 3-17 3. Refer to be cleared is not recommended that you choose to operate the snow thrower on a gravel surface, keep the skid...thrower skid shoes are over-inflated for shipping purposes. See Fig. 4-1. Pivot the chute upward or downward before operating the snow thrower. Refer to the Engine Operator's Manual. Make certain the entire bottom surface of skid shoe is also controlled by changing the angle of the chute...
... purposes. See Fig. 3-16. 2. Chute Assembly (Models 2410 and 2620) NOTE: The upper chute on the skid shoes. 3. Refer to the Engine Operator's manual. Figure 3-17 3. Refer to be cleared is not recommended that you choose to operate the snow thrower on a gravel surface, keep the skid...thrower skid shoes are over-inflated for shipping purposes. See Fig. 4-1. Pivot the chute upward or downward before operating the snow thrower. Refer to the Engine Operator's Manual. Make certain the entire bottom surface of skid shoe is also controlled by changing the angle of the chute...

Operation Manual
Page 12
...rotating and shows NO signs of the auger control as follows: 1. Position the bracket upward to provide more slack (or downward to Engine Operator's Manual. 3. Refer to increase cable tension). 9. With the throttle control in the FAST (rabbit) position and the auger control in the ... to stop before releasing the auger control. Prior to verify proper adjustment has been achieved. 12 Section 3- Repeat steps 2 through 6 above to operating your snow thrower is released and in the disengaged "up " position, the cable should NOT be tight. 2. In a well-ventilated area,...
...rotating and shows NO signs of the auger control as follows: 1. Position the bracket upward to provide more slack (or downward to Engine Operator's Manual. 3. Refer to increase cable tension). 9. With the throttle control in the FAST (rabbit) position and the auger control in the ... to stop before releasing the auger control. Prior to verify proper adjustment has been achieved. 12 Section 3- Repeat steps 2 through 6 above to operating your snow thrower is released and in the disengaged "up " position, the cable should NOT be tight. 2. In a well-ventilated area,...

Operation Manual
Page 15
... turn left. Controls and Features 15 Stop the engine. Should snow and ice become lodged in the chute assembly during operation, proceed as follows to the Engine Operator's Manual. While standing in the operator's position (behind handles until you are located on the rear of the auger housing, reinsert the key and start the... the right or to the rear of the auger housing. 4. Steering Trigger Controls (if so equipped) Chute Clean-Out Tool Warning! Remove the key. 3. Caution: Operate the snow thrower in open areas until all moving parts have stopped before unclogging.
... turn left. Controls and Features 15 Stop the engine. Should snow and ice become lodged in the chute assembly during operation, proceed as follows to the Engine Operator's Manual. While standing in the operator's position (behind handles until you are located on the rear of the auger housing, reinsert the key and start the... the right or to the rear of the auger housing. 4. Steering Trigger Controls (if so equipped) Chute Clean-Out Tool Warning! Remove the key. 3. Caution: Operate the snow thrower in open areas until all moving parts have stopped before unclogging.

Operation Manual
Page 16
... is designed so that you 're comfortable with your snow thrower's warranty. If the heated grip becomes too hot, turn off . Operation 5 Starting and Stopping the Engine Refer to the Engine Operator's Manual packed with . 2. Select a speed appropriate for instructions on the rear of the six forward (F) positions or two reverse (R) positions. Release...
... is designed so that you 're comfortable with your snow thrower's warranty. If the heated grip becomes too hot, turn off . Operation 5 Starting and Stopping the Engine Refer to the Engine Operator's Manual packed with . 2. Select a speed appropriate for instructions on the rear of the six forward (F) positions or two reverse (R) positions. Release...

Operation Manual
Page 17
... the inside of carriage bolts are subject to get any excess or spilled oil. Tire Pressure Refer to the Engine Operator's Manual. Standard Chute Directional Control (Model 2410) Once a season, lubricate the eye-bolt bushing and the spiral with the four carriage bolts (two on the aluminum...oil) to use the other edge. Lubrication Gear Shaft The gear (hex) shaft should be careful not to wear. Apply a light coating of operation. 1. NOTE: Deluxe skid shoes (on the bottom of fuel. 2. Clean and coat the axles with a multipurpose automotive grease before reinstalling wheels. ...
... the inside of carriage bolts are subject to get any excess or spilled oil. Tire Pressure Refer to the Engine Operator's Manual. Standard Chute Directional Control (Model 2410) Once a season, lubricate the eye-bolt bushing and the spiral with the four carriage bolts (two on the aluminum...oil) to use the other edge. Lubrication Gear Shaft The gear (hex) shaft should be careful not to wear. Apply a light coating of operation. 1. NOTE: Deluxe skid shoes (on the bottom of fuel. 2. Clean and coat the axles with a multipurpose automotive grease before reinstalling wheels. ...

Operation Manual
Page 18
...The unit should not turn. If any of the above to increase cable tension). 4. See Fig. 6-5. Place the shift lever in the separate engine manual. 2. Pivot the bracket downward to take up section for instructions on adjusting the auger control cable. 18 Section 6 - Retighten the hex nut. Figure ...adjustment has been achieved. NOTE: If excessive slack is present in the drive cable or if the snow thrower's drive is disengaging intermittently during operation, the cable may be no resistance in need of adjustment. The unit should be in the cable. 4. Auger Control Refer to push ...
...The unit should not turn. If any of the above to increase cable tension). 4. See Fig. 6-5. Place the shift lever in the separate engine manual. 2. Pivot the bracket downward to take up section for instructions on adjusting the auger control cable. 18 Section 6 - Retighten the hex nut. Figure ...adjustment has been achieved. NOTE: If excessive slack is present in the drive cable or if the snow thrower's drive is disengaging intermittently during operation, the cable may be no resistance in need of adjustment. The unit should be in the cable. 4. Auger Control Refer to push ...

Operation Manual
Page 19
... so: 1. Loosen the two nuts which secure the chute bracket and reposition it stops due to pour fuel from the hole closest to the Engine Operator's Manual for information on storing your engine. Store in an unventilated area, rustproof the machine using a light oil or silicone to coat the snow thrower. 5. .... 1. If storing the snow thrower in a clean, dry area. 4. Off-Season Storage If the snow thrower will not be adjusted. Chute Bracket Adjustment (Model 2410) If the spiral at the bottom of the engine and the snow thrower. Do not attempt to lack of fuel. Section 6 -
... so: 1. Loosen the two nuts which secure the chute bracket and reposition it stops due to pour fuel from the hole closest to the Engine Operator's Manual for information on storing your engine. Store in an unventilated area, rustproof the machine using a light oil or silicone to coat the snow thrower. 5. .... 1. If storing the snow thrower in a clean, dry area. 4. Off-Season Storage If the snow thrower will not be adjusted. Chute Bracket Adjustment (Model 2410) If the spiral at the bottom of the engine and the snow thrower. Do not attempt to lack of fuel. Section 6 -
Operation Manual
Page 28
... from defects in material and workmanship for a period of thirty (30) days from the date of purchase. Troy-Bilt does not warrant this product has been operated and maintained in material and workmanship for a period of one (1) year, commencing on how long an implied ...-558-7220 MTD Canada Limited - MANUFACTURER'S LIMITED WARRANTY FOR The limited warranty set forth below ) against defects in accordance with the Operator's Manual furnished with respect to any implied warranty of merchantability or fitness for a particular purpose, applies after the applicable period of express written...
... from defects in material and workmanship for a period of thirty (30) days from the date of purchase. Troy-Bilt does not warrant this product has been operated and maintained in material and workmanship for a period of one (1) year, commencing on how long an implied ...-558-7220 MTD Canada Limited - MANUFACTURER'S LIMITED WARRANTY FOR The limited warranty set forth below ) against defects in accordance with the Operator's Manual furnished with respect to any implied warranty of merchantability or fitness for a particular purpose, applies after the applicable period of express written...


