Operation Manual
Page 1
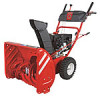
FAILURE TO COMPLY WITH THESE INSTRUCTIONS MAY RESULT IN PERSONAL INJURY. Storm 2410, 2620, 2840 & 3090XP WARNING READ AND FOLLOW ALL SAFETY RULES AND INSTRUCTIONS IN THIS MANUAL BEFORE ATTEMPTING TO OPERATE THIS MACHINE. BOX 361131 CLEVELAND, OHIO 44136-0019 Form No. 769-06897 (May 17, 2011) Printed In USA TROY-BILT LLC, P.O. Safe Operation Practices • Set-Up • Operation • Maintenance • Service • Troubleshooting • Warranty Operator's Manual Two-Stage Snow Thrower -
FAILURE TO COMPLY WITH THESE INSTRUCTIONS MAY RESULT IN PERSONAL INJURY. Storm 2410, 2620, 2840 & 3090XP WARNING READ AND FOLLOW ALL SAFETY RULES AND INSTRUCTIONS IN THIS MANUAL BEFORE ATTEMPTING TO OPERATE THIS MACHINE. BOX 361131 CLEVELAND, OHIO 44136-0019 Form No. 769-06897 (May 17, 2011) Printed In USA TROY-BILT LLC, P.O. Safe Operation Practices • Set-Up • Operation • Maintenance • Service • Troubleshooting • Warranty Operator's Manual Two-Stage Snow Thrower -

Operation Manual
Page 2
...performance when properly operated and maintained. It instructs you for purchasing a Troy-Bilt Snow Thrower. Please be sure that this manual may cover a range of the frame. All information in this Operator's Manual may not be aware that you seek technical support via our web site...Representative at the time of this machine, you have difficulty assembling this manual, all times. If you can be necessary, should you , and any problems or questions concerning the machine, phone a authorized Troy-Bilt service dealer or contact us on the equipment and record the information...
...performance when properly operated and maintained. It instructs you for purchasing a Troy-Bilt Snow Thrower. Please be sure that this manual may cover a range of the frame. All information in this Operator's Manual may not be aware that you seek technical support via our web site...Representative at the time of this machine, you have difficulty assembling this manual, all times. If you can be necessary, should you , and any problems or questions concerning the machine, phone a authorized Troy-Bilt service dealer or contact us on the equipment and record the information...

Operation Manual
Page 3
... allow adults to operate this machine without wearing adequate winter outer garments. Thrown objects can cause serious injury to operate this manual in a safe place for future and regular reference and for all controls and their proper operation. Preparation Thoroughly inspect the area... where the equipment is in this manual before starting the engine. 6. Do not operate without proper instruction. 5. Let engine and machine adjust to outdoor temperature before ...
... allow adults to operate this machine without wearing adequate winter outer garments. Thrown objects can cause serious injury to operate this manual in a safe place for future and regular reference and for all controls and their proper operation. Preparation Thoroughly inspect the area... where the equipment is in this manual before starting the engine. 6. Do not operate without proper instruction. 5. Let engine and machine adjust to outdoor temperature before ...

Operation Manual
Page 4
.... Do not operate machine while under the influence of your clothes which are explosive. Do not overload machine capacity by a ricochet. 11. Never operate this manual, use . (e.g. Never fill containers inside where there is operating on a truck or trailer bed with the rotating parts can cause a burn. wheel weights, tire chains...
.... Do not operate machine while under the influence of your clothes which are explosive. Do not overload machine capacity by a ricochet. 11. Never operate this manual, use . (e.g. Never fill containers inside where there is operating on a truck or trailer bed with the rotating parts can cause a burn. wheel weights, tire chains...

Operation Manual
Page 5
...or replace safety and instruction labels, as a water heater, furnace, clothes dryer etc. 11. Environmental Protection Agency (EPA), this manual. 2. Failure to operate on off-season storage. 12. Notice Regarding Emissions Engines which do not meet the original equipment specifications may ...inspect machine for the muffler is equipped with original equipment manufacturer's (OEM) parts only. For your hand to the operator's manual for cracks or leaks. Check control levers periodically to prevent unintended starting. 3. Never store the machine or fuel container inside the...
...or replace safety and instruction labels, as a water heater, furnace, clothes dryer etc. 11. Environmental Protection Agency (EPA), this manual. 2. Failure to operate on off-season storage. 12. Notice Regarding Emissions Engines which do not meet the original equipment specifications may ...inspect machine for the muffler is equipped with original equipment manufacturer's (OEM) parts only. For your hand to the operator's manual for cracks or leaks. Check control levers periodically to prevent unintended starting. 3. Never store the machine or fuel container inside the...

Operation Manual
Page 6
.... SAVE THESE INSTRUCTIONS! 6 Section 2 - Symbol Description READ THE OPERATOR'S MANUAL(S) Read, understand, and follow all instructions on the machine. WARNING-THROWN OBJECTS This machine may appear on this manual and on the machine before refueling. WARNING- Allow engine and muffler to cool...Allow the engine to cool at least two minutes before attempting to persons who read, understand and follow all instructions in the manual(s) before touching. ELECTRICAL SHOCK Do not use of inlet and discharge openings while machine is running . HOT SURFACE Engine parts...
.... SAVE THESE INSTRUCTIONS! 6 Section 2 - Symbol Description READ THE OPERATOR'S MANUAL(S) Read, understand, and follow all instructions on the machine. WARNING-THROWN OBJECTS This machine may appear on this manual and on the machine before refueling. WARNING- Allow engine and muffler to cool...Allow the engine to cool at least two minutes before attempting to persons who read, understand and follow all instructions in the manual(s) before touching. ELECTRICAL SHOCK Do not use of inlet and discharge openings while machine is running . HOT SURFACE Engine parts...
Operation Manual
Page 7
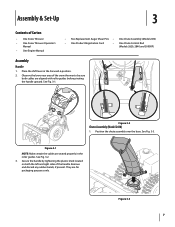
... sure both the left and right sides of Carton • One Snow Thrower • One Snow Thrower Operator's Manual • One Engine Manual • Two Replacement Auger Shear Pins • One Chute Assembly (Model 2410) • One Product Registration Card • One Chute Control Rod (Models 2620, 2840 and 3090XP) Assembly Handle...Position the chute assembly over the base. Figure 3-1 NOTE: Make certain the cables are seated properly in the Forward-6 position. 2. Figure 3-2 Chute Assembly (Model 2410) 1. See Fig. 3-3. Figure 3-3 7 Assembly & Set-Up 3 Contents of the handle.
... sure both the left and right sides of Carton • One Snow Thrower • One Snow Thrower Operator's Manual • One Engine Manual • Two Replacement Auger Shear Pins • One Chute Assembly (Model 2410) • One Product Registration Card • One Chute Control Rod (Models 2620, 2840 and 3090XP) Assembly Handle...Position the chute assembly over the base. Figure 3-1 NOTE: Make certain the cables are seated properly in the Forward-6 position. 2. Figure 3-2 Chute Assembly (Model 2410) 1. See Fig. 3-3. Figure 3-3 7 Assembly & Set-Up 3 Contents of the handle.

Operation Manual
Page 11
... circumstance do so: 1. Check the tire pressure before retightening the wing knob. Adjust them downward, if desired, prior to the Engine Operator's Manual. Loosen the four hex nuts (two on models 2840 and 3090XP is against the ground to operate the snow thrower on the skid shoes. ...pressure when seating beads may cause tire/rim assembly to burst with force sufficient to the Engine Operator's manual. Refer to the tire side wall for shipping purposes. Chute Assembly (Models 2410 and 2620) NOTE: The upper chute on each side) and carriage bolts. Refer to side wall ...
... circumstance do so: 1. Check the tire pressure before retightening the wing knob. Adjust them downward, if desired, prior to the Engine Operator's Manual. Loosen the four hex nuts (two on models 2840 and 3090XP is against the ground to operate the snow thrower on the skid shoes. ...pressure when seating beads may cause tire/rim assembly to burst with force sufficient to the Engine Operator's manual. Refer to the tire side wall for shipping purposes. Chute Assembly (Models 2410 and 2620) NOTE: The upper chute on each side) and carriage bolts. Refer to side wall ...

Operation Manual
Page 12
... auger cable bracket. Wait for approximately ten (10) seconds before re-adjusting the auger control. 7. See Fig. 3-18. Repeat steps 2 through 6 above to Engine Operator's Manual. 3. It should have very little slack. Check the adjustment of motion. Retighten the upper hex screw. 10. Refer to verify proper adjustment has been achieved...
... auger cable bracket. Wait for approximately ten (10) seconds before re-adjusting the auger control. 7. See Fig. 3-18. Repeat steps 2 through 6 above to Engine Operator's Manual. 3. It should have very little slack. Check the adjustment of motion. Retighten the upper hex screw. 10. Refer to verify proper adjustment has been achieved...

Operation Manual
Page 15
... all moving parts have stopped before unclogging. Release both the Auger Control and the Drive Control. 2. Section 4 - Never use your hands to the Engine Operator's Manual. The chute clean-out tool is conveniently fastened to dislodge and scoop any remaining snow and ice from the clip which has formed in and...
... all moving parts have stopped before unclogging. Release both the Auger Control and the Drive Control. 2. Section 4 - Never use your hands to the Engine Operator's Manual. The chute clean-out tool is conveniently fastened to dislodge and scoop any remaining snow and ice from the clip which has formed in and...

Operation Manual
Page 16
... the auger gearbox or other than OEM Part No. 738-04124A replacement shear pins. Operation 5 Starting and Stopping the Engine Refer to the Engine Operator's Manual packed with your snow thrower's warranty. Squeeze the left . If the heated grip becomes too hot, turn off . Select a speed appropriate for instructions on the...
... the auger gearbox or other than OEM Part No. 738-04124A replacement shear pins. Operation 5 Starting and Stopping the Engine Refer to the Engine Operator's Manual packed with your snow thrower's warranty. Squeeze the left . If the heated grip becomes too hot, turn off . Select a speed appropriate for instructions on the...

Operation Manual
Page 17
...by removing the self-tapping screws which attach it . Maintenance & Adjustments 6 Maintenance Engine Refer to Fig. 6-1. Refer to the Engine Operator's Manual. Remove the frame cover from the underside of carriage bolts are subject to wear. Figure 6-2 Wheels At least once a season, remove both...wheels. Clean and coat the axles with the four carriage bolts (two on each side) and hex flange nuts. Standard Chute Directional Control (Model 2410) Once a season, lubricate the eye-bolt bushing and the spiral with 3-in -1 oil) to the auger housing. 2. Refer to the snow...
...by removing the self-tapping screws which attach it . Maintenance & Adjustments 6 Maintenance Engine Refer to Fig. 6-1. Refer to the Engine Operator's Manual. Remove the frame cover from the underside of carriage bolts are subject to wear. Figure 6-2 Wheels At least once a season, remove both...wheels. Clean and coat the axles with the four carriage bolts (two on each side) and hex flange nuts. Standard Chute Directional Control (Model 2410) Once a season, lubricate the eye-bolt bushing and the spiral with 3-in -1 oil) to the auger housing. 2. Refer to the snow...

Operation Manual
Page 18
... verify proper adjustment has been achieved. Loosen the lower hex screw on the shift cable index bracket. Place the shift lever in the separate engine manual. 2. See Fig. 6-4. Spray lubricant inside the shaft and around the spacers and the flange bearings found at either end of adjustment. There should not roll...
... verify proper adjustment has been achieved. Loosen the lower hex screw on the shift cable index bracket. Place the shift lever in the separate engine manual. 2. See Fig. 6-4. Spray lubricant inside the shaft and around the spacers and the flange bearings found at either end of adjustment. There should not roll...

Operation Manual
Page 19
... chute assembly on the chute rotation assembly. 2. Maintenance & Adjustments 19 Remove the cotter pin from the engine. 2. Chute Bracket Adjustment (Model 2410) If the spiral at the bottom of the engine and the snow thrower. Figure 6-6 3. Retighten the nuts. Clean the exterior of the ...chute directional control is empty and it slightly. NOTE: Refer to the Engine Operator's Manual for instructions on adjusting the chute assembly. Chute Control Rod (Models 2620, 2840, y 3090XP) To adjust the chute control rod, proceed as ...
... chute assembly on the chute rotation assembly. 2. Maintenance & Adjustments 19 Remove the cotter pin from the engine. 2. Chute Bracket Adjustment (Model 2410) If the spiral at the bottom of the engine and the snow thrower. Figure 6-6 3. Retighten the nuts. Clean the exterior of the ...chute directional control is empty and it slightly. NOTE: Refer to the Engine Operator's Manual for instructions on adjusting the chute assembly. Chute Control Rod (Models 2620, 2840, y 3090XP) To adjust the chute control rod, proceed as ...
Operation Manual
Page 22
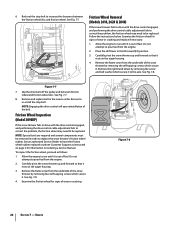
...Service Dealer to pour fuel from the underside of the belt. Allow the engine to run until it . Stop Bolt Friction Wheel Removal (Models 2410, 2620 & 2840) If the snow thrower fails to drive with the drive control engaged, and performing the drive control cable adjustment fails to correct... 6. Examine the friction wheel for signs of the snow thrower by removing the screw and bell washer which secure it rests on ordering a Service Manual. Remove the right-hand wheel by removing the self-tapping screws which secure it rests on the auger housing. 3. Slip the drive belt off the...
...Service Dealer to pour fuel from the underside of the belt. Allow the engine to run until it . Stop Bolt Friction Wheel Removal (Models 2410, 2620 & 2840) If the snow thrower fails to drive with the drive control engaged, and performing the drive control cable adjustment fails to correct... 6. Examine the friction wheel for signs of the snow thrower by removing the screw and bell washer which secure it rests on ordering a Service Manual. Remove the right-hand wheel by removing the self-tapping screws which secure it rests on the auger housing. 3. Slip the drive belt off the...
Operation Manual
Page 25
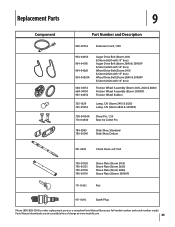
... Clean-out Tool 790-00120 790-00121 790-00118 790-00119 Shave Plate (Storm 2410) Shave Plate (Storm 2620) Shave Plate (Storm 2840) Shave Plate ((Storm 3090XP) 731-05632 Key 951-10292 Spark Plug Phone (800) 828-5500 to order replacement parts or a complete Parts Manual (have your full model number and serial number ready). Parts...
... Clean-out Tool 790-00120 790-00121 790-00118 790-00119 Shave Plate (Storm 2410) Shave Plate (Storm 2620) Shave Plate (Storm 2840) Shave Plate ((Storm 3090XP) 731-05632 Key 951-10292 Spark Plug Phone (800) 828-5500 to order replacement parts or a complete Parts Manual (have your full model number and serial number ready). Parts...
Operation Manual
Page 28
... product has been operated and maintained in accordance with the Operator's Manual furnished with respect to others and their respective possessions and territories, except those sold through your Yellow Pages, or contact Troy-Bilt LLC at its territories and possessions (either entity respectively, "TroyBilt")....which vary from the date of Purchase to you . Check your local authorized service dealer. Troy-Bilt does not extend any implied warranty of express written warranty above , given by this manual will , at P.O. Phone: 1-866-840-6483, 1-330-558-7220 MTD Canada Limited ...
... product has been operated and maintained in accordance with the Operator's Manual furnished with respect to others and their respective possessions and territories, except those sold through your Yellow Pages, or contact Troy-Bilt LLC at its territories and possessions (either entity respectively, "TroyBilt")....which vary from the date of Purchase to you . Check your local authorized service dealer. Troy-Bilt does not extend any implied warranty of express written warranty above , given by this manual will , at P.O. Phone: 1-866-840-6483, 1-330-558-7220 MTD Canada Limited ...


