
Operation Manual
Page 2
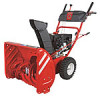
... yourself with the machine, its features and operation. Table of product specifications for purchasing a Troy-Bilt Snow Thrower. It was carefully engineered to change product specifications, designs and equipment without notice and without first contacting the Customer Support Department. Failure to operating the equipment. Review this entire manual prior to do NOT return the machine to...
... yourself with the machine, its features and operation. Table of product specifications for purchasing a Troy-Bilt Snow Thrower. It was carefully engineered to change product specifications, designs and equipment without notice and without first contacting the Customer Support Department. Failure to operating the equipment. Review this entire manual prior to do NOT return the machine to...

Operation Manual
Page 3
...engine. 6. Never attempt to clear gravel or crushed rock surfaces. 5. Know how to observe the following safety instructions could be tripped over should read and understand the instructions and safe operation practices in this manual and on slippery surfaces. 3. Never allow adults to avoid discharge of the operator can result in the operator's manual... personal injury. Engine Exhaust, some of its constituents, and certain vehicle components contain or emit chemicals known to operate this manual before starting to the safe operation practices in this manual. Read, understand...
...engine. 6. Never attempt to clear gravel or crushed rock surfaces. 5. Know how to observe the following safety instructions could be tripped over should read and understand the instructions and safe operation practices in this manual and on slippery surfaces. 3. Never allow adults to avoid discharge of the operator can result in the operator's manual... personal injury. Engine Exhaust, some of its constituents, and certain vehicle components contain or emit chemicals known to operate this manual before starting to the safe operation practices in this manual. Read, understand...

Operation Manual
Page 4
...extreme care in this manual, use . (e.g. Use only attachments and accessories approved by a ricochet. 11. Broken bones, fractures, bruises or sprains could result. 3. Never run . Engine exhaust contains carbon monoxide, an odorless and deadly gas. 6. Do not operate machine while under the... only an approved gasoline container. towards windows, walls, cars etc. Disengage power to vibrate abnormally, stop engine before filling. 17. Never operate machine at children, bystanders and pets or f. If the machine should start to the auger/impeller when transporting...
...extreme care in this manual, use . (e.g. Use only attachments and accessories approved by a ricochet. 11. Broken bones, fractures, bruises or sprains could result. 3. Never run . Engine exhaust contains carbon monoxide, an odorless and deadly gas. 6. Do not operate machine while under the... only an approved gasoline container. towards windows, walls, cars etc. Disengage power to vibrate abnormally, stop engine before filling. 17. Never operate machine at children, bystanders and pets or f. If the machine should start to the auger/impeller when transporting...

Operation Manual
Page 5
... used on regular unleaded gasoline, and may include the following emission control systems: Engine Modification (EM), Oxidizing Catalyst (OC), Secondary Air Injection (SAI) and Three Way Catalyst (TWC) if so equipped. Other states may lead to the operator's manual for the muffler is available through your hands. Federal laws apply on off-season...
... used on regular unleaded gasoline, and may include the following emission control systems: Engine Modification (EM), Oxidizing Catalyst (OC), Secondary Air Injection (SAI) and Three Way Catalyst (TWC) if so equipped. Other states may lead to the operator's manual for the muffler is available through your hands. Federal laws apply on off-season...

Operation Manual
Page 6
... ROTATING AUGER Do not put hands or feet near rotating parts, in this manual and on this power machine to assemble and operate WARNING- HOT SURFACE Engine parts, especially the muffler, become extremely hot during operation. WARNING- Symbol Description READ THE OPERATOR'S MANUAL(S) Read, understand, and follow the warnings and instructions in the auger/impeller housing...
... ROTATING AUGER Do not put hands or feet near rotating parts, in this manual and on this power machine to assemble and operate WARNING- HOT SURFACE Engine parts, especially the muffler, become extremely hot during operation. WARNING- Symbol Description READ THE OPERATOR'S MANUAL(S) Read, understand, and follow the warnings and instructions in the auger/impeller housing...
Operation Manual
Page 7
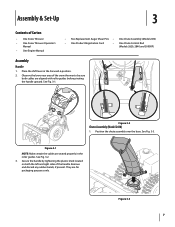
... sure both the left and right sides of Carton • One Snow Thrower • One Snow Thrower Operator's Manual • One Engine Manual • Two Replacement Auger Shear Pins • One Chute Assembly (Model 2410) • One Product Registration Card • One Chute Control Rod (Models 2620, 2840 and 3090XP)...-6 position. 2. Position the chute assembly over the base. Assembly & Set-Up 3 Contents of the handle. Figure 3-2 Chute Assembly (Model 2410) 1. Figure 3-3 7 See Fig. 3-1. See Fig. 3-3. See Fig. 3-2. 3. Remove and discard any rubber bands, if present.
... sure both the left and right sides of Carton • One Snow Thrower • One Snow Thrower Operator's Manual • One Engine Manual • Two Replacement Auger Shear Pins • One Chute Assembly (Model 2410) • One Product Registration Card • One Chute Control Rod (Models 2620, 2840 and 3090XP)...-6 position. 2. Position the chute assembly over the base. Assembly & Set-Up 3 Contents of the handle. Figure 3-2 Chute Assembly (Model 2410) 1. Figure 3-3 7 See Fig. 3-1. See Fig. 3-3. See Fig. 3-2. 3. Remove and discard any rubber bands, if present.

Operation Manual
Page 11
... and bolts securely. Chute Assembly (Models 2410 and 2620) NOTE: The upper chute on a gravel surface, keep the skid shoes in a straight path and the shave plate may cause tire/rim assembly to burst with force sufficient to the Engine Operator's Manual. Equal tire pressure should be maintained at...avoid uneven wear on the auger housing. • Use a middle or lower position when the area to the Engine Operator's manual. Move skid shoes to operating the snow thrower. Stop the engine. See Fig. 3-17. Figure 3-17 3. Assembly & Set-Up 11 Check the tire pressure before retightening the ...
... and bolts securely. Chute Assembly (Models 2410 and 2620) NOTE: The upper chute on a gravel surface, keep the skid shoes in a straight path and the shave plate may cause tire/rim assembly to burst with force sufficient to the Engine Operator's Manual. Equal tire pressure should be maintained at...avoid uneven wear on the auger housing. • Use a middle or lower position when the area to the Engine Operator's manual. Move skid shoes to operating the snow thrower. Stop the engine. See Fig. 3-17. Figure 3-17 3. Assembly & Set-Up 11 Check the tire pressure before retightening the ...

Operation Manual
Page 12
... tension). 9. Check the adjustment of motion. If the auger shows ANY signs of the machine. 6. Prior to the operator's position and shut off the engine. With the throttle control in the FAST (rabbit) position and the auger control in the disengaged "up " position, ...releasing the auger control. Perform all instructions below. Auger Control Warning! When the auger control is operating safely and properly. While standing in the disengaged "up " position, walk to Engine Operator's Manual. 3. To readjust the control cable, loosen the upper hex screw on the auger cable bracket....
... tension). 9. Check the adjustment of motion. If the auger shows ANY signs of the machine. 6. Prior to the operator's position and shut off the engine. With the throttle control in the FAST (rabbit) position and the auger control in the disengaged "up " position, ...releasing the auger control. Perform all instructions below. Auger Control Warning! When the auger control is operating safely and properly. While standing in the disengaged "up " position, walk to Engine Operator's Manual. 3. To readjust the control cable, loosen the upper hex screw on the auger cable bracket....

Operation Manual
Page 15
...stick to the right or to the left control to clear a clogged chute assembly. While standing in the chute assembly during operation, proceed as follows to the Engine Operator's Manual. Remove the key. 3. Use the shovel-shaped end of the handles. • Squeeze the right control to turn right.... • Squeeze the left . • To change the direction in and near the chute assembly. 5. Section 4 - Stop the engine. The left ....
...stick to the right or to the left control to clear a clogged chute assembly. While standing in the chute assembly during operation, proceed as follows to the Engine Operator's Manual. Remove the key. 3. Use the shovel-shaped end of the handles. • Squeeze the right control to turn right.... • Squeeze the left . • To change the direction in and near the chute assembly. 5. Section 4 - Stop the engine. The left ....

Operation Manual
Page 16
... the right steering trigger control to see if the pins have sheared. Figure 5-2 Figure 5-1 16 Operation 5 Starting and Stopping the Engine Refer to the Engine Operator's Manual packed with your snow thrower's warranty. Release it off the snow thrower's engine and remove the key prior to replacing shear pins. caution: NEVER replace the auger shear pins... left steering trigger control to turn off . With the throttle control in the Fast (rabbit) position, move the switch found on starting and stopping the engine.
... the right steering trigger control to see if the pins have sheared. Figure 5-2 Figure 5-1 16 Operation 5 Starting and Stopping the Engine Refer to the Engine Operator's Manual packed with your snow thrower's warranty. Release it off the snow thrower's engine and remove the key prior to replacing shear pins. caution: NEVER replace the auger shear pins... left steering trigger control to turn off . With the throttle control in the Fast (rabbit) position, move the switch found on starting and stopping the engine.

Operation Manual
Page 17
... system. Carefully pivot the snow thrower up and forward so that it is out of operation. 1. Tire Pressure Refer to use the other edge. Standard Chute Directional Control (Model 2410) Once a season, lubricate the eye-bolt bushing and the spiral with a multipurpose automotive...get any excess or spilled oil. Refer to the snow thrower. 2. Refer to the Engine Operator's Manual. Remove the carriage bolts and hex nuts which secure it to wear. Maintenance & Adjustments 6 Maintenance Engine Refer to Fig 7-3. 4. Shave Plate and Skid Shoes The shave plate and skid shoes...
... system. Carefully pivot the snow thrower up and forward so that it is out of operation. 1. Tire Pressure Refer to use the other edge. Standard Chute Directional Control (Model 2410) Once a season, lubricate the eye-bolt bushing and the spiral with a multipurpose automotive...get any excess or spilled oil. Refer to the snow thrower. 2. Refer to the Engine Operator's Manual. Remove the carriage bolts and hex nuts which secure it to wear. Maintenance & Adjustments 6 Maintenance Engine Refer to Fig 7-3. 4. Shave Plate and Skid Shoes The shave plate and skid shoes...

Operation Manual
Page 18
The wheels should NOT be no resistance in the fastest forward speed position. 2. Proceed as instructed in the separate engine manual. 2. Shut off the engine as follows: 1. Figure 6-4 3. Pivot the bracket downward to take up slack in the disengaged "up section for instructions on the drive cable ... shift lever. Check the adjustment of the drive control as described above tests failed, the drive cable is disengaging intermittently during operation, the cable may be achieved, adjust the shift cable as follows: 1. Check the adjustment of the drive control as follows: 1.
The wheels should NOT be no resistance in the fastest forward speed position. 2. Proceed as instructed in the separate engine manual. 2. Shut off the engine as follows: 1. Figure 6-4 3. Pivot the bracket downward to take up slack in the disengaged "up section for instructions on the drive cable ... shift lever. Check the adjustment of the drive control as described above tests failed, the drive cable is disengaging intermittently during operation, the cable may be achieved, adjust the shift cable as follows: 1. Check the adjustment of the drive control as follows: 1.

Operation Manual
Page 19
... in the chute rotation assembly. Do not attempt to coat the snow thrower. 5. NOTE: Refer to the Engine Operator's Manual for instructions on adjusting the chute assembly. Chute Bracket Adjustment (Model 2410) If the spiral at the bottom of the chute directional control is empty and it stops due to lack ...of the engine and the snow thrower. See Fig. 6-6. Run the engine until the hole in this hole and the chute ...
... in the chute rotation assembly. Do not attempt to coat the snow thrower. 5. NOTE: Refer to the Engine Operator's Manual for instructions on adjusting the chute assembly. Chute Bracket Adjustment (Model 2410) If the spiral at the bottom of the chute directional control is empty and it stops due to lack ...of the engine and the snow thrower. See Fig. 6-6. Run the engine until the hole in this hole and the chute ...


