
Operation Manual
Page 17
...off and the spark plug wire disconnected, remove the two hex screws (3⁄8-16 x 1.00) and hex lock nuts (3⁄8-16) that secure the tine assembly to the tine shaft. Rear/Operator Removing/Installing a Tine Assembly: 1. If necessary, use , the tines will wear with dirt, sand or metal particles. 1. Apply a thin coat... part numbers. See Fig. 7-2. the-counter" belt may not perform satisfactorily. This will enter the soil first as the tiller moves forward. Secure the tine assembly to do so could damage the belt and/or belt cover. Drain the oil from the right side of grease to...
...off and the spark plug wire disconnected, remove the two hex screws (3⁄8-16 x 1.00) and hex lock nuts (3⁄8-16) that secure the tine assembly to the tine shaft. Rear/Operator Removing/Installing a Tine Assembly: 1. If necessary, use , the tines will wear with dirt, sand or metal particles. 1. Apply a thin coat... part numbers. See Fig. 7-2. the-counter" belt may not perform satisfactorily. This will enter the soil first as the tiller moves forward. Secure the tine assembly to do so could damage the belt and/or belt cover. Drain the oil from the right side of grease to...
Service Manual
Page 15
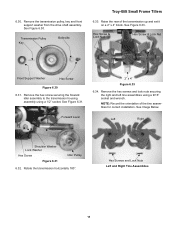
...Troy-Bilt Small Frame Tillers 6.33. Forward Lever 2" x 4" Figure 6.33 6.34. 6.30. Hex Screws and Lock Nuts Left and Right Tine Assemblies 11 Remove the transmission pulley, key and front support washer from the drive shaft assembly. Remove the hex screws and lock nuts securing the right and left tine... assemblies using a 1/2" socket. NOTE: Record the orientation of the transmission up and set it on a 2" x 4" block. Raise the rear of the tine assemblies for correct installation.... transmission housing assembly using a 9/16" socket and wrench.
...Troy-Bilt Small Frame Tillers 6.33. Forward Lever 2" x 4" Figure 6.33 6.34. 6.30. Hex Screws and Lock Nuts Left and Right Tine Assemblies 11 Remove the transmission pulley, key and front support washer from the drive shaft assembly. Remove the hex screws and lock nuts securing the right and left tine... assemblies using a 1/2" socket. NOTE: Record the orientation of the transmission up and set it on a 2" x 4" block. Raise the rear of the tine assemblies for correct installation.... transmission housing assembly using a 9/16" socket and wrench.


