

User Manual
Page 12
Chapter 3 Setup Mounting 3-2 Vertical mounting 3-2 Horizontal mounting 3-3 Wall mounting 3-4 AC adapter 3-4 Connecting the Wireless Routing Center 3-5 Setting up the Ethernet/Wireless LAN client 3-7 Setting up Ethernet client 3-7 ...
Chapter 3 Setup Mounting 3-2 Vertical mounting 3-2 Horizontal mounting 3-3 Wall mounting 3-4 AC adapter 3-4 Connecting the Wireless Routing Center 3-5 Setting up the Ethernet/Wireless LAN client 3-7 Setting up Ethernet client 3-7 ...

User Manual
Page 15
... appendixes and an index. Appendix A lists all default settings. For example: Read Only Memory (ROM). Preface Congratulations on your TOSHIBA Wireless Routing Center WRC-1000, herein referred to as the Wireless Routing Center. Chapter 3, Setup, tells how to configure the Wireless Routing Center via Web browser. Chapter 4, Web Configuration, tells how to connect and...
... appendixes and an index. Appendix A lists all default settings. For example: Read Only Memory (ROM). Preface Congratulations on your TOSHIBA Wireless Routing Center WRC-1000, herein referred to as the Wireless Routing Center. Chapter 3, Setup, tells how to configure the Wireless Routing Center via Web browser. Chapter 4, Web Configuration, tells how to connect and...

User Manual
Page 17
... connection to be configured to filter internal access to your LAN devices, and with 10/100Base-T Ethernet card and TCP/IP protocol installed for initial setup x Internet Explorer 5.0 or higher for Web configuration x Requirement for the Equipment checklist. The router can also be shared through either the IEEE 802.11b Access...
... connection to be configured to filter internal access to your LAN devices, and with 10/100Base-T Ethernet card and TCP/IP protocol installed for initial setup x Internet Explorer 5.0 or higher for Web configuration x Requirement for the Equipment checklist. The router can also be shared through either the IEEE 802.11b Access...

User Manual
Page 27
Internet Internet Service Provider Server Home/Office Desktop PC Cable/ADSL Modem Wireless Routing Center Ethernet Desktop PC Figure 3-1 Network connections Wireless LAN Client PC Wireless LAN Client PC Wireless LAN Client PC SETUP 3-1 Chapter 3 Setup This chapter describes how to position your Wireless Routing Center for wireless data exchange and how to the Internet. The figure below shows an example of connections in a LAN and a LAN connection to connect cables.
Internet Internet Service Provider Server Home/Office Desktop PC Cable/ADSL Modem Wireless Routing Center Ethernet Desktop PC Figure 3-1 Network connections Wireless LAN Client PC Wireless LAN Client PC Wireless LAN Client PC SETUP 3-1 Chapter 3 Setup This chapter describes how to position your Wireless Routing Center for wireless data exchange and how to the Internet. The figure below shows an example of connections in a LAN and a LAN connection to connect cables.

User Manual
Page 28
... with the hole in the Wireless Routing Center and fit the Wireless Routing Center into the stand. Avoid placing the device in its vertical stand 3-2 SETUP User's Manual Mounting The Wireless Routing Center can be used either vertically or horizontally on a desk or hung on the cables. Vertical mounting To install...
... with the hole in the Wireless Routing Center and fit the Wireless Routing Center into the stand. Avoid placing the device in its vertical stand 3-2 SETUP User's Manual Mounting The Wireless Routing Center can be used either vertically or horizontally on a desk or hung on the cables. Vertical mounting To install...

User Manual
Page 29
SETUP 3-3 Set the Wireless Routing Center upright. 2. Lay it on a flat surface with the pad side down. Mounting Figure 3-3 The Wireless Routing Center's upright position in a stand Horizontal mounting Four rubber pads protect the back of the Wireless Routing Center.
SETUP 3-3 Set the Wireless Routing Center upright. 2. Lay it on a flat surface with the pad side down. Mounting Figure 3-3 The Wireless Routing Center's upright position in a stand Horizontal mounting Four rubber pads protect the back of the Wireless Routing Center.

User Manual
Page 30
...Connecting the wrong adapter could damage the Wireless Routing Center. Connect the power cord to an electrical outlet (100 to the AC adapter. 2. SETUP User's Manual Wall mounting To install the Wireless Routing Center on a wall, secure it to with two screws provided with the Wireless Routing ...Center. Connect the power cord to 240 VAC). TOSHIBA assumes no liability for any damage in such case. 3-4 Figure 3-4 Mounting the Wireless Routing Center on the back of the Wireless Routing Center....
...Connecting the wrong adapter could damage the Wireless Routing Center. Connect the power cord to an electrical outlet (100 to the AC adapter. 2. SETUP User's Manual Wall mounting To install the Wireless Routing Center on a wall, secure it to with two screws provided with the Wireless Routing ...Center. Connect the power cord to 240 VAC). TOSHIBA assumes no liability for any damage in such case. 3-4 Figure 3-4 Mounting the Wireless Routing Center on the back of the Wireless Routing Center....

User Manual
Page 31
SETUP Connecting the Wireless Routing Center Follow the order of 1, 2, 3 as shown in LAN operation. Logging onto a LAN using the computer's default setting could cause a malfunction ...
SETUP Connecting the Wireless Routing Center Follow the order of 1, 2, 3 as shown in LAN operation. Logging onto a LAN using the computer's default setting could cause a malfunction ...

User Manual
Page 32
.../ADSL modem to the WAN port of the power adapter to the WAN port. Connecting your computer to an AC outlet. 4. Connecting the power adapter. SETUP User's Manual 1. Connecting Cable/ADSL modem to the power jack on the power switch. 3-6 Connect the single DC output connector of your Wireless Routing Center...
.../ADSL modem to the WAN port of the power adapter to the WAN port. Connecting your computer to an AC outlet. 4. Connecting the power adapter. SETUP User's Manual 1. Connecting Cable/ADSL modem to the power jack on the power switch. 3-6 Connect the single DC output connector of your Wireless Routing Center...

User Manual
Page 33
....255.0, and its DHCP server is between 2 and 254), subnet mask as 255.255.255.0 and the gateway as one computer may cause setting errors. SETUP Setting up the Ethernet/Wireless LAN client Setting up Ethernet client To access the Wireless Routing Center via Ethernet or wireless network, you must properly...
....255.0, and its DHCP server is between 2 and 254), subnet mask as 255.255.255.0 and the gateway as one computer may cause setting errors. SETUP Setting up the Ethernet/Wireless LAN client Setting up Ethernet client To access the Wireless Routing Center via Ethernet or wireless network, you must properly...

User Manual
Page 34
SETUP User's Manual 2. Figure 3-8 Obtain an IP address automatically Checking/Renew IP Address under Windows XP The following steps help you want to get a new IP ...
SETUP User's Manual 2. Figure 3-8 Obtain an IP address automatically Checking/Renew IP Address under Windows XP The following steps help you want to get a new IP ...

User Manual
Page 35
... are the same. 3-9 From the Start menu, point to Settings and then click Network and Dial-up the Ethernet/Wireless LAN client For Windows 2000 1. SETUP Setting up Connections. 2.
... are the same. 3-9 From the Start menu, point to Settings and then click Network and Dial-up the Ethernet/Wireless LAN client For Windows 2000 1. SETUP Setting up Connections. 2.
User Manual
Page 36
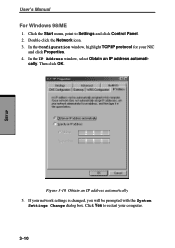
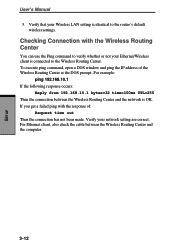
In the IP Address window, select Obtain an IP address automati- Figure 3-10 Obtain an IP address automatically 5. If your computer. 3-10 SETUP User's Manual For Windows 98/ME 1. Then click OK. cally. Click Yes to Settings and click Control Panel. 2. Double-click the Network icon. 3. In the Configuration window, highlight TCP/IP protocol for your NIC and click Properties. 4. Click the Start menu, point to restart your network settings is changed, you will be prompted with the System Settings Change dialog box.
In the IP Address window, select Obtain an IP address automati- Figure 3-10 Obtain an IP address automatically 5. If your computer. 3-10 SETUP User's Manual For Windows 98/ME 1. Then click OK. cally. Click Yes to Settings and click Control Panel. 2. Double-click the Network icon. 3. In the Configuration window, highlight TCP/IP protocol for your NIC and click Properties. 4. Click the Start menu, point to restart your network settings is changed, you will be prompted with the System Settings Change dialog box.

User Manual
Page 37
... to obtain a dynamic IP address from the drop-down list to show the IP address. Enter winipcfg in the dialog box and then click OK. 3. SETUP Setting up Wireless client You can also choose to open the Run dialog box. 2. From the Start menu, click Run to access the Wireless Routing...
... to obtain a dynamic IP address from the drop-down list to show the IP address. Enter winipcfg in the dialog box and then click OK. 3. SETUP Setting up Wireless client You can also choose to open the Run dialog box. 2. From the Start menu, click Run to access the Wireless Routing...
User Manual
Page 38
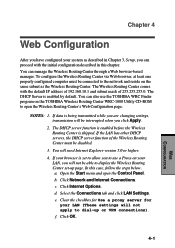
... out Then the connection has not been made. For Ethernet client, also check the cable between the Wireless Routing Center and the network is OK. SETUP User's Manual 3.
... out Then the connection has not been made. For Ethernet client, also check the cable between the Wireless Routing Center and the network is OK. SETUP User's Manual 3.
User Manual
Page 39
... described in Chapter 3, Setup, you can proceed with the default IP address of 192.168.10.1 and subnet mask of the Wireless Routing Center must be able to display the Wireless Routing Center set to allow you to use the TOSHIBA WRC Finder program on the TOSHIBA Wireless Routing Center WRC-1000 Utility CD-ROM to...
... described in Chapter 3, Setup, you can proceed with the default IP address of 192.168.10.1 and subnet mask of the Wireless Routing Center must be able to display the Wireless Routing Center set to allow you to use the TOSHIBA WRC Finder program on the TOSHIBA Wireless Routing Center WRC-1000 Utility CD-ROM to...
User Manual
Page 68
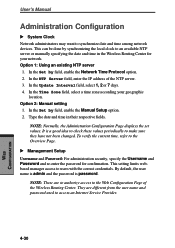
...the Wireless Routing Center. Option 2: Manual setting 1. In the Set by field, enable the Network Time Protocol option. 2. u Management Setup Username and Password: For administration security, specify the Username and Password and re-enter the password for your geographic location. This setting limits... according your network. NOTE: Normally, the Administration Configuration Page displays the set values. In the Set by field, enable the Manual Setup option. 2. It is password. To verify the current time, refer to users with the correct credentials. By default, the user name...
...the Wireless Routing Center. Option 2: Manual setting 1. In the Set by field, enable the Network Time Protocol option. 2. u Management Setup Username and Password: For administration security, specify the Username and Password and re-enter the password for your geographic location. This setting limits... according your network. NOTE: Normally, the Administration Configuration Page displays the set values. In the Set by field, enable the Manual Setup option. 2. It is password. To verify the current time, refer to users with the correct credentials. By default, the user name...

User Manual
Page 73
...be a problem. Cause No power is not properly connected. Remedy Refer to the Setting up the Ethernet/Wireless LAN client section in Chapter 3, Setup, and make sure you are using the proper cable. Cause The cable is supplied to the Wireless Routing Center. Remedy Refer to the Setting up...The Configuration window does not open, even if the IP address of the browser. Remedy The default local IP address is entered in Chapter 3, Setup, and reconnect the cable. If the local IP address has been changed , specify this address. Refer also to your Wireless Routing Center to proper...
...be a problem. Cause No power is not properly connected. Remedy Refer to the Setting up the Ethernet/Wireless LAN client section in Chapter 3, Setup, and make sure you are using the proper cable. Cause The cable is supplied to the Wireless Routing Center. Remedy Refer to the Setting up...The Configuration window does not open, even if the IP address of the browser. Remedy The default local IP address is entered in Chapter 3, Setup, and reconnect the cable. If the local IP address has been changed , specify this address. Refer also to your Wireless Routing Center to proper...

User Manual
Page 76
... stations and the Wireless Routing Center. x SSID (Network Name) x Basic rate not higher than the communication rate of the Wireless LAN PC cards in Chapter 3, Setup, for more of the Wireless Routing Center. If you want to configure the IP address, refer to open the Command Prompt window. 2. Make sure the...
... stations and the Wireless Routing Center. x SSID (Network Name) x Basic rate not higher than the communication rate of the Wireless LAN PC cards in Chapter 3, Setup, for more of the Wireless Routing Center. If you want to configure the IP address, refer to open the Command Prompt window. 2. Make sure the...
User Manual
Page 77
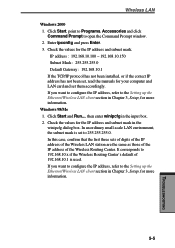
...Me 1. If you want to configure the IP address, refer to the Setting up the Ethernet/Wireless LAN client section in Chapter 3, Setup, for more information. 5-5 TROUBLESHOOTING If you want to configure the IP address, refer to the Setting up the Ethernet/Wireless LAN client... section in Chapter 3, Setup, for more information. Click Start and Run..., then enter winipcfg in the winipcfg dialog box. Enter ipconfig and press Enter. 3. Click ...
...Me 1. If you want to configure the IP address, refer to the Setting up the Ethernet/Wireless LAN client section in Chapter 3, Setup, for more information. 5-5 TROUBLESHOOTING If you want to configure the IP address, refer to the Setting up the Ethernet/Wireless LAN client... section in Chapter 3, Setup, for more information. Click Start and Run..., then enter winipcfg in the winipcfg dialog box. Enter ipconfig and press Enter. 3. Click ...