
User Manual
Page 42
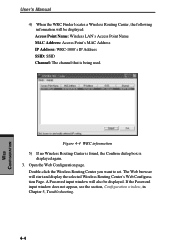
Open the Web Configuration page. A Password input window will also be displayed: Access Point Name: Wireless LAN's Access Point Name MAC Address: Access Point's MAC Address IP Address: WRC-1000's IP Address SSID: SSID Channel: The channel that is displayed again. 3. Double-click the Wireless...will start and display the selected Wireless Routing Center's Web Configuration Page. Figure 4-4 WRC information 5) If no Wireless Routing Center is found, the Confirm dialog box is being used. If the Password input window does not appear, see the section, Configuration window, in Chapter 5, ...
Open the Web Configuration page. A Password input window will also be displayed: Access Point Name: Wireless LAN's Access Point Name MAC Address: Access Point's MAC Address IP Address: WRC-1000's IP Address SSID: SSID Channel: The channel that is displayed again. 3. Double-click the Wireless...will start and display the selected Wireless Routing Center's Web Configuration Page. Figure 4-4 WRC information 5) If no Wireless Routing Center is found, the Confirm dialog box is being used. If the Password input window does not appear, see the section, Configuration window, in Chapter 5, ...

User Manual
Page 43
Figure 4-5 Password window After you will be displayed. You can click the menu options at the left side to enter username and password. Accessing Web Configuration Page After connecting to the Wireless Routing Center, you login, the Overview Configuration page of password. From this point on, the Wireless Routing Center will be prompted to start your request. Leave the username admin and enter the default password of the Wireless Routing Center will act as a Web server sending HTML pages/forms on your configuration task. 4-5 WEB CONFIGURATION
Figure 4-5 Password window After you will be displayed. You can click the menu options at the left side to enter username and password. Accessing Web Configuration Page After connecting to the Wireless Routing Center, you login, the Overview Configuration page of password. From this point on, the Wireless Routing Center will be prompted to start your request. Leave the username admin and enter the default password of the Wireless Routing Center will act as a Web server sending HTML pages/forms on your configuration task. 4-5 WEB CONFIGURATION

User Manual
Page 49
... the user name and password provided by your ISP. Connect on your Internet connection, you should select Auto. PPPoE Connection Status: This item is PAP or CHAP and makes the ...
... the user name and password provided by your ISP. Connect on your Internet connection, you should select Auto. PPPoE Connection Status: This item is PAP or CHAP and makes the ...

User Manual
Page 61
The shared secret is a password for more criteria if required. Specifying IP Filter Rules NOTE: If you make a mistake in Filter Rules, you are allowed to access the Internet. Shared ...
The shared secret is a password for more criteria if required. Specifying IP Filter Rules NOTE: If you make a mistake in Filter Rules, you are allowed to access the Internet. Shared ...
User Manual
Page 68
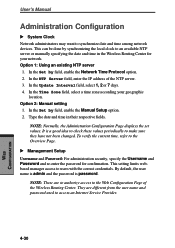
...setting limits webbased manager access to the Overview Page. Option 2: Manual setting 1. By default, the user name is admin and the password is a good idea to check these values periodically to make sure they have not been changed. This can be done by synchronizing .... Type the date and time in the Wireless Routing Center for confirmation. u Management Setup Username and Password: For administration security, specify the Username and Password and re-enter the password for your geographic location. They are to authorize access to synchronize date and time among network devices.
...setting limits webbased manager access to the Overview Page. Option 2: Manual setting 1. By default, the user name is admin and the password is a good idea to check these values periodically to make sure they have not been changed. This can be done by synchronizing .... Type the date and time in the Wireless Routing Center for confirmation. u Management Setup Username and Password: For administration security, specify the Username and Password and re-enter the password for your geographic location. They are to authorize access to synchronize date and time among network devices.

User Manual
Page 75
... dialog box. 4. Wireless LAN There is operating correctly. Remedy If the User name and Password was changed in Chapter 2, The Grand Tour. Refer to 255.255.255.0. The user name and password are using a TOSHIBA Wireless LAN PC card in the winipcfg dialog box. Cause The wrong user name and... password have not been correctly installed. Click Start, point to Control Panel and click System to ...
... dialog box. 4. Wireless LAN There is operating correctly. Remedy If the User name and Password was changed in Chapter 2, The Grand Tour. Refer to 255.255.255.0. The user name and password are using a TOSHIBA Wireless LAN PC card in the winipcfg dialog box. Cause The wrong user name and... password have not been correctly installed. Click Start, point to Control Panel and click System to ...
User Manual
Page 80
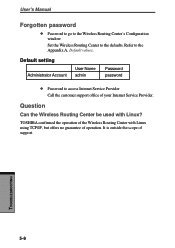
... access Internet Service Provider Call the customer support office of support. TROUBLESHOOTING 5-8 User's Manual Forgotten password x Password to go to the Wireless Routing Center's Configuration window: Set the Wireless Routing Center to the Appendix A, Default values. It is outside the scope of ...your Internet Service Provider. Question Can the Wireless Routing Center be used with Linux using TCP/IP, but offers no guarantee of operation. TOSHIBA confirmed the operation of the Wireless Routing Center with Linux? Refer to the defaults.
... access Internet Service Provider Call the customer support office of support. TROUBLESHOOTING 5-8 User's Manual Forgotten password x Password to go to the Wireless Routing Center's Configuration window: Set the Wireless Routing Center to the Appendix A, Default values. It is outside the scope of ...your Internet Service Provider. Question Can the Wireless Routing Center be used with Linux using TCP/IP, but offers no guarantee of operation. TOSHIBA confirmed the operation of the Wireless Routing Center with Linux? Refer to the defaults.

User Manual
Page 82
APPENDIX A User's Manual Filters Filter Type MAC Filters IP Filters TCP Port Filters UDP Port Filters Listed Block disable disable disable disable Administration System Clock set by Username Password WAN Management WAN Port Ping Reply WRC Finder Function Via WAN UPnP Function NetBIOS Communication Report Log to TFTP Server Manual Setup admin password disable disable disable enable disable disable A-2
APPENDIX A User's Manual Filters Filter Type MAC Filters IP Filters TCP Port Filters UDP Port Filters Listed Block disable disable disable disable Administration System Clock set by Username Password WAN Management WAN Port Ping Reply WRC Finder Function Via WAN UPnP Function NetBIOS Communication Report Log to TFTP Server Manual Setup admin password disable disable disable enable disable disable A-2

User Manual
Page 86
... distributed. If different types of authentication are prepared. The station can be distributed depends on the authentication type.) 6. Authentication method using the user name and password In this type of authentication, the certificate needs to be distributed depends on the authentication type.) The WEP key is created at random by "Smart...
... distributed. If different types of authentication are prepared. The station can be distributed depends on the authentication type.) 6. Authentication method using the user name and password In this type of authentication, the certificate needs to be distributed depends on the authentication type.) The WEP key is created at random by "Smart...

User Manual
Page 89
APPENDIX B Appendix B 5. In this example, my shared secret is set . Set Shared secret. Step 2. Enter the password for communication between the access point and the RADIUS server. In this example, 192.168.10.1 is set . Figure B-2 Add RADIUS Client window Click Finish. Select Remote Access Policies in the default setting. Leave the other items in the Tree window and click the right mouse button. 2. B-7 Select New Remote Access Policy from the menu. Enter the IP address of the access point and RADIUS server. Setting Remote Access Policies 1. Set Client address.
APPENDIX B Appendix B 5. In this example, my shared secret is set . Set Shared secret. Step 2. Enter the password for communication between the access point and the RADIUS server. In this example, 192.168.10.1 is set . Figure B-2 Add RADIUS Client window Click Finish. Select Remote Access Policies in the default setting. Leave the other items in the Tree window and click the right mouse button. 2. B-7 Select New Remote Access Policy from the menu. Enter the IP address of the access point and RADIUS server. Setting Remote Access Policies 1. Set Client address.

User Manual
Page 93
... my shared secret. The characters you enter in the IP Address field. RADIUSgroup Select the 1 Enable radio button in the Port field. Shared secret is a password for communication between the access point and the RADIUS server. In this field will be displayed as q. Set a value in the RADIUS Servers field. Figure...
... my shared secret. The characters you enter in the IP Address field. RADIUSgroup Select the 1 Enable radio button in the Port field. Shared secret is a password for communication between the access point and the RADIUS server. In this field will be displayed as q. Set a value in the RADIUS Servers field. Figure...

User Manual
Page 106
INDEX User's Manual N NAT routing mode 4-9 LAN configuration 4-13 WAN configuration 4-9 P Password 4-5, 4-11 Ping 3-12 Ports 2-2 Power switch 2-2 R Reboot 4-33 Router features 1-2 Routing configuration 4-29 S Security 1-3 802.1x B-1... 4-32 user configurations 4-33 System requirements 1-1 T Troubleshooting 5-1 application problems 5-7 configuration window 5-1 Index-2 Ethernet 5-1 forgotten password 5-8 Linux 5-8 power 5-1 Wireless LAN 5-3 U User name 4-11 W WAN connection 3-5 port 2-2 WRC Finder 4-2 Wireless LAN, See also Security configuration 4-18 advanced 4-19 basic 4-18 features list 1-3
INDEX User's Manual N NAT routing mode 4-9 LAN configuration 4-13 WAN configuration 4-9 P Password 4-5, 4-11 Ping 3-12 Ports 2-2 Power switch 2-2 R Reboot 4-33 Router features 1-2 Routing configuration 4-29 S Security 1-3 802.1x B-1... 4-32 user configurations 4-33 System requirements 1-1 T Troubleshooting 5-1 application problems 5-7 configuration window 5-1 Index-2 Ethernet 5-1 forgotten password 5-8 Linux 5-8 power 5-1 Wireless LAN 5-3 U User name 4-11 W WAN connection 3-5 port 2-2 WRC Finder 4-2 Wireless LAN, See also Security configuration 4-18 advanced 4-19 basic 4-18 features list 1-3