

User Manual
Page 1
TOSHIBA Wireless Routing Center WRC-1000 User's Manual R10UM020801
TOSHIBA Wireless Routing Center WRC-1000 User's Manual R10UM020801

User Manual
Page 2
... the information contained herein. No patent liability is a registered trademark of the Wireless Ethernet Compatibility Alliance, Inc. TOSHIBA assumes no liability for accuracy. TOSHIBA Wireless Routing Center WRC-1000 User's Manual First edition August 2002 Disclaimer This manual has been validated and reviewed for damages incurred directly or indirectly from errors, omissions or discrepancies between the...
... the information contained herein. No patent liability is a registered trademark of the Wireless Ethernet Compatibility Alliance, Inc. TOSHIBA assumes no liability for accuracy. TOSHIBA Wireless Routing Center WRC-1000 User's Manual First edition August 2002 Disclaimer This manual has been validated and reviewed for damages incurred directly or indirectly from errors, omissions or discrepancies between the...

User Manual
Page 11
Table of Contents Preface Manual contents xv Conventions xv Abbreviations xv Icons xvi Keys xvi Key operation xvi Display xvi Messages xvi Chapter 1 Introduction Overview 1-1 Package contents 1-1 System requirements 1-1 Features 1-2 ...
Table of Contents Preface Manual contents xv Conventions xv Abbreviations xv Icons xvi Keys xvi Key operation xvi Display xvi Messages xvi Chapter 1 Introduction Overview 1-1 Package contents 1-1 System requirements 1-1 Features 1-2 ...

User Manual
Page 15
... and an index. Chapter 1, Introduction, is composed of the device's features and capabilities. Conventions This manual uses the following their definition. xv This manual tells how to set up and begin using your TOSHIBA Wireless Routing Center WRC-1000, herein referred to connect and setup your purchase of action if the device doesn't seem to...
... and an index. Chapter 1, Introduction, is composed of the device's features and capabilities. Conventions This manual uses the following their definition. xv This manual tells how to set up and begin using your TOSHIBA Wireless Routing Center WRC-1000, herein referred to connect and setup your purchase of action if the device doesn't seem to...

User Manual
Page 16
... the type face you are used, hold down the first two and at the same time press C. Keys The keyboard keys are used in this manual to bring important information to simultaneously use of your Wireless Routing Center. A caution informs you that helps you see to the left . Key operation Some... icons or text generated by a plus sign (+). Messages Messages are used in the text to the left . For example, Enter identifies the Enter key. User's Manual Icons Icons identify ports, dials, and other parts of your equipment.
... the type face you are used, hold down the first two and at the same time press C. Keys The keyboard keys are used in this manual to bring important information to simultaneously use of your Wireless Routing Center. A caution informs you that helps you see to the left . Key operation Some... icons or text generated by a plus sign (+). Messages Messages are used in the text to the left . For example, Enter identifies the Enter key. User's Manual Icons Icons identify ports, dials, and other parts of your equipment.

User Manual
Page 18
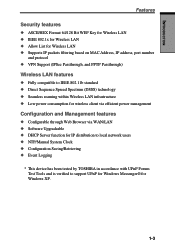
INTRODUCTION User's Manual Features WAN port features x One 10/100 Base-TX RJ-45 auto sensing and crossover Ethernet WAN port for Broadband connection (Cable/DSL or direct ...
INTRODUCTION User's Manual Features WAN port features x One 10/100 Base-TX RJ-45 auto sensing and crossover Ethernet WAN port for Broadband connection (Cable/DSL or direct ...
User Manual
Page 19
... Web Browser via WAN/LAN x Software Upgradeable x DHCP Server function for IP distribution to local network users x NTP/Manual System Clock x Configuration Saving/Retrieving x Event Logging * This device has been tested by TOSHIBA in accordance with UPnP Forum Test Tools and is verified to support UPnP for Windows Messenger® for Windows...
... Web Browser via WAN/LAN x Software Upgradeable x DHCP Server function for IP distribution to local network users x NTP/Manual System Clock x Configuration Saving/Retrieving x Event Logging * This device has been tested by TOSHIBA in accordance with UPnP Forum Test Tools and is verified to support UPnP for Windows Messenger® for Windows...

User Manual
Page 20
INTRODUCTION User's Manual 1-4
INTRODUCTION User's Manual 1-4

User Manual
Page 22
... to hang the Wireless Routing Center from screws in an upright position. Mounting hole Fit pin on a flat surface with the pad side down. User's Manual Bottom and right Figure 2-2 shows the Wireless Routing Center's bottom and right sides.
... to hang the Wireless Routing Center from screws in an upright position. Mounting hole Fit pin on a flat surface with the pad side down. User's Manual Bottom and right Figure 2-2 shows the Wireless Routing Center's bottom and right sides.

User Manual
Page 24
THE GRAND TOUR User's Manual LED Indicators The Wireless Routing Center is not initialized properly. Table 2-1 Indicator conditions LEDs LINK ACT WAN LAN 1-4 Function Color Status Description Power Green Off ...
THE GRAND TOUR User's Manual LED Indicators The Wireless Routing Center is not initialized properly. Table 2-1 Indicator conditions LEDs LINK ACT WAN LAN 1-4 Function Color Status Description Power Green Off ...

User Manual
Page 26
Figure 2-7 The AC adapter and power cord 2-6 It can automatically adjust to any voltage from 100 to 240 volts and to a frequency of fire or damage to your Wireless Routing Center. CAUTION: Always use the correct AC adapter to avoid the risk of either 50 or 60 hertz, enabling you to the Wireless Routing Center. The current rating for the Wireless Routing Center is 2.0 amperes. THE GRAND TOUR User's Manual AC adapter and power cord The AC adapter converts AC power to DC power and reduces the voltage supplied to use the Wireless Routing Center in almost any country/region.
Figure 2-7 The AC adapter and power cord 2-6 It can automatically adjust to any voltage from 100 to 240 volts and to a frequency of fire or damage to your Wireless Routing Center. CAUTION: Always use the correct AC adapter to avoid the risk of either 50 or 60 hertz, enabling you to the Wireless Routing Center. The current rating for the Wireless Routing Center is 2.0 amperes. THE GRAND TOUR User's Manual AC adapter and power cord The AC adapter converts AC power to DC power and reduces the voltage supplied to use the Wireless Routing Center in almost any country/region.

User Manual
Page 28
NOTES: 1. Place the device on a wall. Place the device close to a power outlet if possible. 2. SETUP User's Manual Mounting The Wireless Routing Center can be used either vertically or horizontally on a desk or hung on a flat and stable stand. Also keep it away ...
NOTES: 1. Place the device on a wall. Place the device close to a power outlet if possible. 2. SETUP User's Manual Mounting The Wireless Routing Center can be used either vertically or horizontally on a desk or hung on a flat and stable stand. Also keep it away ...

User Manual
Page 30
Connect the power cord to an electrical outlet (100 to connect the AC adapter. 1. TOSHIBA assumes no liability for any damage in such case. 3-4 Figure 3-4 Mounting the Wireless Routing Center on a wall AC adapter Follow the steps below to 240 ... the power cord to with two screws provided with the Wireless Routing Center. Connecting the wrong adapter could damage the Wireless Routing Center. SETUP User's Manual Wall mounting To install the Wireless Routing Center on a wall, secure it to the AC adapter. 2. CAUTION: Use the adapter supplied with the Wireless Routing...
Connect the power cord to an electrical outlet (100 to connect the AC adapter. 1. TOSHIBA assumes no liability for any damage in such case. 3-4 Figure 3-4 Mounting the Wireless Routing Center on a wall AC adapter Follow the steps below to 240 ... the power cord to with two screws provided with the Wireless Routing Center. Connecting the wrong adapter could damage the Wireless Routing Center. SETUP User's Manual Wall mounting To install the Wireless Routing Center on a wall, secure it to the AC adapter. 2. CAUTION: Use the adapter supplied with the Wireless Routing...

User Manual
Page 32
... Center. Connecting your computer to one end of your hub, switch or a computer's Ethernet port, and the other end to the WAN port. SETUP User's Manual 1.
... Center. Connecting your computer to one end of your hub, switch or a computer's Ethernet port, and the other end to the WAN port. SETUP User's Manual 1.

User Manual
Page 34
... get a new IP address, type ipconfig /release to release the previous IP address and then type ipconfig /renew to renew the IP information. 1. SETUP User's Manual 2. Right-click the Local Area Connection icon and then click Properties. 3. In the General window, highlight Internet Protocol (TCP/IP) and then click Properties. 4.
... get a new IP address, type ipconfig /release to release the previous IP address and then type ipconfig /renew to renew the IP information. 1. SETUP User's Manual 2. Right-click the Local Area Connection icon and then click Properties. 3. In the General window, highlight Internet Protocol (TCP/IP) and then click Properties. 4.
User Manual
Page 36
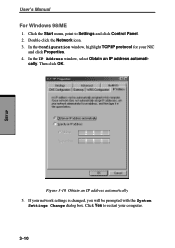
Click Yes to Settings and click Control Panel. 2. SETUP User's Manual For Windows 98/ME 1. In the IP Address window, select Obtain an IP address automati- If your NIC and click Properties. 4. cally. Then click OK. Figure 3-10 Obtain an IP address automatically 5. Click the Start menu, point to restart your computer. 3-10 In the Configuration window, highlight TCP/IP protocol for your network settings is changed, you will be prompted with the System Settings Change dialog box. Double-click the Network icon. 3.
Click Yes to Settings and click Control Panel. 2. SETUP User's Manual For Windows 98/ME 1. In the IP Address window, select Obtain an IP address automati- If your NIC and click Properties. 4. cally. Then click OK. Figure 3-10 Obtain an IP address automatically 5. Click the Start menu, point to restart your computer. 3-10 In the Configuration window, highlight TCP/IP protocol for your network settings is changed, you will be prompted with the System Settings Change dialog box. Double-click the Network icon. 3.
User Manual
Page 38
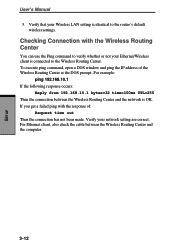
...: Reply from 192.168.10.1 bytes=32 time=100ms TTL=255 Then the connection between the Wireless Routing Center and the computer. 3-12 SETUP User's Manual 3. For Ethernet client, also check the cable between the Wireless Routing Center and the network is identical to verify whether or not your network setting...
...: Reply from 192.168.10.1 bytes=32 time=100ms TTL=255 Then the connection between the Wireless Routing Center and the computer. 3-12 SETUP User's Manual 3. For Ethernet client, also check the cable between the Wireless Routing Center and the network is identical to verify whether or not your network setting...

User Manual
Page 40
Your Web browser will start TOSHIBA WRC Finder. 1) Load the TOSHIBA Wireless Routing Center WRC-1000 Utility CDROM in the set , you can enter ... Routing Center. The default value is 192.168.10.1) Figure 4-1 Web Browser 1. The computer running WRC Finder to the Wireless Routing Center by cable. You should not use a wireless connection. Follow the steps...start and display that Wireless Routing Center's Web Confirmation Page. User's Manual Accessing Web Configuration Page NOTE: Connect the computer running WRC Finder must be on the same subnet as the Wireless Routing Center in...
Your Web browser will start TOSHIBA WRC Finder. 1) Load the TOSHIBA Wireless Routing Center WRC-1000 Utility CDROM in the set , you can enter ... Routing Center. The default value is 192.168.10.1) Figure 4-1 Web Browser 1. The computer running WRC Finder to the Wireless Routing Center by cable. You should not use a wireless connection. Follow the steps...start and display that Wireless Routing Center's Web Confirmation Page. User's Manual Accessing Web Configuration Page NOTE: Connect the computer running WRC Finder must be on the same subnet as the Wireless Routing Center in...
User Manual
Page 42
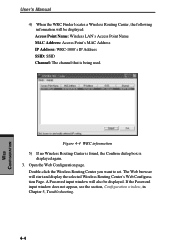
A Password input window will start and display the selected Wireless Routing Center's Web Configuration Page. Figure 4-4 WRC information 5) If no Wireless Routing Center is found, the Confirm dialog box is being used. Double-click the Wireless ...: Access Point's MAC Address IP Address: WRC-1000's IP Address SSID: SSID Channel: The channel that is displayed again. 3. If the Password input window does not appear, see the section, Configuration window, in Chapter 5, Troubleshooting. 4-4 WEB CONFIGURATION User's Manual 4) When the WRC Finder locates a Wireless Routing Center, the...
A Password input window will start and display the selected Wireless Routing Center's Web Configuration Page. Figure 4-4 WRC information 5) If no Wireless Routing Center is found, the Confirm dialog box is being used. Double-click the Wireless ...: Access Point's MAC Address IP Address: WRC-1000's IP Address SSID: SSID Channel: The channel that is displayed again. 3. If the Password input window does not appear, see the section, Configuration window, in Chapter 5, Troubleshooting. 4-4 WEB CONFIGURATION User's Manual 4) When the WRC Finder locates a Wireless Routing Center, the...

User Manual
Page 44
The utility also displays an error message if you make settings with the Web configuration utility, fields related to a selected option will be displayed to avoid conflicting setting. User's Manual Figure 4-6 Configuration window When you enter an invalid value. 4-6 WEB CONFIGURATION
The utility also displays an error message if you make settings with the Web configuration utility, fields related to a selected option will be displayed to avoid conflicting setting. User's Manual Figure 4-6 Configuration window When you enter an invalid value. 4-6 WEB CONFIGURATION