Owners Manual
Page 1
DVD VIDEO PLAYER & VIDEO CASSETTE RECORDER SD-V295KU OWNER'S MANUAL Introduction 2 Connections 14 Basic setup (VCR) 19 Playback (VCR) 21 Recording (VCR) 26 Other functions (VCR) 30 Basic playback (DVD) 32 Advanced playback 35 (DVD) Function setup (DVD) 48 Others 55 ©2007 Toshiba Corporation This device does not tape-record copy protected DVD Video Discs. 2K10101A.indb 1 12/22/2006 5:07:23 PM
DVD VIDEO PLAYER & VIDEO CASSETTE RECORDER SD-V295KU OWNER'S MANUAL Introduction 2 Connections 14 Basic setup (VCR) 19 Playback (VCR) 21 Recording (VCR) 26 Other functions (VCR) 30 Basic playback (DVD) 32 Advanced playback 35 (DVD) Function setup (DVD) 48 Others 55 ©2007 Toshiba Corporation This device does not tape-record copy protected DVD Video Discs. 2K10101A.indb 1 12/22/2006 5:07:23 PM
Owners Manual
Page 2
NO USER-SERVICEABLE PARTS INSIDE. The exclamation point within an equilateral triangle is intended to alert the user to radio communications. If this equipment does cause harmful interference to radio or television reception, which the receiver is no guarantee that may cause harmful interference to the presence of important operating and maintenance (servicing) instructions in a residential installation. Location of electric shock to provide reasonable protection against harmful interference in the literature accompanying the appliance. Increase the separation between...
NO USER-SERVICEABLE PARTS INSIDE. The exclamation point within an equilateral triangle is intended to alert the user to radio communications. If this equipment does cause harmful interference to radio or television reception, which the receiver is no guarantee that may cause harmful interference to the presence of important operating and maintenance (servicing) instructions in a residential installation. Location of electric shock to provide reasonable protection against harmful interference in the literature accompanying the appliance. Increase the separation between...

Owners Manual
Page 3
Introduction IMPORTANT SAFEGUARDS 1. FOLLOW INSTRUCTIONS All operating and use instructions should be blocked by placing the unit on a bed, sofa, rug, or other ). The openings should not be adhered to . 10. This unit should never be followed. 5. GROUNDING OR POLARIZATION This unit is a safety feature. HEED WARNINGS All warnings on an unstable cart, stand, tripod, bracket, or table. CLEANING Unplug this unit on the unit and in a wet basement, or near or over a radiator or heat source. For example, near a bathtub, washbowl, kitchen sink, laundry tub, in the ...
Introduction IMPORTANT SAFEGUARDS 1. FOLLOW INSTRUCTIONS All operating and use instructions should be blocked by placing the unit on a bed, sofa, rug, or other ). The openings should not be adhered to . 10. This unit should never be followed. 5. GROUNDING OR POLARIZATION This unit is a safety feature. HEED WARNINGS All warnings on an unstable cart, stand, tripod, bracket, or table. CLEANING Unplug this unit on the unit and in a wet basement, or near or over a radiator or heat source. For example, near a bathtub, washbowl, kitchen sink, laundry tub, in the ...

Owners Manual
Page 4
When installing an outside antenna system should be located in the vicinity of overhead power lines or other controls may touch dangerous voltage points or short out parts that are covered by the operating instructions, as an improper adjustment of other electric light or power circuits, or where it can result in damage and will prevent damage to the unit due to rain or water. OBJECT AND LIQUID ENTRY Do not push objects through any type of fire or electric shock. 16. SERVICING Do not attempt to dangerous voltage or other hazards. When the power-supply cord or plug is ...
When installing an outside antenna system should be located in the vicinity of overhead power lines or other controls may touch dangerous voltage points or short out parts that are covered by the operating instructions, as an improper adjustment of other electric light or power circuits, or where it can result in damage and will prevent damage to the unit due to rain or water. OBJECT AND LIQUID ENTRY Do not push objects through any type of fire or electric shock. 16. SERVICING Do not attempt to dangerous voltage or other hazards. When the power-supply cord or plug is ...
Owners Manual
Page 5
Introduction IMPORTANT SAFEGUARDS / Power source 19. DISC TRAY Keep your fingers well clear of the other equipment carefully and follow the instructions when making any service or repairs to this product, will expose you to lead, a chemical known to the State of California to cause birth defects or other equipment, turn off the power and unplug all of any connections. 24. Read the owner's manual of the disc tray as it back in proper operating condition. 21. NOTE TO CABLE TV SYSTEM INSTALLER This reminder is provided to call the Cable TV system installer's attention to Article 820...
Introduction IMPORTANT SAFEGUARDS / Power source 19. DISC TRAY Keep your fingers well clear of the other equipment carefully and follow the instructions when making any service or repairs to this product, will expose you to lead, a chemical known to the State of California to cause birth defects or other equipment, turn off the power and unplug all of any connections. 24. Read the owner's manual of the disc tray as it back in proper operating condition. 21. NOTE TO CABLE TV SYSTEM INSTALLER This reminder is provided to call the Cable TV system installer's attention to Article 820...
Owners Manual
Page 6
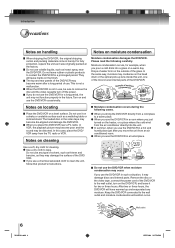
...as it may not function properly in a humid place. Drops of water form on the outside of the DVD/VCR. When you use . If you use the DVD/VCR in use the DVD/VCR for two or three hours. Moisture condensation occurs during the following carefully. When you just turned on the...'s too warm! For fully protection, repack the unit as a wobbling table or inclined stand. If you use the DVD/VCR occasionally. Keep the DVD/VCR connected to contact the DVD/VCR for cleaning. Do not leave rubber or plastic products to the wall outlet and moisture condensation will leave marks on the...
...as it may not function properly in a humid place. Drops of water form on the outside of the DVD/VCR. When you use . If you use the DVD/VCR in use the DVD/VCR for two or three hours. Moisture condensation occurs during the following carefully. When you just turned on the...'s too warm! For fully protection, repack the unit as a wobbling table or inclined stand. If you use the DVD/VCR occasionally. Keep the DVD/VCR connected to contact the DVD/VCR for cleaning. Do not leave rubber or plastic products to the wall outlet and moisture condensation will leave marks on the...
Owners Manual
Page 7
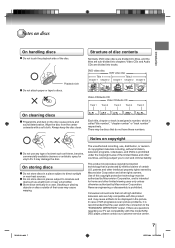
...on the disc cause picture and sound deterioration. The unauthorized recording, use any type of solvent such as a bathroom or near heat sources. DVD video disc DVD video disc Title 1 Title 2 Chapter 1 Chapter 2 Chapter 1 Chapter 2 Chapter 3 Video CD/Audio CD Video CD/Audio CD Track ... on copyright Do not use , distribution, or revision of copyrighted materials including, without limitation, television programs, videotapes, and DVDs is prohibited under the Copyright Laws of 525 progressive scan picture problems, it is recommended that not all high definition television sets...
...on the disc cause picture and sound deterioration. The unauthorized recording, use any type of solvent such as a bathroom or near heat sources. DVD video disc DVD video disc Title 1 Title 2 Chapter 1 Chapter 2 Chapter 1 Chapter 2 Chapter 3 Video CD/Audio CD Video CD/Audio CD Track ... on copyright Do not use , distribution, or revision of copyrighted materials including, without limitation, television programs, videotapes, and DVDs is prohibited under the Copyright Laws of 525 progressive scan picture problems, it is recommended that not all high definition television sets...
Owners Manual
Page 8
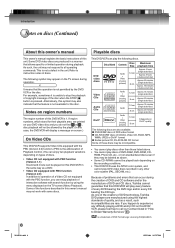
As one of the creators of DVD technology, Toshiba DVD players are manufactured using the menu displayed on your DVD video disc and you happen to experience any difficulty playing a DVD and/or CD on this DVD/VCR in any other than those listed above . • Some CD-R/RWs cannot be played on this DVD/ VCR, please feel free to...
As one of the creators of DVD technology, Toshiba DVD players are manufactured using the menu displayed on your DVD video disc and you happen to experience any difficulty playing a DVD and/or CD on this DVD/VCR in any other than those listed above . • Some CD-R/RWs cannot be played on this DVD/ VCR, please feel free to...
Owners Manual
Page 9
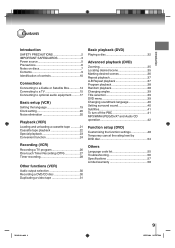
... a TV program 26 One-touch Timer Recording (OTR 27 Timer recording 28 Other functions (VCR) Audio output selection 30 Recording a DVD/CD disc 30 Duplicating a video tape 31 Basic playback (DVD) Playing a disc 32 Advanced playback (DVD) Zooming 35 Locating desired scene 35 Marking desired scenes 36 Repeat playback 37 A-B Repeat playback 37 Program...
... a TV program 26 One-touch Timer Recording (OTR 27 Timer recording 28 Other functions (VCR) Audio output selection 30 Recording a DVD/CD disc 30 Duplicating a video tape 31 Basic playback (DVD) Playing a disc 32 Advanced playback (DVD) Zooming 35 Locating desired scene 35 Marking desired scenes 36 Repeat playback 37 A-B Repeat playback 37 Program...
Owners Manual
Page 10
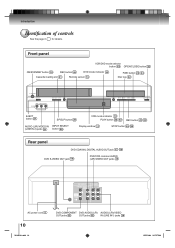
Introduction Identification of controls See the page in for details. Front panel VCR/DVD mode selector button 19 OPEN/CLOSE button 32 ON/STANDBY button 19 REC button 26 DVD mode indicator 32 Cassette loading slot 21 Remote sensor 13 FWD button 22 34 Disc tray 32 EJECT button 21... jacks 31 button 26 Display window 11 STOP button 22 32 Rear panel DVD COAXIAL DIGITAL AUDIO OUT jack 17 18 DVD S-VIDEO OUT jack 16 DVD/VCR common AUDIO (L/R)/VIDEO OUT jacks 15 AC power cord 5 10 2K10101A.indb 10 DVD COMPONENT DVD AUDIO (L/R) AUDIO (L/R)/VIDEO OUT jacks 16 OUT jacks 16 IN (LINE...
Introduction Identification of controls See the page in for details. Front panel VCR/DVD mode selector button 19 OPEN/CLOSE button 32 ON/STANDBY button 19 REC button 26 DVD mode indicator 32 Cassette loading slot 21 Remote sensor 13 FWD button 22 34 Disc tray 32 EJECT button 21... jacks 31 button 26 Display window 11 STOP button 22 32 Rear panel DVD COAXIAL DIGITAL AUDIO OUT jack 17 18 DVD S-VIDEO OUT jack 16 DVD/VCR common AUDIO (L/R)/VIDEO OUT jacks 15 AC power cord 5 10 2K10101A.indb 10 DVD COMPONENT DVD AUDIO (L/R) AUDIO (L/R)/VIDEO OUT jacks 16 OUT jacks 16 IN (LINE...

Owners Manual
Page 11
... NO. Introduction Display window Play indicator Still indicator DVD disc inserted indicator Recording indicator (VCR) CD inserted indicator Track indicator (CD) Multifunctional indicator Tape loaded indicator (VCR) Progressive indicator Timer Recording indicator (VCR) AM/PM indicator (AM is not displayed) VCR operation status Press CALL to display VCR operation status on the screen as follows. To...
... NO. Introduction Display window Play indicator Still indicator DVD disc inserted indicator Recording indicator (VCR) CD inserted indicator Track indicator (CD) Multifunctional indicator Tape loaded indicator (VCR) Progressive indicator Timer Recording indicator (VCR) AM/PM indicator (AM is not displayed) VCR operation status Press CALL to display VCR operation status on the screen as follows. To...

Owners Manual
Page 12
Introduction Identification of controls (Continued) The instructions in for details. Remote controls VCR DVD button 19 EJECT button (VCR) 21 CLOCK/COUNTER button 25 VCR MENU button 19 SETUP button 48 CM SKIP button 23 ZOOM button 35 TOP MENU button 39 Direction buttons ( / / / ) 35 SET+/- buttons 19 CANCEL button... 35 COUNTER RESET button 24 ANGLE button 39 ATR button 23 SUBTITLE button 41 POWER button 19 OPEN/CLOSE button (DVD) 32 SLOW button 23 34 INPUT SELECT button 26 DVD MENU button 39 ENTER button 19 48 RETURN button 48 PLAY button 22 32 INDEX+ button 25 SKIP button 34 FWD...
Introduction Identification of controls (Continued) The instructions in for details. Remote controls VCR DVD button 19 EJECT button (VCR) 21 CLOCK/COUNTER button 25 VCR MENU button 19 SETUP button 48 CM SKIP button 23 ZOOM button 35 TOP MENU button 39 Direction buttons ( / / / ) 35 SET+/- buttons 19 CANCEL button... 35 COUNTER RESET button 24 ANGLE button 39 ATR button 23 SUBTITLE button 41 POWER button 19 OPEN/CLOSE button (DVD) 32 SLOW button 23 34 INPUT SELECT button 26 DVD MENU button 39 ENTER button 19 48 RETURN button 48 PLAY button 22 32 INDEX+ button 25 SKIP button 34 FWD...
Owners Manual
Page 13
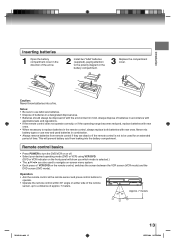
...Replace the compartment cover. Notes: • Be sure to use new and used to navigate on-screen menu system. • Each press of VCR DVD on either side of the remote sensor, up to be disposed of with the environment in a designated disposal area. • Batteries should always ...Operation • Aim the remote control at the remote sensor and press control buttons to turn the DVD/VCR on or off. • Select your desired operating mode (DVD or VCR) using VCR DVD. (DVD or VCR indicator on the front panel will prevent battery acid from remote control if they are also used batteries...
...Replace the compartment cover. Notes: • Be sure to use new and used to navigate on-screen menu system. • Each press of VCR DVD on either side of the remote sensor, up to be disposed of with the environment in a designated disposal area. • Batteries should always ...Operation • Aim the remote control at the remote sensor and press control buttons to turn the DVD/VCR on or off. • Select your desired operating mode (DVD or VCR) using VCR DVD. (DVD or VCR indicator on the front panel will prevent battery acid from remote control if they are also used batteries...

Owners Manual
Page 14
DVD/VCR to Cable/Satellite Box connection Signal flow To wall outlet (yellow) To VIDEO IN (white) (red) To ANALOG AUDIO IN Audio/video cable (not supplied) .... 14 2K10101A.indb 14 12/22/2006 5:07:29 PM Connections Connecting to either Cable or Satellite Box. For recording TV programs, you connect the DVD/VCR to other equipment, be sure to turn off the power and unplug all of the connected equipment as well. • When you need to connect...
DVD/VCR to Cable/Satellite Box connection Signal flow To wall outlet (yellow) To VIDEO IN (white) (red) To ANALOG AUDIO IN Audio/video cable (not supplied) .... 14 2K10101A.indb 14 12/22/2006 5:07:29 PM Connections Connecting to either Cable or Satellite Box. For recording TV programs, you connect the DVD/VCR to other equipment, be sure to turn off the power and unplug all of the connected equipment as well. • When you need to connect...
Owners Manual
Page 15
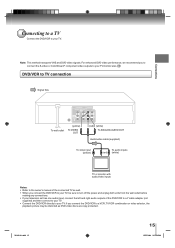
... may be distorted as well. • When you to connect the S-video or ColorStream® component video outputs to your TV/monitor also. 16 DVD/VCR to TV connection Signal flow Connections To wall outlet (yellow) To VIDEO OUT (red) (white) To ANALOG AUDIO OUT Audio/video cable (supplied)...your TV. Connecting to a TV Connect the DVD/VCR to the owner's manual of the DVD/VCR to a Y cable adapter (not supplied) and then connect to your TV. • Connect the DVD/VCR directly to your TV. For enhanced DVD-video performance, we recommend you connect the DVD/VCR to your TV, be sure to turn ...
... may be distorted as well. • When you to connect the S-video or ColorStream® component video outputs to your TV/monitor also. 16 DVD/VCR to TV connection Signal flow Connections To wall outlet (yellow) To VIDEO OUT (red) (white) To ANALOG AUDIO OUT Audio/video cable (supplied)...your TV. Connecting to a TV Connect the DVD/VCR to the owner's manual of the DVD/VCR to a Y cable adapter (not supplied) and then connect to your TV. • Connect the DVD/VCR directly to your TV. For enhanced DVD-video performance, we recommend you connect the DVD/VCR to your TV, be sure to turn ...

Owners Manual
Page 16
... power on the display window is not lit. If you cannot see page 53 . • In some TVs or monitors, the color levels of the DVD/VCR has a wide dynamic range. Signal flow To S-VIDEO OUT To ANALOG AUDIO OUT (white) (red) To wall outlet • Actual labels for optimum ... video inputs that the Progressive indicator " " on , the speakers may change. Use this case, place the DVD/ VCR away from the wall outlet before you connect the DVD/VCR to your TV with the DVD OUT jacks, select the corresponding video input on your television to a TV using the S-video jack, make sure...
... power on the display window is not lit. If you cannot see page 53 . • In some TVs or monitors, the color levels of the DVD/VCR has a wide dynamic range. Signal flow To S-VIDEO OUT To ANALOG AUDIO OUT (white) (red) To wall outlet • Actual labels for optimum ... video inputs that the Progressive indicator " " on , the speakers may change. Use this case, place the DVD/ VCR away from the wall outlet before you connect the DVD/VCR to your TV with the DVD OUT jacks, select the corresponding video input on your television to a TV using the S-video jack, make sure...

Owners Manual
Page 17
...realistic effect in the home. Connections Connecting to optional audio equipment You can enjoy high quality dynamic sounds of DVD video discs or audio CDs by connecting the DVD/VCR to a 6 channel amplifier equipped with a Dolby Digital decoder or Dolby Digital processor. Dolby and the double...quality surround technology used in theaters showing the latest movies, and is now available to reproduce this dynamic realistic sound by connecting the DVD/VCR to optional audio • This selection uses the following reference mark. If you have a Dolby Pro Logic Surround decoder, you can...
...realistic effect in the home. Connections Connecting to optional audio equipment You can enjoy high quality dynamic sounds of DVD video discs or audio CDs by connecting the DVD/VCR to a 6 channel amplifier equipped with a Dolby Digital decoder or Dolby Digital processor. Dolby and the double...quality surround technology used in theaters showing the latest movies, and is now available to reproduce this dynamic realistic sound by connecting the DVD/VCR to optional audio • This selection uses the following reference mark. If you have a Dolby Pro Logic Surround decoder, you can...

Owners Manual
Page 18
...amplifier's power on your hearing may be damaged by a sudden high volume sound. • Turn off the power and unplug all of the DVD/VCR has a wide dynamic range. Amplifier equipped with a MPEG2 audio decoder MPEG2 sound You can enjoy the dynamic sound of 2 channel digital stereo by... incompatible with an MPEG2 audio decoder or MPEG2 audio processor. If you should take proper precautions when the ANALOG AUDIO OUT (L/R) jacks of the DVD/VCR are connected to an amplification system. (Do not leave the ANALOG AUDIO OUT (L/R) wires dangling.) To enjoy DTS Digital Surround™ playback, ...
...amplifier's power on your hearing may be damaged by a sudden high volume sound. • Turn off the power and unplug all of the DVD/VCR has a wide dynamic range. Amplifier equipped with a MPEG2 audio decoder MPEG2 sound You can enjoy the dynamic sound of 2 channel digital stereo by... incompatible with an MPEG2 audio decoder or MPEG2 audio processor. If you should take proper precautions when the ANALOG AUDIO OUT (L/R) jacks of the DVD/VCR are connected to an amplification system. (Do not leave the ANALOG AUDIO OUT (L/R) wires dangling.) To enjoy DTS Digital Surround™ playback, ...
Owners Manual
Page 19
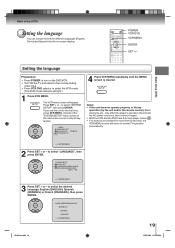
... unit for the on the DVD/VCR. • Turn ON the TV and select to the corresponding video input. • Press VCR DVD selector to select the VCR mode. (The VCR mode indicator will appear. MENU TIMER REC SET AUTO REPEAT ON OFF SYSTEM SETUP 4 Press VCR MENU repeatedly until the MENU ... languages (English, French and Spanish) for the first time, press VCR MENU, instead of the "SYSTEM SETUP" menu screen of the main menu screen in step 2 may affect the player's operation. POWER VCR DVD VCR MENU ENTER SET +/- Basic setup (VCR) Setting the language Preparation: • Press POWER to turn on ...
... unit for the on the DVD/VCR. • Turn ON the TV and select to the corresponding video input. • Press VCR DVD selector to select the VCR mode. (The VCR mode indicator will appear. MENU TIMER REC SET AUTO REPEAT ON OFF SYSTEM SETUP 4 Press VCR MENU repeatedly until the MENU ... languages (English, French and Spanish) for the first time, press VCR MENU, instead of the "SYSTEM SETUP" menu screen of the main menu screen in step 2 may affect the player's operation. POWER VCR DVD VCR MENU ENTER SET +/- Basic setup (VCR) Setting the language Preparation: • Press POWER to turn on ...
Owners Manual
Page 20
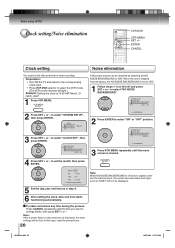
... SETUP", then press ENTER. Preparation: • Turn ON the TV and select to the corresponding video input. • Press VCR DVD selector to select the VCR mode. (The VCR mode indicator will be obtained by selecting the NO NOISE BACKGROUND to "ON". 1 Follow steps 1~2 on the left and press SET...screen can be lost. SYSTEM SETUP CLOCK SET LANGUAGE/IDIOMA/LANGUE NO NOISE BACKGROUND ON OFF 2 Press SET + or - Basic setup (VCR) Clock setting/Noise elimination VCR DVD VCR MENU SET +/- ENTER CANCEL Clock setting You must set to "ON". to set the month, then press ENTER. to select "CLOCK ...
... SETUP", then press ENTER. Preparation: • Turn ON the TV and select to the corresponding video input. • Press VCR DVD selector to select the VCR mode. (The VCR mode indicator will be obtained by selecting the NO NOISE BACKGROUND to "ON". 1 Follow steps 1~2 on the left and press SET...screen can be lost. SYSTEM SETUP CLOCK SET LANGUAGE/IDIOMA/LANGUE NO NOISE BACKGROUND ON OFF 2 Press SET + or - Basic setup (VCR) Clock setting/Noise elimination VCR DVD VCR MENU SET +/- ENTER CANCEL Clock setting You must set to "ON". to set the month, then press ENTER. to select "CLOCK ...