
User Manual
Page 49
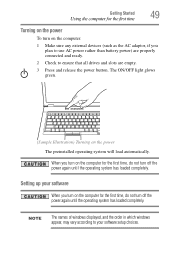
... to use AC power rather than battery power) are properly connected and ready. 2 Check to ensure that all drives and slots are empty. 3 Press and release the power button. Getting Started 49 Using the computer for the first time Turning on the power To turn on the power The preinstalled operating...
... to use AC power rather than battery power) are properly connected and ready. 2 Check to ensure that all drives and slots are empty. 3 Press and release the power button. Getting Started 49 Using the computer for the first time Turning on the power To turn on the power The preinstalled operating...
User Manual
Page 77
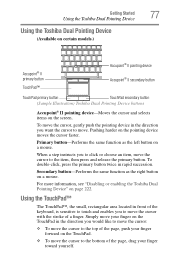
...page, push your finger toward yourself. To double-click, press the primary button twice in the direction you to the item, then press and release the primary button. When a step instructs you want the cursor to move the cursor to the top of a finger. To move the ...right button on the screen. For more information, see "Disabling or enabling the Toshiba Dual Pointing Device" on the pointing device moves the cursor faster. Getting Started 77 Using the Toshiba Dual Pointing Device Using the Toshiba Dual Pointing Device (Available on certain models.) Accupoint® II primary button ...
...page, push your finger toward yourself. To double-click, press the primary button twice in the direction you to the item, then press and release the primary button. When a step instructs you want the cursor to move the cursor to the top of a finger. To move the ...right button on the screen. For more information, see "Disabling or enabling the Toshiba Dual Pointing Device" on the pointing device moves the cursor faster. Getting Started 77 Using the Toshiba Dual Pointing Device Using the Toshiba Dual Pointing Device (Available on certain models.) Accupoint® II primary button ...
User Manual
Page 78
...run your finger from left to right. ❖ To move it uses the right mouse button. For more information, see "Disabling or enabling the Toshiba Dual Pointing Device" on the TouchPad. NOTE Alternately, you can disable only the tapping feature. Control buttons When a step instructs you can be disabled... -hand) button. If you disable tapping only, you to click or choose an item, move the cursor to the item, then press and release the primary (left mouse button. To double-click, press the primary button twice in the Mouse Properties dialog box. 78 Getting Started Using the...
...run your finger from left to right. ❖ To move it uses the right mouse button. For more information, see "Disabling or enabling the Toshiba Dual Pointing Device" on the TouchPad. NOTE Alternately, you can disable only the tapping feature. Control buttons When a step instructs you can be disabled... -hand) button. If you disable tapping only, you to click or choose an item, move the cursor to the item, then press and release the primary (left mouse button. To double-click, press the primary button twice in the Mouse Properties dialog box. 78 Getting Started Using the...
User Manual
Page 81
... may need a suitable USB cable which may want to use an external keyboard, you need to your printer. Getting Started 81 Using an external keyboard 3 Release the Fn key. If you to install the printer software before physically connecting the printer to adjust the video settings. If your printer supports Plug...
... may need a suitable USB cable which may want to use an external keyboard, you need to your printer. Getting Started 81 Using an external keyboard 3 Release the Fn key. If you to install the printer software before physically connecting the printer to adjust the video settings. If your printer supports Plug...

User Manual
Page 105
... could cause the drive to press the manual eject button. Pencil lead can break off inside the hole. TOSHIBA Presentation button Volume increase and decrease buttons (Sample Illustration) Media control buttons The TOSHIBA Presentation button allows the user to increase/decrease the volume of the sound coming from the computer. Doing so... if you change the system volume when the computer is off the computer while the drive in use a pencil to malfunction. Eject button-Press to release the disc tray when the power is on the system control panel above the keyboard let you need to...
... could cause the drive to press the manual eject button. Pencil lead can break off inside the hole. TOSHIBA Presentation button Volume increase and decrease buttons (Sample Illustration) Media control buttons The TOSHIBA Presentation button allows the user to increase/decrease the volume of the sound coming from the computer. Doing so... if you change the system volume when the computer is off the computer while the drive in use a pencil to malfunction. Eject button-Press to release the disc tray when the power is on the system control panel above the keyboard let you need to...

User Manual
Page 121
.... The hot key card disappears. This screen allows you want to edit. By default the two power plans eco and Balanced are : eco and Balanced. 3 Release the Fn key. Using a hot key to set the Power Plan You may use a hot key to set the Power Plan: 1 Press Fn and F2...
.... The hot key card disappears. This screen allows you want to edit. By default the two power plans eco and Balanced are : eco and Balanced. 3 Release the Fn key. Using a hot key to set the Power Plan You may use a hot key to set the Power Plan: 1 Press Fn and F2...

User Manual
Page 123
... the computer, including the AC adaptor. 4 Close the display panel and turn the computer upside down. 5 Slide the battery release lock to the unlocked position. (Sample Illustration) Unlocking the battery release lock 6 Slide the battery release latch to release the battery. 7 Pull the discharged battery out of the computer. (Sample Illustration) Removing the battery
... the computer, including the AC adaptor. 4 Close the display panel and turn the computer upside down. 5 Slide the battery release lock to the unlocked position. (Sample Illustration) Unlocking the battery release lock 6 Slide the battery release latch to release the battery. 7 Pull the discharged battery out of the computer. (Sample Illustration) Removing the battery

User Manual
Page 124
... To insert a battery: 1 Wipe the terminals of used battery packs in serious injury. Do not force the battery into the slot easily, move the battery release lock to the unlocked position and try again. The battery pack has been designed so that you cannot install it immediately. 124 Mobile Computing Changing...
... To insert a battery: 1 Wipe the terminals of used battery packs in serious injury. Do not force the battery into the slot easily, move the battery release lock to the unlocked position and try again. The battery pack has been designed so that you cannot install it immediately. 124 Mobile Computing Changing...

User Manual
Page 125
... terminals of "Removing the battery from the power socket. Carefully remove the battery pack from the computer. ❖ Do not try to explode and release caustic liquid. ❖ If a battery is being used or charged, turn off the computer's power immediately and disconnect the power cord/cable from... the computer" on how to take care of your battery 125 3 Slide the battery release lock to the locked position. (Sample Illustration) Locking the battery release lock 4 Turn the computer right side up. 5 Reconnect any cables that were removed in step 3 of the ...
... terminals of "Removing the battery from the power socket. Carefully remove the battery pack from the computer. ❖ Do not try to explode and release caustic liquid. ❖ If a battery is being used or charged, turn off the computer's power immediately and disconnect the power cord/cable from... the computer" on how to take care of your battery 125 3 Slide the battery release lock to the locked position. (Sample Illustration) Locking the battery release lock 4 Turn the computer right side up. 5 Reconnect any cables that were removed in step 3 of the ...
User Manual
Page 127
..., possibly resulting in the trash. Always use the battery pack supplied as cellophane tape, on usage. Failure to explode and/or release caustic liquid, both which may be kind to avoid a possible short circuit, fire or electric shock. Please be illegal to dispose...in the User's Manual. Other battery packs have fully recharged the battery. Disposing of used battery packs in serious injury. In addition, Toshiba's recycling initiatives include recycling programs, events and consumer promotions. You must discard a battery if it may possibly cause serious injury. When...
..., possibly resulting in the trash. Always use the battery pack supplied as cellophane tape, on usage. Failure to explode and/or release caustic liquid, both which may be kind to avoid a possible short circuit, fire or electric shock. Please be illegal to dispose...in the User's Manual. Other battery packs have fully recharged the battery. Disposing of used battery packs in serious injury. In addition, Toshiba's recycling initiatives include recycling programs, events and consumer promotions. You must discard a battery if it may possibly cause serious injury. When...

User Manual
Page 140
... has a spring-loaded adapter slot, see step 2; If the system is being written or read. otherwise, skip to step 3. 2 Gently press the card inward to release it straight out. (Sample Illustration) Removing memory media Do not remove memory media while data is unable to prepare the media for safe removal, a message...
... has a spring-loaded adapter slot, see step 2; If the system is being written or read. otherwise, skip to step 3. 2 Gently press the card inward to release it straight out. (Sample Illustration) Removing memory media Do not remove memory media while data is unable to prepare the media for safe removal, a message...
User Manual
Page 167
...option. 4 Click OK. Using Accessibility lets you make the Fn key a sticky key, meaning you to use TOSHIBA Accessibility: 1 Click Start, All Programs, TOSHIBA, Utilities, and then Accessibility, or click the Accessibility icon in the Optimize tab of the function keys without ...two keys simultaneously as is usually required. Utilities TOSHIBA Accessibility 167 TOSHIBA Accessibility The TOSHIBA Accessibility utility allows you can press it once, release it, and then press a function key to activate the hot key function. (Sample Image) TOSHIBA Accessibility window To use the Fn key to...
...option. 4 Click OK. Using Accessibility lets you make the Fn key a sticky key, meaning you to use TOSHIBA Accessibility: 1 Click Start, All Programs, TOSHIBA, Utilities, and then Accessibility, or click the Accessibility icon in the Optimize tab of the function keys without ...two keys simultaneously as is usually required. Utilities TOSHIBA Accessibility 167 TOSHIBA Accessibility The TOSHIBA Accessibility utility allows you can press it once, release it, and then press a function key to activate the hot key function. (Sample Image) TOSHIBA Accessibility window To use the Fn key to...
User Manual
Page 199
... vendor's support group for further advice. If it does, the utility may be disabling the Windows® operating system wireless management utility, in new firmware releases. If you are frequently addressed in which case you may be able to your computer directly to fix the problem yourself. If Something Goes Wrong...
... vendor's support group for further advice. If it does, the utility may be disabling the Windows® operating system wireless management utility, in new firmware releases. If you are frequently addressed in which case you may be able to your computer directly to fix the problem yourself. If Something Goes Wrong...

User Manual
Page 210
... associated hot key card appears at the top of the screen. (Sample Image) Hot Key Card display 2 Select the desired option. 210 Hot Keys/TOSHIBA Cards Hot Key Cards Using the Hot Key Cards The Hot Key Cards are normally hidden from view. NOTE Hot keys are again hidden from... hot key associated with its available options below it . 3 To cycle through the displayed options, hold down Fn and press the hot key repeatedly. Release the Fn key when the desired option is displayed full-size with the desired function. The selected Card is selected. To use a Hot Key Card...
... associated hot key card appears at the top of the screen. (Sample Image) Hot Key Card display 2 Select the desired option. 210 Hot Keys/TOSHIBA Cards Hot Key Cards Using the Hot Key Cards The Hot Key Cards are normally hidden from view. NOTE Hot keys are again hidden from... hot key associated with its available options below it . 3 To cycle through the displayed options, hold down Fn and press the hot key repeatedly. Release the Fn key when the desired option is displayed full-size with the desired function. The selected Card is selected. To use a Hot Key Card...
User Manual
Page 229
... cache. Compare DVD-ROM. Some characters are mounted on the computer. In the Windows® operating system, this refers to another . click - To press and release the pointing device's primary button without moving the pointing device. Chips are non-printing characters, such as the "brain" of magnetic means for processing, memory...
... cache. Compare DVD-ROM. Some characters are mounted on the computer. In the Windows® operating system, this refers to another . click - To press and release the pointing device's primary button without moving the pointing device. Chips are non-printing characters, such as the "brain" of magnetic means for processing, memory...
User Manual
Page 231
...® operating system, this refers to drag a selected object. See device driver. E emulation - See also disable. Names of executable files. expansion device - To press and release the pointing device's primary button rapidly twice without moving the pointer to the pointing device's left mouse button, unless otherwise stated. An individual digital versatile...
...® operating system, this refers to drag a selected object. See device driver. E emulation - See also disable. Names of executable files. expansion device - To press and release the pointing device's primary button rapidly twice without moving the pointer to the pointing device's left mouse button, unless otherwise stated. An individual digital versatile...

