
User Guide
Page 15
Contents Introduction 23 Chapter 1: Finding Your Way Around 27 Making sure you have everything 27 Finding where everything is located 28 Front with the display panel closed 28 Back with rear panel closed 29 Back with rear panel open 30 Right side 31 Left side 32 Front with the display panel open 33 Underside 35 Indicator panel lights 36 System indicator panel lights 36 Keyboard indicator panel lights 38 15
Contents Introduction 23 Chapter 1: Finding Your Way Around 27 Making sure you have everything 27 Finding where everything is located 28 Front with the display panel closed 28 Back with rear panel closed 29 Back with rear panel open 30 Right side 31 Left side 32 Front with the display panel open 33 Underside 35 Indicator panel lights 36 System indicator panel lights 36 Keyboard indicator panel lights 38 15
User Guide
Page 16
... the AC adapter 46 Charging the battery 47 Turning on the computer 48 Opening the display panel 48 Turning on the power 49 Setting up your software 50 Registering your computer with Toshiba 50 Setting up other devices 50 Turning off the computer 51 Closing the... display panel 51 Chapter 3: Connecting Other External Devices 53 Using external display devices 53 Connecting the display device 54 Directing the display output when you turn on the computer...
... the AC adapter 46 Charging the battery 47 Turning on the computer 48 Opening the display panel 48 Turning on the power 49 Setting up your software 50 Registering your computer with Toshiba 50 Setting up other devices 50 Turning off the computer 51 Closing the... display panel 51 Chapter 3: Connecting Other External Devices 53 Using external display devices 53 Connecting the display device 54 Directing the display output when you turn on the computer...

User Guide
Page 20
... playlists 155 Resuming normal playback after using playlists......... 156 Customizing WinDVD 156 Setting general properties 157 Setting audio properties 158 Setting display properties 160 Using WinDVD advanced features 161 Zooming in 165 Zooming out 165 Panning 165 Adjusting the color balance 166 Launching an... Internet browser from WinDVD 166 Getting help 166 Exiting WinDVD 166 Chapter 8: Toshiba Utilities 167 Fn-esse 168 Starting Fn-esse 168 Using the keyboard or pointing device to assign keys 170 Viewing existing key...
... playlists 155 Resuming normal playback after using playlists......... 156 Customizing WinDVD 156 Setting general properties 157 Setting audio properties 158 Setting display properties 160 Using WinDVD advanced features 161 Zooming in 165 Zooming out 165 Panning 165 Adjusting the color balance 166 Launching an... Internet browser from WinDVD 166 Getting help 166 Exiting WinDVD 166 Chapter 8: Toshiba Utilities 167 Fn-esse 168 Starting Fn-esse 168 Using the keyboard or pointing device to assign keys 170 Viewing existing key...

User Guide
Page 21
... action 201 Resolving hardware conflicts on your own 201 Memory card problems 204 Power and the batteries 205 Keyboard problems 206 AccuPoint II problems 208 Display problems 208 Disk drive problems 210 Modem problems 212 Problems with the CD-ROM or DVD-ROM drive......... 213 Sound system problems 214 Optional devices...
... action 201 Resolving hardware conflicts on your own 201 Memory card problems 204 Power and the batteries 205 Keyboard problems 206 AccuPoint II problems 208 Display problems 208 Disk drive problems 210 Modem problems 212 Problems with the CD-ROM or DVD-ROM drive......... 213 Sound system problems 214 Optional devices...
User Guide
Page 28
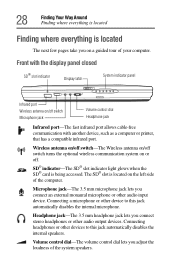
... or off switch Microphone jack Volume control dial Headphone jack Infrared port-The fast infrared port allows cable-free communication with the display panel closed SD® slot indicator Display latch System indicator panel Infrared port Wireless antenna on the left side of the computer. The SD® slot is being accessed...
... or off switch Microphone jack Volume control dial Headphone jack Infrared port-The fast infrared port allows cable-free communication with the display panel closed SD® slot indicator Display latch System indicator panel Infrared port Wireless antenna on the left side of the computer. The SD® slot is being accessed...

User Guide
Page 29
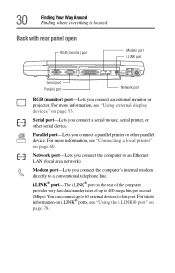
... "System indicator panel lights" on page 36 for a description of each of peripherals, which means that provide information about various system functions. Back with the display panel open" on . _ + DC IN -Lets you connect an optional PS/2-compatible mouse or keyboard. You can use an optional Y-cable to connect both a mouse... lights that components may be plugged and unplugged while the computer is on page 33. System indicator panel-The system indicator panel is located 29 Display latch-Sliding the display latch opens the computer...
... "System indicator panel lights" on page 36 for a description of each of peripherals, which means that provide information about various system functions. Back with the display panel open" on . _ + DC IN -Lets you connect an optional PS/2-compatible mouse or keyboard. You can use an optional Y-cable to connect both a mouse... lights that components may be plugged and unplugged while the computer is on page 33. System indicator panel-The system indicator panel is located 29 Display latch-Sliding the display latch opens the computer...
User Guide
Page 30
For more information on i.LINK® ports, see "Using external display devices" on page 78. For more information, see "Connecting a local printer" on the rear of the computer provides very fast data transfer rates of up ...
For more information on i.LINK® ports, see "Using external display devices" on page 78. For more information, see "Connecting a local printer" on the rear of the computer provides very fast data transfer rates of up ...

User Guide
Page 33
... button Speaker TOSHIBA Console button CapsLock indicator AccuPoint II pointing device AccuPoint II buttons Keyboard indicator panel Programmable buttons System indicator panel Power button -The power button is located 33 Front with the display panel open To view the front of the computer with the display panel open... angle. Finding Your Way Around Finding where everything is used to turn on power to the computer. CAUTION: To avoid damaging the display panel, be careful when opening and closing it to lift the computer. For more information, see "Turning on the computer" on page...
... button Speaker TOSHIBA Console button CapsLock indicator AccuPoint II pointing device AccuPoint II buttons Keyboard indicator panel Programmable buttons System indicator panel Power button -The power button is located 33 Front with the display panel open To view the front of the computer with the display panel open... angle. Finding Your Way Around Finding where everything is used to turn on power to the computer. CAUTION: To avoid damaging the display panel, be careful when opening and closing it to lift the computer. For more information, see "Turning on the computer" on page...

User Guide
Page 34
34 Finding Your Way Around Finding where everything is located Screen-The computer's screen is a liquid crystal display (LCD) that provides clear, sharp images. AccuPoint® II pointing device-This device combines the function of a mouse with the convenience...status information about various keyboard functions. See "System indicator panel lights" on page 38 for a description of the panel lights. TOSHIBA Console button-This button activates the Toshiba Console. See "Keyboard indicator panel lights" on page 36 for a description of each panel light. For more information, see...
34 Finding Your Way Around Finding where everything is located Screen-The computer's screen is a liquid crystal display (LCD) that provides clear, sharp images. AccuPoint® II pointing device-This device combines the function of a mouse with the convenience...status information about various keyboard functions. See "System indicator panel lights" on page 38 for a description of the panel lights. TOSHIBA Console button-This button activates the Toshiba Console. See "Keyboard indicator panel lights" on page 36 for a description of each panel light. For more information, see...

User Guide
Page 36
Indicator panel lights Two sets of indicator lights, the system indicator panel and the keyboard indicator lights, display the current state of the main battery. ❖ Flashes amber when you are running on battery power and the battery charge is running low. ❖ ...
Indicator panel lights Two sets of indicator lights, the system indicator panel and the keyboard indicator lights, display the current state of the main battery. ❖ Flashes amber when you are running on battery power and the battery charge is running low. ❖ ...

User Guide
Page 43
... or lean back too far. Use tinted windows or shades to reduce glare. ❖ Avoid placing your computer in front of the display and reduce eyestrain. ❖ Position the display panel or external monitor so that your eyes. Keep them in your hands, wrists, and arms to improve circulation. If possible, schedule...
... or lean back too far. Use tinted windows or shades to reduce glare. ❖ Avoid placing your computer in front of the display and reduce eyestrain. ❖ Position the display panel or external monitor so that your eyes. Keep them in your hands, wrists, and arms to improve circulation. If possible, schedule...

User Guide
Page 45
... a local printer. Your computer comes with a rechargeable battery pack that must be sure to complete "Setting up your software" on page 50. See "Using external display devices" on page 64 ❖ Connect a mouse. See "Using an external keyboard" on page 46. Getting Started Setting up your computer 45 Setting up your...
... a local printer. Your computer comes with a rechargeable battery pack that must be sure to complete "Setting up your software" on page 50. See "Using external display devices" on page 64 ❖ Connect a mouse. See "Using an external keyboard" on page 46. Getting Started Setting up your computer 45 Setting up your...

User Guide
Page 48
...Once the battery is charged for more information on battery use, see "Running the computer on battery power" on page 114. Opening the display panel 1 Slide the display latch to turn it on , the battery will charge in the Slim SelectBay, charging time will be longer. 48 Getting Started Turning on ... full power. For more than a few hours at a time. CAUTION: To avoid damaging the display panel, do not force it beyond the point where it . If you to the right. 2 Lift the display panel. Turning on the computer The computer is on and begin using it moves easily, and never...
...Once the battery is charged for more information on battery use, see "Running the computer on battery power" on page 114. Opening the display panel 1 Slide the display latch to turn it on , the battery will charge in the Slim SelectBay, charging time will be longer. 48 Getting Started Turning on ... full power. For more than a few hours at a time. CAUTION: To avoid damaging the display panel, do not force it beyond the point where it . If you to the right. 2 Lift the display panel. Turning on the computer The computer is on and begin using it moves easily, and never...

User Guide
Page 51
... and result in loss of the computer. Doing so may take up to three hours to keep dust and dirt out of data. Closing the display panel When you are finished, shut the computer down when connected to fully charge the main battery. If you close the... display panel to recharge the main battery. Guidelines for turning off the computer: ❖ If you have the LCD power-saver feature set, the LCD panel ...
... and result in loss of the computer. Doing so may take up to three hours to keep dust and dirt out of data. Closing the display panel When you are finished, shut the computer down when connected to fully charge the main battery. If you close the... display panel to recharge the main battery. Guidelines for turning off the computer: ❖ If you have the LCD power-saver feature set, the LCD panel ...

User Guide
Page 53
... to one of your operating system and devices. 53 Connect a television, video projector, monitor or other display device and then configure your computer for your Tecra® 9100 Series computer. Chapter 3 Connecting Other External Devices This chapter describes how to connect devices that can also... connect three different types of external display devices to the documentation for the type of device you...
... to one of your operating system and devices. 53 Connect a television, video projector, monitor or other display device and then configure your computer for your Tecra® 9100 Series computer. Chapter 3 Connecting Other External Devices This chapter describes how to connect devices that can also... connect three different types of external display devices to the documentation for the type of device you...

User Guide
Page 54
Connecting to "Connecting an external monitor or projector" on page 55. For the best video quality, always use a properly shielded cable. HINT: Toshiba recommends using a cable no longer than 20 feet (approximately 6 meters). To connect a device to the video-out port, you 'll need to purchase ...in a dull or fuzzy picture, poor color, ghosting, video noise, or loss of video. 54 Connecting Other External Devices Using external display devices Connecting the display device If you're connecting a television or other end of the video cable to the video-out port on the left side of the...
Connecting to "Connecting an external monitor or projector" on page 55. For the best video quality, always use a properly shielded cable. HINT: Toshiba recommends using a cable no longer than 20 feet (approximately 6 meters). To connect a device to the video-out port, you 'll need to purchase ...in a dull or fuzzy picture, poor color, ghosting, video noise, or loss of video. 54 Connecting Other External Devices Using external display devices Connecting the display device If you're connecting a television or other end of the video cable to the video-out port on the left side of the...

User Guide
Page 55
...cable to the RGB port on the external device. 4 Set the display mode by pressing Fn + F5, or by setting the Display Properties settings. Connecting an external monitor or projector You can choose to use the internal display only, the external device only, or both simultaneously. For more information,... the computer. 2 Connect the device's power cable to your computer if you want takes effect. The quickest way to change the display output settings is to use the display hot key (Fn + F5): 1 Press Fn and F5 simultaneously. 2 While holding down Fn, press F5 repeatedly until the setting...
...cable to the RGB port on the external device. 4 Set the display mode by pressing Fn + F5, or by setting the Display Properties settings. Connecting an external monitor or projector You can choose to use the internal display only, the external device only, or both simultaneously. For more information,... the computer. 2 Connect the device's power cable to your computer if you want takes effect. The quickest way to change the display output settings is to use the display hot key (Fn + F5): 1 Press Fn and F5 simultaneously. 2 While holding down Fn, press F5 repeatedly until the setting...

User Guide
Page 56
...device) only 3 Release the Fn key. Click the Settings tab and click the Advanced button. - For more information on switching the display output, see "Display modes" on page 237. To set to dual. Click Apply then click Ok. - Restarting the system returns the controller option to ...dual (in display and TV (or other external video device) simultaneously NOTE: This setting is single. Double-click the Display icon. - Click Start, then Control Panel. - 56 Connecting Other External Devices Using external...
...device) only 3 Release the Fn key. Click the Settings tab and click the Advanced button. - For more information on switching the display output, see "Display modes" on page 237. To set to dual. Click Apply then click Ok. - Restarting the system returns the controller option to ...dual (in display and TV (or other external video device) simultaneously NOTE: This setting is single. Double-click the Display icon. - Click Start, then Control Panel. - 56 Connecting Other External Devices Using external...

User Guide
Page 57
...it . ❖ Since most televisions and video projectors overscan by 15 to 20 percent, some of the external display device. The external display device must set the resolution of the internal display panel to match the resolution of the desktop will be limited to the capabilities of the external video device. ❖...; If the external video device, such as an SVGA monitor, is capable of displaying at a maximum resolution of 640 x 480 and your system is set to 640 x 480 or 800 x 600, the image on the screen. See ...
...it . ❖ Since most televisions and video projectors overscan by 15 to 20 percent, some of the external display device. The external display device must set the resolution of the internal display panel to match the resolution of the desktop will be limited to the capabilities of the external video device. ❖...; If the external video device, such as an SVGA monitor, is capable of displaying at a maximum resolution of 640 x 480 and your system is set to 640 x 480 or 800 x 600, the image on the screen. See ...
User Guide
Page 64
... not boot beyond the BIOS memory check. CAUTION: To avoid damaging the computer's screws, use only compatible memory. A message may display. You can be installed in good condition. Your Tecra® 9100 Series computer is in the memory expansion slots on page 51. In the event original memory is recommended that is equipped..., it is replaced with invalid memory, the system will beep and will need a standard Phillips no . 1 screwdriver that you can provide for this occurs, contact Toshiba's support center at (800) 457-7777.
... not boot beyond the BIOS memory check. CAUTION: To avoid damaging the computer's screws, use only compatible memory. A message may display. You can be installed in good condition. Your Tecra® 9100 Series computer is in the memory expansion slots on page 51. In the event original memory is recommended that is equipped..., it is replaced with invalid memory, the system will beep and will need a standard Phillips no . 1 screwdriver that you can provide for this occurs, contact Toshiba's support center at (800) 457-7777.


