
User Guide
Page 19
...Your Options 127 Exploring the desktop 127 Finding your way around the desktop 128 Exploring audio features 132 Using external speakers or headphones 132 Recording sounds 132 Playing an audio CD-ROM 134 Exchanging data with another computer 136 Transferring files 136 Getting help transferring... files 136 Setting up for communications 136 Connecting the modem to a telephone line 138 Connecting your computer to a network 139 Toshiba's online resources 142...
...Your Options 127 Exploring the desktop 127 Finding your way around the desktop 128 Exploring audio features 132 Using external speakers or headphones 132 Recording sounds 132 Playing an audio CD-ROM 134 Exchanging data with another computer 136 Transferring files 136 Getting help transferring... files 136 Setting up for communications 136 Connecting the modem to a telephone line 138 Connecting your computer to a network 139 Toshiba's online resources 142...

User Guide
Page 20
... 154 Loading and playing playlists 155 Resuming normal playback after using playlists......... 156 Customizing WinDVD 156 Setting general properties 157 Setting audio properties 158 Setting display properties 160 Using WinDVD advanced features 161 Zooming in 165 Zooming out 165 Panning 165 Adjusting the color... balance 166 Launching an Internet browser from WinDVD 166 Getting help 166 Exiting WinDVD 166 Chapter 8: Toshiba Utilities 167 Fn-esse 168 Starting Fn-esse 168 Using the keyboard or pointing device to assign keys 170 Viewing existing key ...
... 154 Loading and playing playlists 155 Resuming normal playback after using playlists......... 156 Customizing WinDVD 156 Setting general properties 157 Setting audio properties 158 Setting display properties 160 Using WinDVD advanced features 161 Zooming in 165 Zooming out 165 Panning 165 Adjusting the color... balance 166 Launching an Internet browser from WinDVD 166 Getting help 166 Exiting WinDVD 166 Chapter 8: Toshiba Utilities 167 Fn-esse 168 Starting Fn-esse 168 Using the keyboard or pointing device to assign keys 170 Viewing existing key ...
User Guide
Page 28
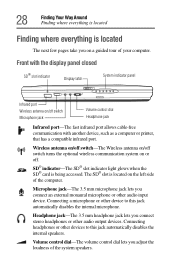
...slot is located on the left side of your computer. Headphone jack-The 3.5 mm headphone jack lets you connect stereo headphones or other audio input device. SD® indicator-The SD® slot indicator light glows when the SD® card is being accessed. 28 Finding... jack automatically disables the internal microphone. Volume control dial-The volume control dial lets you connect an external monaural microphone or other audio output devices. Front with the display panel closed SD® slot indicator Display latch System indicator panel Infrared port Wireless antenna on...
...slot is located on the left side of your computer. Headphone jack-The 3.5 mm headphone jack lets you connect stereo headphones or other audio input device. SD® indicator-The SD® slot indicator light glows when the SD® card is being accessed. 28 Finding... jack automatically disables the internal microphone. Volume control dial-The volume control dial lets you connect an external monaural microphone or other audio output devices. Front with the display panel closed SD® slot indicator Display latch System indicator panel Infrared port Wireless antenna on...

User Guide
Page 62
... external speakers or headphones" on page 132, or "WinDVD" on the front of the computer. 2 Using any necessary adapters, plug the cable from the external audio device into the microphone jack. 62 Connecting Other External Devices Connecting external speakers or headphones To connect an optional external USB diskette drive, connect the...
... external speakers or headphones" on page 132, or "WinDVD" on the front of the computer. 2 Using any necessary adapters, plug the cable from the external audio device into the microphone jack. 62 Connecting Other External Devices Connecting external speakers or headphones To connect an optional external USB diskette drive, connect the...

User Guide
Page 132
...record is equipped with a full stereo sound system with internal speakers. Instead of external stereo speakers. To play .wav sound files or audio CDs using the built-in microphone or external microphone. Recording sounds You may record sounds and save them as.wav files using the ... speakers that require an external power source. The headphone jack requires a 16-ohm stereo mini jack. 132 Exploring Your Options Exploring audio features Exploring audio features You can play back sound files through the computer's built-in microphone. You can use the computer's volume control dial.
...record is equipped with a full stereo sound system with internal speakers. Instead of external stereo speakers. To play .wav sound files or audio CDs using the built-in microphone or external microphone. Recording sounds You may record sounds and save them as.wav files using the ... speakers that require an external power source. The headphone jack requires a 16-ohm stereo mini jack. 132 Exploring Your Options Exploring audio features Exploring audio features You can play back sound files through the computer's built-in microphone. You can use the computer's volume control dial.

User Guide
Page 133
... bar Sound Recorder screen Record Stop Play Skip forward Skip backward 4 Click the Record button. 5 Speak normally into the microphone. 133 Exploring Your Options Exploring audio features DEFINITION: A .wav (pronounced "wave") file is 60 seconds. 6 When you have finished recording, click the Stop button. 7 To hear what you want to use...
... bar Sound Recorder screen Record Stop Play Skip forward Skip backward 4 Click the Record button. 5 Speak normally into the microphone. 133 Exploring Your Options Exploring audio features DEFINITION: A .wav (pronounced "wave") file is 60 seconds. 6 When you have finished recording, click the Stop button. 7 To hear what you want to use...

User Guide
Page 134
... and close the disc tray. The CD begins to your needs. 5 Click OK. 134 Exploring Your Options Exploring audio features Adjusting recording quality The better the quality of the recording, the more disk space the sound file requires. You can open...2 Click Start, point to Programs, Accessories, Entertainment, and then click Sound Recorder. 3 In the Sound Recorder window, click Edit, then click Audio Properties. 4 In the Audio Properties dialog box, adjust the Recording Volume, Preferred device, and Preferred quality according to play . If the computer is turned on, Windows Media™...
... and close the disc tray. The CD begins to your needs. 5 Click OK. 134 Exploring Your Options Exploring audio features Adjusting recording quality The better the quality of the recording, the more disk space the sound file requires. You can open...2 Click Start, point to Programs, Accessories, Entertainment, and then click Sound Recorder. 3 In the Sound Recorder window, click Edit, then click Audio Properties. 4 In the Audio Properties dialog box, adjust the Recording Volume, Preferred device, and Preferred quality according to play . If the computer is turned on, Windows Media™...

User Guide
Page 135
135 Exploring Your Options Exploring audio features Sample Windows Media™ Player screen The CD Player control panel works much like an ordinary compact disc player: ❖ To play the CD or to an audio CD, turn the volume dial down. Playing the CD with the volume set too high could damage your ears. WARNING: Before using headphones to listen to pause, click the Play/pause button on the CD Player control panel. ❖ To stop the CD, click the Stop button.
135 Exploring Your Options Exploring audio features Sample Windows Media™ Player screen The CD Player control panel works much like an ordinary compact disc player: ❖ To play the CD or to an audio CD, turn the volume dial down. Playing the CD with the volume set too high could damage your ears. WARNING: Before using headphones to listen to pause, click the Play/pause button on the CD Player control panel. ❖ To stop the CD, click the Stop button.

User Guide
Page 143
... you have established an ISP account, you in the world. They make it guides you through other higher-speed communication methods such as text, images, audio, or video to a telephone line. 143 Exploring Your Options An overview of using a telephone and modem or through signing up your computer's modem to be...
... you have established an ISP account, you in the world. They make it guides you through other higher-speed communication methods such as text, images, audio, or video to a telephone line. 143 Exploring Your Options An overview of using a telephone and modem or through signing up your computer's modem to be...

User Guide
Page 150
... status bar The time slider enables you to rapidly move forward or backward in the center plays the DVD at normal speed, and enables the audio. Move the time slider to the left to slow the playback speed or move forward. Move the slider to the left to move backward or... move it to the right to move it to the right to control the speed at which features the DVD supports. The audio is currently playing. Placing the slider in the DVD content. Depending on the right side of the status bar. The current time slot is indicated...
... status bar The time slider enables you to rapidly move forward or backward in the center plays the DVD at normal speed, and enables the audio. Move the time slider to the left to slow the playback speed or move forward. Move the slider to the left to move backward or... move it to the right to move it to the right to control the speed at which features the DVD supports. The audio is currently playing. Placing the slider in the DVD content. Depending on the right side of the status bar. The current time slot is indicated...

User Guide
Page 151
... have inserted a DVD and started WinDVD, you can also create a playlist, to a desired location, then begin playing. 151 WinDVD Playing DVDs Bookmarks Playlist Time slider Audio volume controls Counter Exit Repeat Help button Directional buttons Sample WinDVD control panel Eject Properties Web Expanded controls button You can open a shortcut menu by...
... have inserted a DVD and started WinDVD, you can also create a playlist, to a desired location, then begin playing. 151 WinDVD Playing DVDs Bookmarks Playlist Time slider Audio volume controls Counter Exit Repeat Help button Directional buttons Sample WinDVD control panel Eject Properties Web Expanded controls button You can open a shortcut menu by...

User Guide
Page 156
Properties dialog box with the General tab on top You control these general, audio and display features from the Properties dialog box. 1 Launch WinDVD, if it again. The DVD resumes normal playback. WinDVD displays the Properties dialog box, with ... Properties button. Customizing WinDVD You can control several general WinDVD characteristics, such as whether the toolbar and status bar are visible, as well as numerous audio and display features.
Properties dialog box with the General tab on top You control these general, audio and display features from the Properties dialog box. 1 Launch WinDVD, if it again. The DVD resumes normal playback. WinDVD displays the Properties dialog box, with ... Properties button. Customizing WinDVD You can control several general WinDVD characteristics, such as whether the toolbar and status bar are visible, as well as numerous audio and display features.

User Guide
Page 158
...panel features may be unavailable when playing a DVD. Status bar is the bar that is the WinDVD control panel. 5 Click OK to the front. Setting audio properties TECHNICAL NOTE: The DVD author determines which features the DVD supports. Depending on top. 3 In the Properties dialog box, click the... Audio tab. WinDVD displays the Properties dialog box, with the General tab on the DVD format and the computer's hardware configuration, some of the WinDVD ...
...panel features may be unavailable when playing a DVD. Status bar is the bar that is the WinDVD control panel. 5 Click OK to the front. Setting audio properties TECHNICAL NOTE: The DVD author determines which features the DVD supports. Depending on top. 3 In the Properties dialog box, click the... Audio tab. WinDVD displays the Properties dialog box, with the General tab on the DVD format and the computer's hardware configuration, some of the WinDVD ...

User Guide
Page 159
...sound experience. ❖ If you have six speakers, select 6 speaker mode. 159 WinDVD Customizing WinDVD Properties dialog box with Audio tab on top 4 In the Audio channels box, select the appropriate speaker mode to an external receiver. 5 In the Vocal options box, select the desired option ... compliant sound card, select Enable S/PDIF output. Mono mixes the audio channels into one of the 2 speaker modes. Stereo mixes the audio channels into two channels plus Dolby Pro Logic Surround sound. 3D audio provides standard 3D audio sound. ❖ If you have four speakers, select 4 speaker...
...sound experience. ❖ If you have six speakers, select 6 speaker mode. 159 WinDVD Customizing WinDVD Properties dialog box with Audio tab on top 4 In the Audio channels box, select the appropriate speaker mode to an external receiver. 5 In the Vocal options box, select the desired option ... compliant sound card, select Enable S/PDIF output. Mono mixes the audio channels into one of the 2 speaker modes. Stereo mixes the audio channels into two channels plus Dolby Pro Logic Surround sound. 3D audio provides standard 3D audio sound. ❖ If you have four speakers, select 4 speaker...

User Guide
Page 163
...shortcut Menu button - This button is most commonly used with multi-language content to play . displays a list A of menus are: Root, Audio Language, Subtitles. Select the chapter you want to change the spoken/ heard language. None Chapter button - Use your mouse or the control ...panel directional buttons to resume DVD playback. Title button - displays all the audio track options. This feature is enabled only when the DVD supports dynamic audio track changes. Audio tracks - Use this 163 WinDVD Using WinDVD advanced features To do this Or use the...
...shortcut Menu button - This button is most commonly used with multi-language content to play . displays a list A of menus are: Root, Audio Language, Subtitles. Select the chapter you want to change the spoken/ heard language. None Chapter button - Use your mouse or the control ...panel directional buttons to resume DVD playback. Title button - displays all the audio track options. This feature is enabled only when the DVD supports dynamic audio track changes. Audio tracks - Use this 163 WinDVD Using WinDVD advanced features To do this Or use the...

User Guide
Page 214
..., PC Cards, an external monitor, or any other device you are using an external microphone or speakers, check that they are securely connected to your audio application. If you have changed the settings for the Record Monitor feature in the Recording Control Utility (default Off) or the Mute feature in the...
..., PC Cards, an external monitor, or any other device you are using an external microphone or speakers, check that they are securely connected to your audio application. If you have changed the settings for the Record Monitor feature in the Recording Control Utility (default Off) or the Mute feature in the...

User Guide
Page 220
... Shut off Monitor slider to Never. 6 Click OK to close the Details window. 7 Click OK to close the Toshiba Power Saver window. The DVD-ROM drive should appear in the Toshiba Power Saver Properties using the following steps: 1 Click Start, then Control Panel. The Control Panel window appears. 2 ... list. 7 See "Checking device properties" on page 202 for new information on DVDROM drives and their operation. A dirty drive can also cause audio problems. If you are using Device Manager to get it cleaned. 6 Verify that your computer recognizes your drive to an authorized service provider to...
... Shut off Monitor slider to Never. 6 Click OK to close the Details window. 7 Click OK to close the Toshiba Power Saver window. The DVD-ROM drive should appear in the Toshiba Power Saver Properties using the following steps: 1 Click Start, then Control Panel. The Control Panel window appears. 2 ... list. 7 See "Checking device properties" on page 202 for new information on DVDROM drives and their operation. A dirty drive can also cause audio problems. If you are using Device Manager to get it cleaned. 6 Verify that your computer recognizes your drive to an authorized service provider to...

User Guide
Page 257
... memory 64 AccuPoint II pointing device 34 replacing the cap 208 troubleshooting 208 AccuPoint II pointing device 85 alarms 118 assign keys Fn-esse 170 audio, .wav files 132 B basics backing up files 79 keyboard 81 battery alarms 118 caring for 121 changing 119 charging 46, 48, 51 charging before use...
... memory 64 AccuPoint II pointing device 34 replacing the cap 208 troubleshooting 208 AccuPoint II pointing device 85 alarms 118 assign keys Fn-esse 170 audio, .wav files 132 B basics backing up files 79 keyboard 81 battery alarms 118 caring for 121 changing 119 charging 46, 48, 51 charging before use...

User Guide
Page 258
... CD or DVD control buttons 134 CD Player control panel 135 CD-ROM drive 134 opening 95 playing audio CDs 134 troubleshooting 213 communications network connection 139 troubleshooting 212 compact discs handling 96 inserting 95 removing 97 computer display latch 33 precautions 44 turning ...
... CD or DVD control buttons 134 CD Player control panel 135 CD-ROM drive 134 opening 95 playing audio CDs 134 troubleshooting 213 communications network connection 139 troubleshooting 212 compact discs handling 96 inserting 95 removing 97 computer display latch 33 precautions 44 turning ...


