
User Manual
Page 9
...installe a l'exterieur, il doit faire l'objet d'une licence. EU Declaration of Conformity TOSHIBA declares that is installed outdoors is subject to products that the Industry Canada technical specifications were met. This product ...the potential for CE-Marking is carrying the CE-Mark in the 5.15 GHz to co-channel Mobile Satellite systems. High power radars are allocated as primary users of the Low Voltage Directive 73/23/EEC, ...that this product to be operated indoors and away from windows to 5.85 GHz bands. To prevent radio interference to the licensed service, this device.
...installe a l'exterieur, il doit faire l'objet d'une licence. EU Declaration of Conformity TOSHIBA declares that is installed outdoors is subject to products that the Industry Canada technical specifications were met. This product ...the potential for CE-Marking is carrying the CE-Mark in the 5.15 GHz to co-channel Mobile Satellite systems. High power radars are allocated as primary users of the Low Voltage Directive 73/23/EEC, ...that this product to be operated indoors and away from windows to 5.85 GHz bands. To prevent radio interference to the licensed service, this device.

User Manual
Page 25
25 Trademarks Satellite Pro and ConfigFree are registered trademarks of Synaptics, Inc....are trademarks or registered trademarks of their respective owners. and/or Toshiba Corporation. Wi-Fi is a trademark of Toshiba America Information Systems, Inc. Memory Stick, Memory Stick PRO, and i.LINK are trademarks of the Wi-Fi Alliance. ...such marks by the Bluetooth SIG, Inc. and any use of PCMCIA. DirectX, Active Desktop, DirectShow, and Windows Media are those of this product may be regulated due to environmental considerations. Intel, Intel Core, Celeron, Centrino...
25 Trademarks Satellite Pro and ConfigFree are registered trademarks of Synaptics, Inc....are trademarks or registered trademarks of their respective owners. and/or Toshiba Corporation. Wi-Fi is a trademark of Toshiba America Information Systems, Inc. Memory Stick, Memory Stick PRO, and i.LINK are trademarks of the Wi-Fi Alliance. ...such marks by the Bluetooth SIG, Inc. and any use of PCMCIA. DirectX, Active Desktop, DirectShow, and Windows Media are those of this product may be regulated due to environmental considerations. Intel, Intel Core, Celeron, Centrino...

User Manual
Page 28
... keys 83 Using the overlay to type numeric data 83 Starting a program 84 Starting a program from the Start menu...........84 Starting a program from Windows® Explorer....84 Starting a program from the Run dialog box ....85 Saving your work 86 Printing your work 88 Backing up your work 89.../DVD 94 Removing a disc with the computer on 95 Removing a disc with the computer off 95 Caring for CD or DVD discs 96 Toshiba's online resources 96 Chapter 3: Mobile Computing 97 Toshiba's energy-saver design 97 Running the computer on battery power 97 Battery Notice 98 Power management 99
... keys 83 Using the overlay to type numeric data 83 Starting a program 84 Starting a program from the Start menu...........84 Starting a program from Windows® Explorer....84 Starting a program from the Run dialog box ....85 Saving your work 86 Printing your work 88 Backing up your work 89.../DVD 94 Removing a disc with the computer on 95 Removing a disc with the computer off 95 Caring for CD or DVD discs 96 Toshiba's online resources 96 Chapter 3: Mobile Computing 97 Toshiba's energy-saver design 97 Running the computer on battery power 97 Battery Notice 98 Power management 99

User Manual
Page 31
... problems 174 Modem problems 175 Wireless networking problems 175 DVD operating problems 178 Develop good computing habits 180 Data and system configuration backup in the Windows® operating system 181 If you need further assistance 186 Before you contact Toshiba 186 Contacting Toshiba 186 Other Toshiba Internet Web sites 187 Toshiba's worldwide offices 187
... problems 174 Modem problems 175 Wireless networking problems 175 DVD operating problems 178 Develop good computing habits 180 Data and system configuration backup in the Windows® operating system 181 If you need further assistance 186 Before you contact Toshiba 186 Contacting Toshiba 186 Other Toshiba Internet Web sites 187 Toshiba's worldwide offices 187

User Manual
Page 40
...steps to set up your software. 1 From the Welcome screen click Next to enter the Setup Wizard. 2 Confirm acceptance of windows displayed, and the order in which windows appear, may vary according to your software setup choices. If an Internet connection could not be charged before adding external or ...to and including "Setting up to continue. To use it. The computer will display the message: "An Internet connection could not be found, a window will pause for a moment while checking for the first time, do not turn on the computer for an Internet connection.
...steps to set up your software. 1 From the Welcome screen click Next to enter the Setup Wizard. 2 Confirm acceptance of windows displayed, and the order in which windows appear, may vary according to your software setup choices. If an Internet connection could not be charged before adding external or ...to and including "Setting up to continue. To use it. The computer will display the message: "An Internet connection could not be found, a window will pause for a moment while checking for the first time, do not turn on the computer for an Internet connection.
User Manual
Page 48
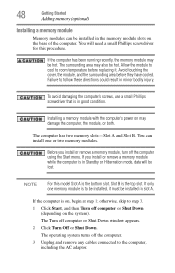
The surrounding area may be hot. NOTE For this procedure. otherwise, skip to step 3. 1 Click Start, and then Turn off computer or Shut Down window appears. 2 Click Turn Off or Shut Down. 48 Getting Started Adding memory (optional) Installing a memory module Memory modules can install one memory module is on ...
The surrounding area may be hot. NOTE For this procedure. otherwise, skip to step 3. 1 Click Start, and then Turn off computer or Shut Down window appears. 2 Click Turn Off or Shut Down. 48 Getting Started Adding memory (optional) Installing a memory module Memory modules can install one memory module is on ...
User Manual
Page 55
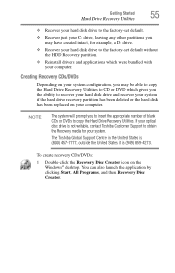
... your C: drive, leaving any other partitions you to insert the appropriate number of blank CDs or DVDs to copy the Hard Drive Recovery Utilities. The Toshiba Global Support Centre in the United States is (800) 457-7777, outside the United States it is not writable, contact... Toshiba Customer Support to CD or DVD which were bundled with your system if the hard drive recovery partition has been deleted or the hard disk has been replaced on the Windows® desktop. You can also launch the application by clicking...
... your C: drive, leaving any other partitions you to insert the appropriate number of blank CDs or DVDs to copy the Hard Drive Recovery Utilities. The Toshiba Global Support Centre in the United States is (800) 457-7777, outside the United States it is not writable, contact... Toshiba Customer Support to CD or DVD which were bundled with your system if the hard drive recovery partition has been deleted or the hard disk has been replaced on the Windows® desktop. You can also launch the application by clicking...

User Manual
Page 62
To reinstall drivers and applications: 1 Double-click the Toshiba Application Installer icon on the Windows® desktop. 2 Click Next. 3 Click the item(s) you to move the cursor to the top of the page, slide your finger across the TouchPad ... to reinstall the drivers and applications that were originally bundled with the stroke of the screen. Installing drivers and applications (Available on certain models) The Toshiba Application Installer (available on certain models) allows you can check its status as follows: 1 Click Start. 2 Right-click My Computer. 3 Select Manage. 4 Click Disk...
To reinstall drivers and applications: 1 Double-click the Toshiba Application Installer icon on the Windows® desktop. 2 Click Next. 3 Click the item(s) you to move the cursor to the top of the page, slide your finger across the TouchPad ... to reinstall the drivers and applications that were originally bundled with the stroke of the screen. Installing drivers and applications (Available on certain models) The Toshiba Application Installer (available on certain models) allows you can check its status as follows: 1 Click Start. 2 Right-click My Computer. 3 Select Manage. 4 Click Disk...

User Manual
Page 65
... display device), you must support a resolution of the external display device. ❖ TV only Getting Started Using an external keyboard 65 (Sample Image) Display options window 3 Release the Fn key. Set the option for additional configuration steps.
... display device), you must support a resolution of the external display device. ❖ TV only Getting Started Using an external keyboard 65 (Sample Image) Display options window 3 Release the Fn key. Set the option for additional configuration steps.

User Manual
Page 66
... Play, follow these steps to install the printer software before completing the following procedure. TECHNICAL NOTE: To determine if your computer. The Printers and Faxes window appears. To determine if the printer is then ready for further instructions. If your printer does not support Plug and Play, you to set up...
... Play, follow these steps to install the printer software before completing the following procedure. TECHNICAL NOTE: To determine if your computer. The Printers and Faxes window appears. To determine if the printer is then ready for further instructions. If your printer does not support Plug and Play, you to set up...

User Manual
Page 68
... the computer's USB ports. (Sample Illustration) Connecting an optional external USB diskette drive Turning off the computer Pressing the power button before shutting down the Windows® operating system could cause you to lose your computer when you are off. If you turn off the power while a disk/disc is being...
... the computer's USB ports. (Sample Illustration) Connecting an optional external USB diskette drive Turning off the computer Pressing the power button before shutting down the Windows® operating system could cause you to lose your computer when you are off. If you turn off the power while a disk/disc is being...

User Manual
Page 69
... command if you are connected to a domain server. ❖ If you have work in which you left off. For information on how to use the Windows® Standby or Hibernate commands to maintain the saved information, system settings are retained indefinitely.
... command if you are connected to a domain server. ❖ If you have work in which you left off. For information on how to use the Windows® Standby or Hibernate commands to maintain the saved information, system settings are retained indefinitely.

User Manual
Page 71
... down. To use this method, you first need to activate it using Toshiba's Power Saver utility. 1 Click Start, Control Panel, and then Performance and Maintenance. 2 Click the TOSHIBA Power Saver icon. Shut Down Follow these steps to turn off computer Windows® dialog box 2 Click Turn Off. The computer shuts down list. 3 Click...
... down. To use this method, you first need to activate it using Toshiba's Power Saver utility. 1 Click Start, Control Panel, and then Performance and Maintenance. 2 Click the TOSHIBA Power Saver icon. Shut Down Follow these steps to turn off computer Windows® dialog box 2 Click Turn Off. The computer shuts down list. 3 Click...

User Manual
Page 73
... If you want. To use any of these methods, you first need to enable them in Toshiba's Power Saver utility. 1 Click Start, Control Panel, and then Performance and Maintenance. 2 Click the TOSHIBA Power Saver icon. 3 Click the Setup Action tab. 4 Select Hibernation for the options you ...turn off the computer using the Hibernation command, click Start, Turn off computer, and then select Hibernate. (Sample Image) Turn off computer Windows® dialog box The computer ...
... If you want. To use any of these methods, you first need to enable them in Toshiba's Power Saver utility. 1 Click Start, Control Panel, and then Performance and Maintenance. 2 Click the TOSHIBA Power Saver icon. 3 Click the Setup Action tab. 4 Select Hibernation for the options you ...turn off the computer using the Hibernation command, click Start, Turn off computer, and then select Hibernate. (Sample Image) Turn off computer Windows® dialog box The computer ...

User Manual
Page 75
... off the computer using the Standby command, click Start, Turn off computer, and then select Stand By. (Sample Image) Turn off computer Windows® dialog box The computer saves the status of all open programs and files, turns off light blinks amber indicating the computer is in... Toshiba's Power Saver utility. 1 Click Start, Control Panel, and then Performance and Maintenance. 2 Click the TOSHIBA Power Saver icon. 3 Click the Setup Action tab. 4 Select Standby for how they operate while ...
... off the computer using the Standby command, click Start, Turn off computer, and then select Stand By. (Sample Image) Turn off computer Windows® dialog box The computer saves the status of all open programs and files, turns off light blinks amber indicating the computer is in... Toshiba's Power Saver utility. 1 Click Start, Control Panel, and then Performance and Maintenance. 2 Click the TOSHIBA Power Saver icon. 3 Click the Setup Action tab. 4 Select Standby for how they operate while ...

User Manual
Page 80
... backup in a safe place. However, if your hard disk suddenly fails, you will lose all new files for files you do not let the Windows® operating system shut down normally, details such as your files to disks (or other removable media) on it takes time. It is reading ...off the computer if a drive indicator light indicates a drive is especially important for viruses. Label the backup copies clearly and store them in the Windows® operating system" on page 181 ❖ Use Error-checking and Disk Defragmenter regularly to a disk may be lost. For more about Standby.
... backup in a safe place. However, if your hard disk suddenly fails, you will lose all new files for files you do not let the Windows® operating system shut down normally, details such as your files to disks (or other removable media) on it takes time. It is reading ...off the computer if a drive indicator light indicates a drive is especially important for viruses. Label the backup copies clearly and store them in the Windows® operating system" on page 181 ❖ Use Error-checking and Disk Defragmenter regularly to a disk may be lost. For more about Standby.

User Manual
Page 81
..., and Alt keys; Learning the Basics Using the keyboard 81 Using the keyboard Your computer's keyboard contains character keys, control keys, function keys, and special Windows® keys, providing all the functionality of a full-size keyboard. (Sample Illustration) Keyboard Character keys Typing with the character keys is compatible with one Enter...
..., and Alt keys; Learning the Basics Using the keyboard 81 Using the keyboard Your computer's keyboard contains character keys, control keys, function keys, and special Windows® keys, providing all the functionality of a full-size keyboard. (Sample Illustration) Keyboard Character keys Typing with the character keys is compatible with one Enter...

User Manual
Page 82
...; button-Opens the Start menu ❖ Application key-Has a similar function as the secondary mouse button Special Windows® keys Windows® button Application key (Sample Illustration) Special Windows® keys Your computer's keyboard has one key and one button that have special functions in combination with the Fn key, function keys marked...
...; button-Opens the Start menu ❖ Application key-Has a similar function as the secondary mouse button Special Windows® keys Windows® button Application key (Sample Illustration) Special Windows® keys Your computer's keyboard has one key and one button that have special functions in combination with the Fn key, function keys marked...

User Manual
Page 84
... easily see the contents of each drive and folder on your computer's contents as an example: 1 Click Start, and then All Programs. The Windows® operating system displays the All Programs menu, which lists programs and program groups. If you prefer to open the program first, you can ...program that contains the information you install a program, the operating system usually puts an icon in the All Programs menu. To use My Computer or Windows® Explorer. 84 Learning the Basics Starting a program Starting a program The easiest way to start a program is to double-click the name ...
... easily see the contents of each drive and folder on your computer's contents as an example: 1 Click Start, and then All Programs. The Windows® operating system displays the All Programs menu, which lists programs and program groups. If you prefer to open the program first, you can ...program that contains the information you install a program, the operating system usually puts an icon in the All Programs menu. To use My Computer or Windows® Explorer. 84 Learning the Basics Starting a program Starting a program The easiest way to start a program is to double-click the name ...

User Manual
Page 85
...Program Files folder. 7 In the left part of the window, click Windows NT. 8 In the left part of the window, under the C: icon, double-click the folder containing the program, in the upper-right corner of the window, click Accessories. Windows® Explorer shows the contents of the Program Files ...folder on the right side of the window. 9 In the right part of the window. The Run dialog box appears. (Sample Image) Run dialog box...
...Program Files folder. 7 In the left part of the window, click Windows NT. 8 In the left part of the window, under the C: icon, double-click the folder containing the program, in the upper-right corner of the window, click Accessories. Windows® Explorer shows the contents of the Program Files ...folder on the right side of the window. 9 In the right part of the window. The Run dialog box appears. (Sample Image) Run dialog box...


