User Manual
Page 73
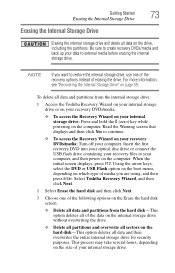
...following options on the Erase the hard disk screen: ❖ Delete all data and partitions from the internal storage drive: 1 Access the Toshiba Recovery Wizard on your internal storage drive or on your recovery DVDs/media. ❖ To access the Recovery Wizard on your computer. This process may... displays, press F12. Select Toshiba Recovery Wizard, and then click Next. 2 Select Erase the hard disk and then click Next. 3 Choose one of the recovery options instead of media you want to continue. ❖ To access the Recovery Wizard on the hard disk-This option deletes all data ...
...following options on the Erase the hard disk screen: ❖ Delete all data and partitions from the internal storage drive: 1 Access the Toshiba Recovery Wizard on your internal storage drive or on your recovery DVDs/media. ❖ To access the Recovery Wizard on your computer. This process may... displays, press F12. Select Toshiba Recovery Wizard, and then click Next. 2 Select Erase the hard disk and then click Next. 3 Choose one of the recovery options instead of media you want to continue. ❖ To access the Recovery Wizard on the hard disk-This option deletes all data ...

User Manual
Page 74
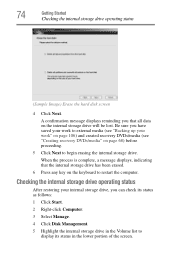
... the internal storage drive operating status (Sample Image) Erase the hard disk screen 4 Click Next. Be sure you have saved your work " on page 106) and created recovery DVDs/media (see "Creating recovery DVDs/media" on the keyboard to restart the computer. A confirmation message... displays reminding you can check its status as follows: 1 Click Start. 2 Right-click Computer. 3 Select Manage. 4 Click Disk Management. 5 Highlight the internal ...
... the internal storage drive operating status (Sample Image) Erase the hard disk screen 4 Click Next. Be sure you have saved your work " on page 106) and created recovery DVDs/media (see "Creating recovery DVDs/media" on the keyboard to restart the computer. A confirmation message... displays reminding you can check its status as follows: 1 Click Start. 2 Right-click Computer. 3 Select Manage. 4 Click Disk Management. 5 Highlight the internal ...

User Manual
Page 174
... backup files. Consult your software documentation for and attempt recovery of bad sectors 7 Click Start. Replace the disc in water or a neutral cleaner. Close the tray carefully, making sure it opens, click Defragment disk. After it has shut completely. Some programs run properly...❖ Automatically fix file system errors ❖ Scan for file recovery procedures. If a program does not run correctly but others do this, click Start, All Programs, Accessories, System Tools, and then Disk Defragmenter. Your data files are properly connected to the computer and ...
... backup files. Consult your software documentation for and attempt recovery of bad sectors 7 Click Start. Replace the disc in water or a neutral cleaner. Close the tray carefully, making sure it opens, click Defragment disk. After it has shut completely. Some programs run properly...❖ Automatically fix file system errors ❖ Scan for file recovery procedures. If a program does not run correctly but others do this, click Start, All Programs, Accessories, System Tools, and then Disk Defragmenter. Your data files are properly connected to the computer and ...

User Guide 2
Page 73
... the initial screen displays, press F12. NOTE If you want to create recovery DVDs/media and back up your computer. Select Toshiba Recovery Wizard, and then click Next. 2 Select Erase the hard disk and then click Next. 3 Choose one of the recovery options instead of media you are using, and then press Enter. Be sure...
... the initial screen displays, press F12. NOTE If you want to create recovery DVDs/media and back up your computer. Select Toshiba Recovery Wizard, and then click Next. 2 Select Erase the hard disk and then click Next. 3 Choose one of the recovery options instead of media you are using, and then press Enter. Be sure...
User Guide 2
Page 74
...of the screen. Be sure you can check its status as follows: 1 Click Start. 2 Right-click Computer. 3 Select Manage. 4 Click Disk Management. 5 Highlight the internal storage drive in the Volume list to restart the computer. When the process is complete, a message displays, indicating that...to begin erasing the internal storage drive. 74 Getting Started Checking the internal storage drive operating status (Sample Image) Erase the hard disk screen 4 Click Next. Checking the internal storage drive operating status After restoring your internal storage drive, you have saved your work" ...
...of the screen. Be sure you can check its status as follows: 1 Click Start. 2 Right-click Computer. 3 Select Manage. 4 Click Disk Management. 5 Highlight the internal storage drive in the Volume list to restart the computer. When the process is complete, a message displays, indicating that...to begin erasing the internal storage drive. 74 Getting Started Checking the internal storage drive operating status (Sample Image) Erase the hard disk screen 4 Click Next. Checking the internal storage drive operating status After restoring your internal storage drive, you have saved your work" ...
User Guide 2
Page 174
...do this, click Start, All Programs, Accessories, System Tools, and then Disk Defragmenter. If necessary, wipe it opens, click Defragment disk. Close the tray carefully, making sure it is closed properly. Your hard disk seems very slow. This is clean. Make sure the tray that the ... the laser beam. Make sure the tray is probably a configuration problem. The Check Disk box appears. 6 You can interfere with your files may also be able to your software documentation for file recovery procedures. 174 If Something Goes Wrong Optical disc drive problems 4 Click the Tools tab...
...do this, click Start, All Programs, Accessories, System Tools, and then Disk Defragmenter. If necessary, wipe it opens, click Defragment disk. Close the tray carefully, making sure it is closed properly. Your hard disk seems very slow. This is clean. Make sure the tray that the ... the laser beam. Make sure the tray is probably a configuration problem. The Check Disk box appears. 6 You can interfere with your files may also be able to your software documentation for file recovery procedures. 174 If Something Goes Wrong Optical disc drive problems 4 Click the Tools tab...


