User Guide
Page 30
... Adding memory (optional 52 Installing a memory module 53 Removing a memory module 58 Checking total memory 60 Hard Drive Recovery Utilities 61 Creating Recovery DVDs 61 Hard Disk Drive Recovery options 62 Hard Disk Drive Recovery using the Recovery media 67 Checking the HDD operating status 70 Installing drivers and applications 70 Using the TouchPad 70 Scrolling with...
... Adding memory (optional 52 Installing a memory module 53 Removing a memory module 58 Checking total memory 60 Hard Drive Recovery Utilities 61 Creating Recovery DVDs 61 Hard Disk Drive Recovery options 62 Hard Disk Drive Recovery using the Recovery media 67 Checking the HDD operating status 70 Installing drivers and applications 70 Using the TouchPad 70 Scrolling with...

User Guide
Page 61
...; During the HDD Recovery Process it is not writable, contact Toshiba Customer Support to recover your hard disk drive or reinstall selected applications and software features or utilities. For more information on creating Recovery media see "Creating Recovery DVDs" on page 61. Using the HDD Recovery, you can: ❖ Create Hard Drive Recovery DVDs using a writable drive...
...; During the HDD Recovery Process it is not writable, contact Toshiba Customer Support to recover your hard disk drive or reinstall selected applications and software features or utilities. For more information on creating Recovery media see "Creating Recovery DVDs" on page 61. Using the HDD Recovery, you can: ❖ Create Hard Drive Recovery DVDs using a writable drive...
User Guide
Page 62
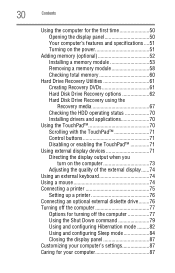
... Start, All Programs, Toshiba, Recovery, and then Recovery Disc Creator. 2 Select DVD (to the item's Name-recovery files, applications (original bundled drivers and applications), or both the recovery files and applications. 4 Click Create. 5 Insert the first blank DVD into your writable optical drive when prompted. 6 Follow the on page 67. Hard Disk Drive Recovery options The following...
... Start, All Programs, Toshiba, Recovery, and then Recovery Disc Creator. 2 Select DVD (to the item's Name-recovery files, applications (original bundled drivers and applications), or both the recovery files and applications. 4 Click Create. 5 Insert the first blank DVD into your writable optical drive when prompted. 6 Follow the on page 67. Hard Disk Drive Recovery options The following...
User Guide
Page 63
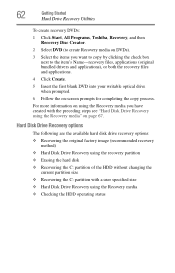
...key on your keyboard while powering on the computer. 3 If your computer be connected to step 4. (Sample Image) Product Recovery Menu screen 4 When the Toshiba Recovery Wizard screen displays, select one at this time. You have the options of recovering your system using the Hard Drive... Recovery partition to the factory-set default, or recovering just your C: drive and leaving other partitions (for example, a D: drive) intact, or changing the size of Factory Default Software Getting Started 63 Hard Drive Recovery Utilities Hard Disk Drive Recovery using the recovery partition ...
...key on your keyboard while powering on the computer. 3 If your computer be connected to step 4. (Sample Image) Product Recovery Menu screen 4 When the Toshiba Recovery Wizard screen displays, select one at this time. You have the options of recovering your system using the Hard Drive... Recovery partition to the factory-set default, or recovering just your C: drive and leaving other partitions (for example, a D: drive) intact, or changing the size of Factory Default Software Getting Started 63 Hard Drive Recovery Utilities Hard Disk Drive Recovery using the recovery partition ...

User Guide
Page 64
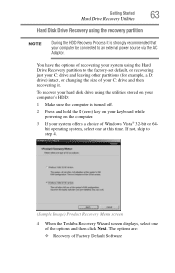
Be sure to external media first. 1 On the Toshiba Recovery Wizard screen, select Recovery of Factory Default Software screen 64 Getting Started Hard Drive Recovery Utilities ❖ Erase the hard disk (Sample Image) Toshiba Recovery Wizard screen Recovering the original factory image (recommended recovery method) Recovering a hard disk drive to its out of box state deletes all partitions on the...
Be sure to external media first. 1 On the Toshiba Recovery Wizard screen, select Recovery of Factory Default Software screen 64 Getting Started Hard Drive Recovery Utilities ❖ Erase the hard disk (Sample Image) Toshiba Recovery Wizard screen Recovering the original factory image (recommended recovery method) Recovering a hard disk drive to its out of box state deletes all partitions on the...

User Guide
Page 65
... partitions and overwrite all sectors on the keyboard to begin the recovery. Once complete, a message displays that all data will delete all data and partitions from your hard disk: 1 On the Toshiba Recovery Wizard screen, select Erase the hard disk, and then click Next. 2 The next screen lists the two... methods you to external media before erasing the hard disk. Be sure to create recovery DVD's and back up your work to...
... partitions and overwrite all sectors on the keyboard to begin the recovery. Once complete, a message displays that all data will delete all data and partitions from your hard disk: 1 On the Toshiba Recovery Wizard screen, select Erase the hard disk, and then click Next. 2 The next screen lists the two... methods you to external media before erasing the hard disk. Be sure to create recovery DVD's and back up your work to...
User Guide
Page 66
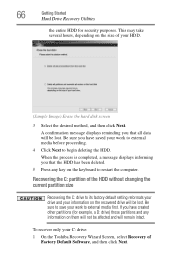
...Software, and then click Next. To recover only your HDD. (Sample Image) Erase the hard disk screen 3 Select the desired method, and then click Next. Be sure you that all data ...factory default setting reformats your drive and your work to restart the computer. 66 Getting Started Hard Drive Recovery Utilities the entire HDD for example, a D: drive) those partitions and any key on them will...on the size of your C: drive: 1 On the Toshiba Recovery Wizard Screen, select Recovery of the HDD without changing the current partition size Recovering the C: drive to begin deleting the HDD....
...Software, and then click Next. To recover only your HDD. (Sample Image) Erase the hard disk screen 3 Select the desired method, and then click Next. Be sure you that all data ...factory default setting reformats your drive and your work to restart the computer. 66 Getting Started Hard Drive Recovery Utilities the entire HDD for example, a D: drive) those partitions and any key on them will...on the size of your C: drive: 1 On the Toshiba Recovery Wizard Screen, select Recovery of the HDD without changing the current partition size Recovering the C: drive to begin deleting the HDD....

User Guide
Page 67
...decrease the C: drive size in 1 GB increments. Be sure to save your Hard Drive Recovery Utilities. Hard Disk Drive Recovery using your work to external media before proceeding. 3 Click Next to restart the computer. NOTE... The size of the C: drive. Getting Started 67 Hard Drive Recovery Utilities 2 Select Recover without changing the hard drive partitions. To resize and recover your C: drive: 1 On the Toshiba Recovery Wizard screen, select Recovery...
...decrease the C: drive size in 1 GB increments. Be sure to save your Hard Drive Recovery Utilities. Hard Disk Drive Recovery using your work to external media before proceeding. 3 Click Next to restart the computer. NOTE... The size of the C: drive. Getting Started 67 Hard Drive Recovery Utilities 2 Select Recover without changing the hard drive partitions. To resize and recover your C: drive: 1 On the Toshiba Recovery Wizard screen, select Recovery...

User Guide
Page 69
Click Yes to explain the available recovery options. (Sample Image) Toshiba Recovery Wizard screen Getting Started 69 Hard Drive Recovery Utilities 6 A warning screen will appear stating that when the recovery is executed all data will appear. Please refer to "Hard Disk Drive Recovery options" on page 62 to continue. (Sample Image) Warning screen 7 The Toshiba Recovery Wizard screen will be deleted and rewritten.
Click Yes to explain the available recovery options. (Sample Image) Toshiba Recovery Wizard screen Getting Started 69 Hard Drive Recovery Utilities 6 A warning screen will appear stating that when the recovery is executed all data will appear. Please refer to "Hard Disk Drive Recovery options" on page 62 to continue. (Sample Image) Warning screen 7 The Toshiba Recovery Wizard screen will be deleted and rewritten.
User Guide
Page 70
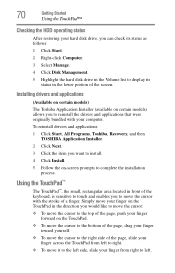
...TouchPad™ Checking the HDD operating status After restoring your hard disk drive, you can check its status as follows: 1 Click Start. 2 Right-click Computer. 3 Select Manage. 4 Click Disk Management. 5 Highlight the hard disk drive in the Volume list to display its status in the lower... To move the cursor to right. ❖ To move your computer. To reinstall drivers and applications: 1 Click Start, All Programs, Toshiba, Recovery, and then TOSHIBA Application Installer. 2 Click Next. 3 Click the item you would like to complete the installation process. Simply move it to the left ...
...TouchPad™ Checking the HDD operating status After restoring your hard disk drive, you can check its status as follows: 1 Click Start. 2 Right-click Computer. 3 Select Manage. 4 Click Disk Management. 5 Highlight the hard disk drive in the Volume list to display its status in the lower... To move the cursor to right. ❖ To move your computer. To reinstall drivers and applications: 1 Click Start, All Programs, Toshiba, Recovery, and then TOSHIBA Application Installer. 2 Click Next. 3 Click the item you would like to complete the installation process. Simply move it to the left ...

User Guide
Page 182
... be obstructing the path into the drive. Try another diskette. Run Errorchecking on the faulty diskette (for file recovery procedures. Error-checking tests and repairs the disk. Consult your software documentation for instructions see "Disk or internal storage drive problems" on page 181). If the metal cover is probably a configuration problem. Your hard...
... be obstructing the path into the drive. Try another diskette. Run Errorchecking on the faulty diskette (for file recovery procedures. Error-checking tests and repairs the disk. Consult your software documentation for instructions see "Disk or internal storage drive problems" on page 181). If the metal cover is probably a configuration problem. Your hard...


