User Guide
Page 40
...; operating system checks the system's performance, and then restarts your software setup choices. To use it. The first time you through steps to set up your software. 1 From the Welcome screen click Next to enter the Setup Wizard. 2 Confirm acceptance of windows displayed, and the ... Next. 4 Enter the computer name and description and click Next. 5 Click the appropriate option from the Help Protect Windows Automatically screen. 6 Follow the remaining screen prompts to your computer. NOTE The names of Microsoft's End User License Agreement and click Next. 3 Enter your desired user name...
...; operating system checks the system's performance, and then restarts your software setup choices. To use it. The first time you through steps to set up your software. 1 From the Welcome screen click Next to enter the Setup Wizard. 2 Confirm acceptance of windows displayed, and the ... Next. 4 Enter the computer name and description and click Next. 5 Click the appropriate option from the Help Protect Windows Automatically screen. 6 Follow the remaining screen prompts to your computer. NOTE The names of Microsoft's End User License Agreement and click Next. 3 Enter your desired user name...

User Guide
Page 46
... are designed to all the features and icons described in this guide. This is also an intrinsic characteristic of the screen will dim and you plan to use AC power rather than battery power) are properly connected and ready. 2 Check to ensure that may appear on your... to accommodate all those features. When the computer is manufactured using highprecision technology. Any small bright dots that all the features and specifications corresponding to increase the brightness of the screen while on battery power, the screen will deteriorate. Your select model may not be able to all...
... are designed to all the features and icons described in this guide. This is also an intrinsic characteristic of the screen will dim and you plan to use AC power rather than battery power) are properly connected and ready. 2 Check to ensure that may appear on your... to accommodate all those features. When the computer is manufactured using highprecision technology. Any small bright dots that all the features and specifications corresponding to increase the brightness of the screen while on battery power, the screen will deteriorate. Your select model may not be able to all...

User Guide
Page 58
... Recovery Utilities 3 Select the items you have created with a user specified size ❖ Hard Disk Drive Recovery using the Recovery media" on -screen prompts for completing the copy process. Hard Disk Drive Recovery Options The following are the available hard disk drive recovery... options: ❖ Hard Disk Drive Recovery using the recovery partition ❖ Recovering the original factory image (recommended recovery method) ...
... Recovery Utilities 3 Select the items you have created with a user specified size ❖ Hard Disk Drive Recovery using the Recovery media" on -screen prompts for completing the copy process. Hard Disk Drive Recovery Options The following are the available hard disk drive recovery... options: ❖ Hard Disk Drive Recovery using the recovery partition ❖ Recovering the original factory image (recommended recovery method) ...
User Guide
Page 59
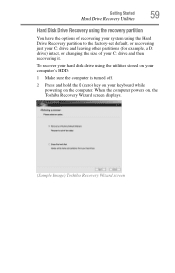
Getting Started 59 Hard Drive Recovery Utilities Hard Disk Drive Recovery using the recovery partition You have the options of recovering your system using the utilities stored on your computer's HDD: 1 Make sure the computer is turned off. 2 Press and hold the 0 (zero) key on your C: ...drive and then recovering it. When the computer powers on the computer. To recover your hard disk drive using the Hard Drive Recovery partition to the factory-set default, or recovering just your C: drive and leaving other partitions (for example, a D: drive) intact,...
Getting Started 59 Hard Drive Recovery Utilities Hard Disk Drive Recovery using the recovery partition You have the options of recovering your system using the utilities stored on your computer's HDD: 1 Make sure the computer is turned off. 2 Press and hold the 0 (zero) key on your C: ...drive and then recovering it. When the computer powers on the computer. To recover your hard disk drive using the Hard Drive Recovery partition to the factory-set default, or recovering just your C: drive and leaving other partitions (for example, a D: drive) intact,...
User Guide
Page 63
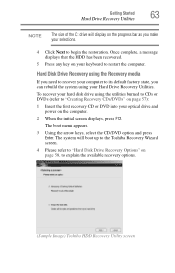
...Recovery Utilities. The boot menu appears. 3 Using the arrow keys, select the CD/DVD option and press Enter. The system will display on page 58, to explain the available recovery options. (Sample Image) Toshiba HDD Recovery Utility screen Getting Started 63 Hard Drive Recovery Utilities NOTE... The size of the C: drive will boot up to the Toshiba Recovery Wizard screen. 4 Please refer to "Hard Disk Drive Recovery Options" on ...
...Recovery Utilities. The boot menu appears. 3 Using the arrow keys, select the CD/DVD option and press Enter. The system will display on page 58, to explain the available recovery options. (Sample Image) Toshiba HDD Recovery Utility screen Getting Started 63 Hard Drive Recovery Utilities NOTE... The size of the C: drive will boot up to the Toshiba Recovery Wizard screen. 4 Please refer to "Hard Disk Drive Recovery Options" on ...

User Guide
Page 64
...applications (Available on certain models) The Toshiba Application Installer (available on certain models) allows you would like to move the cursor: ❖ To move the cursor to the top of the page, push your finger forward on -screen prompts to complete the installation process. ... reinstall the drivers and applications that were originally bundled with the stroke of the screen. 64 Getting Started Using the TouchPad™ Checking the HDD operating status After restoring your computer. Using the TouchPad™ The TouchPad™, the small, smooth, square cutout located ...
...applications (Available on certain models) The Toshiba Application Installer (available on certain models) allows you would like to move the cursor: ❖ To move the cursor to the top of the page, push your finger forward on -screen prompts to complete the installation process. ... reinstall the drivers and applications that were originally bundled with the stroke of the screen. 64 Getting Started Using the TouchPad™ Checking the HDD operating status After restoring your computer. Using the TouchPad™ The TouchPad™, the small, smooth, square cutout located ...
User Guide
Page 65
.... Control buttons When a step instructs you would with the TouchPad™ There are using. Disabling or enabling the TouchPad™ The TouchPad™ is much smaller than the display screen, moving your cursor across the TouchPad in rapid succession. Scrolling with any wheel device on... page 212. Getting Started 65 Using the TouchPad™ NOTE Because the TouchPad is enabled by either...
.... Control buttons When a step instructs you would with the TouchPad™ There are using. Disabling or enabling the TouchPad™ The TouchPad™ is much smaller than the display screen, moving your cursor across the TouchPad in rapid succession. Scrolling with any wheel device on... page 212. Getting Started 65 Using the TouchPad™ NOTE Because the TouchPad is enabled by either...
User Guide
Page 68
...for your operating system and devices. Your computer will automatically detect the external display device and activate a screen with display options. 4 Select the settings you must only be used if the cable outer conductive shielding has been grounded by default. To configure a virtual button: 1 ...entrance, or attachment, as close the Mouse Properties window. Using external display devices Your computer comes with a built-in "Enabling Dual Mode" on page 67. 2 Select the virtual button you need a larger screen. Connecting an external monitor or projector You can also connect...
...for your operating system and devices. Your computer will automatically detect the external display device and activate a screen with display options. 4 Select the settings you must only be used if the cable outer conductive shielding has been grounded by default. To configure a virtual button: 1 ...entrance, or attachment, as close the Mouse Properties window. Using external display devices Your computer comes with a built-in "Enabling Dual Mode" on page 67. 2 Select the virtual button you need a larger screen. Connecting an external monitor or projector You can also connect...
User Guide
Page 79
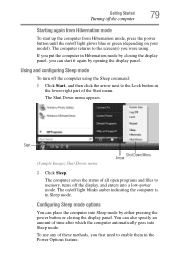
...Image) Shut Down menu Shut Down Menu Arrow 2 Click Sleep. You can also specify an amount of all open programs and files to the screen(s) you were using the Sleep command: 1 Click Start, and then click the arrow next to enable them in the Power Options feature. The computer returns to ...memory, turns off the computer using . The computer saves the status of time after which the computer automatically goes into Sleep mode by either pressing the power button or closing the...
...Image) Shut Down menu Shut Down Menu Arrow 2 Click Sleep. You can also specify an amount of all open programs and files to the screen(s) you were using the Sleep command: 1 Click Start, and then click the arrow next to enable them in the Power Options feature. The computer returns to ...memory, turns off the computer using . The computer saves the status of time after which the computer automatically goes into Sleep mode by either pressing the power button or closing the...
User Guide
Page 82
... your operating system documentation or Help and Support for your computer This section gives tips on cleaning and moving your computer. See "Toshiba Utilities" on page 136. Caring for details. Customizing your computer's settings There are additional custom settings you can choose. Refer to...model). For more information, see "Taking care of the computer's keyboard, speaker, and other openings. Never use harsh or caustic chemical products to the screen(s) you were using. Closing the display panel After you have turned off light glows blue or green (depending on your battery" ...
... your operating system documentation or Help and Support for your computer This section gives tips on cleaning and moving your computer. See "Toshiba Utilities" on page 136. Caring for details. Customizing your computer's settings There are additional custom settings you can choose. Refer to...model). For more information, see "Taking care of the computer's keyboard, speaker, and other openings. Never use harsh or caustic chemical products to the screen(s) you were using. Closing the display panel After you have turned off light glows blue or green (depending on your battery" ...
User Guide
Page 99
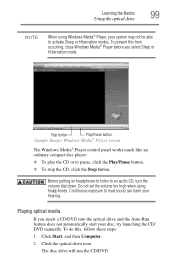
Learning the Basics 99 Using the optical drive NOTE When using headphones. Stop button Play/Pause button (Sample Image) Windows Media® Player screen The Windows Media® Player control panel works much like an ordinary compact disc player: ❖ To play the CD or to an audio CD, ... down. Continuous exposure to activate Sleep or Hibernation modes. The disc drive will run the CD/DVD. Do not set the volume too high when using Windows Media® Player, your system may not be able to loud sound can harm your disc, try launching the CD/ DVD manually. Before ...
Learning the Basics 99 Using the optical drive NOTE When using headphones. Stop button Play/Pause button (Sample Image) Windows Media® Player screen The Windows Media® Player control panel works much like an ordinary compact disc player: ❖ To play the CD or to an audio CD, ... down. Continuous exposure to activate Sleep or Hibernation modes. The disc drive will run the CD/DVD. Do not set the volume too high when using Windows Media® Player, your system may not be able to loud sound can harm your disc, try launching the CD/ DVD manually. Before ...
User Guide
Page 120
Exploring the desktop The desktop is the launching pad for everything you will explore some of the special features of your notebook computer. You use its features to start programs, find documents, set up system components, and perform most other computing tasks. HINT: The illustrated examples in the Windows® ... not indicate any change in the functionality of your system. 120 Chapter 4 Exploring Your Computer's Features In this guide may appear slightly different from the screens displayed by your system.
Exploring the desktop The desktop is the launching pad for everything you will explore some of the special features of your notebook computer. You use its features to start programs, find documents, set up system components, and perform most other computing tasks. HINT: The illustrated examples in the Windows® ... not indicate any change in the functionality of your system. 120 Chapter 4 Exploring Your Computer's Features In this guide may appear slightly different from the screens displayed by your system.

User Guide
Page 129
See your network administrator about a specialized subject with others on their computer screens. ❖ Internet news groups A news group is a unique identifier for information. You can also use a Search Engine, a Web site specifically designed to help you perform many tasks. ❖ Internet email To send... help you look for that computer system linked to the Internet. Exploring Your Computer's Features An overview of using the Internet 129 If you are using a dedicated site to converse about connecting to the Internet. Surfing the Internet Once connected to that offers a...
See your network administrator about a specialized subject with others on their computer screens. ❖ Internet news groups A news group is a unique identifier for information. You can also use a Search Engine, a Web site specifically designed to help you perform many tasks. ❖ Internet email To send... help you look for that computer system linked to the Internet. Exploring Your Computer's Features An overview of using the Internet 129 If you are using a dedicated site to converse about connecting to the Internet. Surfing the Internet Once connected to that offers a...

User Guide
Page 130
...To save the file, type a file name, and then click Save. Exploring audio features You can play sound files or audio CDs using the internal microphone (available on the Web to your Web browser to transfer large amounts of your computer). Start Recording/Stop Recording button (...Sample Image) Sound Recorder screen 3 Click the Start Recording button. 4 Speak normally into the microphone. 5 When you want to use the File Transfer Protocol (FTP) features of data. Recording sounds You may record sounds by...
...To save the file, type a file name, and then click Save. Exploring audio features You can play sound files or audio CDs using the internal microphone (available on the Web to your Web browser to transfer large amounts of your computer). Start Recording/Stop Recording button (...Sample Image) Sound Recorder screen 3 Click the Start Recording button. 4 Speak normally into the microphone. 5 When you want to use the File Transfer Protocol (FTP) features of data. Recording sounds You may record sounds by...

User Guide
Page 142
...the Windows® Logon screen will display the Windows® Logon screen. Use this feature when you can be set a password, you must be deleted and then re-entered after the supervisor password is useful if more than one person uses the computer. To use an instant password. &#... prevents other users from your computer, providing additional protection for a few minutes and do not want to use an instant password, press Fn + F1. 142 Toshiba Utilities Setting passwords Setting passwords Setting a password lets you walk away from changing hardware configuration options. To ...
...the Windows® Logon screen will display the Windows® Logon screen. Use this feature when you can be set a password, you must be deleted and then re-entered after the supervisor password is useful if more than one person uses the computer. To use an instant password. &#... prevents other users from your computer, providing additional protection for a few minutes and do not want to use an instant password, press Fn + F1. 142 Toshiba Utilities Setting passwords Setting passwords Setting a password lets you walk away from changing hardware configuration options. To ...

User Guide
Page 144
... delete a supervisor password: 1 Click Start, All Programs, Toshiba, Utilities, and then TOSHIBA Assist. Using a user password A user password provides instant password and power-on password protection. The TOSHIBA Assist window appears. 2 On the left side, click the Secure tab. 3 Click the Supervisor Password icon. A pop-up screen appears asking for the User Password Mode. 7 Select...
... delete a supervisor password: 1 Click Start, All Programs, Toshiba, Utilities, and then TOSHIBA Assist. Using a user password A user password provides instant password and power-on password protection. The TOSHIBA Assist window appears. 2 On the left side, click the Secure tab. 3 Click the Supervisor Password icon. A pop-up screen appears asking for the User Password Mode. 7 Select...

User Guide
Page 148
... ❖ Wheel ❖ Hardware ❖ Device Settings You may see "Using the TouchPad™" on page 64 or "Using the Dual Mode Pad" on your pointing device or mouse settings. 148 Toshiba Utilities Mouse Utility Mouse Utility The Mouse utility allows you can change your particular... Click Start, Control Panel, and then Mouse, or click the Mouse icon in the Optimize tab of TOSHIBA Assist. The Mouse Properties screen appears. (Sample Image) Mouse Properties screen The settings you to change are divided into these settings, see additional categories depending on page 66. 2...
... ❖ Wheel ❖ Hardware ❖ Device Settings You may see "Using the TouchPad™" on page 64 or "Using the Dual Mode Pad" on your pointing device or mouse settings. 148 Toshiba Utilities Mouse Utility Mouse Utility The Mouse utility allows you can change your particular... Click Start, Control Panel, and then Mouse, or click the Mouse icon in the Optimize tab of TOSHIBA Assist. The Mouse Properties screen appears. (Sample Image) Mouse Properties screen The settings you to change are divided into these settings, see additional categories depending on page 66. 2...

User Guide
Page 149
... you are using after starting in the Optimize tab of TOSHIBA Assist. To access it remembers the last configuration. If data does not appear on page 69. Toshiba Utilities Toshiba Hardware Setup 149 Toshiba Hardware Setup Toshiba Hardware Setup is the Toshiba configuration management tool available through the Windows® operating system. The Toshiba Hardware Setup screen appears. (Sample...
... you are using after starting in the Optimize tab of TOSHIBA Assist. To access it remembers the last configuration. If data does not appear on page 69. Toshiba Utilities Toshiba Hardware Setup 149 Toshiba Hardware Setup Toshiba Hardware Setup is the Toshiba configuration management tool available through the Windows® operating system. The Toshiba Hardware Setup screen appears. (Sample...

User Guide
Page 152
...a CD. 3 Click Set Normal Mode to run more enjoyable. The setting can also be changed by CD burning software or other applications that can use the TOSHIBA Zooming utility, right-click the icon in the Optimize tab of your optical drive to make it run the drive at normal speed for the...drive to "Quiet" mode, the setting is only valid for transferring data. You can set the drive speed. (Sample Image) CD/DVD Drive Acoustic Silencer screen To access the utility: 1 Double-click the icon in the Notification Area, or click the CD/DVD Drive Acoustic Silencer icon in the Notification Area...
...a CD. 3 Click Set Normal Mode to run more enjoyable. The setting can also be changed by CD burning software or other applications that can use the TOSHIBA Zooming utility, right-click the icon in the Optimize tab of your optical drive to make it run the drive at normal speed for the...drive to "Quiet" mode, the setting is only valid for transferring data. You can set the drive speed. (Sample Image) CD/DVD Drive Acoustic Silencer screen To access the utility: 1 Double-click the icon in the Notification Area, or click the CD/DVD Drive Acoustic Silencer icon in the Notification Area...

User Guide
Page 154
...tutorial shows how to update existing fingerprint samples. NOTE When Control Center is recommended that might arise out of the use of the system settings in the Control Center. if the system recognizes the fingerprint, the user is read; Otherwise...privileges" on the main Control Center window before starting fingerprint enrollment. Toshiba does not guarantee that the fingerprint utility technology will accurately screen out unauthorized users at all times. 154 Toshiba Utilities Fingerprint Authentication Utility Fingerprint Authentication Utility (Available on certain models)...
...tutorial shows how to update existing fingerprint samples. NOTE When Control Center is recommended that might arise out of the use of the system settings in the Control Center. if the system recognizes the fingerprint, the user is read; Otherwise...privileges" on the main Control Center window before starting fingerprint enrollment. Toshiba does not guarantee that the fingerprint utility technology will accurately screen out unauthorized users at all times. 154 Toshiba Utilities Fingerprint Authentication Utility Fingerprint Authentication Utility (Available on certain models)...


