

User Manual
Page 34
34 Contents Appendix B: Power Cord/Cable Connectors 243 Appendix C: Using ConfigFree™ with your Toshiba Computer 244 Getting Started 245 Starting ConfigFree 245 ConfigFree Utilities 247 Connectivity Doctor 247 Search for Wireless Devices 250 Profile Settings 255 ConfigFree SUMMIT 259 Quick Connect 263 Using the Automatic Switch 266 Semi-Automatic Switch Feature 266 Glossary 268 Index 283
34 Contents Appendix B: Power Cord/Cable Connectors 243 Appendix C: Using ConfigFree™ with your Toshiba Computer 244 Getting Started 245 Starting ConfigFree 245 ConfigFree Utilities 247 Connectivity Doctor 247 Search for Wireless Devices 250 Profile Settings 255 ConfigFree SUMMIT 259 Quick Connect 263 Using the Automatic Switch 266 Semi-Automatic Switch Feature 266 Glossary 268 Index 283
User Manual
Page 47
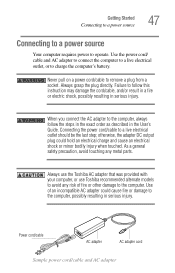
... follow this instruction may damage the cord/cable, and/or result in a fire or electric shock, possibly resulting in serious injury. Getting Started Connecting to a power source 47 Connecting to a power source Your computer requires power to the computer, possibly resulting in serious injury. Always use the Toshiba AC adapter that was provided with your...
... follow this instruction may damage the cord/cable, and/or result in a fire or electric shock, possibly resulting in serious injury. Getting Started Connecting to a power source 47 Connecting to a power source Your computer requires power to the computer, possibly resulting in serious injury. Always use the Toshiba AC adapter that was provided with your...
User Manual
Page 48
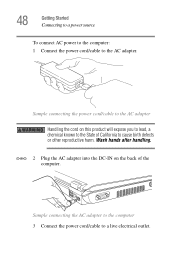
Sample connecting the power cord/cable to cause birth defects or other reproductive harm. 48 Getting Started Connecting to a power source To connect AC power to the computer: 1 Connect the power cord/cable to a live electrical outlet. Sample connecting the AC adapter to the computer 3 Connect the power cord/cable to the AC adapter. Wash hands after handling. _ + 2 Plug the AC adapter into the DC-IN on this product will expose you to lead, a chemical known to the State of California to the AC adapter Handling the cord on the back of the computer.
Sample connecting the power cord/cable to cause birth defects or other reproductive harm. 48 Getting Started Connecting to a power source To connect AC power to the computer: 1 Connect the power cord/cable to a live electrical outlet. Sample connecting the AC adapter to the computer 3 Connect the power cord/cable to the AC adapter. Wash hands after handling. _ + 2 Plug the AC adapter into the DC-IN on this product will expose you to lead, a chemical known to the State of California to the AC adapter Handling the cord on the back of the computer.
User Manual
Page 49
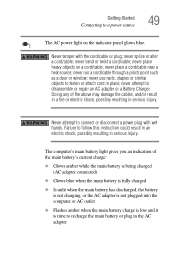
... to disassemble or repair an AC adapter or a Battery Charger. never bend or twist a cord/cable; never attempt to a power source 49 The AC power light on a cord/cable; never splice or alter a cord/cable; The computer's main battery light gives you an indication of the above may damage the... cables, and/or result in a fire or electric shock, possibly resulting in place; Doing any of the main...
... to disassemble or repair an AC adapter or a Battery Charger. never bend or twist a cord/cable; never attempt to a power source 49 The AC power light on a cord/cable; never splice or alter a cord/cable; The computer's main battery light gives you an indication of the above may damage the... cables, and/or result in a fire or electric shock, possibly resulting in place; Doing any of the main...
User Manual
Page 50
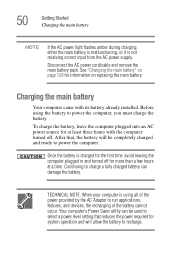
..." on page 120 for system operation and will be used to select a power level setting that reduces the power required for information on replacing the main battery. Your computer's Power Saver utility can damage the battery. Disconnect the AC power cord/cable and remove the main battery pack. After that, the battery will allow the...
..." on page 120 for system operation and will be used to select a power level setting that reduces the power required for information on replacing the main battery. Your computer's Power Saver utility can damage the battery. Disconnect the AC power cord/cable and remove the main battery pack. After that, the battery will allow the...
User Manual
Page 60
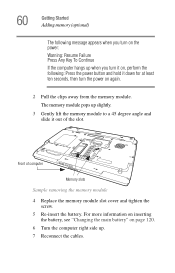
For more information on inserting the battery, see "Changing the main battery" on page 120. 6 Turn the computer right side up. 7 Reconnect the cables. The memory module pops up slightly. 3 Gently lift the memory module to a 45 degree angle and slide it down for at least ten seconds, then ...turn it on, perform the following: Press the power button and hold it out of computer Memory slots Sample removing the memory module 4 Replace the memory module slot cover and tighten the screw. 5 Re...
For more information on inserting the battery, see "Changing the main battery" on page 120. 6 Turn the computer right side up. 7 Reconnect the cables. The memory module pops up slightly. 3 Gently lift the memory module to a 45 degree angle and slide it down for at least ten seconds, then ...turn it on, perform the following: Press the power button and hold it out of computer Memory slots Sample removing the memory module 4 Replace the memory module slot cover and tighten the screw. 5 Re...
User Manual
Page 68
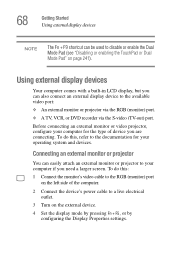
... on page 241). Before connecting an external monitor or video projector, configure your computer for the type of the computer. 2 Connect the device's power cable to the documentation for your computer if you are connecting. To do this , refer to a live electrical outlet. 3 Turn on the left ...side of device you need a larger screen. To do this : 1 Connect the monitor's video cable to your operating system and devices. Connecting an external monitor or projector You can easily attach an external monitor or projector to the RGB (monitor...
... on page 241). Before connecting an external monitor or video projector, configure your computer for the type of the computer. 2 Connect the device's power cable to the documentation for your computer if you are connecting. To do this , refer to a live electrical outlet. 3 Turn on the left ...side of device you need a larger screen. To do this : 1 Connect the monitor's video cable to your operating system and devices. Connecting an external monitor or projector You can easily attach an external monitor or projector to the RGB (monitor...
User Manual
Page 72
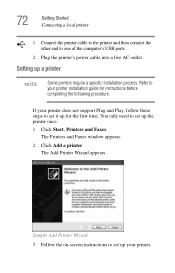
... instructions to set up for instructions before completing the following procedure. The Add Printer Wizard appears. 72 Getting Started Connecting a local printer 1 Connect the printer cable to the printer and then connect the other end to your printer. Refer to one of the computer's USB ports. 2 Plug the printer...
... instructions to set up for instructions before completing the following procedure. The Add Printer Wizard appears. 72 Getting Started Connecting a local printer 1 Connect the printer cable to the printer and then connect the other end to your printer. Refer to one of the computer's USB ports. 2 Plug the printer...

User Manual
Page 114
... command). HINT: Be careful not to recharge the main battery or plug in the AC adapter. Disconnect the AC power cord/cable and remove the battery pack. When the on / off light or power button light flashes amber, it indicates that the system is time to confuse the battery light ( ), the on .../off light ( ), and the power button light (near the upper left corner of the keyboard. NOTE Battery life and charge ...
... command). HINT: Be careful not to recharge the main battery or plug in the AC adapter. Disconnect the AC power cord/cable and remove the battery pack. When the on / off light or power button light flashes amber, it indicates that the system is time to confuse the battery light ( ), the on .../off light ( ), and the power button light (near the upper left corner of the keyboard. NOTE Battery life and charge ...
User Manual
Page 121
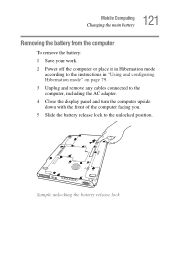
Sample unlocking the battery release lock 121 Mobile Computing Changing the main battery Removing the battery from the computer To remove the battery: 1 Save your work. 2 Power off the computer or place it in Hibernation mode according to the instructions in "Using and configuring Hibernation mode" on page 79. 3 Unplug and remove any cables connected to the computer, including the AC adapter. 4 Close the display panel and turn the computer upside down with the front of the computer facing you. 5 Slide the battery release lock to the unlocked position.
Sample unlocking the battery release lock 121 Mobile Computing Changing the main battery Removing the battery from the computer To remove the battery: 1 Save your work. 2 Power off the computer or place it in Hibernation mode according to the instructions in "Using and configuring Hibernation mode" on page 79. 3 Unplug and remove any cables connected to the computer, including the AC adapter. 4 Close the display panel and turn the computer upside down with the front of the computer facing you. 5 Slide the battery release lock to the unlocked position.

User Manual
Page 123
... battery release lock to take care of your battery and prolong its life. Sample inserting the battery 3 Turn the computer right side up. 4 Reconnect any cables that were removed in step 3 of "Removing the battery from the computer. Taking care of your battery The following sections offer tips on page 121... ❖ If the battery pack produces an odor, overheats or changes color or shape while it is being used or charged, turn off the computer's power immediately and disconnect the power cord/cable from the power socket.
... battery release lock to take care of your battery and prolong its life. Sample inserting the battery 3 Turn the computer right side up. 4 Reconnect any cables that were removed in step 3 of "Removing the battery from the computer. Taking care of your battery The following sections offer tips on page 121... ❖ If the battery pack produces an odor, overheats or changes color or shape while it is being used or charged, turn off the computer's power immediately and disconnect the power cord/cable from the power socket.
User Manual
Page 125
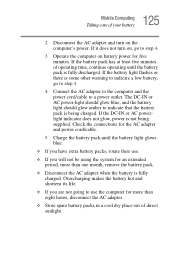
..., continue operating until the battery light glows blue. ❖ If you have extra battery packs, rotate their use the computer for the AC adapter and power cord/cable. 5 Charge the battery pack until the battery pack is being supplied. If the DC-IN or AC powerlight indicator does not glow... your battery 2 Disconnect the AC adapter and turn on, go to step 4. 4 Connect the AC adapter to the computer and the power cord/cable to a power outlet. The DC-IN or AC power-light should glow blue, and the battery light should glow amber to use . ❖ If you are not going to indicate...
..., continue operating until the battery light glows blue. ❖ If you have extra battery packs, rotate their use the computer for the AC adapter and power cord/cable. 5 Charge the battery pack until the battery pack is being supplied. If the DC-IN or AC powerlight indicator does not glow... your battery 2 Disconnect the AC adapter and turn on, go to step 4. 4 Connect the AC adapter to the computer and the power cord/cable to a power outlet. The DC-IN or AC power-light should glow blue, and the battery light should glow amber to use . ❖ If you are not going to indicate...
User Manual
Page 142
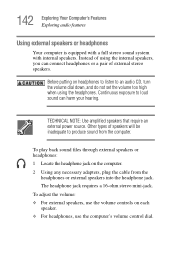
... can harm your hearing. To adjust the volume: ❖ For external speakers, use the volume controls on the computer. 2 Using any necessary adapters, plug the cable from the computer. Before putting on headphones to listen to produce sound from the headphones or external speakers into the headphone jack. To play back... headphones or a pair of using the headphones. The headphone jack requires a 16-ohm stereo mini-jack. TECHNICAL NOTE: Use amplified speakers that require an external power source.
... can harm your hearing. To adjust the volume: ❖ For external speakers, use the volume controls on the computer. 2 Using any necessary adapters, plug the cable from the computer. Before putting on headphones to listen to produce sound from the headphones or external speakers into the headphone jack. To play back... headphones or a pair of using the headphones. The headphone jack requires a 16-ohm stereo mini-jack. TECHNICAL NOTE: Use amplified speakers that require an external power source.
User Manual
Page 191
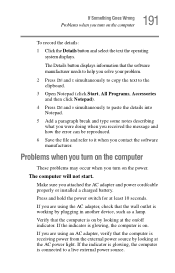
...what you were doing when you received the message and how the error can be reproduced. 6 Save the file and refer to a live external power source. If the indicator is glowing, the computer is on by looking at least 10 seconds. If the indicator is glowing, the computer is ...the external power source by looking at the AC power light. Verify that the computer is connected to it when you contact the software manufacturer. Make sure you are using an AC adapter, verify that the computer is on /off indicator. If you attached the AC adapter and power cord/cable properly or...
...what you were doing when you received the message and how the error can be reproduced. 6 Save the file and refer to a live external power source. If the indicator is glowing, the computer is on by looking at least 10 seconds. If the indicator is glowing, the computer is ...the external power source by looking at the AC power light. Verify that the computer is connected to it when you contact the software manufacturer. Make sure you are using an AC adapter, verify that the computer is on /off indicator. If you attached the AC adapter and power cord/cable properly or...
User Manual
Page 201
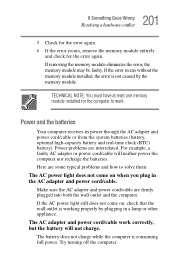
...off the computer. If removing the memory module eliminates the error, the memory module may be faulty. Power and the batteries Your computer receives its power through the AC adapter and power cord/cable or from the system batteries (battery, optional high-capacity battery and real-time clock (RTC) battery... computer is not caused by plugging in the AC adapter and power cord/cable. TECHNICAL NOTE: You must have at least one memory module installed for the error again. The AC adapter and power cord/cable work . Power problems are firmly plugged into both the wall outlet and the ...
...off the computer. If removing the memory module eliminates the error, the memory module may be faulty. Power and the batteries Your computer receives its power through the AC adapter and power cord/cable or from the system batteries (battery, optional high-capacity battery and real-time clock (RTC) battery... computer is not caused by plugging in the AC adapter and power cord/cable. TECHNICAL NOTE: You must have at least one memory module installed for the error again. The AC adapter and power cord/cable work . Power problems are firmly plugged into both the wall outlet and the ...

User Manual
Page 202
... another 20 minutes before you think this is charging. Was the battery fully charged to begin charging immediately. Leave the AC adapter and power cord/ cable connected, wait 20 minutes and see if the battery is the probable cause, let the battery reach room temperature and try charging it ... it may not charge fully. If you added a device, such as it . Check the power options using the hard disk more? Let the battery discharge completely, then try again. Is the display power set to turn on page 121. Try replacing it usually does. 202 If Something Goes Wrong ...
... another 20 minutes before you think this is charging. Was the battery fully charged to begin charging immediately. Leave the AC adapter and power cord/ cable connected, wait 20 minutes and see if the battery is the probable cause, let the battery reach room temperature and try charging it ... it may not charge fully. If you added a device, such as it . Check the power options using the hard disk more? Let the battery discharge completely, then try again. Is the display power set to turn on page 121. Try replacing it usually does. 202 If Something Goes Wrong ...
User Manual
Page 204
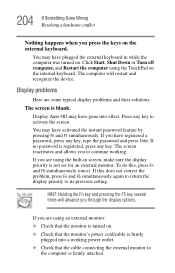
...Nothing happens when you are using an external monitor: ❖ Check that the monitor is turned on. ❖ Check that the monitor's power cord/cable is firmly plugged into effect. You may have plugged the external keyboard in screen, make sure the display priority is blank. Display Auto Off...problems and their solutions: The screen is not set for an external monitor. The computer will advance you to continue working power outlet. ❖ Check that the cable connecting the external monitor to the computer is firmly attached. If you have gone into a working . To do this ...
...Nothing happens when you are using an external monitor: ❖ Check that the monitor is turned on. ❖ Check that the monitor's power cord/cable is firmly plugged into effect. You may have plugged the external keyboard in screen, make sure the display priority is blank. Display Auto Off...problems and their solutions: The screen is not set for an external monitor. The computer will advance you to continue working power outlet. ❖ Check that the cable connecting the external monitor to the computer is firmly attached. If you have gone into a working . To do this ...
User Manual
Page 209
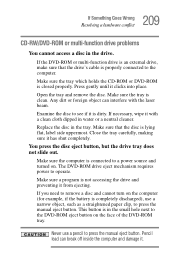
... disc in the small hole next to the DVD-ROM eject button on the face of the DVD-ROM tray. Make sure that the drive's cable is lying flat, label side uppermost. If you need to the computer. Never use a narrow object, such as a straightened paper clip, to press the ...manual eject button. The DVD-ROM drive eject mechanism requires power to see if it has shut completely. This button is completely discharged), use a pencil to press the manual eject button. Any dirt or foreign object...
... disc in the small hole next to the DVD-ROM eject button on the face of the DVD-ROM tray. Make sure that the drive's cable is lying flat, label side uppermost. If you need to the computer. Never use a narrow object, such as a straightened paper clip, to press the ...manual eject button. The DVD-ROM drive eject mechanism requires power to see if it has shut completely. This button is completely discharged), use a pencil to press the manual eject button. Any dirt or foreign object...
User Manual
Page 214
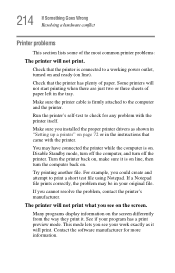
...itself. Check that the printer has plenty of paper left in the tray. See if your original file. Run the printer's self-test to a working power outlet, turned on and ready (on page 72 or in "Setting up a printer" on line). This mode lets you cannot resolve the problem, ...contact the printer's manufacturer. Turn the printer back on, make sure it . Make sure the printer cable is on . Disable Standby mode, turn off the computer, and turn the computer back on . If a Notepad file prints correctly, the problem may have...
...itself. Check that the printer has plenty of paper left in the tray. See if your original file. Run the printer's self-test to a working power outlet, turned on and ready (on page 72 or in "Setting up a printer" on line). This mode lets you cannot resolve the problem, ...contact the printer's manufacturer. Turn the printer back on, make sure it . Make sure the printer cable is on . Disable Standby mode, turn off the computer, and turn the computer back on . If a Notepad file prints correctly, the problem may have...
User Manual
Page 243
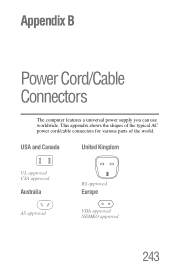
This appendix shows the shapes of the typical AC power cord/cable connectors for various parts of the world. Appendix B Power Cord/Cable Connectors The computer features a universal power supply you can use worldwide. USA and Canada United Kingdom UL approved CSA approved Australia AS approved BS approved Europe VDA approved NEMKO approved 243
This appendix shows the shapes of the typical AC power cord/cable connectors for various parts of the world. Appendix B Power Cord/Cable Connectors The computer features a universal power supply you can use worldwide. USA and Canada United Kingdom UL approved CSA approved Australia AS approved BS approved Europe VDA approved NEMKO approved 243


