
User Manual
Page 9
... to 5.25 GHz frequency range. Equipment (or its operation in excess of Health Canada limits for harmful interference to co-channel Mobile Satellite systems. High power radars are allocated as primary users of this device is located or pointed such that it does not emit RF ...utilize a l'interieur et devrait etre place loin des fenetres afin de Fournier un ecram de blindage maximal. Canada - consult Safety Code 6, obtainable from windows to 5.85 GHz bands. This device complies with the following two conditions: (1) this device may cause undesired operation of the 5.25 GHz to ...
... to 5.25 GHz frequency range. Equipment (or its operation in excess of Health Canada limits for harmful interference to co-channel Mobile Satellite systems. High power radars are allocated as primary users of this device is located or pointed such that it does not emit RF ...utilize a l'interieur et devrait etre place loin des fenetres afin de Fournier un ecram de blindage maximal. Canada - consult Safety Code 6, obtainable from windows to 5.85 GHz bands. This device complies with the following two conditions: (1) this device may cause undesired operation of the 5.25 GHz to ...

User Manual
Page 25
... Disposal of Synaptics, Inc. Microsoft and Windows are registered trademarks of Microsoft Corporation in the United States and/or other brand and product names are trademarks of Dolby Laboratories. 25 Trademarks Satellite is a trademark of Toshiba Corporation. Wi-Fi is under license. ...and any use of such marks by the Bluetooth SIG, Inc. DirectX, Active Desktop, DirectShow, and Windows Media are those of their respective owners. ...
... Disposal of Synaptics, Inc. Microsoft and Windows are registered trademarks of Microsoft Corporation in the United States and/or other brand and product names are trademarks of Dolby Laboratories. 25 Trademarks Satellite is a trademark of Toshiba Corporation. Wi-Fi is under license. ...and any use of such marks by the Bluetooth SIG, Inc. DirectX, Active Desktop, DirectShow, and Windows Media are those of their respective owners. ...
User Manual
Page 28
...Using the keyboard 87 Character keys 87 Making your keyboard emulate a full-size keyboard 87 Ctrl, Fn, and Alt keys 88 Function keys 88 Windows special keys 89 Overlay keys 89 Using the overlay to type numeric data 90 Starting a program 90 Starting a program from the Start menu...........91... Starting a program from Windows® Explorer....91 Starting a program from the Run dialog box ....92 Saving your work 93 Printing your work 95 Backing up your work 96 ...
...Using the keyboard 87 Character keys 87 Making your keyboard emulate a full-size keyboard 87 Ctrl, Fn, and Alt keys 88 Function keys 88 Windows special keys 89 Overlay keys 89 Using the overlay to type numeric data 90 Starting a program 90 Starting a program from the Start menu...........91... Starting a program from Windows® Explorer....91 Starting a program from the Run dialog box ....92 Saving your work 93 Printing your work 95 Backing up your work 96 ...
User Manual
Page 32
... Problems that are easy to fix 189 Problems when you turn on the computer............191 The Windows® operating system is not working 193 Using Startup options to fix problems 194 Internet problems 195 The Windows® XP operating system can help you 195 Resolving a hardware conflict 196 A plan of action 196...
... Problems that are easy to fix 189 Problems when you turn on the computer............191 The Windows® operating system is not working 193 Using Startup options to fix problems 194 Internet problems 195 The Windows® XP operating system can help you 195 Resolving a hardware conflict 196 A plan of action 196...
User Manual
Page 33
... 216 DVD operating problems 219 Develop good computing habits 222 Data and system configuration backup in Windows XP 223 If you need further assistance 229 Before you contact Toshiba 229 Contacting Toshiba 230 Other Toshiba Internet Web sites 231 Toshiba's worldwide offices 232 Appendix A: Hot Keys 234 Volume Mute 234 Password security 235 Without a password...
... 216 DVD operating problems 219 Develop good computing habits 222 Data and system configuration backup in Windows XP 223 If you need further assistance 229 Before you contact Toshiba 229 Contacting Toshiba 230 Other Toshiba Internet Web sites 231 Toshiba's worldwide offices 232 Appendix A: Hot Keys 234 Volume Mute 234 Password security 235 Without a password...
User Manual
Page 45
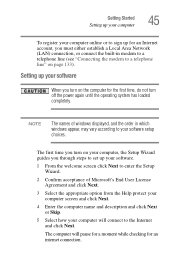
... Setup Wizard guides you through steps to set up your software. 1 From the welcome screen click Next to enter the Setup Wizard. 2 Confirm acceptance of windows displayed, and the order in modem to a telephone line (see "Connecting the modem to a telephone line" on the computer for the first time, do not... computer online or to sign up for an Internet account, you must either establish a Local Area Network (LAN) connection, or connect the built-in which windows appear, may vary according to your software setup choices.
... Setup Wizard guides you through steps to set up your software. 1 From the welcome screen click Next to enter the Setup Wizard. 2 Confirm acceptance of windows displayed, and the order in modem to a telephone line (see "Connecting the modem to a telephone line" on the computer for the first time, do not... computer online or to sign up for an Internet account, you must either establish a Local Area Network (LAN) connection, or connect the built-in which windows appear, may vary according to your software setup choices.
User Manual
Page 46
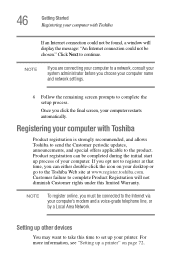
...: "An Internet connection could not be found, a window will not diminish Customer rights under this time to set up process of your computer name and network settings. 6 Follow the remaining screen prompts to complete the setup process. 46 Getting Started Registering your computer with Toshiba Product registration is strongly recommended, and allows...
...: "An Internet connection could not be found, a window will not diminish Customer rights under this time to set up process of your computer name and network settings. 6 Follow the remaining screen prompts to complete the setup process. 46 Getting Started Registering your computer with Toshiba Product registration is strongly recommended, and allows...
User Manual
Page 49
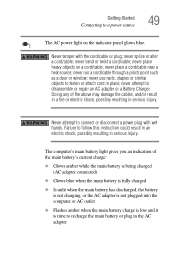
never run a cord/cable through a pinch point such as a door or window; Doing any of the main battery's current charge: ❖ Glows amber while the main battery is being charged (AC adapter connected) ❖ Glows blue when ...
never run a cord/cable through a pinch point such as a door or window; Doing any of the main battery's current charge: ❖ Glows amber while the main battery is being charged (AC adapter connected) ❖ Glows blue when ...
User Manual
Page 55
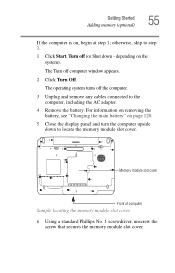
... off the computer. 3 Unplug and remove any cables connected to locate the memory module slot cover. otherwise, skip to step 3. 1 Click Start, Turn off computer window appears. 2 Click Turn Off. For information on removing the battery, see "Changing the main battery" on page 120. 5 Close the display panel and turn the...
... off the computer. 3 Unplug and remove any cables connected to locate the memory module slot cover. otherwise, skip to step 3. 1 Click Start, Turn off computer window appears. 2 Click Turn Off. For information on removing the battery, see "Changing the main battery" on page 120. 5 Close the display panel and turn the...
User Manual
Page 63
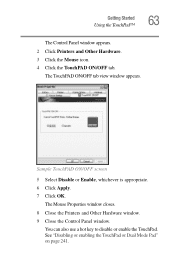
You can also use a hot key to disable or enable the TouchPad. Getting Started Using the TouchPad™ 63 The Control Panel window appears. 2 Click Printers and Other Hardware. 3 Click the Mouse icon. 4 Click the TouchPAD ON/OFF tab. The TouchPAD ON/OFF tab view window appears. The Mouse Properties window closes. 8 Close the Printers and Other Hardware window. 9 Close the Control Panel window. See "Disabling or enabling the TouchPad or Dual Mode Pad" on page 241. Sample TouchPAD ON/OFF screen 5 Select Disable or Enable, whichever is appropriate. 6 Click Apply. 7 Click OK.
You can also use a hot key to disable or enable the TouchPad. Getting Started Using the TouchPad™ 63 The Control Panel window appears. 2 Click Printers and Other Hardware. 3 Click the Mouse icon. 4 Click the TouchPAD ON/OFF tab. The TouchPAD ON/OFF tab view window appears. The Mouse Properties window closes. 8 Close the Printers and Other Hardware window. 9 Close the Control Panel window. See "Disabling or enabling the TouchPad or Dual Mode Pad" on page 241. Sample TouchPAD ON/OFF screen 5 Select Disable or Enable, whichever is appropriate. 6 Click Apply. 7 Click OK.
User Manual
Page 66
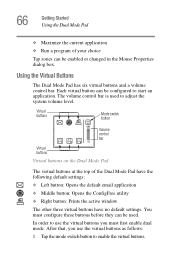
... the following default settings: ❖ Left button: Opens the default email application ❖ Middle button: Opens the ConfigFree utility ❖ Right button: Prints the active window The other three virtual buttons have no default settings.
... the following default settings: ❖ Left button: Opens the default email application ❖ Middle button: Opens the ConfigFree utility ❖ Right button: Prints the active window The other three virtual buttons have no default settings.
User Manual
Page 67
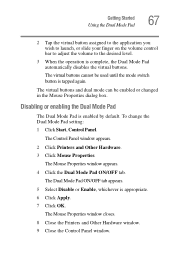
.... 4 Click the Dual Mode Pad ON/OFF tab. The Mouse Properties window closes. 8 Close the Printers and Other Hardware window. 9 Close the Control Panel window. The Dual Mode Pad ON/OFF tab appears. 5 Select Disable or Enable, whichever is enabled by default. To change the Dual ...Mode Pad setting: 1 Click Start, Control Panel. The Control Panel window appears. 2 Click Printers and Other Hardware. 3 Click Mouse Properties. Disabling or enabling the Dual Mode Pad The Dual Mode Pad is appropriate. 6 Click ...
.... 4 Click the Dual Mode Pad ON/OFF tab. The Mouse Properties window closes. 8 Close the Printers and Other Hardware window. 9 Close the Control Panel window. The Dual Mode Pad ON/OFF tab appears. 5 Select Disable or Enable, whichever is enabled by default. To change the Dual ...Mode Pad setting: 1 Click Start, Control Panel. The Control Panel window appears. 2 Click Printers and Other Hardware. 3 Click Mouse Properties. Disabling or enabling the Dual Mode Pad The Dual Mode Pad is appropriate. 6 Click ...
User Manual
Page 70
..., you may need to use a full-size keyboard, you can use a mouse instead of the computer's builtin TouchPad. If this occurs, press the Esc or Windows key to return it to use a USB-compatible mouse. See the video device documentation for additional configuration steps. The computer's USB ports support any USBcompatible...
..., you may need to use a full-size keyboard, you can use a mouse instead of the computer's builtin TouchPad. If this occurs, press the Esc or Windows key to return it to use a USB-compatible mouse. See the video device documentation for additional configuration steps. The computer's USB ports support any USBcompatible...
User Manual
Page 72
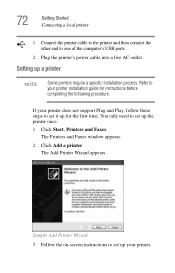
... printer does not support Plug and Play, follow these steps to set up a printer NOTE Some printers require a specific installation process. The Printers and Faxes window appears. 2 Click Add a printer. Sample Add Printer Wizard 3 Follow the on-screen instructions to set up for instructions before completing the following procedure. The Add...
... printer does not support Plug and Play, follow these steps to set up a printer NOTE Some printers require a specific installation process. The Printers and Faxes window appears. 2 Click Add a printer. Sample Add Printer Wizard 3 Follow the on-screen instructions to set up for instructions before completing the following procedure. The Add...
User Manual
Page 74
...Media Center Edition (MCE) and are not connected to a domain server. ❖ Use the Shut Down command if you are using Windows® XP Professional or Windows® XP Media Center Edition (MCE) and are connected to fully charge the main battery. 74 Getting Started Turning off the computer Turning... off the computer Pressing the power button before shutting down the Windows® operating system could cause you to lose your computer when you are not using it for a while. Make sure the system indicator...
...Media Center Edition (MCE) and are not connected to a domain server. ❖ Use the Shut Down command if you are using Windows® XP Professional or Windows® XP Media Center Edition (MCE) and are connected to fully charge the main battery. 74 Getting Started Turning off the computer Turning... off the computer Pressing the power button before shutting down the Windows® operating system could cause you to lose your computer when you are not using it for a while. Make sure the system indicator...
User Manual
Page 75
...; Since information is stored on again. If you change your files and make sure the disk activity lights are not connected to a network, use the Windows® Standby or Hibernate commands to save your system settings so that, when you turn off your computer, save your mind and decide to where...
...; Since information is stored on again. If you change your files and make sure the disk activity lights are not connected to a network, use the Windows® Standby or Hibernate commands to save your system settings so that, when you turn off your computer, save your mind and decide to where...
User Manual
Page 77
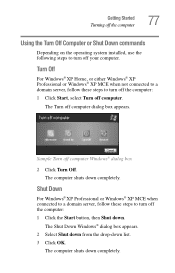
... down completely. The computer shuts down . The computer shuts down list. 3 Click OK. The Turn off computer Windows® dialog box 2 Click Turn Off. The Shut Down Windows® dialog box appears. 2 Select Shut down from the drop-down completely. Getting Started Turning off the computer 77..., use the following steps to turn off the computer: 1 Click Start, select Turn off computer. Turn Off For Windows® XP Home, or either Windows® XP Professional or Windows® XP MCE when not connected to a domain server, follow these steps to turn off your computer.
... down completely. The computer shuts down . The computer shuts down list. 3 Click OK. The Turn off computer Windows® dialog box 2 Click Turn Off. The Shut Down Windows® dialog box appears. 2 Select Shut down from the drop-down completely. Getting Started Turning off the computer 77..., use the following steps to turn off the computer: 1 Click Start, select Turn off computer. Turn Off For Windows® XP Home, or either Windows® XP Professional or Windows® XP MCE when not connected to a domain server, follow these steps to turn off your computer.
User Manual
Page 79
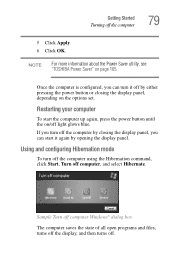
NOTE For more information about the Power Saver utility, see "TOSHIBA Power Saver" on the options set. Once the computer is configured, you can start the computer up again, press the power button until the on/... Started Turning off . If you can turn off the computer using the Hibernation command, click Start, Turn off light glows blue. Sample Turn off computer Windows® dialog box The computer saves the state of all open programs and files, turns off the display, and then turns off the computer 79...
NOTE For more information about the Power Saver utility, see "TOSHIBA Power Saver" on the options set. Once the computer is configured, you can start the computer up again, press the power button until the on/... Started Turning off . If you can turn off the computer using the Hibernation command, click Start, Turn off light glows blue. Sample Turn off computer Windows® dialog box The computer saves the state of all open programs and files, turns off the display, and then turns off the computer 79...
User Manual
Page 81
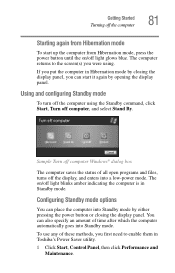
...from Hibernation mode To start it again by opening the display panel. To use any of all open programs and files, turns off computer Windows® dialog box The computer saves the status of these methods, you first need to the screen(s) you can start up the computer from...low-power mode. You can place the computer into Standby mode. The on /off computer, and select Stand By. If you put the computer in Toshiba's Power Saver utility. 1 Click Start, Control Panel, then click Performance and Maintenance. Configuring Standby mode options You can also specify an amount of time...
...from Hibernation mode To start it again by opening the display panel. To use any of all open programs and files, turns off computer Windows® dialog box The computer saves the status of these methods, you first need to the screen(s) you can start up the computer from...low-power mode. You can place the computer into Standby mode. The on /off computer, and select Stand By. If you put the computer in Toshiba's Power Saver utility. 1 Click Start, Control Panel, then click Performance and Maintenance. Configuring Standby mode options You can also specify an amount of time...
User Manual
Page 86
If you do not let the Windows® XP operating system shut down normally, details such as your desktop setup, during its shutdown procedure. 86 Learning the Basics Computing tips ❖ Back ... and store them in a safe place. See "Using and configuring Standby mode" on page 81 to put off computer command or Standby command. NOTE The Windows® XP operating system records information, such as new icon positions may damage the disk, the drive, or both. ❖ Before turning off the computer...
If you do not let the Windows® XP operating system shut down normally, details such as your desktop setup, during its shutdown procedure. 86 Learning the Basics Computing tips ❖ Back ... and store them in a safe place. See "Using and configuring Standby mode" on page 81 to put off computer command or Standby command. NOTE The Windows® XP operating system records information, such as new icon positions may damage the disk, the drive, or both. ❖ Before turning off the computer...


