User Guide
Page 8
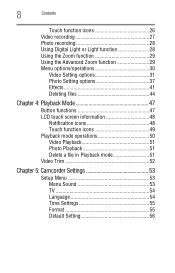
8 Contents Touch function icons 26 Video recording 27 Photo recording 28 Using Digital Light or Light function 28 Using the Zoom function 29 Using the Advanced Zoom function 29 Menu options/operations 30 Video Setting options 31 Photo Setting options 37 ...
8 Contents Touch function icons 26 Video recording 27 Photo recording 28 Using Digital Light or Light function 28 Using the Zoom function 29 Using the Advanced Zoom function 29 Menu options/operations 30 Video Setting options 31 Photo Setting options 37 ...

User Guide
Page 12
12 Getting to Know Your Camcorder Overview NOTE The LCD touch screen is manufactured using extremely high-precision technology. These dots are a normal result of the manufacturing process, and do not affect the recording. However, some tiny black and/or bright dots (white, red, blue or green) may appear on the LCD touch screen. Front view Photo button Tele/Wide button Speaker Light Lens IR receiver Microphone (Sample Illustration) Front view Rear view Indicator light LCD touch screen Mini USB/Mini HDMI™ port cover (Sample Illustration) Rear view Pause button Video button
12 Getting to Know Your Camcorder Overview NOTE The LCD touch screen is manufactured using extremely high-precision technology. These dots are a normal result of the manufacturing process, and do not affect the recording. However, some tiny black and/or bright dots (white, red, blue or green) may appear on the LCD touch screen. Front view Photo button Tele/Wide button Speaker Light Lens IR receiver Microphone (Sample Illustration) Front view Rear view Indicator light LCD touch screen Mini USB/Mini HDMI™ port cover (Sample Illustration) Rear view Pause button Video button
User Guide
Page 13
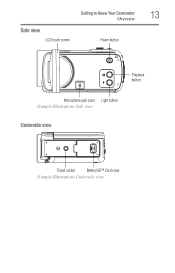
Side view LCD touch screen Getting to Know Your Camcorder Overview Power button 13 Playback button Microphone jack cover Light button (Sample Illustration) Side view Underside view Tripod socket Battery/SD™ Card cover (Sample Illustration) Underside view
Side view LCD touch screen Getting to Know Your Camcorder Overview Power button 13 Playback button Microphone jack cover Light button (Sample Illustration) Side view Underside view Tripod socket Battery/SD™ Card cover (Sample Illustration) Underside view
User Guide
Page 16
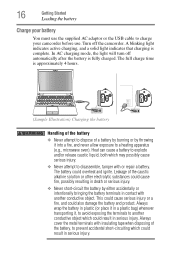
... injury. This could cause serious injury or a fire, and could overheat and ignite. The full charge time is fully charged. In AC charging mode, the light will turn off the camcorder. Always wrap the battery in plastic (or place it , to avoid exposing the terminals to charge your camcorder before use.... 16 Getting Started Loading the battery Charge your battery You must use the supplied AC adaptor or the USB cable to another conductive object. A blinking light indicates active charging, and a solid light indicates that charging is complete.
... injury. This could cause serious injury or a fire, and could overheat and ignite. The full charge time is fully charged. In AC charging mode, the light will turn off the camcorder. Always wrap the battery in plastic (or place it , to avoid exposing the terminals to charge your camcorder before use.... 16 Getting Started Loading the battery Charge your battery You must use the supplied AC adaptor or the USB cable to another conductive object. A blinking light indicates active charging, and a solid light indicates that charging is complete.

User Guide
Page 24
24 Record Mode LCD touch screen information Playback button: Switch between Record/Playback mode. Light button: Press to show the status of the setting. LCD touch screen information The indicators shown on the images below may appear on the LCD ...: Medium power 1 Battery: Low power Battery: No power DC power mode 2 Macro mode for close ups NOTE Touch the LCD touch screen to toggle the Light settings (Light ON, Light OFF, Digital...
24 Record Mode LCD touch screen information Playback button: Switch between Record/Playback mode. Light button: Press to show the status of the setting. LCD touch screen information The indicators shown on the images below may appear on the LCD ...: Medium power 1 Battery: Low power Battery: No power DC power mode 2 Macro mode for close ups NOTE Touch the LCD touch screen to toggle the Light settings (Light ON, Light OFF, Digital...

User Guide
Page 26
26 Record Mode LCD touch screen information Touch function icons Digital light ON 9 Light ON Light OFF 20x Advanced Zoom ON (only available in FULL HD 1080p/30) 20x Advanced Zoom OFF 10 15x Advanced Zoom ON 15x Advanced Zoom OFF Video Resolution Full HD (1080p 30) 60p HD60 (720p 60) 30p HD30 (720p 30) VGA (480p 30) 11 WQVGA (while the Slow Motion function is active, the video resolution is 432 x 240 [WQVGA]) Photo resolution High-16MP Standard-8MP Low-3MP Video Record mode Backlight ON/OFF 12 Photo Record mode Self-timer ON/OFF 13 Menu 14 Playback mode 15 Photo mode
26 Record Mode LCD touch screen information Touch function icons Digital light ON 9 Light ON Light OFF 20x Advanced Zoom ON (only available in FULL HD 1080p/30) 20x Advanced Zoom OFF 10 15x Advanced Zoom ON 15x Advanced Zoom OFF Video Resolution Full HD (1080p 30) 60p HD60 (720p 60) 30p HD30 (720p 30) VGA (480p 30) 11 WQVGA (while the Slow Motion function is active, the video resolution is 432 x 240 [WQVGA]) Photo resolution High-16MP Standard-8MP Low-3MP Video Record mode Backlight ON/OFF 12 Photo Record mode Self-timer ON/OFF 13 Menu 14 Playback mode 15 Photo mode
User Guide
Page 28
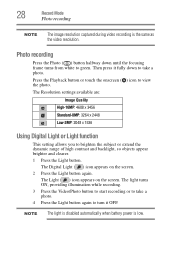
...low. The Resolution settings available are: Image Quality High-16MP: 4608 x 3456 Standard-8MP: 3264 x 2448 Low-3MP: 2048 x 1536 Using Digital Light or Light function This setting allows you to view the photo. Photo recording Press the Photo ( ) button halfway down to take a photo. 4 Press the... Light button again to green. The Digital Light ( ) icon appears on the screen. Press the Playback button or touch the onscreen ( ) icon to brighten the subject or extend ...
...low. The Resolution settings available are: Image Quality High-16MP: 4608 x 3456 Standard-8MP: 3264 x 2448 Low-3MP: 2048 x 1536 Using Digital Light or Light function This setting allows you to view the photo. Photo recording Press the Photo ( ) button halfway down to take a photo. 4 Press the... Light button again to green. The Digital Light ( ) icon appears on the screen. Press the Playback button or touch the onscreen ( ) icon to brighten the subject or extend ...

User Guide
Page 30
.../Exit ( ) icon twice, or hold it down to exit. 30 Record Mode Menu options/operations Menu options/operations Video Setting Photo Setting Effects Setup* Delete Light Light Resolution Resolution Stabilization Self-Timer Motion Detection Smile Detection Face Tracking Date Printing Slow Motion ISO Pre-Record Slideshow Time Lapse Date Printing Continuous Play...
.../Exit ( ) icon twice, or hold it down to exit. 30 Record Mode Menu options/operations Menu options/operations Video Setting Photo Setting Effects Setup* Delete Light Light Resolution Resolution Stabilization Self-Timer Motion Detection Smile Detection Face Tracking Date Printing Slow Motion ISO Pre-Record Slideshow Time Lapse Date Printing Continuous Play...
User Guide
Page 31
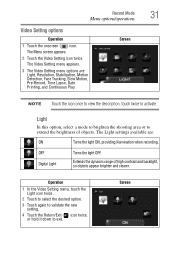
... the description, touch twice to exit. Record Mode Menu options/operations Video Setting options Operation 1 Touch the onscreen ( ) icon. Light In this option, select a mode to brighten the shooting area or to extend the brightness of high contrast and backlight, so objects... appear brighter and clearer. The Light settings available are : Light, Resolution, Stabilization, Motion Detection, Face Tracking, Slow Motion, Pre-Record, Time Lapse, Date Printing, and Continuous Play. Screen ...
... the description, touch twice to exit. Record Mode Menu options/operations Video Setting options Operation 1 Touch the onscreen ( ) icon. Light In this option, select a mode to brighten the shooting area or to extend the brightness of high contrast and backlight, so objects... appear brighter and clearer. The Light settings available are : Light, Resolution, Stabilization, Motion Detection, Face Tracking, Slow Motion, Pre-Record, Time Lapse, Date Printing, and Continuous Play. Screen ...

User Guide
Page 37
...Photo Setting menu options are : ON Turns the light ON, providing illumination when recording. The Light settings available are : Light, Resolution, Self-Timer, Smile Detection, Date Printing, ISO, and Slideshow. Operation 1 In the Photo Setting menu, touch the Light icon twice. 2 Touch to select the desired option... onscreen ( ) icon. The Menu screen appears. 2 Touch the Photo Settings icon twice. Screen OFF Digital Light Turns the light OFF. Extends the dynamic range of objects. Screen 37 Light In this option, select a mode to brighten the shooting area or to exit.
...Photo Setting menu options are : ON Turns the light ON, providing illumination when recording. The Light settings available are : Light, Resolution, Self-Timer, Smile Detection, Date Printing, ISO, and Slideshow. Operation 1 In the Photo Setting menu, touch the Light icon twice. 2 Touch to select the desired option... onscreen ( ) icon. The Menu screen appears. 2 Touch the Photo Settings icon twice. Screen OFF Digital Light Turns the light OFF. Extends the dynamic range of objects. Screen 37 Light In this option, select a mode to brighten the shooting area or to exit.

User Guide
Page 42
... ) icon twice, or hold it down to the scene and conditions. The Scene settings available are : The camcorder meters the light in capturing the light of a candle. The Exposure settings available are : Auto Automatically adjusts to appear more clear, while the surrounding may appear darker. ...42 Record Mode Menu options/operations Exposure Measure The camcorder adjusts the exposure (amount of light the camcorder receives from behind. This way, the center of the image appears more natural. Screen Scene You can select a mode ...
... ) icon twice, or hold it down to the scene and conditions. The Scene settings available are : The camcorder meters the light in capturing the light of a candle. The Exposure settings available are : Auto Automatically adjusts to appear more clear, while the surrounding may appear darker. ...42 Record Mode Menu options/operations Exposure Measure The camcorder adjusts the exposure (amount of light the camcorder receives from behind. This way, the center of the image appears more natural. Screen Scene You can select a mode ...

User Guide
Page 44
The White Balance settings available are : Delete Video, Delete Photo, Select & Delete, and Delete All. Tungsten Use in fluorescent lighting. Operation 1 In the Effects menu, touch the White Balance icon twice. 2 Touch to select the desired option. 3 Touch again to validate the new setting. 4 Touch .../operations White Balance The camcorder adjusts the white balance of images automatically. Screen Screen Deleting files Operation 1 Touch the onscreen ( ) icon. Fluorescent Use in tungsten lighting. Daylight Use in outdoor conditions.
The White Balance settings available are : Delete Video, Delete Photo, Select & Delete, and Delete All. Tungsten Use in fluorescent lighting. Operation 1 In the Effects menu, touch the White Balance icon twice. 2 Touch to select the desired option. 3 Touch again to validate the new setting. 4 Touch .../operations White Balance The camcorder adjusts the white balance of images automatically. Screen Screen Deleting files Operation 1 Touch the onscreen ( ) icon. Fluorescent Use in tungsten lighting. Daylight Use in outdoor conditions.
User Guide
Page 56
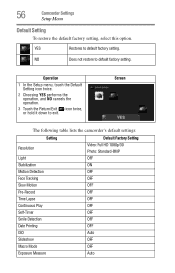
..., select this option. Screen The following table lists the camcorder's default settings: Setting Default Factory Setting Resolution Video: Full HD 1080p/30 Photo: Standard-8MP Light OFF Stabilization ON Motion Detection OFF Face Tracking OFF Slow Motion OFF Pre-Record OFF Time Lapse OFF Continuous Play OFF Self-Timer OFF Smile...
..., select this option. Screen The following table lists the camcorder's default settings: Setting Default Factory Setting Resolution Video: Full HD 1080p/30 Photo: Standard-8MP Light OFF Stabilization ON Motion Detection OFF Face Tracking OFF Slow Motion OFF Pre-Record OFF Time Lapse OFF Continuous Play OFF Self-Timer OFF Smile...
User Guide
Page 61
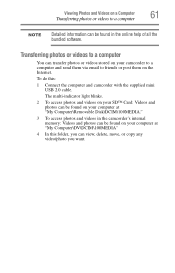
... computer at "My Computer\Removable Disk\DCIM\100MEDIA." 3 To access photos and videos in the online help of all the bundled software. The multi-indicator light blinks. 2 To access photos and videos on your computer at "My Computer\DV\DCIM\100MEDIA" 4 In this : 1 Connect the computer and camcorder with the supplied...
... computer at "My Computer\Removable Disk\DCIM\100MEDIA." 3 To access photos and videos in the online help of all the bundled software. The multi-indicator light blinks. 2 To access photos and videos on your computer at "My Computer\DV\DCIM\100MEDIA" 4 In this : 1 Connect the computer and camcorder with the supplied...

User Guide
Page 67
In this mode, you can implement live video conference meetings and multimedia communications. (Sample Illustration) Connecting the camcorder to the Webcam mode. Press the Video button to switch to a computer 67 The Multi-indicator light glows blue. Chapter 9 Webcam Mode Connect the camcorder to your computer, using the supplied USB 2.0 cable.
In this mode, you can implement live video conference meetings and multimedia communications. (Sample Illustration) Connecting the camcorder to the Webcam mode. Press the Video button to switch to a computer 67 The Multi-indicator light glows blue. Chapter 9 Webcam Mode Connect the camcorder to your computer, using the supplied USB 2.0 cable.
User Guide
Page 69
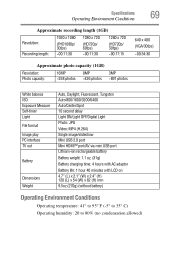
...photo capacity (1GB) Resolution: Photo capacity: 16MP 8MP 3MP ~258 photos ~426 photos ~891 photos White balance ISO Exposure Measure Self-timer Light File format Image play PC interface TV out Battery Dimensions Weight Auto, Daylight, Fluorescent, Tungsten Auto/800/1600/3200/6400 Auto/Center/Spot 10... second delay Light ON/Light OFF/Digital Light Photo: JPG Video: MP4 (H.264) Single image/slideshow Mini USB 2.0 port Mini HDMI™ port/AV via mini USB port ...
...photo capacity (1GB) Resolution: Photo capacity: 16MP 8MP 3MP ~258 photos ~426 photos ~891 photos White balance ISO Exposure Measure Self-timer Light File format Image play PC interface TV out Battery Dimensions Weight Auto, Daylight, Fluorescent, Tungsten Auto/800/1600/3200/6400 Auto/Center/Spot 10... second delay Light ON/Light OFF/Digital Light Photo: JPG Video: MP4 (H.264) Single image/slideshow Mini USB 2.0 port Mini HDMI™ port/AV via mini USB port ...
User Guide
Page 70
.../SDHC/SDXC card to "Format" on the memory card do not display properly when the LCD touch screen shows the "!" You must be adjusted? The light turns off automatically after battery is taken. 4 How do some of a computer (Refer to a high speed card. 3 Why do I charge the battery? ...The camcorder extends picture exposure time under low-light/ indoor conditions. Try switching between Macro and Normal modes. 2 The files on page 55). The camcorder must use the supplied AC adaptor or the USB...
.../SDHC/SDXC card to "Format" on the memory card do not display properly when the LCD touch screen shows the "!" You must be adjusted? The light turns off automatically after battery is taken. 4 How do some of a computer (Refer to a high speed card. 3 Why do I charge the battery? ...The camcorder extends picture exposure time under low-light/ indoor conditions. Try switching between Macro and Normal modes. 2 The files on page 55). The camcorder must use the supplied AC adaptor or the USB...