
User Guide
Page 7
... 26 Photo recording 27 Using the Zoom function 27 Using the Advanced Zoom function 28 Menu options/operations 29 Video Setting options 30 Photo setting options 34 Effects 39 Deleting files 42 Chapter 4: Playback Mode 44 Button functions 44 LCD touch screen information ...45 Notification icons 45 Touch function icons 46 Playback mode operations 47 Video Playback 48 Photo Playback 48 Delete a file in Playback mode 49 Chapter 5: Camcorder Settings 50 Setup Menu 50 Menu Sound 50 TV 51 ...
... 26 Photo recording 27 Using the Zoom function 27 Using the Advanced Zoom function 28 Menu options/operations 29 Video Setting options 30 Photo setting options 34 Effects 39 Deleting files 42 Chapter 4: Playback Mode 44 Button functions 44 LCD touch screen information ...45 Notification icons 45 Touch function icons 46 Playback mode operations 47 Video Playback 48 Photo Playback 48 Delete a file in Playback mode 49 Chapter 5: Camcorder Settings 50 Setup Menu 50 Menu Sound 50 TV 51 ...
User Guide
Page 8
...video/photo files selected manually to a Web site 60 Setting up your account information for a Web site 61 Webcam mode 62 ArcSoft MediaImpression 63 Chapter 9: Specifications 66 Operating Environment Conditions 67 Chapter 10: Troubleshooting 68 Chapter 11: Other Information 70 Toshiba... Support 70 Before you call 70 Contacting Toshiba 71 Toshiba's technical support Web site 71 Toshiba voice contact 71 Warranty 72 Online Warranty Information 72 Warranty Service 72
...video/photo files selected manually to a Web site 60 Setting up your account information for a Web site 61 Webcam mode 62 ArcSoft MediaImpression 63 Chapter 9: Specifications 66 Operating Environment Conditions 67 Chapter 10: Troubleshooting 68 Chapter 11: Other Information 70 Toshiba... Support 70 Before you call 70 Contacting Toshiba 71 Toshiba's technical support Web site 71 Toshiba voice contact 71 Warranty 72 Online Warranty Information 72 Warranty Service 72
User Guide
Page 9
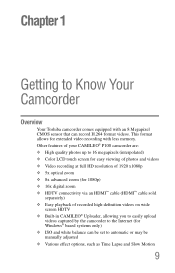
Other features of your CAMILEO® P100 camcorder are: ❖ High quality photos up to 16 megapixels (interpolated) ❖ Color LCD touch screen for easy viewing of photos and videos ❖ Video recording at full HD resolution of 1920 x1080p ❖ 5x optical zoom ❖ 8x advanced ...in CAMILEO® Uploader, allowing you to easily upload videos captured by the camcorder to the Internet (for extended video recording with an 8 Megapixel CMOS sensor that can be set to Know Your Camcorder Overview Your Toshiba camcorder comes equipped with less memory. This format allows for...
Other features of your CAMILEO® P100 camcorder are: ❖ High quality photos up to 16 megapixels (interpolated) ❖ Color LCD touch screen for easy viewing of photos and videos ❖ Video recording at full HD resolution of 1920 x1080p ❖ 5x optical zoom ❖ 8x advanced ...in CAMILEO® Uploader, allowing you to easily upload videos captured by the camcorder to the Internet (for extended video recording with an 8 Megapixel CMOS sensor that can be set to Know Your Camcorder Overview Your Toshiba camcorder comes equipped with less memory. This format allows for...
User Guide
Page 10
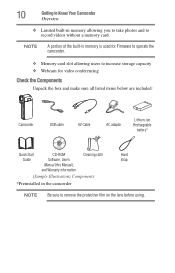
10 Getting to Know Your Camcorder Overview ❖ Limited built-in memory allowing you to take photos and to record videos without a memory card NOTE A portion of the built-in memory is used for Firmware to operate the camcorder. ❖ Memory card slot allowing users ...to increase storage capacity ❖ Webcam for video conferencing Check the Components Unpack the box and make sure all listed items below are included: Camcorder USB cable AV Cable AC adaptor Lithium-ion...
10 Getting to Know Your Camcorder Overview ❖ Limited built-in memory allowing you to take photos and to record videos without a memory card NOTE A portion of the built-in memory is used for Firmware to operate the camcorder. ❖ Memory card slot allowing users ...to increase storage capacity ❖ Webcam for video conferencing Check the Components Unpack the box and make sure all listed items below are included: Camcorder USB cable AV Cable AC adaptor Lithium-ion...
User Guide
Page 13
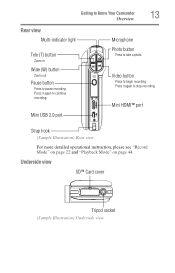
Press it again to stop recording. Video button Press to take a photo. Press it again to pause recording. Mini USB 2.0 port Microphone Photo button Press to begin recording. Mini HDMI™ port ...
Press it again to stop recording. Video button Press to take a photo. Press it again to pause recording. Mini USB 2.0 port Microphone Photo button Press to begin recording. Mini HDMI™ port ...
User Guide
Page 20
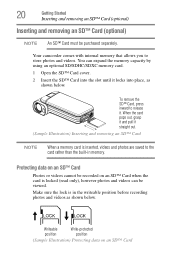
... Card (optional) NOTE An SD™ Card must be viewed. You can be purchased separately. Protecting data on an SD™ Card Photos or videos cannot be recorded on an SD™ Card When the card pops out, grasp it and pull it straight out. (Sample Illustration) Inserting and removing... an SD™ Card NOTE When a memory card is in memory. To remove the SD™ Card, press inward to store photos and videos. Writeable Write-protected position position (Sample Illustration) Protecting data on an SD™ Card when the card is locked (read only), however photos and...
... Card (optional) NOTE An SD™ Card must be viewed. You can be purchased separately. Protecting data on an SD™ Card Photos or videos cannot be recorded on an SD™ Card When the card pops out, grasp it and pull it straight out. (Sample Illustration) Inserting and removing... an SD™ Card NOTE When a memory card is in memory. To remove the SD™ Card, press inward to store photos and videos. Writeable Write-protected position position (Sample Illustration) Protecting data on an SD™ Card when the card is locked (read only), however photos and...
User Guide
Page 21
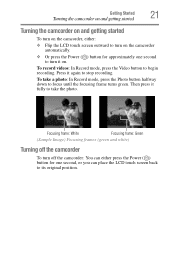
... 21 Turning the camcorder on and getting started Turning the camcorder on and getting started To turn it on. To take the photo. To record videos: In Record mode, press the Video button to stop recording.
... 21 Turning the camcorder on and getting started Turning the camcorder on and getting started To turn it on. To take the photo. To record videos: In Record mode, press the Video button to stop recording.
User Guide
Page 22
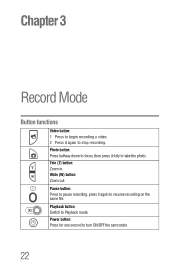
Pause button: Press to pause recording, press it again to stop recording. Chapter 3 Record Mode Button functions Video button: 1 Press to begin recording a video. 2 Press it again to resume recording on the same file. Wide (W) button: Zoom out. Photo button: Press halfway down to focus, then press it fully to turn ON/OFF the camcorder. 22 Tele (T) button: Zoom in. Power button: Press for one second to take the photo. Playback button: Switch to Playback mode.
Pause button: Press to pause recording, press it again to stop recording. Chapter 3 Record Mode Button functions Video button: 1 Press to begin recording a video. 2 Press it again to resume recording on the same file. Wide (W) button: Zoom out. Photo button: Press halfway down to focus, then press it fully to turn ON/OFF the camcorder. 22 Tele (T) button: Zoom in. Power button: Press for one second to take the photo. Playback button: Switch to Playback mode.
User Guide
Page 23
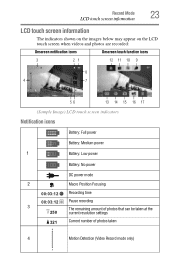
... Mode 23 LCD touch screen information LCD touch screen information The indicators shown on the images below may appear on the LCD touch screen when videos and photos are recorded: Onscreen notification icons Onscreen touch function icons 3 21 12 11 10 9 8 4 7 56 13 14 15 16 17 (Sample Image) LCD touch... Pause recording 3 The remaining amount of photos that can be taken at the 250 current resolution settings 321 Current number of photos taken 4 Motion Detection (Video Record mode only)
... Mode 23 LCD touch screen information LCD touch screen information The indicators shown on the images below may appear on the LCD touch screen when videos and photos are recorded: Onscreen notification icons Onscreen touch function icons 3 21 12 11 10 9 8 4 7 56 13 14 15 16 17 (Sample Image) LCD touch... Pause recording 3 The remaining amount of photos that can be taken at the 250 current resolution settings 321 Current number of photos taken 4 Motion Detection (Video Record mode only)

User Guide
Page 24
... (Available for Advanced Zoom activated in FULL HD 1080p/30 or HD 720p/30 video recording) 7 1x~96x (6x Advanced Zoom, 16x Digital Zoom) (Available for Advanced Zoom activated in HD 720p/60 video recording) 1x~160x (10x Advanced Zoom, 16x Digital Zoom) (Available for Advanced Zoom... activated in VGA 480p/30 video recording) Slow Motion (Video Record mode only) Note: Slow motion videos will be recorded in QVGA resolution (320 x 240 [QVGA...
... (Available for Advanced Zoom activated in FULL HD 1080p/30 or HD 720p/30 video recording) 7 1x~96x (6x Advanced Zoom, 16x Digital Zoom) (Available for Advanced Zoom activated in HD 720p/60 video recording) 1x~160x (10x Advanced Zoom, 16x Digital Zoom) (Available for Advanced Zoom... activated in VGA 480p/30 video recording) Slow Motion (Video Record mode only) Note: Slow motion videos will be recorded in QVGA resolution (320 x 240 [QVGA...
User Guide
Page 25
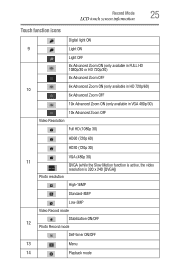
... (only available in HD 720p/60) 10 6x Advanced Zoom OFF 10x Advanced Zoom ON (only available in VGA 480p/30) 10x Advanced Zoom OFF Video Resolution Full HD (1080p 30) 60p HD60 (720p 60) 30p HD30 (720p 30) VGA (480p 30) 11 QVGA (while the Slow Motion function is active..., the video resolution is 320 x 240 [QVGA]) Photo resolution High-16MP Standard-8MP Low-3MP Video Record mode Stabilization ON/OFF 12 Photo Record mode Self-timer ON/OFF 13 Menu 14 Playback mode
... (only available in HD 720p/60) 10 6x Advanced Zoom OFF 10x Advanced Zoom ON (only available in VGA 480p/30) 10x Advanced Zoom OFF Video Resolution Full HD (1080p 30) 60p HD60 (720p 60) 30p HD30 (720p 30) VGA (480p 30) 11 QVGA (while the Slow Motion function is active..., the video resolution is 320 x 240 [QVGA]) Photo resolution High-16MP Standard-8MP Low-3MP Video Record mode Stabilization ON/OFF 12 Photo Record mode Self-timer ON/OFF 13 Menu 14 Playback mode
User Guide
Page 26
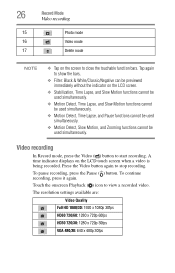
... to close the touchable function bars. To continue recording, press it again. Touch the onscreen Playback ( ) icon to start recording. Press the Video button again to show the bars. ❖ Filter: Black & White/Classic/Negative can be previewed immediately without the indicator on the LCD screen.... functions cannot be used simultaneously. ❖ Motion Detect, Slow Motion, and Zooming functions cannot be used simultaneously. The resolution settings available are: Video Quality Full HD 1080/30: 1920 x 1080p 30fps 60p HD60 720/60: 1280 x 720p 60fps 30p HD30 720/30: 1280 x 720p 30fps...
... to close the touchable function bars. To continue recording, press it again. Touch the onscreen Playback ( ) icon to start recording. Press the Video button again to show the bars. ❖ Filter: Black & White/Classic/Negative can be previewed immediately without the indicator on the LCD screen.... functions cannot be used simultaneously. ❖ Motion Detect, Slow Motion, and Zooming functions cannot be used simultaneously. The resolution settings available are: Video Quality Full HD 1080/30: 1920 x 1080p 30fps 60p HD60 720/60: 1280 x 720p 60fps 30p HD30 720/30: 1280 x 720p 30fps...
User Guide
Page 27
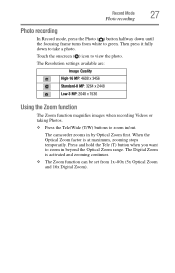
... Quality High-16 MP: 4608 x 3456 Standard-8 MP: 3264 x 2448 Low-3 MP: 2048 x 1536 Using the Zoom function The Zoom function magnifies images when recording Videos or taking Photos. ❖ Press the Tele/Wide (T/W) buttons to take a photo. When the Optical Zoom factor is activated and zooming continues. ❖ The Zoom...
... Quality High-16 MP: 4608 x 3456 Standard-8 MP: 3264 x 2448 Low-3 MP: 2048 x 1536 Using the Zoom function The Zoom function magnifies images when recording Videos or taking Photos. ❖ Press the Tele/Wide (T/W) buttons to take a photo. When the Optical Zoom factor is activated and zooming continues. ❖ The Zoom...
User Guide
Page 28
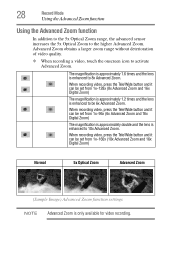
...Advanced Zoom function In addition to the 5x Optical Zoom range, the advanced sensor increases the 5x Optical Zoom to activate Advanced Zoom. When recording video, press the Tele/Wide button and it 60p can be set from 1x~128x (8x Advanced Zoom and 16x Digital Zoom) The magnification is ...approximately 1.2 times and the lens is enhanced to be 6x Advanced Zoom. 30p When recording video, press the Tele/Wide button and it can be set from 1x~160x (10x Advanced Zoom and 16x Digital Zoom) Normal 5x Optical Zoom Advanced...
...Advanced Zoom function In addition to the 5x Optical Zoom range, the advanced sensor increases the 5x Optical Zoom to activate Advanced Zoom. When recording video, press the Tele/Wide button and it 60p can be set from 1x~128x (8x Advanced Zoom and 16x Digital Zoom) The magnification is ...approximately 1.2 times and the lens is enhanced to be 6x Advanced Zoom. 30p When recording video, press the Tele/Wide button and it can be set from 1x~160x (10x Advanced Zoom and 16x Digital Zoom) Normal 5x Optical Zoom Advanced...
User Guide
Page 29
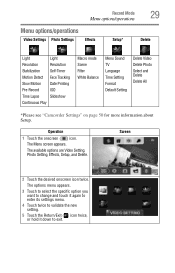
Screen 2 Touch the desired onscreen icon twice. Record Mode 29 Menu options/operations Menu options/operations Video Settings Photo Settings Effects Setup* Delete Light Light Resolution Resolution Stabilization Self-Timer Motion Detect Face Tracking Slow Motion Date ... Pre-Record ISO Time Lapse Slideshow Continuous Play Macro mode Scene Filter White Balance Menu Sound TV Language Time Setting Format Default Setting Delete Video Delete Photo Select and Delete Delete All *Please see "Camcorder Settings" on page 50 for more information about Setup. The options menu ...
Screen 2 Touch the desired onscreen icon twice. Record Mode 29 Menu options/operations Menu options/operations Video Settings Photo Settings Effects Setup* Delete Light Light Resolution Resolution Stabilization Self-Timer Motion Detect Face Tracking Slow Motion Date ... Pre-Record ISO Time Lapse Slideshow Continuous Play Macro mode Scene Filter White Balance Menu Sound TV Language Time Setting Format Default Setting Delete Video Delete Photo Select and Delete Delete All *Please see "Camcorder Settings" on page 50 for more information about Setup. The options menu ...

User Guide
Page 30
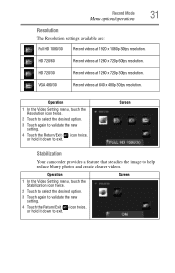
... Resolution, Stabilization, Motion Detect, Slow Motion, Pre-Record, Time Lapse, and Continuous Play. Extends the dynamic range of objects. Operation 1 In the Video Setting menu, touch the Light icon twice. 2 Touch to select the desired option. 3 Touch again to validate the new setting. 4 Touch the ...Return/Exit ( ) icon twice, or hold it down to enter the Video Setting menu. Screen The Video Setting menu appears. 3 The Video Setting menu options are : ON Turns the light ON, providing illumination when recording. The Menu screen appears. 2 Touch...
... Resolution, Stabilization, Motion Detect, Slow Motion, Pre-Record, Time Lapse, and Continuous Play. Extends the dynamic range of objects. Operation 1 In the Video Setting menu, touch the Light icon twice. 2 Touch to select the desired option. 3 Touch again to validate the new setting. 4 Touch the ...Return/Exit ( ) icon twice, or hold it down to enter the Video Setting menu. Screen The Video Setting menu appears. 3 The Video Setting menu options are : ON Turns the light ON, providing illumination when recording. The Menu screen appears. 2 Touch...
User Guide
Page 31
...720p 60fps resolution. Screen Stabilization Your camcorder provides a feature that steadies the image to exit. HD 720/60 Record videos at 1280 x 720p 30fps resolution. Operation 1 In the Video Setting menu, touch the Stabilization icon twice. 2 Touch to select the desired option. 3 Touch again to validate ...the new setting. 4 Touch the Return/Exit ( ) icon twice, or hold it down to exit. Screen Operation 1 In the Video Setting menu, touch the Resolution icon twice. 2 Touch to select the desired option. 3 Touch again to validate the new setting. 4 Touch the Return...
...720p 60fps resolution. Screen Stabilization Your camcorder provides a feature that steadies the image to exit. HD 720/60 Record videos at 1280 x 720p 30fps resolution. Operation 1 In the Video Setting menu, touch the Stabilization icon twice. 2 Touch to select the desired option. 3 Touch again to validate ...the new setting. 4 Touch the Return/Exit ( ) icon twice, or hold it down to exit. Screen Operation 1 In the Video Setting menu, touch the Resolution icon twice. 2 Touch to select the desired option. 3 Touch again to validate the new setting. 4 Touch the Return...

User Guide
Page 32
... The view angle may become smaller when the Slow Motion function is activated. ❖ When the Slow Motion function is activated, the video resolution is detected. 32 Record Mode Menu options/operations Motion detection This option allows the camcorder to exit. It stops recording when movement stops...Touch again to validate the new setting. 4 Touch the Return/Exit ( ) icon twice, or hold it down to exit. Operation Screen 1 In the Video Setting menu, touch the Slow Motion icon twice. 2 Touch to select the desired option. 3 Touch again to validate the new setting. 4 Touch the...
... The view angle may become smaller when the Slow Motion function is activated. ❖ When the Slow Motion function is activated, the video resolution is detected. 32 Record Mode Menu options/operations Motion detection This option allows the camcorder to exit. It stops recording when movement stops...Touch again to validate the new setting. 4 Touch the Return/Exit ( ) icon twice, or hold it down to exit. Operation Screen 1 In the Video Setting menu, touch the Slow Motion icon twice. 2 Touch to select the desired option. 3 Touch again to validate the new setting. 4 Touch the...
User Guide
Page 33
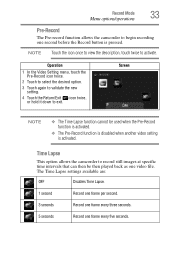
...specific time intervals that can then be used when the Pre-Record function is activated. ❖ The Pre-Record function is disabled when another video setting is pressed. The Time Lapse settings available are: OFF Disables Time Lapse. 1 second Record one frame per second. 3 seconds Record one... one second before the Record button is activated. Screen NOTE ❖ The Time Lapse function cannot be then played back as one video file. Record Mode 33 Menu options/operations Pre-Record The Pre-record function allows the camcorder to begin recording one frame every five seconds....
...specific time intervals that can then be used when the Pre-Record function is activated. ❖ The Pre-Record function is disabled when another video setting is pressed. The Time Lapse settings available are: OFF Disables Time Lapse. 1 second Record one frame per second. 3 seconds Record one... one second before the Record button is activated. Screen NOTE ❖ The Time Lapse function cannot be then played back as one video file. Record Mode 33 Menu options/operations Pre-Record The Pre-record function allows the camcorder to begin recording one frame every five seconds....

User Guide
Page 34
... desired option. 3 Touch again to validate the new setting. 4 Touch the Return/Exit ( ) icon twice, or hold it down to exit. Screen Operation 1 In the Video Setting menu, touch the Continuous Play icon twice. 2 Touch to select the desired option. 3 Touch again to validate the new setting. 4 Touch the Return/Exit...
... desired option. 3 Touch again to validate the new setting. 4 Touch the Return/Exit ( ) icon twice, or hold it down to exit. Screen Operation 1 In the Video Setting menu, touch the Continuous Play icon twice. 2 Touch to select the desired option. 3 Touch again to validate the new setting. 4 Touch the Return/Exit...
