

User Guide
Page 6
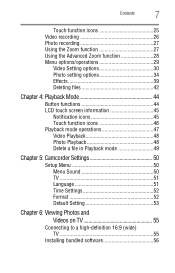
Contents Chapter 1: Getting to Know Your Camcorder 9 Overview 9 Check the Components 10 System Requirements 11 Front/Side views 12 Rear view 13 Underside view 13 Chapter 2: Getting Started 14 Loading the battery 14 Charging the battery 15 Inserting and removing an SD™ Card (optional 20 Protecting data on an SD™ Card 20 Turning the camcorder on and getting started ........21 Turning off the camcorder 21 Chapter 3: Record Mode 22 Button functions 22 LCD touch screen information 23 Notification icons 23 6
Contents Chapter 1: Getting to Know Your Camcorder 9 Overview 9 Check the Components 10 System Requirements 11 Front/Side views 12 Rear view 13 Underside view 13 Chapter 2: Getting Started 14 Loading the battery 14 Charging the battery 15 Inserting and removing an SD™ Card (optional 20 Protecting data on an SD™ Card 20 Turning the camcorder on and getting started ........21 Turning off the camcorder 21 Chapter 3: Record Mode 22 Button functions 22 LCD touch screen information 23 Notification icons 23 6
User Guide
Page 7
... options/operations 29 Video Setting options 30 Photo setting options 34 Effects 39 Deleting files 42 Chapter 4: Playback Mode 44 Button functions 44 LCD touch screen information 45 Notification icons 45 Touch function icons 46 Playback mode operations 47 Video Playback 48 Photo Playback 48 Delete a file in Playback mode 49...
... options/operations 29 Video Setting options 30 Photo setting options 34 Effects 39 Deleting files 42 Chapter 4: Playback Mode 44 Button functions 44 LCD touch screen information 45 Notification icons 45 Touch function icons 46 Playback mode operations 47 Video Playback 48 Photo Playback 48 Delete a file in Playback mode 49...
User Guide
Page 9
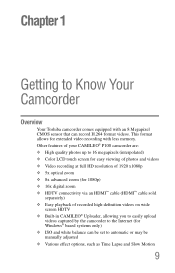
...; ISO and white balance can record H.264 format videos. Other features of your CAMILEO® P100 camcorder are: ❖ High quality photos up to 16 megapixels (interpolated) ❖ Color LCD touch screen for easy viewing of photos and videos ❖ Video recording at full HD resolution of 1920 ... connectivity via an HDMI™ cable (HDMI™ cable sold separately) ❖ Easy playback of recorded high-definition videos on wide screen HDTV ❖ Built-in CAMILEO® Uploader, allowing you to easily upload videos captured by the camcorder to Know Your Camcorder Overview Your...
...; ISO and white balance can record H.264 format videos. Other features of your CAMILEO® P100 camcorder are: ❖ High quality photos up to 16 megapixels (interpolated) ❖ Color LCD touch screen for easy viewing of photos and videos ❖ Video recording at full HD resolution of 1920 ... connectivity via an HDMI™ cable (HDMI™ cable sold separately) ❖ Easy playback of recorded high-definition videos on wide screen HDTV ❖ Built-in CAMILEO® Uploader, allowing you to easily upload videos captured by the camcorder to Know Your Camcorder Overview Your...

User Guide
Page 11
...® 2 Duo 2.4 GHz or above ❖ 1 GB system memory ❖ 1 GB free HDD space ❖ DVD-ROM ❖ Available USB 2.0 port NOTE The LCD touch screen is manufactured using extremely high-precision technology. However, some tiny black and/or bright dots (white, red, blue or green) may appear on the LCD...
...® 2 Duo 2.4 GHz or above ❖ 1 GB system memory ❖ 1 GB free HDD space ❖ DVD-ROM ❖ Available USB 2.0 port NOTE The LCD touch screen is manufactured using extremely high-precision technology. However, some tiny black and/or bright dots (white, red, blue or green) may appear on the LCD...
User Guide
Page 21
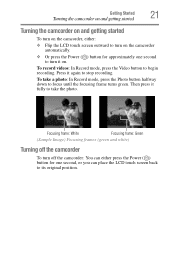
... to turn on the camcorder automatically. ❖ Or press the Power ( ) button for approximately one second, or you can either : ❖ Flip the LCD touch screen outward to turn it on. To record videos: In Record mode, press the Video button to take a photo: In Record mode, press the Photo button... Focusing frame: Green (Sample Image) Focusing frames (green and white) Turning off the camcorder To turn off the camcorder: You can place the LCD touch screen back to its original position.
... to turn on the camcorder automatically. ❖ Or press the Power ( ) button for approximately one second, or you can either : ❖ Flip the LCD touch screen outward to turn it on. To record videos: In Record mode, press the Video button to take a photo: In Record mode, press the Photo button... Focusing frame: Green (Sample Image) Focusing frames (green and white) Turning off the camcorder To turn off the camcorder: You can place the LCD touch screen back to its original position.
User Guide
Page 23
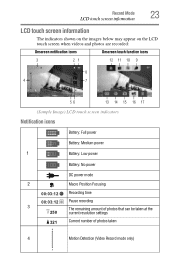
... and photos are recorded: Onscreen notification icons Onscreen touch function icons 3 21 12 11 10 9 8 4 7 56 13 14 15 16 17 (Sample Image) LCD touch screen indicators Notification icons Battery: Full power Battery: Medium power 1 Battery: Low power Battery: No power DC power mode 2 Macro Position Focusing 00:03:12 Recording...
... and photos are recorded: Onscreen notification icons Onscreen touch function icons 3 21 12 11 10 9 8 4 7 56 13 14 15 16 17 (Sample Image) LCD touch screen indicators Notification icons Battery: Full power Battery: Medium power 1 Battery: Low power Battery: No power DC power mode 2 Macro Position Focusing 00:03:12 Recording...

User Guide
Page 24
24 Record Mode LCD touch screen information Scene 5 Skin Night Backlight Manual white balance Daylight 6 Fluorescent Tungsten Zoom meter: 1x~80x (5x Optical Zoom, 16x Digital Zoom) 1x~128x (8x Advanced ...
24 Record Mode LCD touch screen information Scene 5 Skin Night Backlight Manual white balance Daylight 6 Fluorescent Tungsten Zoom meter: 1x~80x (5x Optical Zoom, 16x Digital Zoom) 1x~128x (8x Advanced ...
User Guide
Page 25
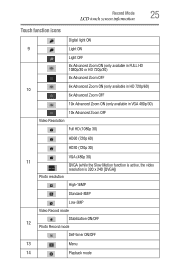
Record Mode 25 LCD touch screen information Touch function icons Digital light ON 9 Light ON Light OFF 8x Advanced Zoom ON (only available in FULL HD 1080p/30 or HD 720p/...
Record Mode 25 LCD touch screen information Touch function icons Digital light ON 9 Light ON Light OFF 8x Advanced Zoom ON (only available in FULL HD 1080p/30 or HD 720p/...
User Guide
Page 26
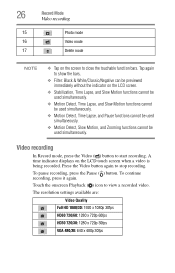
26 15 16 17 Record Mode Video recording Photo mode Video mode Delete mode NOTE ❖ Tap on the LCD screen. ❖ Stabilization, Time Lapse, and Slow Motion functions cannot be used simultaneously. ❖ Motion Detect, Time Lapse, and Slow Motion functions cannot be ... to show the bars. ❖ Filter: Black & White/Classic/Negative can be previewed immediately without the indicator on the screen to start recording. A time indicator displays on the LCD touch screen when a video is being recorded. Video recording In Record mode, press the Video ( ) button to close the touchable ...
26 15 16 17 Record Mode Video recording Photo mode Video mode Delete mode NOTE ❖ Tap on the LCD screen. ❖ Stabilization, Time Lapse, and Slow Motion functions cannot be used simultaneously. ❖ Motion Detect, Time Lapse, and Slow Motion functions cannot be ... to show the bars. ❖ Filter: Black & White/Classic/Negative can be previewed immediately without the indicator on the screen to start recording. A time indicator displays on the LCD touch screen when a video is being recorded. Video recording In Record mode, press the Video ( ) button to close the touchable ...
User Guide
Page 29
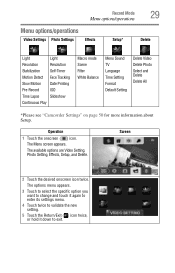
The Menu screen appears. The options menu appears. 3 Touch to select the specific option you want to change and touch it again to enter its settings menu. 4 Touch ... ( ) icon twice, or hold it down to exit. The available options are Video Setting, Photo Setting, Effects, Setup, and Delete. Operation 1 Touch the onscreen ( ) icon. Screen 2 Touch the desired onscreen icon twice. Record Mode 29 Menu options/operations Menu options/operations Video Settings Photo Settings Effects Setup* Delete Light Light Resolution...
The Menu screen appears. The options menu appears. 3 Touch to select the specific option you want to change and touch it again to enter its settings menu. 4 Touch ... ( ) icon twice, or hold it down to exit. The available options are Video Setting, Photo Setting, Effects, Setup, and Delete. Operation 1 Touch the onscreen ( ) icon. Screen 2 Touch the desired onscreen icon twice. Record Mode 29 Menu options/operations Menu options/operations Video Settings Photo Settings Effects Setup* Delete Light Light Resolution...

User Guide
Page 30
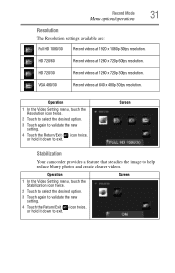
..., providing illumination when recording. Light In this option select a mode to brighten the shooting area or to exit. OFF Digital Light Turns the light OFF. Screen NOTE Touch the icon once to view the description, touch twice to enter the Video Setting menu. The Light settings available are : Light, Resolution, Stabilization... objects appear brighter and clearer. 30 Record Mode Menu options/operations Video Setting options Operation 1 Touch the onscreen ( ) icon. Extends the dynamic range of objects. Screen
..., providing illumination when recording. Light In this option select a mode to brighten the shooting area or to exit. OFF Digital Light Turns the light OFF. Screen NOTE Touch the icon once to view the description, touch twice to enter the Video Setting menu. The Light settings available are : Light, Resolution, Stabilization... objects appear brighter and clearer. 30 Record Mode Menu options/operations Video Setting options Operation 1 Touch the onscreen ( ) icon. Extends the dynamic range of objects. Screen
User Guide
Page 31
... setting. 4 Touch the Return/Exit ( ) icon twice, or hold it down to help reduce blurry photos and create clearer videos. Screen HD 720/30 Record videos at 640 x 480p 30fps resolution. Screen Stabilization Your camcorder provides a feature that steadies the image to exit. VGA 480/30 Record videos at 1280 x 720p 30fps...
... setting. 4 Touch the Return/Exit ( ) icon twice, or hold it down to help reduce blurry photos and create clearer videos. Screen HD 720/30 Record videos at 640 x 480p 30fps resolution. Screen Stabilization Your camcorder provides a feature that steadies the image to exit. VGA 480/30 Record videos at 1280 x 720p 30fps...

User Guide
Page 32
... automatically if movement is played, the playback time will be longer than the actual recording time. It stops recording when movement stops. Screen Slow motion This option allows recording of videos with a slow motion effect. NOTE ❖ While using the Slow Motion setting, audio...function is activated, the video resolution is QVGA. 32 Record Mode Menu options/operations Motion detection This option allows the camcorder to exit. Operation Screen 1 In the Video Setting menu, touch the Slow Motion icon twice. 2 Touch to select the desired option. 3 Touch again to validate ...
... automatically if movement is played, the playback time will be longer than the actual recording time. It stops recording when movement stops. Screen Slow motion This option allows recording of videos with a slow motion effect. NOTE ❖ While using the Slow Motion setting, audio...function is activated, the video resolution is QVGA. 32 Record Mode Menu options/operations Motion detection This option allows the camcorder to exit. Operation Screen 1 In the Video Setting menu, touch the Slow Motion icon twice. 2 Touch to select the desired option. 3 Touch again to validate ...
User Guide
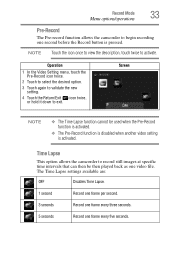
Page 33
Screen NOTE ❖ The Time Lapse function cannot be then played back as one frame every five seconds. Time Lapse This option allows the camcorder to ...
Screen NOTE ❖ The Time Lapse function cannot be then played back as one frame every five seconds. Time Lapse This option allows the camcorder to ...

User Guide
Page 34
... new setting. 4 Touch the Return/Exit ( ) icon twice, or hold it down to exit. The Menu screen appears. 2 Touch the Photo Settings icon twice to playback files continuously. Screen Photo setting options Operation 1 Touch the onscreen ( ) icon. Operation 1 In the Video Setting menu, touch the...desired option. 3 Touch again to validate the new setting. 4 Touch the Return/Exit ( ) icon twice, or hold it down to exit. Screen Screen Continuous Play This option allows you to enter the Photo Setting menu. The Photo Setting Menu appears. 3 The Photo Setting menu options are: Light,...
... new setting. 4 Touch the Return/Exit ( ) icon twice, or hold it down to exit. The Menu screen appears. 2 Touch the Photo Settings icon twice to playback files continuously. Screen Photo setting options Operation 1 Touch the onscreen ( ) icon. Operation 1 In the Video Setting menu, touch the...desired option. 3 Touch again to validate the new setting. 4 Touch the Return/Exit ( ) icon twice, or hold it down to exit. Screen Screen Continuous Play This option allows you to enter the Photo Setting menu. The Photo Setting Menu appears. 3 The Photo Setting menu options are: Light,...

User Guide
Page 35
.... 2 Touch to select the desired option. 3 Touch again to validate the new setting. 4 Touch the Return/Exit ( ) icon twice, or hold it down to exit. Screen The Light settings available are : High-16M Take photos at 4608 x 3456, 16 MP quality. Extends the dynamic range of objects. Standard-8M Take photos.../Exit ( ) icon twice, or hold it down to exit. OFF Digital Light Turns the light OFF. Low-3M Take photos at 3264 x 2448, 8 MP quality. Screen Resolution The Resolution settings available are : ON Turns the light ON, providing illumination when recording.
.... 2 Touch to select the desired option. 3 Touch again to validate the new setting. 4 Touch the Return/Exit ( ) icon twice, or hold it down to exit. Screen The Light settings available are : High-16M Take photos at 4608 x 3456, 16 MP quality. Extends the dynamic range of objects. Standard-8M Take photos.../Exit ( ) icon twice, or hold it down to exit. OFF Digital Light Turns the light OFF. Low-3M Take photos at 3264 x 2448, 8 MP quality. Screen Resolution The Resolution settings available are : ON Turns the light ON, providing illumination when recording.

User Guide
Page 36
.... 3 Touch again to validate the new setting. 4 Touch the Return/Exit ( ) icon twice, or hold it down to capture portraits in Photo mode to exit. Screen In Photo mode, when the camcorder is taken. This function works in backlit conditions. The blinking speed increases just before the photo is aimed at...
.... 3 Touch again to validate the new setting. 4 Touch the Return/Exit ( ) icon twice, or hold it down to capture portraits in Photo mode to exit. Screen In Photo mode, when the camcorder is taken. This function works in backlit conditions. The blinking speed increases just before the photo is aimed at...

User Guide
Page 37
Two manual ISO sensitivity settings are also available (800 and 1600). Auto Sets the ISO setting automatically according to exit. Screen When this option, you can imprint the date and time on the corner of each photo. Use the higher setting to take a photo in the ...
Two manual ISO sensitivity settings are also available (800 and 1600). Auto Sets the ISO setting automatically according to exit. Screen When this option, you can imprint the date and time on the corner of each photo. Use the higher setting to take a photo in the ...

User Guide
Page 38
Slideshow Photos can be viewed one photo every ten seconds. OFF Disables Slideshow. Screen NOTE The image may become grainy with a higher ISO setting. 38 Record Mode Menu options/operations Operation 1 In the Photo Setting menu, touch the ISO ... one photo every two seconds. 5 seconds Displays one photo every five seconds. 10 seconds Displays one after another in a slideshow in a chosen interval of time. Screen Operation 1 In the Photo Setting menu, touch the Slideshow icon twice. 2 Touch to select the desired option. 3 Touch again to validate the new setting. 4 Touch...
Slideshow Photos can be viewed one photo every ten seconds. OFF Disables Slideshow. Screen NOTE The image may become grainy with a higher ISO setting. 38 Record Mode Menu options/operations Operation 1 In the Photo Setting menu, touch the ISO ... one photo every two seconds. 5 seconds Displays one photo every five seconds. 10 seconds Displays one after another in a slideshow in a chosen interval of time. Screen Operation 1 In the Photo Setting menu, touch the Slideshow icon twice. 2 Touch to select the desired option. 3 Touch again to validate the new setting. 4 Touch...

User Guide
Page 39
.... Record Mode Menu options/operations Effects Operation 1 Touch the onscreen ( ) icon. When this function is brightly lit from behind. Screen Scene You can select a mode according to current conditions. The Scene settings available are : Macro mode, Scene, Filter, and White Balance. ...The Menu screen appears. 2 Touch the Effects icon twice to enter its settings menu. 3 The Effects menu options are : Auto Automatically adjusts to the scene and conditions. Screen 39 Macro mode The camcorder adjusts the focus automatically.
.... Record Mode Menu options/operations Effects Operation 1 Touch the onscreen ( ) icon. When this function is brightly lit from behind. Screen Scene You can select a mode according to current conditions. The Scene settings available are : Macro mode, Scene, Filter, and White Balance. ...The Menu screen appears. 2 Touch the Effects icon twice to enter its settings menu. 3 The Effects menu options are : Auto Automatically adjusts to the scene and conditions. Screen 39 Macro mode The camcorder adjusts the focus automatically.
