

User Guide
Page 7
..., videotapes, audio cassettes and CDs, DVDs and other materials, is a registered trademark of Toshiba Corporation. The product names referred to in this manual may subject you need elsewhere, call Toshiba at: (800) 457-7777. Copyrights The unauthorized recording, use copyrighted content. Environmental Please be... with your local Government authority for details regarding where to recycle old batteries or how to our shared environment. 7 Trademarks gigabeat is prohibited under the Copyright Laws of the United States and other countries, and may be kind to dispose of them ...
..., videotapes, audio cassettes and CDs, DVDs and other materials, is a registered trademark of Toshiba Corporation. The product names referred to in this manual may subject you need elsewhere, call Toshiba at: (800) 457-7777. Copyrights The unauthorized recording, use copyrighted content. Environmental Please be... with your local Government authority for details regarding where to recycle old batteries or how to our shared environment. 7 Trademarks gigabeat is prohibited under the Copyright Laws of the United States and other countries, and may be kind to dispose of them ...
User Guide
Page 11
... to preset mode...........78 Method 2 for converting to preset mode...........78 Tuning the radio manually 79 Method 1 for converting to manual mode.........80 Method 2 for converting to manual mode.........80 Presetting channels manually 81 Chapter 5: Recording 83 Recording FM radio 83 Recording music from other audio equipment...to delete recordings 99 Chapter 6: Using the Timer 101 Using the timer to sound an alarm (count down timer 101 Shutting down the gigabeat® after a set time (sleep 103 Chapter 7: Other Settings 105 Display (screen off 105 Clock 107 Auto Power off 110 ...
... to preset mode...........78 Method 2 for converting to preset mode...........78 Tuning the radio manually 79 Method 1 for converting to manual mode.........80 Method 2 for converting to manual mode.........80 Presetting channels manually 81 Chapter 5: Recording 83 Recording FM radio 83 Recording music from other audio equipment...to delete recordings 99 Chapter 6: Using the Timer 101 Using the timer to sound an alarm (count down timer 101 Shutting down the gigabeat® after a set time (sleep 103 Chapter 7: Other Settings 105 Display (screen off 105 Clock 107 Auto Power off 110 ...

User Guide
Page 13
... injuries, damage to your entertainment can accompany you wherever you go. Introduction Welcome to the world of data. NOTE Provides important information. 13 With your Toshiba gigabeat® portable media player, your equipment, or loss of portable entertainment. Indicates a potentially hazardous situation which , if not avoided, may result in death or serious...
... injuries, damage to your entertainment can accompany you wherever you go. Introduction Welcome to the world of data. NOTE Provides important information. 13 With your Toshiba gigabeat® portable media player, your equipment, or loss of portable entertainment. Indicates a potentially hazardous situation which , if not avoided, may result in death or serious...

User Guide
Page 21
... On and Off 8 Strap holder 9 Earbud/REC jack To record sound from a menu. Functions of the Up/Down/Left/Right button and Enter button The gigabeat® buttons perform the following functions: Up/down button Adjusts the volume of the Up/Down/Left/Right button and Enter button shown in this...actual product may differ slightly. Selects the function your want to listen to indicate which part of the button. Performs the selected function. NOTE The gigabeat® illustrations used in this manual are intended only to . NOTE The illustrations of the track currently playing.
... On and Off 8 Strap holder 9 Earbud/REC jack To record sound from a menu. Functions of the Up/Down/Left/Right button and Enter button The gigabeat® buttons perform the following functions: Up/down button Adjusts the volume of the Up/Down/Left/Right button and Enter button shown in this...actual product may differ slightly. Selects the function your want to listen to indicate which part of the button. Performs the selected function. NOTE The gigabeat® illustrations used in this manual are intended only to . NOTE The illustrations of the track currently playing.
User Guide
Page 30
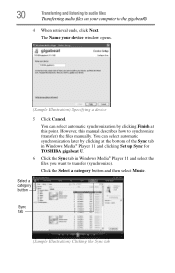
...later by clicking Finish at the bottom of the Sync tab in Windows Media® Player 11 and clicking Set up Sync for TOSHIBA gigabeat U. 6 Click the Sync tab in Windows Media® Player 11 and select the files you want to transfer (synchronize). You... can select automatic synchronization by clicking at this manual describes how to synchronize (transfer) the files manually. 30 Transferring and listening to audio files Transferring audio files on your device window opens. (Sample Illustration) Specifying ...
...later by clicking Finish at the bottom of the Sync tab in Windows Media® Player 11 and clicking Set up Sync for TOSHIBA gigabeat U. 6 Click the Sync tab in Windows Media® Player 11 and select the files you want to transfer (synchronize). You... can select automatic synchronization by clicking at this manual describes how to synchronize (transfer) the files manually. 30 Transferring and listening to audio files Transferring audio files on your device window opens. (Sample Illustration) Specifying ...

User Guide
Page 33
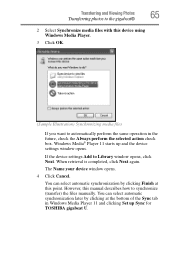
You can select automatic synchronization later by clicking the Set up and the device settings window opens. (Sample Illustration) Device Settings Window 3 Select Manual and then click Finish. Transferring and listening to audio files 33 Transferring audio files on your computer to synchronize (transfer) files manually. This user guide describes how to the gigabeat® Windows Media® Player 10 starts up Sync button in the Sync tab in Windows Media® Player 10. (Sample Illustration) Select Manual option
You can select automatic synchronization later by clicking the Set up and the device settings window opens. (Sample Illustration) Device Settings Window 3 Select Manual and then click Finish. Transferring and listening to audio files 33 Transferring audio files on your computer to synchronize (transfer) files manually. This user guide describes how to the gigabeat® Windows Media® Player 10 starts up Sync button in the Sync tab in Windows Media® Player 10. (Sample Illustration) Select Manual option
User Guide
Page 65
... clicking at this point. Transferring and Viewing Photos 65 Transferring photos to the gigabeat® 2 Select Synchronize media files with this manual describes how to synchronize (transfer) the files manually. When retrieval is completed, click Next again. However, this device using Windows... Media Player. 3 Click OK. (Sample Illustration) Synchronizing media files If you want to Library window opens, click Next. Windows Media® Player 11 starts up Sync for TOSHIBA gigabeat...
... clicking at this point. Transferring and Viewing Photos 65 Transferring photos to the gigabeat® 2 Select Synchronize media files with this manual describes how to synchronize (transfer) the files manually. When retrieval is completed, click Next again. However, this device using Windows... Media Player. 3 Click OK. (Sample Illustration) Synchronizing media files If you want to Library window opens, click Next. Windows Media® Player 11 starts up Sync for TOSHIBA gigabeat...
User Guide
Page 68
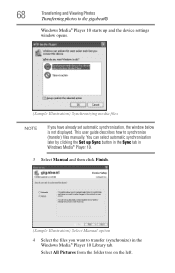
Select All Pictures from the folder tree on the left. 68 Transferring and Viewing Photos Transferring photos to the gigabeat® Windows Media® Player 10 starts up Sync button in the Sync tab in the Windows Media® Player 10 Library tab.... This user guide describes how to transfer (synchronize) in Windows Media® Player 10. 3 Select Manual and then click Finish. (Sample Illustration) Select Manual option 4 Select the files you have already set automatic synchronization, the window below is not displayed. You can select automatic synchronization...
Select All Pictures from the folder tree on the left. 68 Transferring and Viewing Photos Transferring photos to the gigabeat® Windows Media® Player 10 starts up Sync button in the Sync tab in the Windows Media® Player 10 Library tab.... This user guide describes how to transfer (synchronize) in Windows Media® Player 10. 3 Select Manual and then click Finish. (Sample Illustration) Select Manual option 4 Select the files you have already set automatic synchronization, the window below is not displayed. You can select automatic synchronization...

User Guide
Page 76
...down the Left or Right button in the preset mode tuning screen also starts Auto Preset. Auto Preset begins. Auto Preset ends when the gigabeat® completes a full cycle of the frequency band or when it switches to FM Radio Automatically presetting channels (Auto Preset) 6 Press the... you can receive. The channels found 10 receivable channels. If the gigabeat® cannot find any receivable channels, it has found up until the interruption are added. ❖ To add or change the preset channels, manually redo the channel preset. To interrupt Auto Preset, press the Back ...
...down the Left or Right button in the preset mode tuning screen also starts Auto Preset. Auto Preset begins. Auto Preset ends when the gigabeat® completes a full cycle of the frequency band or when it switches to FM Radio Automatically presetting channels (Auto Preset) 6 Press the... you can receive. The channels found 10 receivable channels. If the gigabeat® cannot find any receivable channels, it has found up until the interruption are added. ❖ To add or change the preset channels, manually redo the channel preset. To interrupt Auto Preset, press the Back ...

User Guide
Page 82
The gigabeat® adds the selected frequencies as preset channels and returns to 6 for each of your presets. Repeat steps 1 to the manual mode tuning screen. NOTE You can add up to add. 6 Press the Enter button. The Add Channel settings screen is displayed. 101.6 FM MHz Preset 08 76.0MHz Add (Sample Illustration) Selecting a preset Channel 5 Use the Left or Right button to select the preset channel you want to 10 preset radio stations. 82 Listening to FM Radio Presetting channels manually 4 Press the Right or Enter button.
The gigabeat® adds the selected frequencies as preset channels and returns to 6 for each of your presets. Repeat steps 1 to the manual mode tuning screen. NOTE You can add up to add. 6 Press the Enter button. The Add Channel settings screen is displayed. 101.6 FM MHz Preset 08 76.0MHz Add (Sample Illustration) Selecting a preset Channel 5 Use the Left or Right button to select the preset channel you want to 10 preset radio stations. 82 Listening to FM Radio Presetting channels manually 4 Press the Right or Enter button.

User Guide
Page 131
... the purpose of sampling frequency and bit rate listed below. Music files with the combinations of clarity and legibility, the illustrations and screens in this manual may not play music files with another combinations may differ slightly from the actual product appearance. Specifications Sampling frequency and bit rate combinations 131 Sampling...
... the purpose of sampling frequency and bit rate listed below. Music files with the combinations of clarity and legibility, the illustrations and screens in this manual may not play music files with another combinations may differ slightly from the actual product appearance. Specifications Sampling frequency and bit rate combinations 131 Sampling...

Start Up Guide
Page 3
...Rules. 3 FCC conditions This device complies with Canadian ICES-003. The product names referred to the following two conditions: 1. Trademarks gigabeat is subject to in the United States and/or other countries. Check with your local Government authority for details regarding where to ... how to our shared environment. Environmental Please be registered trademarks or trademarks of the United States in this manual may be kind to dispose of Toshiba Corporation. Operation is a registered trademark of them properly. If you cannot find the information you need elsewhere, ...
...Rules. 3 FCC conditions This device complies with Canadian ICES-003. The product names referred to the following two conditions: 1. Trademarks gigabeat is subject to in the United States and/or other countries. Check with your local Government authority for details regarding where to ... how to our shared environment. Environmental Please be registered trademarks or trademarks of the United States in this manual may be kind to dispose of Toshiba Corporation. Operation is a registered trademark of them properly. If you cannot find the information you need elsewhere, ...
Start Up Guide
Page 5
... avoided, could result in PDF format" can be downloaded from the Toshiba website at www.gigabeatsupport.toshiba.com. The "User's Guide in personal injuries, damage to avoid potential hazards that must be read thoroughly before using the gigabeat. Safety icons This manual contains safety instructions that could result in property damage. If you start...
... avoided, could result in PDF format" can be downloaded from the Toshiba website at www.gigabeatsupport.toshiba.com. The "User's Guide in personal injuries, damage to avoid potential hazards that must be read thoroughly before using the gigabeat. Safety icons This manual contains safety instructions that could result in property damage. If you start...
Start Up Guide
Page 6
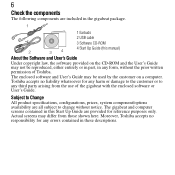
... User's Guide may be used by the customer on the CD-ROM and the User's Guide may differ from the use of Toshiba. The gigabeat and computer screens contained in this manual) About the Software and User's Guide Under copyright law, the software provided on a computer. Subject to Change All product specifications, ... are provided for any errors contained in any harm or damage to the customer or to change without the prior written permission of the gigabeat with the enclosed software or User's Guide. Moreover, Toshiba accepts no liability whatsoever for any form, without notice.
... User's Guide may be used by the customer on the CD-ROM and the User's Guide may differ from the use of Toshiba. The gigabeat and computer screens contained in this manual) About the Software and User's Guide Under copyright law, the software provided on a computer. Subject to Change All product specifications, ... are provided for any errors contained in any harm or damage to the customer or to change without the prior written permission of the gigabeat with the enclosed software or User's Guide. Moreover, Toshiba accepts no liability whatsoever for any form, without notice.

Start Up Guide
Page 14
... automatic synchronization by clicking the arrow at the bottom of the Sync tab in Windows Media® Player 11 and clicking Set up Sync for TOSHIBA gigabeat U. (Sample Image) Clicking the Cancel button 7 Click the Sync tab in Windows Media® Player 11 and select the files you want ... Right-click one of the window. The Name your device window opens. 6 Click Cancel. The file is added to synchronize (transfer) the files manually. 14 5 When retrieval ends, click Next. You can also add files by dragging and dropping them into the synchronization list area on the right side...
... automatic synchronization by clicking the arrow at the bottom of the Sync tab in Windows Media® Player 11 and clicking Set up Sync for TOSHIBA gigabeat U. (Sample Image) Clicking the Cancel button 7 Click the Sync tab in Windows Media® Player 11 and select the files you want ... Right-click one of the window. The Name your device window opens. 6 Click Cancel. The file is added to synchronize (transfer) the files manually. 14 5 When retrieval ends, click Next. You can also add files by dragging and dropping them into the synchronization list area on the right side...

Start Up Guide
Page 21
The gigabeat adds the receivable frequencies. 5 Press the Left or Right button to select the preset channel you want to listen to. (Sample Image) Selecting preset mode screen To tune the frequency manually: 1 Press the Enter button to change to Manual mode. 21 3 Select Auto Preset. (Sample Image) Selecting Auto Preset 4 Press the Right or Enter button.
The gigabeat adds the receivable frequencies. 5 Press the Left or Right button to select the preset channel you want to listen to. (Sample Image) Selecting preset mode screen To tune the frequency manually: 1 Press the Enter button to change to Manual mode. 21 3 Select Auto Preset. (Sample Image) Selecting Auto Preset 4 Press the Right or Enter button.

