Owners Manual
Page 2
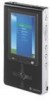
... Microsoft make no representations, warranties or other headphones, be hazardous if your attention has been diverted away from TOSHIBA and Microsoft Corporation (This gigabeat player use Microsoft® Windows Mobile® Software for Portable Media Centers) Do not use this product while driving a car. Even occasional short scans to the screen may lead to hearing...
... Microsoft make no representations, warranties or other headphones, be hazardous if your attention has been diverted away from TOSHIBA and Microsoft Corporation (This gigabeat player use Microsoft® Windows Mobile® Software for Portable Media Centers) Do not use this product while driving a car. Even occasional short scans to the screen may lead to hearing...
Owners Manual
Page 9
...19 Charging the Built-in Battery 19 Turning the Power ON/OFF 21 Setting Up Your PC 22 Installing the Included Software 22 Connecting the gigabeat to Your PC 24 Basic Operation 25 Basic Operation ...25 Enjoying Music 28 Downloading Tracks 28 Downloading Tracks from a Music CD to Your PC... 28 Transferring Tracks from the PC to the gigabeat 29 Listening to Music 32 Playback Functions 35 Repeat Play/Random Play 36 Changing the EQ 37 Adjusting Audio Quality 38 Using a Quick List for...
...19 Charging the Built-in Battery 19 Turning the Power ON/OFF 21 Setting Up Your PC 22 Installing the Included Software 22 Connecting the gigabeat to Your PC 24 Basic Operation 25 Basic Operation ...25 Enjoying Music 28 Downloading Tracks 28 Downloading Tracks from a Music CD to Your PC... 28 Transferring Tracks from the PC to the gigabeat 29 Listening to Music 32 Playback Functions 35 Repeat Play/Random Play 36 Changing the EQ 37 Adjusting Audio Quality 38 Using a Quick List for...

Owners Manual
Page 10
...Slide Interval 58 Playing a Slideshow in Random Order 59 Managing Photos 60 Deleting a Photo ...60 Enjoying Video 61 Downloading Video 61 Transferring Videos to your gigabeat 61 Watching Video...63 Deleting Video Data 65 Watching videos/Viewing photos from your gigabeat on your TV 66 Enjoying TV 69 Downloading TV Shows 69 ... Radio 77 Selecting a station 77 Changing Settings 78 Adjusting the Display 78 Changing the Language and Region 82 Operation Settings 85 Resetting the gigabeat 88 Returning to the Factory Settings 88 System Information 89 Others 90 Menu List ...90 10
...Slide Interval 58 Playing a Slideshow in Random Order 59 Managing Photos 60 Deleting a Photo ...60 Enjoying Video 61 Downloading Video 61 Transferring Videos to your gigabeat 61 Watching Video...63 Deleting Video Data 65 Watching videos/Viewing photos from your gigabeat on your TV 66 Enjoying TV 69 Downloading TV Shows 69 ... Radio 77 Selecting a station 77 Changing Settings 78 Adjusting the Display 78 Changing the Language and Region 82 Operation Settings 85 Resetting the gigabeat 88 Returning to the Factory Settings 88 System Information 89 Others 90 Menu List ...90 10
Owners Manual
Page 12
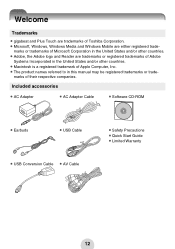
... CD-ROM -Earbuds -USB Cable -USB Conversion Cable -AV Cable -Safety Precautions -Quick Start Guide -Limited Warranty 12 Welcome Trademarks -gigabeat and Plus Touch are trademarks of Toshiba Corporation. -Microsoft, Windows, Windows Media and Windows Mobile are trademarks or registered trademarks of Adobe Systems Incorporated in the United States and/or other countries...
... CD-ROM -Earbuds -USB Cable -USB Conversion Cable -AV Cable -Safety Precautions -Quick Start Guide -Limited Warranty 12 Welcome Trademarks -gigabeat and Plus Touch are trademarks of Toshiba Corporation. -Microsoft, Windows, Windows Media and Windows Mobile are trademarks or registered trademarks of Adobe Systems Incorporated in the United States and/or other countries...

Owners Manual
Page 16
...product is consumed quickly after a full charge, the built-in Hard Disk -The internal hard disk contains firmware data and demo files for the gigabeat. If the battery is not being used. Precautions Concerning the Built-in battery may have failed. The disk area that can actually be liable ...and is not used is a consumable part. When disposing of or reselling the gigabeat, please delete all of the built-in battery is the area except for reference purposes only.) -The built-in battery. 16 TOSHIBA shall not be used for any corruption or loss of stored data due to the...
...product is consumed quickly after a full charge, the built-in Hard Disk -The internal hard disk contains firmware data and demo files for the gigabeat. If the battery is not being used. Precautions Concerning the Built-in battery may have failed. The disk area that can actually be liable ...and is not used is a consumable part. When disposing of or reselling the gigabeat, please delete all of the built-in battery is the area except for reference purposes only.) -The built-in battery. 16 TOSHIBA shall not be used for any corruption or loss of stored data due to the...

Owners Manual
Page 18
... "off " and it will extend the life of your battery. When not using the gigabeat for extended periods, switch this manual) o BATTERY switch Comes from the factory in the direction of the unit. 18 Note -Use only Toshiba authorized accessories when connecting to "off " position. p USB2.0 connector q Connect terminal ! c POWER button d VOL... button m Plus Touch button n OK button (referred to as "ok" in this to the pin connector at the bottom of the arrow to lock the gigabeat to prevent inadvertent button operations. Parts diagram a i j k n b c d e f g l m + h VOL.
... "off " and it will extend the life of your battery. When not using the gigabeat for extended periods, switch this manual) o BATTERY switch Comes from the factory in the direction of the unit. 18 Note -Use only Toshiba authorized accessories when connecting to "off " position. p USB2.0 connector q Connect terminal ! c POWER button d VOL... button m Plus Touch button n OK button (referred to as "ok" in this to the pin connector at the bottom of the arrow to lock the gigabeat to prevent inadvertent button operations. Parts diagram a i j k n b c d e f g l m + h VOL.

Owners Manual
Page 19
It takes approximately 3 hours to ON. Preparation Set the BATTERY switch on the bottom of the main unit to fully charge the gigabeat. C Connect to fully charge the battery. Set Up Setting Up the gigabeat Charging the Built-in the order A to C shown below. Using the AC Adapter Connect the AC adapter to the gigabeat in Battery When charging the gigabeat for the first time, make certain to outlet B A Battery icon display Battery Status Charging Fully charged Charging completed 19
It takes approximately 3 hours to ON. Preparation Set the BATTERY switch on the bottom of the main unit to fully charge the gigabeat. C Connect to fully charge the battery. Set Up Setting Up the gigabeat Charging the Built-in the order A to C shown below. Using the AC Adapter Connect the AC adapter to the gigabeat in Battery When charging the gigabeat for the first time, make certain to outlet B A Battery icon display Battery Status Charging Fully charged Charging completed 19
Owners Manual
Page 20
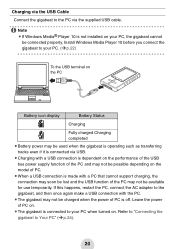
...supplied USB cable. / Note -If Windows Media® Player 10 is not installed on your PC, the gigabeat cannot be connected properly. Charging via the USB Cable Connect the gigabeat to your PC when turned on. Refer to "Connecting the gigabeat to the gigabeat, and then once again make a USB ... use temporarily. If this happens, restart the PC, connect the AC adapter to Your PC" (>p.24). 20 Install Windows Media Player 10 before you connect the gigabeat to your PC. (>p.22) To the USB terminal on the PC Battery icon display Battery Status Charging Fully charged Charging completed...
...supplied USB cable. / Note -If Windows Media® Player 10 is not installed on your PC, the gigabeat cannot be connected properly. Charging via the USB Cable Connect the gigabeat to your PC when turned on. Refer to "Connecting the gigabeat to the gigabeat, and then once again make a USB ... use temporarily. If this happens, restart the PC, connect the AC adapter to Your PC" (>p.24). 20 Install Windows Media Player 10 before you connect the gigabeat to your PC. (>p.22) To the USB terminal on the PC Battery icon display Battery Status Charging Fully charged Charging completed...

Owners Manual
Page 21
...turn on the condition of the built-in battery, ambient temperature, etc. -The charge may stop temporarily to limit the temperature increase in the gigabeat. -Charge the built-in battery within the specified operating-temperature range (>p.99). If the temperature is activated. 21 indicates the battery remaining. ...USB. -If the battery remaining reaches low and the power has run out, connect the AC adapter to the gigabeat. If the battery is very low, connect the AC adapter to the gigabeat. / Note -If the screen does not display the charging status, see "Troubleshooting" (> p. 96). -...
...turn on the condition of the built-in battery, ambient temperature, etc. -The charge may stop temporarily to limit the temperature increase in the gigabeat. -Charge the built-in battery within the specified operating-temperature range (>p.99). If the temperature is activated. 21 indicates the battery remaining. ...USB. -If the battery remaining reaches low and the power has run out, connect the AC adapter to the gigabeat. If the battery is very low, connect the AC adapter to the gigabeat. / Note -If the screen does not display the charging status, see "Troubleshooting" (> p. 96). -...

Owners Manual
Page 22
Setting Up Your PC Setting Up the gigabeat Installing the Included Software PC Requirements (*1) ● Operating System : Microsoft® Windows® XP Home Edition / XP Professional / XP Media Center Edition (Windows XP Service Pack 2 is recommended.) ● CPU : 300MHz or faster (1.5GHz is recommended) ● RAM : 128MB or more (512MB is recommended) ●...
Setting Up Your PC Setting Up the gigabeat Installing the Included Software PC Requirements (*1) ● Operating System : Microsoft® Windows® XP Home Edition / XP Professional / XP Media Center Edition (Windows XP Service Pack 2 is recommended.) ● CPU : 300MHz or faster (1.5GHz is recommended) ● RAM : 128MB or more (512MB is recommended) ●...

Owners Manual
Page 23
...the PC, continue the installation procedure. Even when Windows Media Player 10 is already installed on screen instructions 23 Files necessary to work with the gigabeat will be installed on the PC, continue the installation procedure. Windows Media Player 10 and the Owner's Manual are installed. To ...transfer music, video and photo data to work with the gigabeat will be installed on the PC. Files necessary to the gigabeat via PC, use Windows Media Player 10. ! b Click the "Install Windows Media Player 10" button. a Insert the included CD-ROM into the PC. ...
...the PC, continue the installation procedure. Even when Windows Media Player 10 is already installed on screen instructions 23 Files necessary to work with the gigabeat will be installed on the PC, continue the installation procedure. Windows Media Player 10 and the Owner's Manual are installed. To ...transfer music, video and photo data to work with the gigabeat will be installed on the PC. Files necessary to the gigabeat via PC, use Windows Media Player 10. ! b Click the "Install Windows Media Player 10" button. a Insert the included CD-ROM into the PC. ...

Owners Manual
Page 24
... disconnect the USB cable or AC Adapter. If the screen displays "Updating", do not disconnect the gigabeat. Connecting the gigabeat to Your PC To transfer tracks and other data to the gigabeat, connect the gigabeat to your PC, you should also plug in the AC adapter otherwise some of the data being transferred could... been connected to a PC using a USB hub. 24 b Turn on the PC. c Using the USB cable, connect the PC and gigabeat. Do not disconnect the USB cable if "Connected" is not displayed on when connected to the PC. -When connecting to a PC for the first time, ...
... disconnect the USB cable or AC Adapter. If the screen displays "Updating", do not disconnect the gigabeat. Connecting the gigabeat to Your PC To transfer tracks and other data to the gigabeat, connect the gigabeat to your PC, you should also plug in the AC adapter otherwise some of the data being transferred could... been connected to a PC using a USB hub. 24 b Turn on the PC. c Using the USB cable, connect the PC and gigabeat. Do not disconnect the USB cable if "Connected" is not displayed on when connected to the PC. -When connecting to a PC for the first time, ...

Owners Manual
Page 25
Selection of any menu items starts from this screen. 25 Basic Operation Setting Up the gigabeat Basic Operation Buttons on the gigabeat and their Functions Back button Returns you can select a menu item to operate. Plus Touch button Touch the top, bottom, left or right to the previous screen. OK button Confirms the item selection made with the Plus Touch™ button and performs the associated function. ●Start screen The Start screen is the basic screen for all gigabeat operations. START button Displays the Start screen in which you to select a menu item.
Selection of any menu items starts from this screen. 25 Basic Operation Setting Up the gigabeat Basic Operation Buttons on the gigabeat and their Functions Back button Returns you can select a menu item to operate. Plus Touch button Touch the top, bottom, left or right to the previous screen. OK button Confirms the item selection made with the Plus Touch™ button and performs the associated function. ●Start screen The Start screen is the basic screen for all gigabeat operations. START button Displays the Start screen in which you to select a menu item.

Owners Manual
Page 27
...OK, it switches the elapsed and remaining time display. This screen is also displayed when a display takes a long time to zero. You cannot operate the gigabeat while this screen is transferring information. Play Pause Rewind Forward Lock Standby screen This screen is displayed when the... gigabeat is displayed. On-screen Displays ●Icons Track name Track Number Elapsed Time bar Artist name Album title Random play (> p. 36) Repeat play (> p. 36) ...
...OK, it switches the elapsed and remaining time display. This screen is also displayed when a display takes a long time to zero. You cannot operate the gigabeat while this screen is transferring information. Play Pause Rewind Forward Lock Standby screen This screen is displayed when the... gigabeat is displayed. On-screen Displays ●Icons Track name Track Number Elapsed Time bar Artist name Album title Random play (> p. 36) Repeat play (> p. 36) ...

Owners Manual
Page 29
Transferring Tracks from Microsoft Corporation. 29 Manual: Proceed to transfer in the Library tab. Automatic: Synchronization automatically starts. d When Windows Media Player 10 opens, select the content to Step4. Microsoft product screen shot(s) reprinted with permission from the PC to the gigabeat a Using the USB cable, connect the gigabeat to this device" and click OK. c Select "Automatic" or "Manual" for the PC/gigabeat synchronization method. b Select "Synchronize media files to your PC.
Transferring Tracks from Microsoft Corporation. 29 Manual: Proceed to transfer in the Library tab. Automatic: Synchronization automatically starts. d When Windows Media Player 10 opens, select the content to Step4. Microsoft product screen shot(s) reprinted with permission from the PC to the gigabeat a Using the USB cable, connect the gigabeat to this device" and click OK. c Select "Automatic" or "Manual" for the PC/gigabeat synchronization method. b Select "Synchronize media files to your PC.

Owners Manual
Page 30
f Click the "Start Sync" button in the lower right-hand corner. / Note -When synchronization is set to "Automatic" and the synchronized data are deleted from the PC, the data will also be performed during the transfer depending on the center of the screen and select "Add to the PC. Do not use the gigabeat as a backup for the PC library. -Data conversion may be deleted from the list on the WMA file format you chose. 30 e Right-click the content to transfer from the gigabeat next time connected to "➝ "Sync List".
f Click the "Start Sync" button in the lower right-hand corner. / Note -When synchronization is set to "Automatic" and the synchronized data are deleted from the PC, the data will also be performed during the transfer depending on the center of the screen and select "Add to the PC. Do not use the gigabeat as a backup for the PC library. -Data conversion may be deleted from the list on the WMA file format you chose. 30 e Right-click the content to transfer from the gigabeat next time connected to "➝ "Sync List".

Owners Manual
Page 31
Transferring Album Art to the gigabeat To transfer album art to the gigabeat, the album info with picture has to be imported to import. c Click the "Finish". 31 b Search the album info you want to Windows Media Player 10 in advance. (Importing album art) a In the "Library" tab, right-click the album and then select the "Find Album Info".
Transferring Album Art to the gigabeat To transfer album art to the gigabeat, the album info with picture has to be imported to import. c Click the "Finish". 31 b Search the album info you want to Windows Media Player 10 in advance. (Importing album art) a In the "Library" tab, right-click the album and then select the "Find Album Info".

Owners Manual
Page 33
Renew the subscription and perform synchronization.) 2) "SYNCHRONIZE WITH THE PC" (The message is enabled by synchronization with Windows Media Player 10). 33 In this circumstance, playback is displayed when the gigabeat hasn't been connected to the PC for a prolonged period or after a reset. d Select the desired album and press OK. e Select the desired track...
Renew the subscription and perform synchronization.) 2) "SYNCHRONIZE WITH THE PC" (The message is enabled by synchronization with Windows Media Player 10). 33 In this circumstance, playback is displayed when the gigabeat hasn't been connected to the PC for a prolonged period or after a reset. d Select the desired album and press OK. e Select the desired track...

Owners Manual
Page 35
The setup screen allows you to set the shuffle, repeat settings as well as EQ settings. / Note -Album art is not displayed if the art is not transferred to the gigabeat. Playback Functions Controlling the Volume Press the VOL(+) or VOL(-) button. Volume display appears for about one second. 35
The setup screen allows you to set the shuffle, repeat settings as well as EQ settings. / Note -Album art is not displayed if the art is not transferred to the gigabeat. Playback Functions Controlling the Volume Press the VOL(+) or VOL(-) button. Volume display appears for about one second. 35

Owners Manual
Page 42
Each time you press the OK button, the number of stars. b Select the stars. When tracks are synchronized to Windows Media Player 10, the track information in this application is playing back, scroll to the left or right using the Plus Touch button to reflect the new evaluation results determined by the gigabeat. 42 Managing Tracks Enjoying Music Rating a Track a While a track is updated to display the Setup screen. c Press OK to change the number of stars changes.
Each time you press the OK button, the number of stars. b Select the stars. When tracks are synchronized to Windows Media Player 10, the track information in this application is playing back, scroll to the left or right using the Plus Touch button to reflect the new evaluation results determined by the gigabeat. 42 Managing Tracks Enjoying Music Rating a Track a While a track is updated to display the Setup screen. c Press OK to change the number of stars changes.