

User Guide
Page 6
... on your files or folders from the following to be copied to modify the default source data. Chapter 1 "Using Backup NOW!" You can select your computer. To modify the source for backup: 1 On the left hand side of the window, there are referred to quickly select the most common data files...
... on your files or folders from the following to be copied to modify the default source data. Chapter 1 "Using Backup NOW!" You can select your computer. To modify the source for backup: 1 On the left hand side of the window, there are referred to quickly select the most common data files...

User Guide
Page 7
... files and folders that are available below: Destination Capacity Alert-A warning message appears when the destination has reached your previously set the threshold from the computer such as folders on the folder image below the drive icon to open the data. The program decrypts the data to the option. 2 After selecting...
... files and folders that are available below: Destination Capacity Alert-A warning message appears when the destination has reached your previously set the threshold from the computer such as folders on the folder image below the drive icon to open the data. The program decrypts the data to the option. 2 After selecting...

User Guide
Page 8
... example, when you have set the backup schedule, click Finish to return to modify the default backup schedule. A calendar to speed up the computer applications. Weekly-Backup is scheduled on the specified day of the month and time of four predetermined intervals. You can also schedule your backup on... an hourly basis. Backup Now EZ backs up the computer applications and slows the backup process. Daily-Backup is scheduled on the specified day and time of the month. The Backup Priority-This ...
... example, when you have set the backup schedule, click Finish to return to modify the default backup schedule. A calendar to speed up the computer applications. Weekly-Backup is scheduled on the specified day of the month and time of four predetermined intervals. You can also schedule your backup on... an hourly basis. Backup Now EZ backs up the computer applications and slows the backup process. Daily-Backup is scheduled on the specified day and time of the month. The Backup Priority-This ...

User Guide
Page 10
... in the right pane. 4 Click the Restore ( ) button. You can select the files from the following to choose the most common data files on your computer.
... in the right pane. 4 Click the Restore ( ) button. You can select the files from the following to choose the most common data files on your computer.

User Guide
Page 11
.... 2 Click the File and Folder Restore tab, and then click the Easy button. 3 Select each box to choose the most common data files on your computer.
.... 2 Click the File and Folder Restore tab, and then click the Easy button. 3 Select each box to choose the most common data files on your computer.

User Guide
Page 13
The drive letter may be different depending on your computer. 2 A window automatically appears asking if you do not see this screen, click Run from the Start button on your system configuration. 3 Click OK to execute ..." Installation Installing and Uninstalling Backup Now EZ Installing Backup Now EZ To install Backup Now EZ: 1 Connect the Toshiba hard drive with the installation of the Backup Now EZ software. 6 Choose the computer system for the software and click OK to continue. 5 Read the END-USER LICENSE AGREEMENT FOR SOFTWARE and select...
The drive letter may be different depending on your computer. 2 A window automatically appears asking if you do not see this screen, click Run from the Start button on your system configuration. 3 Click OK to execute ..." Installation Installing and Uninstalling Backup Now EZ Installing Backup Now EZ To install Backup Now EZ: 1 Connect the Toshiba hard drive with the installation of the Backup Now EZ software. 6 Choose the computer system for the software and click OK to continue. 5 Read the END-USER LICENSE AGREEMENT FOR SOFTWARE and select...

User Guide
Page 14
... option and click the Finish button to reboot now or later. The Setup Complete dialog allows you to reboot your computer. Backup Now EZ program group with the appropriate shortcuts are added to the Start menu. 9 You will be asked to confirm the removal operation. 6 ...Click Finish when the uninstall process is complete. NOTE You must have administrator rights to install Backup Now EZ on your computer. 4 Click Add/Remove... 5 Click Yes to restart your computer. It is installed in the target directory. Uninstalling Backup Now EZ To uninstall the Backup Now EZ software: 1 Run the ...
... option and click the Finish button to reboot now or later. The Setup Complete dialog allows you to reboot your computer. Backup Now EZ program group with the appropriate shortcuts are added to the Start menu. 9 You will be asked to confirm the removal operation. 6 ...Click Finish when the uninstall process is complete. NOTE You must have administrator rights to install Backup Now EZ on your computer. 4 Click Add/Remove... 5 Click Yes to restart your computer. It is installed in the target directory. Uninstalling Backup Now EZ To uninstall the Backup Now EZ software: 1 Run the ...
Quick Start Guide for Canvio DESK
Page 1
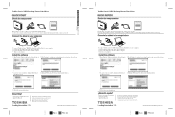
...Setup.exe. 2. Connect the AC adapter to the drive and the computer. 3. Conecte la unidad a la computadora 4 1 3 2 To connect Toshiba's Canvio® DESK Desktop External Hard Drive to your computer. Toshiba Canvio® DESK Desktop External Hard Drive QUICK START Check the components... a newer version is available, clicking will download the updated software. 4. Connect the drive to your computer 4 1 3 2 To connect Toshiba's Canvio® DESK Desktop External Hard Drive to your computer. Connect the USB cable to the drive and a wall outlet. 2. Highlight NTI Backup Now EZ and...
...Setup.exe. 2. Connect the AC adapter to the drive and the computer. 3. Conecte la unidad a la computadora 4 1 3 2 To connect Toshiba's Canvio® DESK Desktop External Hard Drive to your computer. Toshiba Canvio® DESK Desktop External Hard Drive QUICK START Check the components... a newer version is available, clicking will download the updated software. 4. Connect the drive to your computer 4 1 3 2 To connect Toshiba's Canvio® DESK Desktop External Hard Drive to your computer. Connect the USB cable to the drive and a wall outlet. 2. Highlight NTI Backup Now EZ and...

