Owner's Manual - English
Page 4
... power source only. 27) Always make occasional snapping or popping sounds. If you need to clean the LCD screen, follow the instructions in item 30 on this manual to a Toshiba Authorized Service Center. 38) If you are never in wire Ground clamp Antenna discharge unit (NEC Section 810... TV may damage the surface of the TV. Antenna lead-in a position where your TOSHIBA TV, follow this product contain mercury. Avoid contact with a sharp or heavy object. 36) • The LCD screen of this equipment from the TV if you to dangerous voltage or other electrical circuits. ...
... power source only. 27) Always make occasional snapping or popping sounds. If you need to clean the LCD screen, follow the instructions in item 30 on this manual to a Toshiba Authorized Service Center. 38) If you are never in wire Ground clamp Antenna discharge unit (NEC Section 810... TV may damage the surface of the TV. Antenna lead-in a position where your TOSHIBA TV, follow this product contain mercury. Avoid contact with a sharp or heavy object. 36) • The LCD screen of this equipment from the TV if you to dangerous voltage or other electrical circuits. ...

Owner's Manual - English
Page 6
... technology must be present. Reverse engineering or disassembly is assigned a number (the "title number," "chapter number," and "track number," respectively). Stacking or placing objects on -screen.) Some DVDs that is 1. DVD video disc DVD video disc Title 1 Title 2 Chapter 1 Chapter 2 Chapter 1 Chapter 2 Chapter 3 On handling discs • Do not touch the...
... technology must be present. Reverse engineering or disassembly is assigned a number (the "title number," "chapter number," and "track number," respectively). Stacking or placing objects on -screen.) Some DVDs that is 1. DVD video disc DVD video disc Title 1 Title 2 Chapter 1 Chapter 2 Chapter 1 Chapter 2 Chapter 3 On handling discs • Do not touch the...

Owner's Manual - English
Page 8
... antenna. • Increase the separation between the equipment and the receiver. • Connect the equipment into an outlet on -screen during playback. WOW technology is manufactured using the internal DVD player. For example, sometimes the DVD player is unable to stop ...or available for using an extremely high level of precision technology; FCC Declaration of Conformity Compliance Statement (Part 15): The Toshiba 26LV67, 32LV67 and 32LV67U Televisions comply with the instructions, may cause harmful interference to radio communications. moving image is pressed. This is...
... antenna. • Increase the separation between the equipment and the receiver. • Connect the equipment into an outlet on -screen during playback. WOW technology is manufactured using the internal DVD player. For example, sometimes the DVD player is unable to stop ...or available for using an extremely high level of precision technology; FCC Declaration of Conformity Compliance Statement (Part 15): The Toshiba 26LV67, 32LV67 and 32LV67U Televisions comply with the instructions, may cause harmful interference to radio communications. moving image is pressed. This is...

Owner's Manual - English
Page 11
... RGB) computer terminal (- ABC, HBO, etc.) on the market. For more information call your new Toshiba widescreen, integrated HD, LCD TV: • Integrated digital tuning (8VSB ATSC and QAM) eliminates the need for purchasing this... Toshiba LCD TV/DVD combination, one of receiving analog basic, digital basic and digital premium cable television ...require the use of a set -top box (in most innovative LCD TVs on the screen along with Dolby® Digital optical output format (-
... RGB) computer terminal (- ABC, HBO, etc.) on the market. For more information call your new Toshiba widescreen, integrated HD, LCD TV: • Integrated digital tuning (8VSB ATSC and QAM) eliminates the need for purchasing this... Toshiba LCD TV/DVD combination, one of receiving analog basic, digital basic and digital premium cable television ...require the use of a set -top box (in most innovative LCD TVs on the screen along with Dolby® Digital optical output format (-
Owner's Manual - English
Page 12
Secure the TV to a wall, pillar, or other objects to allow proper ventilation. THIS TYPE OF DAMAGE IS NOT COVERED UNDER THE TOSHIBA WARRANTY. 3 Do not plug in any power cords until the TV goes into the TV's channel memory (- page 30). 11 Program channels into standby mode. ... and hold the POWER button for 5 seconds to reset the TV. 10 See "Menu layout and navigation" for an overview of the buttons on the screen. • Place the TV far enough from walls and other immovable structure (-
Secure the TV to a wall, pillar, or other objects to allow proper ventilation. THIS TYPE OF DAMAGE IS NOT COVERED UNDER THE TOSHIBA WARRANTY. 3 Do not plug in any power cords until the TV goes into the TV's channel memory (- page 30). 11 Program channels into standby mode. ... and hold the POWER button for 5 seconds to reset the TV. 10 See "Menu layout and navigation" for an overview of the buttons on the screen. • Place the TV far enough from walls and other immovable structure (-

Owner's Manual - English
Page 13
... HD1, ColorStream HD2, HDMI 1, HDMI 2, HDMI 3, PC). 11 PLAY - Press to reset the TV. 5 ARROWS BbC c - When no menu is on-screen, these buttons function as up/down/left/right menu navigation buttons. 6 MENU (ENTER) - If the TV stops responding to the controls on the remote control...1 Green and Yellow LEDs Green = Power indicator Yellow = Disc indicator See "LED indications" on page 71 for 5 or more seconds to instantly close an on-screen menu. 8 CHANNEL Bb - Insert a playable disc to skip DVD chapter, or CD track. 14 OPEN/CLOSE - "Remote control effective range" on the TV...
... HD1, ColorStream HD2, HDMI 1, HDMI 2, HDMI 3, PC). 11 PLAY - Press to reset the TV. 5 ARROWS BbC c - When no menu is on-screen, these buttons function as up/down/left/right menu navigation buttons. 6 MENU (ENTER) - If the TV stops responding to the controls on the remote control...1 Green and Yellow LEDs Green = Power indicator Yellow = Disc indicator See "LED indications" on page 71 for 5 or more seconds to instantly close an on-screen menu. 8 CHANNEL Bb - Insert a playable disc to skip DVD chapter, or CD track. 14 OPEN/CLOSE - "Remote control effective range" on the TV...

Owner's Manual - English
Page 22
TV upper back panel TV lower back panel Computer PC audio cable • Depending on the DVD's title and the specifications of the screen (i.e. Signal name 1 R 6 Ground 11 NC 2 G 7 Ground 12 NC 3 B 8 Ground 13 H-sync 4 NC * 9 NC 14 V-sync 5 NC 10 Ground 15 NC *NC=Not connected To connect a ...
TV upper back panel TV lower back panel Computer PC audio cable • Depending on the DVD's title and the specifications of the screen (i.e. Signal name 1 R 6 Ground 11 NC 2 G 7 Ground 12 NC 3 B 8 Ground 13 H-sync 4 NC * 9 NC 14 V-sync 5 NC 10 Ground 15 NC *NC=Not connected To connect a ...

Owner's Manual - English
Page 24
... a complete list of the remote control's functions, see "Arrow buttons.") 15 Arrow buttons (BbC c) When a menu is on, the green LED indicator on -screen (- page 26). The = button is on the TV front will be illuminated. 2 PIC MODE selects the picture mode (- For DVD operation the following buttons are... 33). 8 VOL + - page 41). 12 MUTE reduces or turns off . Set to "TV" to edit the Favorites List (- When the TV is on -screen menus. 19 MODE SELECT switch switches between TV, CABLE/SAT, AUX 1, and AUX 2 modes (- page 40). (Also see the remote control functional key chart (- ...
... a complete list of the remote control's functions, see "Arrow buttons.") 15 Arrow buttons (BbC c) When a menu is on, the green LED indicator on -screen (- page 26). The = button is on the TV front will be illuminated. 2 PIC MODE selects the picture mode (- For DVD operation the following buttons are... 33). 8 VOL + - page 41). 12 MUTE reduces or turns off . Set to "TV" to edit the Favorites List (- When the TV is on -screen menus. 19 MODE SELECT switch switches between TV, CABLE/SAT, AUX 1, and AUX 2 modes (- page 40). (Also see the remote control functional key chart (- ...

Owner's Manual - English
Page 25
...2 Channel Numbers (0-9) Press to directly access channels (as opposed to < ,). 3 +10 Press to recognize the device (if you have a non-Toshiba device or a Toshiba device that the remote control is programmed, it may not work on any other devices If you will need to control a VCR; page 41... the picture; b selects the next lower channel. 6 GUIDE Displays the channel guide in the AUX mode. 7 INFO Displays TV status information on-screen. 8 BbC c Press to navigate DVD menus (may not operate certain features on some DVD players). 9 ENTER Required by some satellite receivers and DVD...
...2 Channel Numbers (0-9) Press to directly access channels (as opposed to < ,). 3 +10 Press to recognize the device (if you have a non-Toshiba device or a Toshiba device that the remote control is programmed, it may not work on any other devices If you will need to control a VCR; page 41... the picture; b selects the next lower channel. 6 GUIDE Displays the channel guide in the AUX mode. 7 INFO Displays TV status information on-screen. 8 BbC c Press to navigate DVD menus (may not operate certain features on some DVD players). 9 ENTER Required by some satellite receivers and DVD...
Owner's Manual - English
Page 30
... menu] S Off/On S [Opens the Edit Rating Limits menu] S [Opens the Channels block menu] S Off/Video/Video+ S Off/On S [Opens the New PIN Code entry screen] S [Opens the Installation menu (- To open the main menus (illustrated below and on the remote control or TV control panel. page 31)] S [Opens the Sleep...
... menu] S Off/On S [Opens the Edit Rating Limits menu] S [Opens the Channels block menu] S Off/Video/Video+ S Off/On S [Opens the New PIN Code entry screen] S [Opens the Installation menu (- To open the main menus (illustrated below and on the remote control or TV control panel. page 31)] S [Opens the Sleep...
Owner's Manual - English
Page 31
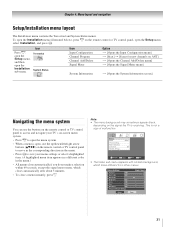
... Configuration menu] S [Start] S [Scans for new channels on ANT] S [Opens the Channel Add/Delete menu] S [Opens the Signal Meter menu] S [Opens the System Information screen] Navigating the menu system You can use the buttons on the remote control or TV control panel to access and navigate your TV's on...-screen menu system. • Press Y to save your menu settings or select a highlighted item. (A highlighted menu item appears in a different color in the menu. • Press ...
... Configuration menu] S [Start] S [Scans for new channels on ANT] S [Opens the Channel Add/Delete menu] S [Opens the Signal Meter menu] S [Opens the System Information screen] Navigating the menu system You can use the buttons on the remote control or TV control panel to access and navigate your TV's on...-screen menu system. • Press Y to save your menu settings or select a highlighted item. (A highlighted menu item appears in a different color in the menu. • Press ...
Owner's Manual - English
Page 32
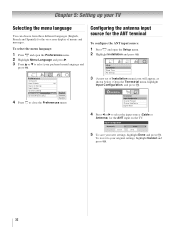
... T. Chapter 5: Setting up your TV Selecting the menu language You can choose from three different languages (English, French and Spanish) for the ANT input on -screen display of Installation menu icons will appear, as shown below.) Open the Terrestrial menu, highlight Input Configuration, and press T.
... T. Chapter 5: Setting up your TV Selecting the menu language You can choose from three different languages (English, French and Spanish) for the ANT input on -screen display of Installation menu icons will appear, as shown below.) Open the Terrestrial menu, highlight Input Configuration, and press T.

Owner's Manual - English
Page 33
... and deleting channels in the channel memory After automatically programming channels into the channel memory, you can automatically detect all active channels in the on-screen display and press T). Installation Terrestrial Input Configuration Channel Program Channel Add/Delete Signal Meter Start ANT Cable Scanning channels, please wait ... 52% Number of Installation...
... and deleting channels in the channel memory After automatically programming channels into the channel memory, you can automatically detect all active channels in the on-screen display and press T). Installation Terrestrial Input Configuration Channel Program Channel Add/Delete Signal Meter Start ANT Cable Scanning channels, please wait ... 52% Number of Installation...

Owner's Manual - English
Page 34
... 5: Setting up your settings, highlight Done and press T. To manually add digital subchannels on a physical channel: Use the Channel Numbers and the Dash (=) on the screen to check the box. When you want to remove, and then press T to an encrypted channel, the following message will appear. If the desired channel...
... 5: Setting up your settings, highlight Done and press T. To manually add digital subchannels on a physical channel: Use the Channel Numbers and the Dash (=) on the screen to check the box. When you want to remove, and then press T to an encrypted channel, the following message will appear. If the desired channel...

Owner's Manual - English
Page 35
... ANIMAL ANT 24 Press CH UP/DOWN to be displayed in the menu. (Also see item 4 on page 14 and "Setting the PC Audio" on -screen software keyboard. 5 The highlighted character is not available from the deletion confirmation window and press T. To delete the custom label: 1 Open the Channel Labeling window...
... ANIMAL ANT 24 Press CH UP/DOWN to be displayed in the menu. (Also see item 4 on page 14 and "Setting the PC Audio" on -screen software keyboard. 5 The highlighted character is not available from the deletion confirmation window and press T. To delete the custom label: 1 Open the Channel Labeling window...

Owner's Manual - English
Page 36
...appear, as shown below . Signal Meter Signal Locked 0 Peak 0 Physical Digital Channel Virtual Digital Channel Advanced 4 4-1 Done To close the screen and return to the Installation menu: Highlight Done and press T. Open the System Status menu, highlight System Information, and press T. Chapter ...5: Setting up your TV Viewing the digital signal meter You can view the digital signal meter in the Signal Meter screen may not correspond to a virtual TV channel number. Installation System Status System Information 4 Press C c to scroll through the menu bar...
...appear, as shown below . Signal Meter Signal Locked 0 Peak 0 Physical Digital Channel Virtual Digital Channel Advanced 4 4-1 Done To close the screen and return to the Installation menu: Highlight Done and press T. Open the System Status menu, highlight System Information, and press T. Chapter ...5: Setting up your TV Viewing the digital signal meter You can view the digital signal meter in the Signal Meter screen may not correspond to a virtual TV channel number. Installation System Status System Information 4 Press C c to scroll through the menu bar...
Owner's Manual - English
Page 38
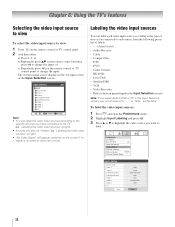
...8226; HD DVD • Laser Disk • Satellite/DSS • VCR • Video Recorder • Hide (to hide an unused input in the Input Selection screen) Note: If you select Built-In DVD or PC in video input mode. Chapter 6: Using the TV's features Selecting the video input source to view... To select the video input source to view: 1 Press + on the screen if no signal is received in the Input Selection screen, you can label each source, from the following preset list of the Input Selection screen. Labeling the video input sources You can choose only "- -" or "Hide" as ...
...8226; HD DVD • Laser Disk • Satellite/DSS • VCR • Video Recorder • Hide (to hide an unused input in the Input Selection screen) Note: If you select Built-In DVD or PC in video input mode. Chapter 6: Using the TV's features Selecting the video input source to view... To select the video input source to view: 1 Press + on the screen if no signal is received in the Input Selection screen, you can label each source, from the following preset list of the Input Selection screen. Labeling the video input sources You can choose only "- -" or "Hide" as ...
Owner's Manual - English
Page 39
... 2 Video 1 3 Video 2 4 ColorStream HD1 5 ColorStream HD2 6 HDMI 1 7 HDMI 2 8 HDMI 3 9 PC ANT 0 - 9 / INPUT to Select Navigate Input Selection screen with none of how you could label the inputs if you connected a VCR to VIDEO 1, Cable TV to VIDEO 2, a video recorder to ColorStream HD1, a DTV... 3 Cable 4 Video Recorder 5 ColorStream HD2 (Hidden) 6 DTV 7 Satellite/DSS 8 DVD 9 PC ANT 0 - 9 / INPUT to Select Navigate Input Selection screen with all inputs labeled except input 5, which means that input to be skipped over channels in the Channel Browser™) or Select mode (to : •...
... 2 Video 1 3 Video 2 4 ColorStream HD1 5 ColorStream HD2 6 HDMI 1 7 HDMI 2 8 HDMI 3 9 PC ANT 0 - 9 / INPUT to Select Navigate Input Selection screen with none of how you could label the inputs if you connected a VCR to VIDEO 1, Cable TV to VIDEO 2, a video recorder to ColorStream HD1, a DTV... 3 Cable 4 Video Recorder 5 ColorStream HD2 (Hidden) 6 DTV 7 Satellite/DSS 8 DVD 9 PC ANT 0 - 9 / INPUT to Select Navigate Input Selection screen with all inputs labeled except input 5, which means that input to be skipped over channels in the Channel Browser™) or Select mode (to : •...

Owner's Manual - English
Page 41
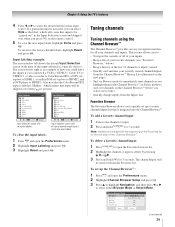
... the R button. 2 Press and hold R for external inputs. 41 Note:This feature will clear the History List. Tuning digital channels: Press the Channel Number (0-9) on -screen. This feature also works for about 2 seconds until the message "Channel Memorized" appears on the remote control, followed by pressing R. The previous channel will be...
... the R button. 2 Press and hold R for external inputs. 41 Note:This feature will clear the History List. Tuning digital channels: Press the Channel Number (0-9) on -screen. This feature also works for about 2 seconds until the message "Channel Memorized" appears on the remote control, followed by pressing R. The previous channel will be...

Owner's Manual - English
Page 42
...8226; The center of the picture remains close to fill the width of the picture sizes may not be "grayed out" in the Picture Size screen). Theater Settings Picture Size Picture Scroll Cinema Mode Auto Aspect Ratio DVD Aspect Ratio Reset Mode: Sports Full -Film On 16:9 Wide Done Note:... Some of the screen, but the left and right edges are stretched wider to civil and criminal liability. page 43). Note: The "picture size" illustrations are currently watching...
...8226; The center of the picture remains close to fill the width of the picture sizes may not be "grayed out" in the Picture Size screen). Theater Settings Picture Size Picture Scroll Cinema Mode Auto Aspect Ratio DVD Aspect Ratio Reset Mode: Sports Full -Film On 16:9 Wide Done Note:... Some of the screen, but the left and right edges are stretched wider to civil and criminal liability. page 43). Note: The "picture size" illustrations are currently watching...


