
Brochure
Page 2
... • Input Labeling • Channel Browser • Sleep Timer • Remote Control Jack Pack • HDMI® Digital Inputs2: 2 w/CEC Easily connect to over , or knocked down. Weight: 15.43 lbs. System Specifications1 Toshiba 19SLV411U Cabinet • Screen Size Class: 19 in. • Actual Screen Size ... w/ Stand (W×H×D): 18.51 in. × 13.52 in. × 7.64 in . Depending on the specifications of your Toshiba television, always use a UL Listed wall bracket appropriate for the size and weight of HDMI®-CEC requires an HDMI®-CEC compatible display/...
... • Input Labeling • Channel Browser • Sleep Timer • Remote Control Jack Pack • HDMI® Digital Inputs2: 2 w/CEC Easily connect to over , or knocked down. Weight: 15.43 lbs. System Specifications1 Toshiba 19SLV411U Cabinet • Screen Size Class: 19 in. • Actual Screen Size ... w/ Stand (W×H×D): 18.51 in. × 13.52 in. × 7.64 in . Depending on the specifications of your Toshiba television, always use a UL Listed wall bracket appropriate for the size and weight of HDMI®-CEC requires an HDMI®-CEC compatible display/...
User Manual
Page 10
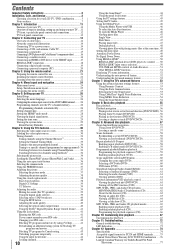
...-LINK® connection 18 Connecting a digital audio system 19 Connecting a personal computer (PC 20 Chapter 3: Using the remote control 21 Preparing the remote control for use 21 Installing the remote control batteries 21 Learning about the remote control 22 Chapter 4: Menu layout and navigation 24 Main menu layout 24 Setup / Installation menu layout 25... Specifications 74 Acceptable signal formats for PC IN and HDMI terminals...........75 Limited United States Warranty LCD TV/DVD Combination ......76 Limited Canadian Warranty for Toshiba Brand Flat Panel Televisions 77
...-LINK® connection 18 Connecting a digital audio system 19 Connecting a personal computer (PC 20 Chapter 3: Using the remote control 21 Preparing the remote control for use 21 Installing the remote control batteries 21 Learning about the remote control 22 Chapter 4: Menu layout and navigation 24 Main menu layout 24 Setup / Installation menu layout 25... Specifications 74 Acceptable signal formats for PC IN and HDMI terminals...........75 Limited United States Warranty LCD TV/DVD Combination ......76 Limited Canadian Warranty for Toshiba Brand Flat Panel Televisions 77
User Manual
Page 11
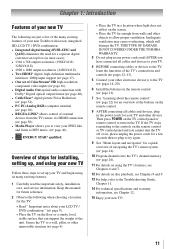
...-13). 5 Connect your other objects to the TV ( pages 14-20). 6 Install the batteries in most cases). • 1366 x 768 output resolution. (19SLV411U, 32SLV411U) • 1920 x 1080 output resolution. (24SLV411U) • Two HDMI® digital, high-definition multimedia interfaces 1080p input support ( page 17). &#... choosing a location for the TV: • Read " Important notes about the remote control page 22) for an overview of the buttons on the TV. THIS TYPE OF DAMAGE IS NOT COVERED UNDER THE TOSHIBA WARRANTY. 3 Do not plug in the power cords for your new TV Follow...
...-13). 5 Connect your other objects to the TV ( pages 14-20). 6 Install the batteries in most cases). • 1366 x 768 output resolution. (19SLV411U, 32SLV411U) • 1920 x 1080 output resolution. (24SLV411U) • Two HDMI® digital, high-definition multimedia interfaces 1080p input support ( page 17). &#... choosing a location for the TV: • Read " Important notes about the remote control page 22) for an overview of the buttons on the TV. THIS TYPE OF DAMAGE IS NOT COVERED UNDER THE TOSHIBA WARRANTY. 3 Do not plug in the power cords for your new TV Follow...
User Manual
Page 12
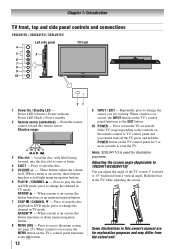
.... Press to reset the TV. Press to eject the disc. 5無 VOLUME +/- - Chapter 1: Introduction TV front, top and side panel controls and connections 19SLV411U / 24SLV411U / 32SLV411U Left side panel 4 TV front 5 3 6 7 8 9 10 21 1無 Power On / Standby LED - When a menu ...Green) = Power indicator Power LED (Red) = Power standby 2無 Remote sensor (embedded) - Point the remote control toward this owner's manual are viewing. Load the disc, with label facing forward, into the disc slot to 19SLV411U/24SLV411U) You can adjust the angle of the TV while adjusting the screen...
.... Press to reset the TV. Press to eject the disc. 5無 VOLUME +/- - Chapter 1: Introduction TV front, top and side panel controls and connections 19SLV411U / 24SLV411U / 32SLV411U Left side panel 4 TV front 5 3 6 7 8 9 10 21 1無 Power On / Standby LED - When a menu ...Green) = Power indicator Power LED (Red) = Power standby 2無 Remote sensor (embedded) - Point the remote control toward this owner's manual are viewing. Load the disc, with label facing forward, into the disc slot to 19SLV411U/24SLV411U) You can adjust the angle of the TV while adjusting the screen...
User Manual
Page 15
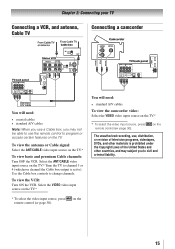
... the Copyright Laws of television programs, videotapes, DVDs, and other countries, and may not be able to use the remote control to program or access certain features on the remote control ( page 30). Select the VIDEO video input source on the TV.* * To select the video input source... TV. Use the Cable box controls to change channels. To view the antenna or Cable signal: Select the ANT/CABLE video input source on the remote control ( page 30). Chapter 2: Connecting your TV Connecting a VCR, and antenna, Cable TV Connecting a camcorder Yellow White Red Yellow Red ...
... the Copyright Laws of television programs, videotapes, DVDs, and other countries, and may not be able to use the remote control to program or access certain features on the remote control ( page 30). Select the VIDEO video input source on the TV.* * To select the video input source... TV. Use the Cable box controls to change channels. To view the antenna or Cable signal: Select the ANT/CABLE video input source on the remote control ( page 30). Chapter 2: Connecting your TV Connecting a VCR, and antenna, Cable TV Connecting a camcorder Yellow White Red Yellow Red ...
User Manual
Page 16
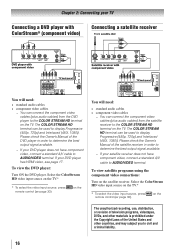
..., see page 17. Select the ColorStream HD video input source on the TV.* * To select the video input source, press INPUT on the remote control ( page 30). The COLOR STREAM HD terminal can connect the component video cables (plus audio cables) from the DVD player to the...and Interlaced (480i, 1080i). Select the ColorStream HD video input source on the TV.* * To select the video input source, press INPUT on the remote control ( page 30). The COLOR STREAM HD terminal can connect the component video cables (plus audio cables) from the satellite receiver to AUDIO/VIDEO...
..., see page 17. Select the ColorStream HD video input source on the TV.* * To select the video input source, press INPUT on the remote control ( page 30). The COLOR STREAM HD terminal can connect the component video cables (plus audio cables) from the DVD player to the...and Interlaced (480i, 1080i). Select the ColorStream HD video input source on the TV.* * To select the video input source, press INPUT on the remote control ( page 30). The COLOR STREAM HD terminal can connect the component video cables (plus audio cables) from the satellite receiver to AUDIO/VIDEO...
User Manual
Page 17
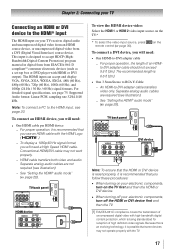
... HDMI or DVI device to the HDMI input, see page 75. Note: To connect a PC to the HDMI® input The HDMI input on the remote control ( page 30).
... HDMI or DVI device to the HDMI input, see page 75. Note: To connect a PC to the HDMI® input The HDMI input on the remote control ( page 30).
User Manual
Page 18
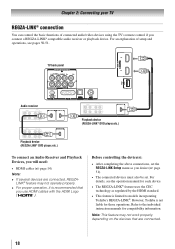
For an explanation of connected audio/video devices using the TV's remote control if you use HDMI cables with the HDMI Logo ( ). Refer to the individual instruction manuals for each device. • The REGZA-LINK® feature ... details, see pages 50-51. Note: This feature may not operate properly. •• For proper operation, it is not liable for those operations. However, Toshiba is recommended that are connected, REGZALINK® feature may not work properly depending on the devices that you connect a REGZA-LINK® compatible audio receiver...
For an explanation of connected audio/video devices using the TV's remote control if you use HDMI cables with the HDMI Logo ( ). Refer to the individual instruction manuals for each device. • The REGZA-LINK® feature ... details, see pages 50-51. Note: This feature may not operate properly. •• For proper operation, it is not liable for those operations. However, Toshiba is recommended that are connected, REGZALINK® feature may not work properly depending on the devices that you connect a REGZA-LINK® compatible audio receiver...
User Manual
Page 19
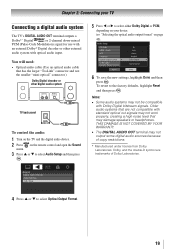
... other digital audio system TV back panel To control the audio: 1無 Turn on the TV and the digital audio device. 2無 Press on the remote control and open the Sound menu. 3無 Press p or q to select Audio Setup and then press . 5無 Press t or u to the factory defaults, highlight Reset...
... other digital audio system TV back panel To control the audio: 1無 Turn on the TV and the digital audio device. 2無 Press on the remote control and open the Sound menu. 3無 Press p or q to select Audio Setup and then press . 5無 Press t or u to the factory defaults, highlight Reset...

User Manual
Page 21
...you connect a REGZA-LINK® compatible audio receiver or playback device ( page 50). Note: •• Be sure to use The remote control can operate your LCD TV / DVD combination and control the basic functions of with new ones. •• When necessary to excessive heat... such as sunshine, fire or the like. Installing the remote control batteries 1無 Open the battery lid at the bottom of batteries in a designated disposal area. •• Batteries should always be ...
...you connect a REGZA-LINK® compatible audio receiver or playback device ( page 50). Note: •• Be sure to use The remote control can operate your LCD TV / DVD combination and control the basic functions of with new ones. •• When necessary to excessive heat... such as sunshine, fire or the like. Installing the remote control batteries 1無 Open the battery lid at the bottom of batteries in a designated disposal area. •• Batteries should always be ...
User Manual
Page 22
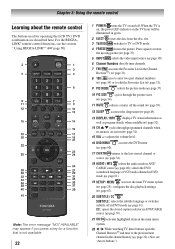
... REGZA-LINK® " ( page 50). adjusts the volume level. 16無 DVD MENU ( page 60). Chapter 3: Using the remote control Learning about the remote control The buttons used for a function that is on the TV front will be illuminated in green. 2無 EJECT ejects the disc from...disc slot. 3無 TV/DVD TV/DVD switches to TV or DVD mode. 4無 FREEZE FREEZE freezes the picture. For the REGZALINK® remote control functions, see "Arrow buttons.") selects the DVD soundtrack language or VCD audio channel in ANT/ CABLE source ( page 40); When the ...
... REGZA-LINK® " ( page 50). adjusts the volume level. 16無 DVD MENU ( page 60). Chapter 3: Using the remote control Learning about the remote control The buttons used for a function that is on the TV front will be illuminated in green. 2無 EJECT ejects the disc from...disc slot. 3無 TV/DVD TV/DVD switches to TV or DVD mode. 4無 FREEZE FREEZE freezes the picture. For the REGZALINK® remote control functions, see "Arrow buttons.") selects the DVD soundtrack language or VCD audio channel in ANT/ CABLE source ( page 40); When the ...
User Manual
Page 23
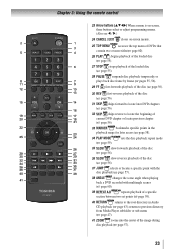
... DVD chapter or locate previous chapter ( page 56). 33無 MARKER bookmarks specific points in Audio CD playback ( page 63); Chapter 3: Using the remote control 23無 Arrow buttons (pqtu) When a menu is on-screen, these buttons select or adjust programming menus. (Also see t / u.) 24無 CANCEL / EXIT closes...
... DVD chapter or locate previous chapter ( page 56). 33無 MARKER bookmarks specific points in Audio CD playback ( page 63); Chapter 3: Using the remote control 23無 Arrow buttons (pqtu) When a menu is on-screen, these buttons select or adjust programming menus. (Also see t / u.) 24無 CANCEL / EXIT closes...

User Manual
Page 24
Chapter 4: Menu layout and navigation Main menu layout The tables below ), press on the remote control or MENU on the next page provide a quick overview of 12 hours ] [Opens the PC Settings menu] [Opens the Media Player menu] ...
Chapter 4: Menu layout and navigation Main menu layout The tables below ), press on the remote control or MENU on the next page provide a quick overview of 12 hours ] [Opens the PC Settings menu] [Opens the Media Player menu] ...

User Manual
Page 25
.... • To close a menu instantly, press . 25 To open the Installation menu (illustrated below), press on the remote control or MENU on the signal the TV is opened, use the buttons on the remote control or TV control panel to access and navigate your TV's onscreen menu system. • Press to save...
.... • To close a menu instantly, press . 25 To open the Installation menu (illustrated below), press on the remote control or MENU on the signal the TV is opened, use the buttons on the remote control or TV control panel to access and navigate your TV's onscreen menu system. • Press to save...
User Manual
Page 26
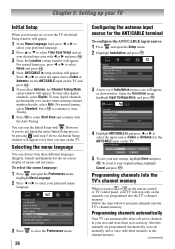
... pressing until step 5 above, the Initial Setup window will appear every time you programmed into the TV's channel memory When you press or on the remote control or TV control panel, your TV will stop the Initial Setup with the Auto Tuning. Open the Terrestrial menu, highlight Input Configuration, and press...
... pressing until step 5 above, the Initial Setup window will appear every time you programmed into the TV's channel memory When you press or on the remote control or TV control panel, your TV will stop the Initial Setup with the Auto Tuning. Open the Terrestrial menu, highlight Input Configuration, and press...
User Manual
Page 27
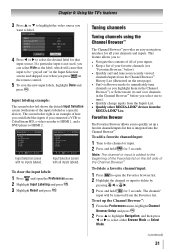
...Open the Terrestrial menu, highlight Channel Program to bring up your TV Note: •• You must use the Channel Number buttons on the remote control. •• Programming channels when the ANT/CABLE input is configured for Cable will take substantially longer than when the antenna input is... cycling through all the antenna channels, and store all active channels in the on the remote control (or highlight Cancel in the channel memory. digit PIN code. A tick will appear in the channel memory: You can be locked...
...Open the Terrestrial menu, highlight Channel Program to bring up your TV Note: •• You must use the Channel Number buttons on the remote control. •• Programming channels when the ANT/CABLE input is configured for Cable will take substantially longer than when the antenna input is... cycling through all the antenna channels, and store all active channels in the on the remote control (or highlight Cancel in the channel memory. digit PIN code. A tick will appear in the channel memory: You can be locked...
User Manual
Page 28
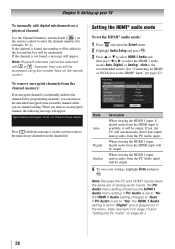
... will be output. 4無 To save your TV To manually add digital subchannels on a physical channel: Use the Channel Numbers and the Dash ( ) on the remote control to the channel list by programming channels, you can still be selected with or ; If PC Audio is grayed out in the menu. (Also... 3 on page 13 and "Setting the PC Audio" on page 45.) 28 Note: Skipped channels cannot be accessed using the number keys on the remote control. Press 1 on remote to remove channel Press while the message is on the screen to "Digital" and is set to "No" the HDMI 1 Audio setting changes...
... will be output. 4無 To save your TV To manually add digital subchannels on a physical channel: Use the Channel Numbers and the Dash ( ) on the remote control to the channel list by programming channels, you can still be selected with or ; If PC Audio is grayed out in the menu. (Also... 3 on page 13 and "Setting the PC Audio" on page 45.) 28 Note: Skipped channels cannot be accessed using the number keys on the remote control. Press 1 on remote to remove channel Press while the message is on the screen to "Digital" and is set to "No" the HDMI 1 Audio setting changes...

User Manual
Page 30
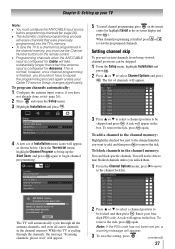
... screen if no signal is received in video input mode. ••If CEC device is connected to the HDMI input: Press INPUT on the remote control or TV control panel. 2無 And then either: a) Press 0-6 ; Note: ••You can label the video input sources according to ...Chapter 6: Using the TV's features Selecting the video input source to view To select the video input source to view: 1無 Press INPUT on the remote or TV control panel repeatedly to highlight HDMI 1 or HDMI 2. If the connected CEC device has any connected devices, a separate device selection popup window...
... screen if no signal is received in video input mode. ••If CEC device is connected to the HDMI input: Press INPUT on the remote control or TV control panel. 2無 And then either: a) Press 0-6 ; Note: ••You can label the video input sources according to ...Chapter 6: Using the TV's features Selecting the video input source to view To select the video input source to view: 1無 Press INPUT on the remote or TV control panel repeatedly to highlight HDMI 1 or HDMI 2. If the connected CEC device has any connected devices, a separate device selection popup window...
User Manual
Page 31
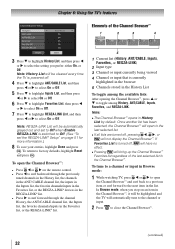
...; Highlight the channel or input to quickly set up a favorite channels/inputs list that is added to the beginning of the Favorites list on the remote control. 5無 To save the new input labels, highlight Done and press . Input Selection 0 ANT/CABLE 1 Video 2 VCR 3 Video Recorder 4 DVD 5 PC 6 DVD ANT/CABLE...
...; Highlight the channel or input to quickly set up a favorite channels/inputs list that is added to the beginning of the Favorites list on the remote control. 5無 To save the new input labels, highlight Done and press . Input Selection 0 ANT/CABLE 1 Video 2 VCR 3 Video Recorder 4 DVD 5 PC 6 DVD ANT/CABLE...
User Manual
Page 32
...™, press or to factory defaults, highlight Reset and press . To open the Channel Browser™: • Press or on the remote control. • Press to surf backward through the previously tuned channels in the History list, the channels in the ANT/ CABLE channel list, the...
...™, press or to factory defaults, highlight Reset and press . To open the Channel Browser™: • Press or on the remote control. • Press to surf backward through the previously tuned channels in the History list, the channels in the ANT/ CABLE channel list, the...

