
Operation Manual
Page 6
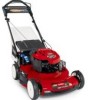
Figure 5 1. Blade control bar 9. Recoil start models only) 6 Battery charger (electric-start handle 7. change it yearly thereafter. Handle 8. Oil fill/dipstick 12. Spark plug Figure 6 1. Side discharge chute 3. Drain the excess oil...Washout port (not shown) 13. Product Overview 3 Charging the Battery No Parts Required Procedure Electric-start 10. Install the dipstick into the oil fill tube securely. Bag-on the dipstick reads Full. 6. Ignition key (electric-start models only Refer to Changing the Engine Oil. Important: Do not overfill the crankcase with...
Figure 5 1. Blade control bar 9. Recoil start models only) 6 Battery charger (electric-start handle 7. change it yearly thereafter. Handle 8. Oil fill/dipstick 12. Spark plug Figure 6 1. Side discharge chute 3. Drain the excess oil...Washout port (not shown) 13. Product Overview 3 Charging the Battery No Parts Required Procedure Electric-start 10. Install the dipstick into the oil fill tube securely. Bag-on the dipstick reads Full. 6. Ignition key (electric-start models only Refer to Changing the Engine Oil. Important: Do not overfill the crankcase with...

Operation Manual
Page 8
... the rear wheels (Figure 9). Blade control bar Figure 10 2. Raise the mower Figure 9 2. Hold the blade control bar against the handle (Figure 10). Turn the ignition key (Figure 11) (electric-start models only) or pull the recoil start handle, pull it lightly until you . and 4 inches (102 mm).... 8 Figure 11 To lower the mower, move the front cutting height levers rearward and the rear cutting height ...
... the rear wheels (Figure 9). Blade control bar Figure 10 2. Raise the mower Figure 9 2. Hold the blade control bar against the handle (Figure 10). Turn the ignition key (Figure 11) (electric-start models only) or pull the recoil start handle, pull it lightly until you . and 4 inches (102 mm).... 8 Figure 11 To lower the mower, move the front cutting height levers rearward and the rear cutting height ...

Operation Manual
Page 9
...personal pace handle to collect grass and leaf clippings from the factory ready to the operator or bystanders. If the grass bag is on the mower, remove it to the bagging position (refer to stop walking...A worn grass bag could allow the mower to roll a couple of inches (centimeters). WARNING The blade is damaged, install a new Toro replacement bag. Stop the engine and ...the clippings. If the side discharge chute is on the mower, remove it is sharp; Important: When you leave the mower (electric-start after self-propelling, stop before recycling the clippings. Figure ...
...personal pace handle to collect grass and leaf clippings from the factory ready to the operator or bystanders. If the grass bag is on the mower, remove it to the bagging position (refer to stop walking...A worn grass bag could allow the mower to roll a couple of inches (centimeters). WARNING The blade is damaged, install a new Toro replacement bag. Stop the engine and ...the clippings. If the side discharge chute is on the mower, remove it is sharp; Important: When you leave the mower (electric-start after self-propelling, stop before recycling the clippings. Figure ...

Operation Manual
Page 13
... have it more frequently in dusty operating conditions. • Charge the battery for additional maintenance procedures. tip the mower prior to remove the fuel. Run the engine dry or remove the gasoline with the air filter up. After ...toro.com to the spark plug. Important: Refer to your engine operator's manual for 24 hours (electric-start models only). • Empty the fuel tank before repairs as directed and before performing any additional yearly maintenance procedures. Gasoline is flammable, explosive and can cause personal injury. Important: Before tipping the mower...
... have it more frequently in dusty operating conditions. • Charge the battery for additional maintenance procedures. tip the mower prior to remove the fuel. Run the engine dry or remove the gasoline with the air filter up. After ...toro.com to the spark plug. Important: Refer to your engine operator's manual for 24 hours (electric-start models only). • Empty the fuel tank before repairs as directed and before performing any additional yearly maintenance procedures. Gasoline is flammable, explosive and can cause personal injury. Important: Before tipping the mower...

Operation Manual
Page 15
...mower wire harness located below the ignition key (Figure 22). • A green light indicates that the charger is fully charged or the charger is nearly fully charged. Battery compartment Figure 22 2. Wash hands after handling. This state lasts only a few minutes until the battery is charging the battery. 2. Replacing the Fuse Electric-start... of the lead-acid battery according to cause cancer and reproductive harm. Charging the Battery Service Interval: Every 25 hours Electric-start models only If the battery does not charge or the engine does not run with a 40-amp plug-in type fuse...
...mower wire harness located below the ignition key (Figure 22). • A green light indicates that the charger is fully charged or the charger is nearly fully charged. Battery compartment Figure 22 2. Wash hands after handling. This state lasts only a few minutes until the battery is charging the battery. 2. Replacing the Fuse Electric-start... of the lead-acid battery according to cause cancer and reproductive harm. Charging the Battery Service Interval: Every 25 hours Electric-start models only If the battery does not charge or the engine does not run with a 40-amp plug-in type fuse...

Operation Manual
Page 18
..., you must store the mower in an unheated area. Start the engine again. 5. Do not store fuel without stabilizer more than 30 days, and do not store stabilized fuel more than 90 days. 3. When you must charge the battery every 90 days (electric-start models only). 2. WARNING... Folding or unfolding the handle improperly can no longer start model only). 2. Removing the Mower from Storage 1. Tighten all nuts, bolts, and screws. 10. Storage Folding the Handle...
..., you must store the mower in an unheated area. Start the engine again. 5. Do not store fuel without stabilizer more than 30 days, and do not store stabilized fuel more than 90 days. 3. When you must charge the battery every 90 days (electric-start models only). 2. WARNING... Folding or unfolding the handle improperly can no longer start model only). 2. Removing the Mower from Storage 1. Tighten all nuts, bolts, and screws. 10. Storage Folding the Handle...


