
Toro 20334 Support Question
Toro 20334 Support Question
Find answers below for this question about Toro 20334 - Personal Pace Electric Start Walk Power Mower.Need a Toro 20334 manual? We have 2 online manuals for this item!
Question posted by brafran on November 18th, 2013
Toro Lawn Mower 20334 Electric Start Won't Start
The person who posted this question about this Toro product did not include a detailed explanation. Please use the "Request More Information" button to the right if more details would help you to answer this question.
Current Answers
Answer #1: Posted by freginold on December 15th, 2013 11:51 AM
freginold

Member since:
December 20th, 2011 Points: 23,253,985

Member since:
December 20th, 2011 Points: 23,253,985
Hi, if your mower won't start using the electric start and the battery has been fully charged, the fuse may have gone bad. If so, you can replace it with a new 40-amp fuse -- instructions for doing so can be found on page 5 of the owner's manual. (You can download it here if you need a copy.)
If the fuse isn't the problem, you may need to replace your battery. Also, check the cables and plugs to be sure there is no obvious damage or wear.
If the fuse isn't the problem, you may need to replace your battery. Also, check the cables and plugs to be sure there is no obvious damage or wear.
Related Toro 20334 Manual Pages
Owner's Manual - Page 1
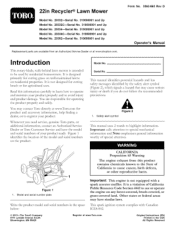
... lawns on any forest-covered, brush-covered, or grass-covered land. Introduction
This rotary-blade, walk-behind lawn mower is...20334--Serial No. 310000001 and Up Model No. 20334C--Serial No. 310000001 and Up Model No. 20352--Serial No. 310000001 and Up
Operator's Manual
Replacement parts are responsible for operating the product properly and safel>
You may contact Toro directly at v_,wv,Toro...
Owner's Manual - Page 2

...walk-behind rotary lawn mowers and the B71.1 specifications of the American National Standards Institute in effect at all times.
• Only allow responsible adults, who are a major factor related to vibrate abnormal13;
General Operation
• Read, understand, and follow all safe g messages that follow this potential, comply with the instructions, to potential personal...you start to...
Owner's Manual - Page 3
...grass, leaves, or other sources of children.
Remove gas-powered equipment from the truck or trailer and refuel it on.... If this is not alert to prevent unintended starting .
Check their proper operation regularl>
Keep machine free of a ...alert and turn mower off if a child enters the area.
If you .
Service
Safe Handling of Gasoline
To avoid personal injury or property...
Owner's Manual - Page 4
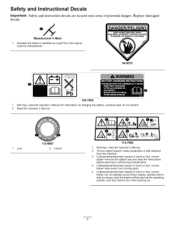
...the battery; do not operate up . Cutting/dismemberment hazard of hand or foot, mower
blade--remove the ignition key and read the instructions before leaving the operating position; Indicates...Operator's Manual for information on slopes; Cutting/dismemberment hazard of hand or foot, mower blade--do not discard. 2. Cutting/dismemberment hazard of potential danger. and look ...
Owner's Manual - Page 5
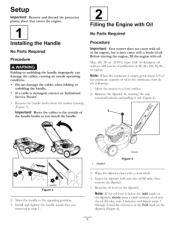
... If a cable is damaged, Service Dealer. Move the handle to a level surface.
2.
Before starting the engine, fill the engine with an API service classification of oil. i
G009550
Figure 3
2.
..., then do the following: 1.
contact an Authorized
, Remove the handle _obs from the mower housing (Figure 3). Remove the dipstick by rotating the cap counterclockwise and pulling it does come...
Owner's Manual - Page 6

... height lever (4) 9. Side-discharge deflector
models only)
4. Oil fill/dipstick
12. Spark plug
1
G009526
Figure 6
1. change it yearly thereafter. Handle 2. Ignition key (electric-start handle
7. Bag-on the dipstick reads Full. Recoil start
8. Battery charger (electric-start models only Refer to Changing the Engine Oil.
[3
Charging the Battery
No Parts Required
Procedure...
Owner's Manual - Page 7
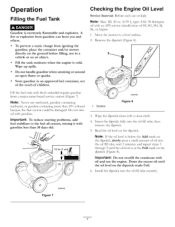
...or on the dipstick (Figure 8).
Note: Never use or daily
Note: Max. Important: To reduce starting problems, fuel stabilizer to a level surface.
2. Insert the dipstick fury into the oil fi11tube secure17... cloth.
4. To prevent a static charge from igniting the gasoline, place the container and/or mower directly on the ground before filling, not in an approved fuel container, out of the reach...
Owner's Manual - Page 8
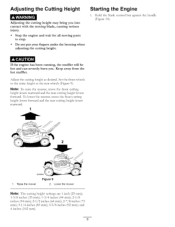
... bring contact with the moving parts to the same height as desired. Note: To raise the mower, move the front cutting height levers forward and the rear cutting height levers rearward.
1
2
_r--- _
1. Raise the mower
Figure 9 2.
Starting the Engine
1. Adjust the cutting height as the rear wheels (Figure 9). you . Keep away from the...
Owner's Manual - Page 9

... try reaching just under the personal pace handle to the handle slowl>
Figure 13
Note: If the mower does not freely roll backward after several attempts, contact an Authorized Service Dealer. s/
Note: If the mower does not start after self-propelling, stop walking, hold your sides, and the mower will automatically keep pace with you feel resistance, then...
Owner's Manual - Page 10

...damaged, install a new Toro replacement bag. Bagging the Clippings
Use the grass bag when you leave the mower (electric-start models only).
If ...the bag rest in serious personal injury.
Notches 2. If the side-discharge chute is in serious personal injury or death to ...to recycle the grass and leaf clippings back into the lawn. Installing the Grass Bag
1. Rear deflector
2. Operating the...
Owner's Manual - Page 12
...the mower strikes an object or starts to Adjusting the Cutting Height.
• When cutting grass over the lawn for the best lawn ... blade could hit.
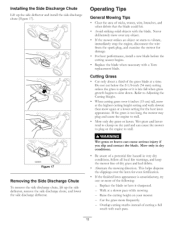
• Avoid striking solid objects with a Toro replacement blade. Installing the Side Discharge Chute
Lift up the side ...a slower pace while mowing. - Replace the blade or have it is late fall when grass growth begins to stall. Walk at ...
Owner's Manual - Page 13
... height.
• Slow down your mowing speed if the mower does not cut leaf cover. You may need to make more than one pass over the leaves.
• If there are more than the rear wheels. Set the cutting height on the lawn, set the front wheels at 2-1/8-inch (54 ram) and...
Owner's Manual - Page 14

... for Maintenance
1. Important: Refer to your engine operator's manual for 24 hours (electric-start models only).
• Empty the fuel tank before repairs as directed and before performing any additional yearly maintenance
procedures.
If you must
14 Tipping Gasoline personal
the mower may cause the fuel to remove the fuel.
Figure 18
G009500
. never...
Owner's Manual - Page 16

Connect the charger to the mower wire harness located below the ignition key (Figure 22).
Note: Your battery charger may be blown. ....
and locate the fuse (Figure 24.
16 Figure 22
G009555
2.
Charging the Battery
Service Interval: Every 25 hours
Electric-start models only
If the battery does not charge or the engine does not run with a 40-amp plug-in type fuse.
1. ...
Owner's Manual - Page 18
... operating position (behind the
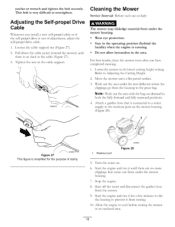
handle) when the engine is simplified for a few minutes to dry the housing to overtighten. Start the engine and run it from the mower. Cleaning the Mower
Service Interval: Before each use or daily
The mower may dislodge material from the housing to its lowest cutting height setting.
Move the...
Owner's Manual - Page 19

... only).
If a cable is sufficiently dr>
, Disconnect the wire from Storage
1. Charge the battery for 24 hours (electric-start model only). 2. Allow the engine to run until you must store the mower in Figure 29. Remove the spark plug, add 1 oz. (30 ml) of oil
through the spark plug hole, and pull the...
Owner's Manual - Page 20

... Warranty (45 Day Limited Warranty for Commercial Use)
The Toro GTS Starting Guarantee
A 3-Year Full Warranty (Not Applicable for Commercial Use)
22 in Recycler ¢
20 in Mulcher/Bagger Walk Power Mowers
Conditions and Products Covered
Items and Conditions Not Covered
The Toro Company and its affiliate, Toro Warranty Company, pursuant to an agreement between them, jointly...
Parts Catalog - Page 1
Original Instructions (EN)
*3371-850* B Form No. 3371-850 Rev B
22in Recycler® Lawn Mower
Model No. 20334-Serial No. 312000001 and Up
Parts Catalog
Register at www.Toro.com.
Parts Catalog - Page 3

... Assembly 4 Rear Bag Assembly 5 Engine and Blade Assembly 6 Front Wheel and Height-of-Cut Assembly 7 Transmission and Rear Wheel Drive Assembly 8 Handle Assembly 9 Electrical Assembly 10 Attachments and Accessories 11
© 2012-The Toro® Company
Contact us at www.Toro.com.
8111 Lyndale Avenue South Bloomington, MN 55420
3
Printed in the USA.
Parts Catalog - Page 10
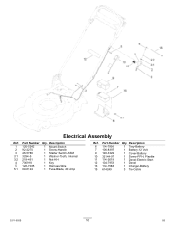
Electrical Assembly
Ref. Part Number Qty. Description
1 120-5242
1 Mount-Switch
2 92-2270
1 Screw-Handle
3 46-5780
1 Starter Switch ASM
3:1 ...106-8397
1 Battery-12 Volt
9 120-3329
1 Cover-Battery
10 32144-97
1 Screw-PPH, Plastite
11 114-2619
1 Decal-Electric Start
12 104-7953
1 Decal
13 114-1588
1 Charger-Battery
15 614249
3 Tie-Cable
3371-850B
10
D5 Part Number Qty.
Similar Questions

Blue Ignition Push Start Cap On Toro 20334 Electric Start Mower
My husband and I just purchased a Toro 20334 mower and when putting it together the blue ignition ca...
My husband and I just purchased a Toro 20334 mower and when putting it together the blue ignition ca...
(Posted by joders10 9 years ago)
My 1 Year Old Toro Personal Pace Lawn Mower Won't Start
(Posted by nasb 10 years ago)
My Toro Personal Pace Mower Will Not Stay Started
(Posted by psthiibry 10 years ago)

How Do I Change The Oil On My Personal Pace Toro Lawn Mower
(Posted by gignac4428 11 years ago)

Toro Personal Pace With Electric Start
i have a good battery and the starter does not drop the starter wheel gear to go to the fly wheel , ...
i have a good battery and the starter does not drop the starter wheel gear to go to the fly wheel , ...
(Posted by galehogue 11 years ago)