

Owner's Manual
Page 2
... ANSI/OPEI standard B71.1-2003. Safety This lawn mower meets or exceeds the CPSC blade safety requirements for walk-behind rotary lawn mowers and the B71.1 specifications of the engine was ... grass can amputate hands and feet and throw objects. Always wear substantial footwear. If you start to avoid possible injury or death. of your footing or balance. The following safety instructions... or other hidden objects. As configured to potential personal injury hazards. Always be ordered through the engine manufacturer. Uneven terrain could cause a slip and fall...
... ANSI/OPEI standard B71.1-2003. Safety This lawn mower meets or exceeds the CPSC blade safety requirements for walk-behind rotary lawn mowers and the B71.1 specifications of the engine was ... grass can amputate hands and feet and throw objects. Always wear substantial footwear. If you start to avoid possible injury or death. of your footing or balance. The following safety instructions... or other hidden objects. As configured to potential personal injury hazards. Always be ordered through the engine manufacturer. Uneven terrain could cause a slip and fall...
Owner's Manual
Page 3
...is not alert to the presence of Gasoline To avoid personal injury or property damage, use extreme care in handling gasoline. Never ...sure the equipment is in safe working condition. Be alert and turn mower off if a child enters the area. Use extra care when approaching...filling. Disconnect the spark plug wire and ground against engine to prevent unintended starting . Children Tragic accidents can kill you strike a foreign object, stop ...Handling of children. Use only an approved gasoline container. Remove gas-powered equipment from the truck or trailer and refuel it on other debris...
...is not alert to the presence of Gasoline To avoid personal injury or property damage, use extreme care in handling gasoline. Never ...sure the equipment is in safe working condition. Be alert and turn mower off if a child enters the area. Use extra care when approaching...filling. Disconnect the spark plug wire and ground against engine to prevent unintended starting . Children Tragic accidents can kill you strike a foreign object, stop ...Handling of children. Use only an approved gasoline container. Remove gas-powered equipment from the truck or trailer and refuel it on other debris...
Owner's Manual
Page 5
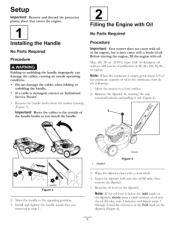
Before starting the engine, fill the engine with a clean cloth. 4. Insert the dipstick flay into the... protective plastic sheet that you install the handle. [2 Filling the Engine with Oil No Parts Required Procedure Important: Your mower does not come with an API service classification of oil. i G009550 Figure 3 2. Read the oil level on the... it does come with oil in step I . 1. Max. contact an Authorized , Remove the handle _obs from the mower housing (Figure 3). Important: Route the cables to the outside of the handle knobs as you removed in the engine, ...
Before starting the engine, fill the engine with a clean cloth. 4. Insert the dipstick flay into the... protective plastic sheet that you install the handle. [2 Filling the Engine with Oil No Parts Required Procedure Important: Your mower does not come with an API service classification of oil. i G009550 Figure 3 2. Read the oil level on the... it does come with oil in step I . 1. Max. contact an Authorized , Remove the handle _obs from the mower housing (Figure 3). Important: Route the cables to the outside of the handle knobs as you removed in the engine, ...

Owner's Manual
Page 6
... the dipstick reads Full. Important: Do not overfill the crankcase oil and run the engine. Recoil start models only Refer to Changing the Engine Oil. [3 Charging the Battery No Parts Required Procedure Electric-start handle 7. Battery charger (electric-start 8. with oil until 6. Install the dipstick into the oil fill tube secure1> Important: Change the engine...
... the dipstick reads Full. Important: Do not overfill the crankcase oil and run the engine. Recoil start models only Refer to Changing the Engine Oil. [3 Charging the Battery No Parts Required Procedure Electric-start handle 7. Battery charger (electric-start 8. with oil until 6. Install the dipstick into the oil fill tube secure1> Important: Change the engine...
Owner's Manual
Page 7
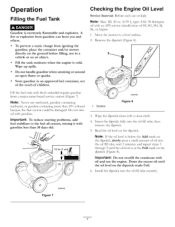
... the Engine Oil Level Service Interval: Before each use methanol, gasoline containing methanol, or gasoline containing more than 30 days old. Move the mower to the fuel all season, mixing gasoline less than 10% ethanol because the fuel system could be damaged. Note: Never use or daily ...Note: Max. Important: To reduce starting problems, fuel stabilizer to a level surface. 2. Read the oil level on the dipstick reads Full. Fill the tank outdoors when the engine is...
... the Engine Oil Level Service Interval: Before each use methanol, gasoline containing methanol, or gasoline containing more than 30 days old. Move the mower to the fuel all season, mixing gasoline less than 10% ethanol because the fuel system could be damaged. Note: Never use or daily ...Note: Max. Important: To reduce starting problems, fuel stabilizer to a level surface. 2. Read the oil level on the dipstick reads Full. Fill the tank outdoors when the engine is...
Owner's Manual
Page 8
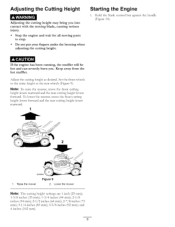
...can severely burn you into serious • Stop the engine and wait for all moving blade, causing injury. and 4 inches (102 ram). Lower the mower Note: The cutting height settings are 1 inch (25 ram); 1-3/8 inches (35 ram); 1-3/4 inches (44 ram); 2-1/8 inches (54 ram); 2-1/2 ...inches (64 ram); 2-7/8inches (73 ram); 3-1/4 inches (83 ram); 3-5/8 inches (92 ram); Starting the Engine 1. Adjusting the Cutting Height Adjusting the cutting height may bring contact with the moving parts to the same height as desired. Adjust the...
...can severely burn you into serious • Stop the engine and wait for all moving blade, causing injury. and 4 inches (102 ram). Lower the mower Note: The cutting height settings are 1 inch (25 ram); 1-3/8 inches (35 ram); 1-3/4 inches (44 ram); 2-1/8 inches (54 ram); 2-1/2 ...inches (64 ram); 2-7/8inches (73 ram); 3-1/4 inches (83 ram); 3-5/8 inches (92 ram); Starting the Engine 1. Adjusting the Cutting Height Adjusting the cutting height may bring contact with the moving parts to the same height as desired. Adjust the...

Owner's Manual
Page 9
...control bar 7 _/_'G009546 Figure 10 , Turn the ignition key (Figure 11) (electric-start models only) or pul the recoil start after self-propelling, stop walking, hold your sides, and the mower will automatically keep pace with your hands on the upper handle and your elbows at your hands in place...and push the mower forward a couple of inches (centimeters). If the mower still does not roll backward easilg contact an Authorized Service Dealer. Note: When you pull the recoil start handle, pull it sharply (Figure 12). You can also try reaching just under the personal pace handle to ...
...control bar 7 _/_'G009546 Figure 10 , Turn the ignition key (Figure 11) (electric-start models only) or pul the recoil start after self-propelling, stop walking, hold your sides, and the mower will automatically keep pace with your hands on the upper handle and your elbows at your hands in place...and push the mower forward a couple of inches (centimeters). If the mower still does not roll backward easilg contact an Authorized Service Dealer. Note: When you pull the recoil start handle, pull it sharply (Figure 12). You can also try reaching just under the personal pace handle to ...

Owner's Manual
Page 10
... the Bag-on the handle (Figure 14). 3. The blade is damaged, install a new Toro replacement bag. Installing the Grass Bag 1. Notches 2. and contact an Authorized Recycling the Clippings Your mower comes from the lawn. 23 A worn grass bag could allow small stones and other similar ...wait for all moving parts to the operator or bystanders. Important: When you leave the mower (electric-start models only). Install the grass bag, ensuring that the pins on the bag rest in serious personal injury or death to stop within 3 seconds. Note: Remove the ignition key when ...
... the Bag-on the handle (Figure 14). 3. The blade is damaged, install a new Toro replacement bag. Installing the Grass Bag 1. Notches 2. and contact an Authorized Recycling the Clippings Your mower comes from the lawn. 23 A worn grass bag could allow small stones and other similar ...wait for all moving parts to the operator or bystanders. Important: When you leave the mower (electric-start models only). Install the grass bag, ensuring that the pins on the bag rest in serious personal injury or death to stop within 3 seconds. Note: Remove the ignition key when ...
Owner's Manual
Page 12
...cutting height setting and walk slower; Mow only in very dry conditions, follow all local fire warnings, and keep the mower free of the grass blade at a slower pace while mowing. - ...plug, and examine the mower for even fertilization. This helps disperse the clippings over aW object. • If the mower strikes an object or starts to clump on your mower. - Overlap cutting swaths ...a new blade before the cutting season begins. • Replace the blade when necessary with a Toro replacement blade. If the grass is sparse or it sharpened. - G009537 Figure 17 Removing the ...
...cutting height setting and walk slower; Mow only in very dry conditions, follow all local fire warnings, and keep the mower free of the grass blade at a slower pace while mowing. - ...plug, and examine the mower for even fertilization. This helps disperse the clippings over aW object. • If the mower strikes an object or starts to clump on your mower. - Overlap cutting swaths ...a new blade before the cutting season begins. • Replace the blade when necessary with a Toro replacement blade. If the grass is sparse or it sharpened. - G009537 Figure 17 Removing the ...

Owner's Manual
Page 14
...mower. • Replace the air filter; If you must 14 Note: Replacement parts are available from the spark plug (Figure 18) before annual storage. • Change the engine oil. • Replace the blade or have it sharpened (more frequently in dusty operating conditions. • Charge the battery for 24 hours (electric-start... wire to run dry through normal usage. clean it more frequently in dusty operating conditions. Tipping Gasoline personal the mower may cause the fuel to remove the fuel. Recommended Maintenance Schedule(s) Maintenance Service Interval After the first ...
...mower. • Replace the air filter; If you must 14 Note: Replacement parts are available from the spark plug (Figure 18) before annual storage. • Change the engine oil. • Replace the blade or have it sharpened (more frequently in dusty operating conditions. • Charge the battery for 24 hours (electric-start... wire to run dry through normal usage. clean it more frequently in dusty operating conditions. Tipping Gasoline personal the mower may cause the fuel to remove the fuel. Recommended Maintenance Schedule(s) Maintenance Service Interval After the first ...

Owner's Manual
Page 16
... holds a charge, recycle or dispose of California to cause cancer and reproductive harm. Screw _6 Figure 23 3. Replacing the Fuse Electric-start models only CALIFORNIA Proposition 65 Warning Battery accessories chemicals posts, contain known terminals, and related lead and lead compounds, to the State... of the lead-acid battery according to the mower wire harness located below the ignition key (Figure 22). Charging the Battery Service Interval: Every 25 hours Electric-start models only If the battery does not charge or the engine does not run...
... holds a charge, recycle or dispose of California to cause cancer and reproductive harm. Screw _6 Figure 23 3. Replacing the Fuse Electric-start models only CALIFORNIA Proposition 65 Warning Battery accessories chemicals posts, contain known terminals, and related lead and lead compounds, to the State... of the lead-acid battery according to the mower wire harness located below the ignition key (Figure 22). Charging the Battery Service Interval: Every 25 hours Electric-start models only If the battery does not charge or the engine does not run...
Owner's Manual
Page 18
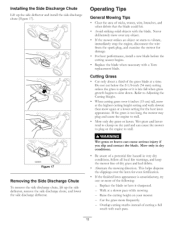
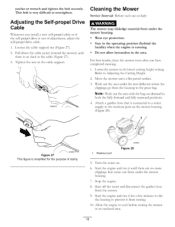
... surface. 3. Wash out the area under the rear deflector where the clippings go from under the mower housing. , Stop the engine. 8. Attach a garden hose that come out from the mower. the garden hose , Start the engine and run it for the purpose of adjustment , adjust the self-propel drive cable. ...Adjusting the Self-propel Drive Cable Whenever you have completed mowing. 1. Pull down the cable jacket (toward the mower) until there are no slack in the cable (Figure 27). 3. Start the engine and run it until there is no more clippings that is connected to a water supply to the...
... surface. 3. Wash out the area under the rear deflector where the clippings go from under the mower housing. , Stop the engine. 8. Attach a garden hose that come out from the mower. the garden hose , Start the engine and run it for the purpose of adjustment , adjust the self-propel drive cable. ...Adjusting the Self-propel Drive Cable Whenever you have completed mowing. 1. Pull down the cable jacket (toward the mower) until there are no slack in the cable (Figure 27). 3. Start the engine and run it until there is no more clippings that is connected to a water supply to the...

Owner's Manual
Page 19
...an unsafe operating condition. Charge the battery for 24 hours, then unplug the battery charger an store the mower in an unheated area. Charge the battery for 24 hours (electric-start model only). 2. Loosen the handle M_obs until you fold the handle. Connect the wire to local ...store stabilized fuel more than 90 days. , Run the mower until it according to the spark plug. 19 Loosely install the spark plug. 9. Do not damage the cables when folding or unfolding the handle. Remove the ignition key (electric-start models only). 2. To unfold the handle, reverse the...
...an unsafe operating condition. Charge the battery for 24 hours, then unplug the battery charger an store the mower in an unheated area. Charge the battery for 24 hours (electric-start model only). 2. Loosen the handle M_obs until you fold the handle. Connect the wire to local ...store stabilized fuel more than 90 days. , Run the mower until it according to the spark plug. 19 Loosely install the spark plug. 9. Do not damage the cables when folding or unfolding the handle. Remove the ignition key (electric-start models only). 2. To unfold the handle, reverse the...

Owner's Manual
Page 20
... Warranty (45 Day Limited Warranty for Commercial Use) The Toro GTS Starting Guarantee A 3-Year Full Warranty (Not Applicable for Commercial Use) 22 in Recycler ¢ 20 in Mulcher/Bagger Walk Power Mowers Conditions and Products Covered Items and Conditions Not Covered The Toro Company and its affiliate, Toro Warranty Company, pursuant to an agreement between them, jointly...
... Warranty (45 Day Limited Warranty for Commercial Use) The Toro GTS Starting Guarantee A 3-Year Full Warranty (Not Applicable for Commercial Use) 22 in Recycler ¢ 20 in Mulcher/Bagger Walk Power Mowers Conditions and Products Covered Items and Conditions Not Covered The Toro Company and its affiliate, Toro Warranty Company, pursuant to an agreement between them, jointly...
Parts Catalog
Page 10
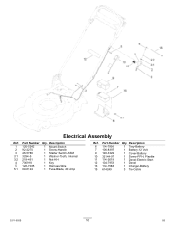
Description 1 120-5242 1 Mount-Switch 2 92-2270 1 Screw-Handle 3 46-5780 1 Starter Switch ASM 3:1 3254-5 1 Washer-Tooth, Internal 3:2 218-461 1 Nut-HH 4 700918 1 Key 5 120-7035 1 Harness-Wire 5:1 99-6124 1 Fuse-Blade, 40 Amp Ref. Part Number Qty. Description 6 114-7936 1 Tray-Battery 7 106-8397 1 Battery-12 Volt 9 120-3329 1 Cover-Battery 10 32144-97 1 Screw-PPH, Plastite 11 114-2619 1 Decal-Electric Start 12 104-7953 1 Decal 13 114-1588 1 Charger-Battery 15 614249 3 Tie-Cable 3371-850B 10 D5 Part Number Qty. Electrical Assembly Ref.
Description 1 120-5242 1 Mount-Switch 2 92-2270 1 Screw-Handle 3 46-5780 1 Starter Switch ASM 3:1 3254-5 1 Washer-Tooth, Internal 3:2 218-461 1 Nut-HH 4 700918 1 Key 5 120-7035 1 Harness-Wire 5:1 99-6124 1 Fuse-Blade, 40 Amp Ref. Part Number Qty. Description 6 114-7936 1 Tray-Battery 7 106-8397 1 Battery-12 Volt 9 120-3329 1 Cover-Battery 10 32144-97 1 Screw-PPH, Plastite 11 114-2619 1 Decal-Electric Start 12 104-7953 1 Decal 13 114-1588 1 Charger-Battery 15 614249 3 Tie-Cable 3371-850B 10 D5 Part Number Qty. Electrical Assembly Ref.


