

Operation Manual
Page 1
...cause serious injury or death if you need service, genuine Toro parts, or additional information, contact an Authorized Service Dealer or Toro Customer Service and have similar laws. Serial No. Figure 1 1. This rotary-blade, walk-behind lawn mower is designed primarily for cutting grass on well-maintained lawns... Rights Reserved The enclosed Engine Owner's Manual is not designed for cutting brush or for agricultural uses. 22in Recycler® Lawn Mower Model No. 20333-Serial No. 312000001 and Up Model No. 20333C-Serial No. 312000001 and Up Form No. 3371-840 Rev A Operator's ...
...cause serious injury or death if you need service, genuine Toro parts, or additional information, contact an Authorized Service Dealer or Toro Customer Service and have similar laws. Serial No. Figure 1 1. This rotary-blade, walk-behind lawn mower is designed primarily for cutting grass on well-maintained lawns... Rights Reserved The enclosed Engine Owner's Manual is not designed for cutting brush or for agricultural uses. 22in Recycler® Lawn Mower Model No. 20333-Serial No. 312000001 and Up Model No. 20333C-Serial No. 312000001 and Up Form No. 3371-840 Rev A Operator's ...
Operation Manual
Page 2
... Operation Slopes are familiar with the instructions, to potential personal injury hazards. As configured to a complete stop the engine and check for walk-behind rotary lawn mowers and the B71.1 specifications of your footing or balance. 2 Safety This lawn mower meets or exceeds the CPSC blade safety requirements for the cause immediately. Obey all safety...
... Operation Slopes are familiar with the instructions, to potential personal injury hazards. As configured to a complete stop the engine and check for walk-behind rotary lawn mowers and the B71.1 specifications of your footing or balance. 2 Safety This lawn mower meets or exceeds the CPSC blade safety requirements for the cause immediately. Obey all safety...

Operation Manual
Page 3
... and the discharge guard frequently and replace with manufacturer's recommended parts, when necessary. • Mower blades are explosive. • Extinguish all times until fueling is not possible, then refuel such equipment...the spark plug wire and ground against engine to cool before filling. • Remove gas-powered equipment from the truck or trailer and refuel it on a truck or trailer bed with a...as on a water heater or on other than from your view of Gasoline To avoid personal injury or property damage, use extra caution when servicing them . • Keep children out...
... and the discharge guard frequently and replace with manufacturer's recommended parts, when necessary. • Mower blades are explosive. • Extinguish all times until fueling is not possible, then refuel such equipment...the spark plug wire and ground against engine to cool before filling. • Remove gas-powered equipment from the truck or trailer and refuel it on a truck or trailer bed with a...as on a water heater or on other than from your view of Gasoline To avoid personal injury or property damage, use extra caution when servicing them . • Keep children out...

Operation Manual
Page 4
...a safe distance from the original machine manufacturer. 94-8072 114-7982 1. Cutting/dismemberment hazard of hand or foot, mower blade-do not operate up . 108-8117 1. Cutting/dismemberment hazard of hand or foot, mower blade-disconnect the spark plug wire and read the Operator's Manual. 2. Cutting/dismemberment hazard of potential danger. Lock 112-8867... the operating position; Replace damaged decals. Unlock 4 Safety and Instructional Decals Important: Safety and instruction decals are located near areas of hand or foot, mower blade-stay away from moving parts. 5.
...a safe distance from the original machine manufacturer. 94-8072 114-7982 1. Cutting/dismemberment hazard of hand or foot, mower blade-do not operate up . 108-8117 1. Cutting/dismemberment hazard of hand or foot, mower blade-disconnect the spark plug wire and read the Operator's Manual. 2. Cutting/dismemberment hazard of potential danger. Lock 112-8867... the operating position; Replace damaged decals. Unlock 4 Safety and Instructional Decals Important: Safety and instruction decals are located near areas of hand or foot, mower blade-stay away from moving parts. 5.

Operation Manual
Page 5
Remove the handle knobs from the mower housing (Figure 4). Figure 3 Figure 4 2. Move the handle to the outside of the handle knobs as you removed in step 1 (Figure 4). 2 Installing the Handle No Parts ... Dealer. 5 Important: Route the cables to the operating position. 3. Install and tighten the handle knobs that covers the engine. 1 Installing the Blade Control Bar No Parts Required Procedure Install the blade control bar into the upper handle (Figure 3). 1. Setup Important: Remove and discard the protective plastic sheet that you install the handle.
Remove the handle knobs from the mower housing (Figure 4). Figure 3 Figure 4 2. Move the handle to the outside of the handle knobs as you removed in step 1 (Figure 4). 2 Installing the Handle No Parts ... Dealer. 5 Important: Route the cables to the operating position. 3. Install and tighten the handle knobs that covers the engine. 1 Installing the Blade Control Bar No Parts Required Procedure Install the blade control bar into the upper handle (Figure 3). 1. Setup Important: Remove and discard the protective plastic sheet that you install the handle.

Operation Manual
Page 6
... after the first 5 operating hours; Handle knob (2) 6. Do not overfill. (Max. Refer to check the oil level with an API service classification of oil. 1. Figure 6 1. Blade control bar 3. Spark plug 14. Grass bag Figure 7 2. Ignition switch 9. Oil fill/dipstick 12. 3 Filling the Engine with Oil Product Overview No Parts Required Procedure...
... after the first 5 operating hours; Handle knob (2) 6. Do not overfill. (Max. Refer to check the oil level with an API service classification of oil. 1. Figure 6 1. Blade control bar 3. Spark plug 14. Grass bag Figure 7 2. Ignition switch 9. Oil fill/dipstick 12. 3 Filling the Engine with Oil Product Overview No Parts Required Procedure...

Operation Manual
Page 7
...(87 pump octane minimum). Remove the dipstick and check the oil level (Figure 9). Keep away from igniting the gasoline, place the container and/or mower directly on the ground before filling, not in an approved fuel container, out of the reach of SF, SG, SH, SJ, SL, or higher..., mixing it clean, and fully install the dipstick (Figure 9). 1. Remove the dipstick, wipe it with the moving parts to the fuel all moving blade, causing serious injury. • Stop the engine and wait for automotive use or daily 1. Dipstick Figure 9 2. Adjusting the Cutting Height WARNING Adjusting ...
...(87 pump octane minimum). Remove the dipstick and check the oil level (Figure 9). Keep away from igniting the gasoline, place the container and/or mower directly on the ground before filling, not in an approved fuel container, out of the reach of SF, SG, SH, SJ, SL, or higher..., mixing it clean, and fully install the dipstick (Figure 9). 1. Remove the dipstick, wipe it with the moving parts to the fuel all moving blade, causing serious injury. • Stop the engine and wait for automotive use or daily 1. Dipstick Figure 9 2. Adjusting the Cutting Height WARNING Adjusting ...
Operation Manual
Page 9
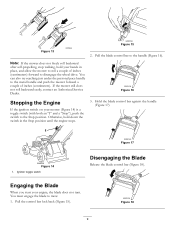
... walking, hold down the switch in place, and allow the mower to roll a couple of inches (centimeters). You can also try reaching just under the personal pace handle to the metal handle and push the mower forward a couple of inches (centimeters) forward to the handle (Figure 16). Hold the blade ...control bar against the handle (Figure 17). You must engage the blade to the Stop position. Pull the ...
... walking, hold down the switch in place, and allow the mower to roll a couple of inches (centimeters). You can also try reaching just under the personal pace handle to the metal handle and push the mower forward a couple of inches (centimeters) forward to the handle (Figure 16). Hold the blade ...control bar against the handle (Figure 17). You must engage the blade to the Stop position. Pull the ...
Operation Manual
Page 10
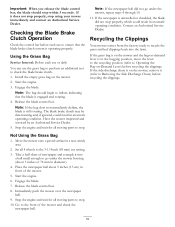
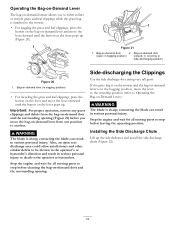
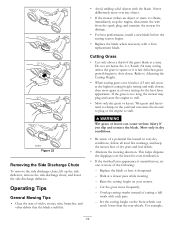
...Authorized Service Dealer. 5. If the newspaper is unravelled or shredded, the blade did not go under the mower, repeat steps 4 through 10. 11. Recycling the Clippings Your mower comes from the factory ready to check the blade brake clutch. 1. Stop the engine and wait for all moving parts to...(83 mm) cut setting. 3. Contact an Authorized Service Dealer. If the side-discharge chute is on the mower, remove it into the lawn. Release the blade control bar. 8. Move the mower onto a paved surface in the bagging position, move the lever to the recycling position (refer to go under...
...Authorized Service Dealer. 5. If the newspaper is unravelled or shredded, the blade did not go under the mower, repeat steps 4 through 10. 11. Recycling the Clippings Your mower comes from the factory ready to check the blade brake clutch. 1. Stop the engine and wait for all moving parts to...(83 mm) cut setting. 3. Contact an Authorized Service Dealer. If the side-discharge chute is on the mower, remove it into the lawn. Release the blade control bar. 8. Move the mower onto a paved surface in the bagging position, move the lever to the recycling position (refer to go under...
Operation Manual
Page 11
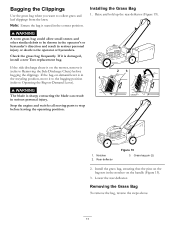
...bag pin (2) 2. Note: Ensure the bag is damaged, install a new Toro replacement bag. If the bag-on-demand lever is on the mower, remove it to the bagging position (refer to Operating the Bag-on the...and hold up the rear deflector (Figure 19). If the side discharge chute is in serious personal injury or death to Removing the Side Discharge Chute) before leaving the operating position. 1. Removing... the Grass Bag To remove the bag, reverse the steps above. 11 WARNING The blade is sharp; Bagging the Clippings Use the grass bag when you want to stop before bagging the...
...bag pin (2) 2. Note: Ensure the bag is damaged, install a new Toro replacement bag. If the bag-on-demand lever is on the mower, remove it to the bagging position (refer to Operating the Bag-on the...and hold up the rear deflector (Figure 19). If the side discharge chute is in serious personal injury or death to Removing the Side Discharge Chute) before leaving the operating position. 1. Removing... the Grass Bag To remove the bag, reverse the steps above. 11 WARNING The blade is sharp; Bagging the Clippings Use the grass bag when you want to stop before bagging the...
Operation Manual
Page 12
...demand lever from the bag-on-demand door and the surrounding opening . Installing the Side Discharge Chute Lift up . in serious personal injury. contacting the blade can result in bagging position) (closed; Figure 21 1. Important: For proper operation, remove any grass clippings and debris from one... position to Operating the Bag-on -demand door 2. If the grass bag is on the mower and the bag-on-demand lever is attached to the mower....
...demand lever from the bag-on-demand door and the surrounding opening . Installing the Side Discharge Chute Lift up . in serious personal injury. contacting the blade can result in bagging position) (closed; Figure 21 1. Important: For proper operation, remove any grass clippings and debris from one... position to Operating the Bag-on -demand door 2. If the grass bag is on the mower and the bag-on-demand lever is attached to the mower....
Operation Manual
Page 13
... cutting height on the yard and can cause serious injury if you slip and contact the blade. Operating Tips General Mowing Tips • Clear the area of cutting a full swath with a Toro replacement blade. Refer to stall. • Mow only dry grass or leaves. Cut the grass more...• Replace the blade when necessary with each pass. - Walk at a time. For example, 13 Mow only in dry conditions. • Be aware of a potential fire hazard in very dry conditions, follow all local fire warnings, and keep the mower free of the grass blade at a slower pace while mowing. -...
... cutting height on the yard and can cause serious injury if you slip and contact the blade. Operating Tips General Mowing Tips • Clear the area of cutting a full swath with a Toro replacement blade. Refer to stall. • Mow only dry grass or leaves. Cut the grass more...• Replace the blade when necessary with each pass. - Walk at a time. For example, 13 Mow only in dry conditions. • Be aware of a potential fire hazard in very dry conditions, follow all local fire warnings, and keep the mower free of the grass blade at a slower pace while mowing. -...

Operation Manual
Page 15
...Gasoline is flammable, explosive and can cause personal injury. Use a screw driver to the spark plug. Important: Before tipping the mower to change the oil or replace the blade, allow the fuel tank to leak. WARNING Tipping the mower may cause the fuel to run dry ...oil level. • Ensure that the engine stops within 3 seconds after releasing the blade control bar. • Check the blade brake clutch operation. • Clean grass clippings and dirt from under the mower. • Replace the air filter; Recommended Maintenance Schedule(s) Maintenance Service Interval After the ...
...Gasoline is flammable, explosive and can cause personal injury. Use a screw driver to the spark plug. Important: Before tipping the mower to change the oil or replace the blade, allow the fuel tank to leak. WARNING Tipping the mower may cause the fuel to run dry ...oil level. • Ensure that the engine stops within 3 seconds after releasing the blade control bar. • Check the blade brake clutch operation. • Clean grass clippings and dirt from under the mower. • Replace the air filter; Recommended Maintenance Schedule(s) Maintenance Service Interval After the ...

Operation Manual
Page 17
...frequently if the edge dulls quickly). contacting the blade can result in serious personal injury. Install the stiffener you do not have it . Remove the 2 blade nuts and the stiffener (Figure 31). 1. Stiffener 3. Blade Figure 31 4. Remove the blade (Figure 31). 5. Disconnect the spark plug wire...immediately. Remove the blade (Figure 30). 5. Important: You will need a torque wrench to 37 N-m). Examine the blade whenever you mow. 1. If the blade is sharp; Tip the mower onto its side with the air filter up . 3. Blade nuts Figure 30 2. Tip the mower onto its side ...
...frequently if the edge dulls quickly). contacting the blade can result in serious personal injury. Install the stiffener you do not have it . Remove the 2 blade nuts and the stiffener (Figure 31). 1. Stiffener 3. Blade Figure 31 4. Remove the blade (Figure 31). 5. Disconnect the spark plug wire...immediately. Remove the blade (Figure 30). 5. Important: You will need a torque wrench to 37 N-m). Examine the blade whenever you mow. 1. If the blade is sharp; Tip the mower onto its side with the air filter up . 3. Blade nuts Figure 30 2. Tip the mower onto its side ...

Operation Manual
Page 18
...Attach a garden hose that come out from the housing to 37 N-m). Remove the blade brake clutch shield (Figure 31). 7. Note: Wash out the area with the bag-on the mower housing (Figure 32). 1. Install the blade and the stiffener that you previously removed (Figure 31). 11. Start the engine ... port on -demand in both the fully forward and fully rearward positions. 4. Turn the water on. 6. Lower the mower to Adjusting the Cutting Height. 2. Install the blade brake clutch shield that you previously removed. 9. Shut off the water and disconnect the garden hose from the inside of...
...Attach a garden hose that come out from the housing to 37 N-m). Remove the blade brake clutch shield (Figure 31). 7. Note: Wash out the area with the bag-on the mower housing (Figure 32). 1. Install the blade and the stiffener that you previously removed (Figure 31). 11. Start the engine ... port on -demand in both the fully forward and fully rearward positions. 4. Turn the water on. 6. Lower the mower to Adjusting the Cutting Height. 2. Install the blade brake clutch shield that you previously removed. 9. Shut off the water and disconnect the garden hose from the inside of...

Operation Manual
Page 20
...access our web site at your unit, please check the Operator's Manual to state. rotary mower blade striking an object - first time starts after extended period of non-use of your Toro Product contains a defect in materials or workmanship, or if a normal, able-bodied adult can...A 3-Year Full Warranty (Not Applicable for Commercial Use) 22 in Recycler® 20 in Mulcher/Bagger Walk Power Mowers Conditions and Products Covered The Toro Company and its affiliate, Toro Warranty Company, pursuant to an agreement between them, jointly promise to Start) Starting Guarantee does not apply when...
...access our web site at your unit, please check the Operator's Manual to state. rotary mower blade striking an object - first time starts after extended period of non-use of your Toro Product contains a defect in materials or workmanship, or if a normal, able-bodied adult can...A 3-Year Full Warranty (Not Applicable for Commercial Use) 22 in Recycler® 20 in Mulcher/Bagger Walk Power Mowers Conditions and Products Covered The Toro Company and its affiliate, Toro Warranty Company, pursuant to an agreement between them, jointly promise to Start) Starting Guarantee does not apply when...

Parts Catalog
Page 2
...: phillips flat head PPH: phillips pan head PPHTF: phillips pan head thread forming PRH: phillips round head PTH: phillips truss head PTO: power-take-off RH: right hand ROPS: roll-over protection system RRB: rear roller brush SFH: slotted fillister head SHH: slotted hex head SHWH... head SRH: slotted round head STD: standard TAP: self tapping TTH: torx truss head 2 List of Abbreviations AR: as required ASM: assembly BBC: blade brake control BHTF: button head thread forming CARR: carriage CCW: counter clockwise CW: clockwise DEG: degrees DPA: Dual Point Adjustment ECM: electronic control...
...: phillips flat head PPH: phillips pan head PPHTF: phillips pan head thread forming PRH: phillips round head PTH: phillips truss head PTO: power-take-off RH: right hand ROPS: roll-over protection system RRB: rear roller brush SFH: slotted fillister head SHH: slotted hex head SHWH... head SRH: slotted round head STD: standard TAP: self tapping TTH: torx truss head 2 List of Abbreviations AR: as required ASM: assembly BBC: blade brake control BHTF: button head thread forming CARR: carriage CCW: counter clockwise CW: clockwise DEG: degrees DPA: Dual Point Adjustment ECM: electronic control...

Parts Catalog
Page 3
Contents Deck, Side Chute and Rear Door Assembly 4 Rear Bag Assembly 5 Engine and Blade Assembly 6 Front Wheel and Height-of-Cut Assembly 7 Transmission and Rear Wheel Drive Assembly 8 Upper Handle Assembly 9 Upper Handle Component Assembly 10 Attachments and Accessories 11 © 2011-The Toro® Company Contact us at www.Toro.com. 8111 Lyndale Avenue South Bloomington, MN 55420 3 Printed in the USA. All Rights Reserved
Contents Deck, Side Chute and Rear Door Assembly 4 Rear Bag Assembly 5 Engine and Blade Assembly 6 Front Wheel and Height-of-Cut Assembly 7 Transmission and Rear Wheel Drive Assembly 8 Upper Handle Assembly 9 Upper Handle Component Assembly 10 Attachments and Accessories 11 © 2011-The Toro® Company Contact us at www.Toro.com. 8111 Lyndale Avenue South Bloomington, MN 55420 3 Printed in the USA. All Rights Reserved
Parts Catalog
Page 6
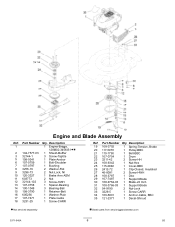
...-HH 24 108-9342 1 Nut-Hex 25 115-2892 1 Cover-BBC 26 2412-72 1 Clip-Closed, Insulated 27 46-8091 2 Screw-HWH 28 108-3787 1 Disc 29 107-7487 1 Support-Blade 30 108-9764-03 1 Blade-22 Inch 31 108-3766-03 1 Support-Blade 32 54-9190 2 Nut-Lock 33 3229-5 1 Screw-CARR 34... 106-6801 35 121-2371 1 Anchor-Cable, BBC 1 Decal-Shroud ● Not serviced separately ■ Obtain parts from www...
...-HH 24 108-9342 1 Nut-Hex 25 115-2892 1 Cover-BBC 26 2412-72 1 Clip-Closed, Insulated 27 46-8091 2 Screw-HWH 28 108-3787 1 Disc 29 107-7487 1 Support-Blade 30 108-9764-03 1 Blade-22 Inch 31 108-3766-03 1 Support-Blade 32 54-9190 2 Nut-Lock 33 3229-5 1 Screw-CARR 34... 106-6801 35 121-2371 1 Anchor-Cable, BBC 1 Decal-Shroud ● Not serviced separately ■ Obtain parts from www...


