

Operation Manual
Page 6
... Recoil start handle 7. Refer to check the oil level with the dipstick. 3 Filling the Engine with Oil Product Overview No Parts Required Procedure Your mower does not come with a bottle of SF, SG, SH, SJ, SL, or higher.) 3. Remove the dipstick (Figure 5). Ignition switch 9. Washout...Slowly pour oil into the oil fill tube until the oil level reaches the Full line on -demand lever 5. Do not overfill. (Max. Grass bag Figure 7 2. Oil fill/dipstick 12. Cutting height lever (4) 2. Fuel tank cap 11. Install the dipstick securely. Side discharge chute 6 Blade...
... Recoil start handle 7. Refer to check the oil level with the dipstick. 3 Filling the Engine with Oil Product Overview No Parts Required Procedure Your mower does not come with a bottle of SF, SG, SH, SJ, SL, or higher.) 3. Remove the dipstick (Figure 5). Ignition switch 9. Washout...Slowly pour oil into the oil fill tube until the oil level reaches the Full line on -demand lever 5. Do not overfill. (Max. Grass bag Figure 7 2. Oil fill/dipstick 12. Cutting height lever (4) 2. Fuel tank cap 11. Install the dipstick securely. Side discharge chute 6 Blade...
Operation Manual
Page 10
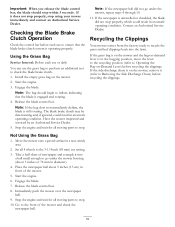
... inflate, indicating that the blade brake clutch system is operating properly. Engage the blade. Note: If the bag does not immediately deflate, the blade is on the mower, remove it into the lawn. If the newspaper is unravelled or shredded, the blade did not go under... Clutch Operation Check the control bar before recycling the clippings. Using the Grass Bag Service Interval: Before each use the grass bag to perform an additional test to Operating the Bag-on the mower. 2. Note: The bag should stop properly, which could result in an unsafe operating condition. Have the...
... inflate, indicating that the blade brake clutch system is operating properly. Engage the blade. Note: If the bag does not immediately deflate, the blade is on the mower, remove it into the lawn. If the newspaper is unravelled or shredded, the blade did not go under... Clutch Operation Check the control bar before recycling the clippings. Using the Grass Bag Service Interval: Before each use the grass bag to perform an additional test to Operating the Bag-on the mower. 2. Note: The bag should stop properly, which could result in an unsafe operating condition. Have the...
Operation Manual
Page 11
...Toro replacement bag. Lower the rear deflector. WARNING A worn grass bag could allow small stones and other similar debris to be thrown in the operator's or bystander's direction and result in serious personal injury or death to Operating the Bag-on the bag rest in serious personal injury. Notches 2. Grass bag pin (2) 2. Removing the Grass Bag To remove the bag..., reverse the steps above. 11 Note: Ensure the bag...Grass Bag ...
...Toro replacement bag. Lower the rear deflector. WARNING A worn grass bag could allow small stones and other similar debris to be thrown in the operator's or bystander's direction and result in serious personal injury or death to Operating the Bag-on the bag rest in serious personal injury. Notches 2. Grass bag pin (2) 2. Removing the Grass Bag To remove the bag..., reverse the steps above. 11 Note: Ensure the bag...Grass Bag ...
Operation Manual
Page 12
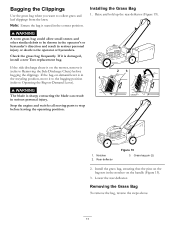
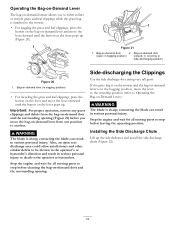
...thrown in the operator's or bystander's direction and result in serious personal injury or death to stop before cleaning the bag-on-demand door and the surrounding opening (Figure 21) before leaving the operating position. Bag-on-demand lever (in serious personal injury. Important: For proper operation, remove any grass clippings and ... until the button on the lever pops up the side deflector and install the side discharge chute (Figure 22). 12 If the grass bag is on the mower and the bag-on-demand lever is attached to either collect or recycle grass and leaf clippings while the grass...
...thrown in the operator's or bystander's direction and result in serious personal injury or death to stop before cleaning the bag-on-demand door and the surrounding opening (Figure 21) before leaving the operating position. Bag-on-demand lever (in serious personal injury. Important: For proper operation, remove any grass clippings and ... until the button on the lever pops up the side deflector and install the side discharge chute (Figure 22). 12 If the grass bag is on the mower and the bag-on-demand lever is attached to either collect or recycle grass and leaf clippings while the grass...

Operation Manual
Page 18
...and the stiffener that you previously removed. 10. Install the blade nuts and torque them to 15 to 27 ft-lb (20 to the grass bag. Stop the engine. 8. Move the mower onto a flat paved surface. 3. Wash out the area under the rear deflector where the clippings go from under the... for a few minutes to dry the housing to its lowest cutting height setting. Refer to the washout port on the mower housing (Figure 32). 1. 6. Note: Wash out the area with the bag-on . 6. Attach a garden hose that come out from the housing to 37 N-m). Remove the blade brake clutch shield (Figure ...
...and the stiffener that you previously removed. 10. Install the blade nuts and torque them to 15 to 27 ft-lb (20 to the grass bag. Stop the engine. 8. Move the mower onto a flat paved surface. 3. Wash out the area under the rear deflector where the clippings go from under the... for a few minutes to dry the housing to its lowest cutting height setting. Refer to the washout port on the mower housing (Figure 32). 1. 6. Note: Wash out the area with the bag-on . 6. Attach a garden hose that come out from the housing to 37 N-m). Remove the blade brake clutch shield (Figure ...

Parts Catalog
Page 3
All Rights Reserved Contents Deck, Side Chute and Rear Door Assembly 4 Rear Bag Assembly 5 Engine and Blade Assembly 6 Front Wheel and Height-of-Cut Assembly 7 Transmission and Rear Wheel Drive Assembly 8 Upper Handle Assembly 9 Upper Handle Component Assembly 10 Attachments and Accessories 11 © 2011-The Toro® Company Contact us at www.Toro.com. 8111 Lyndale Avenue South Bloomington, MN 55420 3 Printed in the USA.
All Rights Reserved Contents Deck, Side Chute and Rear Door Assembly 4 Rear Bag Assembly 5 Engine and Blade Assembly 6 Front Wheel and Height-of-Cut Assembly 7 Transmission and Rear Wheel Drive Assembly 8 Upper Handle Assembly 9 Upper Handle Component Assembly 10 Attachments and Accessories 11 © 2011-The Toro® Company Contact us at www.Toro.com. 8111 Lyndale Avenue South Bloomington, MN 55420 3 Printed in the USA.

Parts Catalog
Page 4
..., Washout Port 26 3254-5 1 Washer-Tooth, Internal 27 3218-6 1 Nut-Jam 29 114-7987 1 Bumper 30 105-6849 2 Screw-Thread Forming 34 117-5928 1 Decal-Bag On Demand 3371-848A 4 A2 Part Number Qty. Deck, Side Chute and Rear Door Assembly Ref. Description 1 117-1084 1 Housing ASM 1:2 94-8072 1 Decal-Danger...
..., Washout Port 26 3254-5 1 Washer-Tooth, Internal 27 3218-6 1 Nut-Jam 29 114-7987 1 Bumper 30 105-6849 2 Screw-Thread Forming 34 117-5928 1 Decal-Bag On Demand 3371-848A 4 A2 Part Number Qty. Deck, Side Chute and Rear Door Assembly Ref. Description 1 117-1084 1 Housing ASM 1:2 94-8072 1 Decal-Danger...

Parts Catalog
Page 8
... 18 110-1792 2 Wheel Cover ASM 18:2 614426 1 Washer-Stepped 19 614650 2 Bolt-Shoulder 20 115-4695 2 8 Inch Wheel Gear ASM 21 115-8406 2 Anchor-Bag 22 105-9437 2 Screw-PPH 23 115-2893 1 Shield-Trailing 24 117-1092 2 Screw-PTH 3371-848A 8 C3 Description 1 114-7955-03 1 Plate-Rear, LH...
... 18 110-1792 2 Wheel Cover ASM 18:2 614426 1 Washer-Stepped 19 614650 2 Bolt-Shoulder 20 115-4695 2 8 Inch Wheel Gear ASM 21 115-8406 2 Anchor-Bag 22 105-9437 2 Screw-PPH 23 115-2893 1 Shield-Trailing 24 117-1092 2 Screw-PTH 3371-848A 8 C3 Description 1 114-7955-03 1 Plate-Rear, LH...


