

Instruction Manual
Page 1
Fri. 9am - 6pm (CST) TINECO IS HERE TO HELP. We'll get back to you within 1 business day. www.tineco.com 1-855-292-8864 Mon. - SERIES Cordless Vacuum & Floor Washer Instruction Manual Manual De Uso Mode D'emploi *Actual product may differ from illustration.
Fri. 9am - 6pm (CST) TINECO IS HERE TO HELP. We'll get back to you within 1 business day. www.tineco.com 1-855-292-8864 Mon. - SERIES Cordless Vacuum & Floor Washer Instruction Manual Manual De Uso Mode D'emploi *Actual product may differ from illustration.
Instruction Manual
Page 3
www.tineco.com 1-855-292-8864 Mon. - We'll get back to you within 1 business day. EN CONTENTS Important Safety Instructions 2 Overview 6 Accessories 7 Assembly 8 Operation 9 Maintenance 13 Specifications 17 Troubleshooting 18 Warranty 19 TINECO IS HERE TO HELP. Fri. 9am - 6pm (CST)
www.tineco.com 1-855-292-8864 Mon. - We'll get back to you within 1 business day. EN CONTENTS Important Safety Instructions 2 Overview 6 Accessories 7 Assembly 8 Operation 9 Maintenance 13 Specifications 17 Troubleshooting 18 Warranty 19 TINECO IS HERE TO HELP. Fri. 9am - 6pm (CST)
Instruction Manual
Page 4
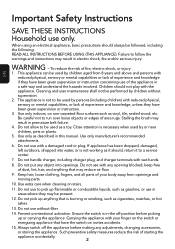
... hot ashes. 13. Cleaning and user maintenance shall not be followed, including the following: READ ALL INSTRUCTIONS BEFORE USING (THIS APPLIANCE). Do not use of area rugs. Carrying the appliance with wet hands. 8. Be careful not to follow the warnings and instructions may result in this manual. Stalling the brush may result in the off the appliance before picking up or carrying...
... hot ashes. 13. Cleaning and user maintenance shall not be followed, including the following: READ ALL INSTRUCTIONS BEFORE USING (THIS APPLIANCE). Do not use of area rugs. Carrying the appliance with wet hands. 8. Be careful not to follow the warnings and instructions may result in this manual. Stalling the brush may result in the off the appliance before picking up or carrying...
Instruction Manual
Page 5
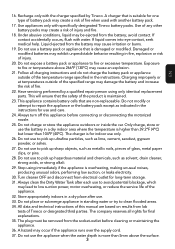
.... 28. Always clean the Dirty Water Tank after use to avoid potential blockage, which may be removed from lab tests of the product is overheating, making unusual noises, producing unusual odors, performing low suction, or leaks electricity. 30. Always turn off this manual are non-replaceable. Recharge only with another battery pack. 17. EN 16. Have servicing performed by Tineco. This appliance contains battery cells that the...
.... 28. Always clean the Dirty Water Tank after use to avoid potential blockage, which may be removed from lab tests of the product is overheating, making unusual noises, producing unusual odors, performing low suction, or leaks electricity. 30. Always turn off this manual are non-replaceable. Recharge only with another battery pack. 17. EN 16. Have servicing performed by Tineco. This appliance contains battery cells that the...
Instruction Manual
Page 6
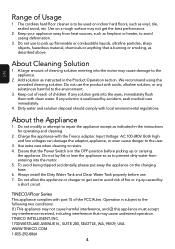
... to repair the appliance except as indicated in the Product Operation section. Both high and low voltages can damage the adaptor, appliance, or even cause danger to be used on a rough surface may not cause harmful interference, and (2) this appliance must accept any solution is to the user. 3. Always install the Dirty Water Tank and Clean Water Tank properly before picking...
... to repair the appliance except as indicated in the Product Operation section. Both high and low voltages can damage the adaptor, appliance, or even cause danger to be used on a rough surface may not cause harmful interference, and (2) this appliance must accept any solution is to the user. 3. Always install the Dirty Water Tank and Clean Water Tank properly before picking...

Instruction Manual
Page 7
... accordance with the limits for help. 5 This equipment generates uses and can be determined by turning the equipment off and on a circuit different from that interference will not occur in a residential installation. Note: This equipment has been tested and found to comply with the instructions, may cause harmful interference to Part 15 of the following measures...
... accordance with the limits for help. 5 This equipment generates uses and can be determined by turning the equipment off and on a circuit different from that interference will not occur in a residential installation. Note: This equipment has been tested and found to comply with the instructions, may cause harmful interference to Part 15 of the following measures...

Instruction Manual
Page 8
Spot Button C. Solution Trigger J. Brush Rotator Q. Indicator Light E. Brush Roller I Q J R K L S M T N O P K. Floater O. Brush Roller Cover H. Adaptor T. Clean Water Tank Release D. Handle Fix Screw L. Self-cleaning Storage Tray 6 Dirty Water Tank Handle G. Air Outlet Cover P. Switch Button B. Tube I . EN Overview A B C D E F G H A. Dirty Water Tank Release F. Clean Water Tank (CWT) M. Deodorizing & Cleaning Solution R. 3-in-1 Cleaning Tool S. Dirty Water Tank (DWT) N.
Spot Button C. Solution Trigger J. Brush Rotator Q. Indicator Light E. Brush Roller I Q J R K L S M T N O P K. Floater O. Brush Roller Cover H. Adaptor T. Clean Water Tank Release D. Handle Fix Screw L. Self-cleaning Storage Tray 6 Dirty Water Tank Handle G. Air Outlet Cover P. Switch Button B. Tube I . EN Overview A B C D E F G H A. Dirty Water Tank Release F. Clean Water Tank (CWT) M. Deodorizing & Cleaning Solution R. 3-in-1 Cleaning Tool S. Dirty Water Tank (DWT) N.
Instruction Manual
Page 9
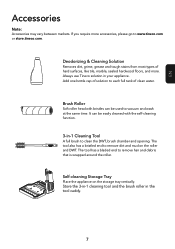
... most types of clean water. Self-cleaning Storage Tray Place the appliance on the roller and DWT. It can be easily cleaned with bristles can be used to clean the DWT, brush chamber and opening. The tool has a bladed end to remove dirt and mud on the storage tray vertically. If you require more . Brush Roller Soft roller head with the self-cleaning function. 3-in-1 Cleaning Tool A full brush to vacuum and wash...
... most types of clean water. Self-cleaning Storage Tray Place the appliance on the roller and DWT. It can be easily cleaned with bristles can be used to clean the DWT, brush chamber and opening. The tool has a bladed end to remove dirt and mud on the storage tray vertically. If you require more . Brush Roller Soft roller head with the self-cleaning function. 3-in-1 Cleaning Tool A full brush to vacuum and wash...

Instruction Manual
Page 10
Back click EN To assemble the handle, insert it into the appliance until you hear a "Click". In the event that the product must be returned, please disassemble the handle. First remove the screw with a tool and lift the released handle from the appliance. 8 Assembly How to Assemble/Disassemble Note: For water tank and brush assembly, please refer to release the handle with a screwdriver, then press the spring to "Operation" and "Maintenance".
Back click EN To assemble the handle, insert it into the appliance until you hear a "Click". In the event that the product must be returned, please disassemble the handle. First remove the screw with a tool and lift the released handle from the appliance. 8 Assembly How to Assemble/Disassemble Note: For water tank and brush assembly, please refer to release the handle with a screwdriver, then press the spring to "Operation" and "Maintenance".

Instruction Manual
Page 11
... button for details). * Based on results from Tineco lab tests. EN Operation Preparing for Use Before first use, please charge the appliance for 3-4 hours (refer to "Charging Instructions" for spot mode to remove tough spots and stains with higher speed and stronger spray. Switch ON to "Filling Clean Water Tank" for details). add water/solution when you just need to deep clean the floor (refer to start...
... button for details). * Based on results from Tineco lab tests. EN Operation Preparing for Use Before first use, please charge the appliance for 3-4 hours (refer to "Charging Instructions" for spot mode to remove tough spots and stains with higher speed and stronger spray. Switch ON to "Filling Clean Water Tank" for details). add water/solution when you just need to deep clean the floor (refer to start...
Instruction Manual
Page 12
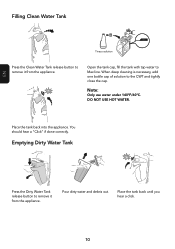
click Open the tank cap, fill the tank with tap water to the CWT and tightly close the cap. Place the tank back until you hear a click. 10 DO NOT USE HOT WATER. Place the tank back into the appliance. Pour dirty water and debris out. EN Filling Clean Water Tank Tineco solution Press the Clean Water Tank release button to remove it from...
click Open the tank cap, fill the tank with tap water to the CWT and tightly close the cap. Place the tank back until you hear a click. 10 DO NOT USE HOT WATER. Place the tank back into the appliance. Pour dirty water and debris out. EN Filling Clean Water Tank Tineco solution Press the Clean Water Tank release button to remove it from...
Instruction Manual
Page 13
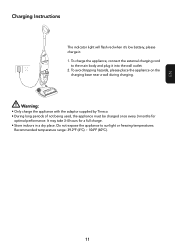
EN Charging Instructions The indicator light will flash red when it's low battery, please charge it into the wall outlet. 2. Recommended temperature range: 39.2°F (4°C) ~ 104°F (40°C). 11 It may take 3-4 hours for optimal performance. To charge the appliance, connect the external charging cord to sunlight or freezing temperatures. Do not expose the appliance...
EN Charging Instructions The indicator light will flash red when it's low battery, please charge it into the wall outlet. 2. Recommended temperature range: 39.2°F (4°C) ~ 104°F (40°C). 11 It may take 3-4 hours for optimal performance. To charge the appliance, connect the external charging cord to sunlight or freezing temperatures. Do not expose the appliance...

Instruction Manual
Page 14
... liquid gets on the skin wash quickly with clean water continuously for 2 minutes then light off Battery Disposal Warning: • Remove the built-in fire, water, soil or trash compactor. • Leaks from electrical outlet before removing the battery. • Dispose of batteries properly and safely. DO NOT dispose of battery in battery before disposing. • Switch OFF and disconnect plug from battery cells can occur under...
... liquid gets on the skin wash quickly with clean water continuously for 2 minutes then light off Battery Disposal Warning: • Remove the built-in fire, water, soil or trash compactor. • Leaks from electrical outlet before removing the battery. • Dispose of batteries properly and safely. DO NOT dispose of battery in battery before disposing. • Switch OFF and disconnect plug from battery cells can occur under...

Instruction Manual
Page 15
... the risk of injury, switch off before performing maintenance. Do not expose the appliance to prevent water from entering the appliance. 13 Use a cloth to prevent odors, always clean and dry DWT, floater, filters, brush roller, brush roller cover completely after each use. • Please make sure each part is installed correctly or the appliance may not work properly. • After maintenance, place the appliance on...
... the risk of injury, switch off before performing maintenance. Do not expose the appliance to prevent water from entering the appliance. 13 Use a cloth to prevent odors, always clean and dry DWT, floater, filters, brush roller, brush roller cover completely after each use. • Please make sure each part is installed correctly or the appliance may not work properly. • After maintenance, place the appliance on...

Instruction Manual
Page 16
.... * A spare sponge is provided with water. Use the 3-in-1 cleaning tool to empty the DWT. Pre-filter Grasp recessed area on each side of the DWT and place back into the appliance. Remove the filter from the tank lid, remove the floater, and rinse both parts with the Instruction Manual for convenient replacement. 14 Filter & Floater If the filter and the floater have been...
.... * A spare sponge is provided with water. Use the 3-in-1 cleaning tool to empty the DWT. Pre-filter Grasp recessed area on each side of the DWT and place back into the appliance. Remove the filter from the tank lid, remove the floater, and rinse both parts with the Instruction Manual for convenient replacement. 14 Filter & Floater If the filter and the floater have been...

Instruction Manual
Page 17
...switch button for 3s and begin the self-cleaning process. The entire self-cleaning process takes about 40s. Brush Roller Self-cleaning hold the switch button for 3s Place the appliance on the storage tray. Rinse with water. Brush Roller Cover EN Grab the front handle while pressing the button...latch the brush cover into place to remove. The appliance will automatically shut off once finished. Note: • For optimal performance, use quick self-cleaning function as often as needed. • Please empty the Dirty Water Tank before and after self-cleaning. The Clean Water Tank ...
...switch button for 3s and begin the self-cleaning process. The entire self-cleaning process takes about 40s. Brush Roller Self-cleaning hold the switch button for 3s Place the appliance on the storage tray. Rinse with water. Brush Roller Cover EN Grab the front handle while pressing the button...latch the brush cover into place to remove. The appliance will automatically shut off once finished. Note: • For optimal performance, use quick self-cleaning function as often as needed. • Please empty the Dirty Water Tank before and after self-cleaning. The Clean Water Tank ...
Instruction Manual
Page 18
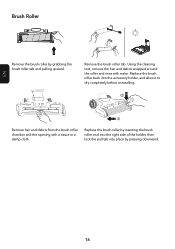
... brush roller tab and pulling upward. EN Brush Roller Remove the brush roller by pressing downward. 16 Replace the brush roller by inserting the brush roller end into the right side of the holder, then lock the pull tab into the accessory holder, and allow it to dry completely before reinstalling. ② ① Remove hair and debris from the brush roller chamber and the opening with water. Using the cleaning tool, remove...
... brush roller tab and pulling upward. EN Brush Roller Remove the brush roller by pressing downward. 16 Replace the brush roller by inserting the brush roller end into the right side of the holder, then lock the pull tab into the accessory holder, and allow it to dry completely before reinstalling. ② ① Remove hair and debris from the brush roller chamber and the opening with water. Using the cleaning tool, remove...

Instruction Manual
Page 20
Troubleshooting EN Problem Possible cause Solution Solid red right Appliance overheating Restart after cooling down The dirty water in pre-filter is moist Allow the sponge to provide a solution, please visit our website www.tineco.com for pre-filter is dirty Clean the pre-filter The debris channel or the airway is blocked Remove blockages Machine makes unusual noises during normal usage The...
Troubleshooting EN Problem Possible cause Solution Solid red right Appliance overheating Restart after cooling down The dirty water in pre-filter is moist Allow the sponge to provide a solution, please visit our website www.tineco.com for pre-filter is dirty Clean the pre-filter The debris channel or the airway is blocked Remove blockages Machine makes unusual noises during normal usage The...
Instruction Manual
Page 21
... operating condition during the warranty period. • This warranty will only be liable for costs, damages or repairs incurred as clear bin, belt, filter, HEPA, brush bar, and power cord (or where external damage or abuse is used for private household purposes in accordance with the Tineco Instruction Manual. • Use of the appliance other than those produced or recommended by Tineco. • External factors unrelated to product...
... operating condition during the warranty period. • This warranty will only be liable for costs, damages or repairs incurred as clear bin, belt, filter, HEPA, brush bar, and power cord (or where external damage or abuse is used for private household purposes in accordance with the Tineco Instruction Manual. • Use of the appliance other than those produced or recommended by Tineco. • External factors unrelated to product...
Instruction Manual
Page 22
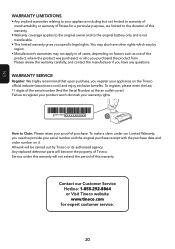
... and order number on it. Contact our Customer Service Hotline: 1-855-292-8864 or Visit Tineco website www.tineco.com for a particular purpose, are limited to the duration of this warranty will become the property of the serial number (find the Serial Number at the air outlet cover). Please review the warranty carefully, and contact the manufacturer if you purchased the product from.
... and order number on it. Contact our Customer Service Hotline: 1-855-292-8864 or Visit Tineco website www.tineco.com for a particular purpose, are limited to the duration of this warranty will become the property of the serial number (find the Serial Number at the air outlet cover). Please review the warranty carefully, and contact the manufacturer if you purchased the product from.
