

Instruction Manual
Page 3
... into water, or is not working as cigarettes, matches, or hot ashes. 11. keep free of dust, lint, hair, and anything that is necessary when used by Tineco. Do not pick up anything that have the switch on non-carpeted floor surfaces such as gasoline, or use in areas where they may be used with another battery pack. 15. Do not use with a damaged cord or plug...
... into water, or is not working as cigarettes, matches, or hot ashes. 11. keep free of dust, lint, hair, and anything that is necessary when used by Tineco. Do not pick up anything that have the switch on non-carpeted floor surfaces such as gasoline, or use in areas where they may be used with another battery pack. 15. Do not use with a damaged cord or plug...
Instruction Manual
Page 4
.... Only charge, store or use a battery pack or appliance that is overheating, making unusual noises, producing unusual odors, performing low suction, or leaks electricity. 28. Do not use the appliance when the water depth is damaged or modified. Do not use to low suction power, motor overheating, or reduce the service life of this appliance before connecting or disconnecting the motorized nozzle. 23. Do not use only. 24. Do...
.... Only charge, store or use a battery pack or appliance that is overheating, making unusual noises, producing unusual odors, performing low suction, or leaks electricity. 28. Do not use the appliance when the water depth is damaged or modified. Do not use to low suction power, motor overheating, or reduce the service life of this appliance before connecting or disconnecting the motorized nozzle. 23. Do not use only. 24. Do...
Instruction Manual
Page 5
... Cleaning Solution 1. We recommend using the provided cleaning solution. If any substances harmful to the appliance. 2. Ensure that the Power Switch is swallowed by a short circuit. 4 About the Appliance 1. Add solution as to repair the appliance except as indicated in the Product Operation section. Do not lay flat or lean the appliance so as instructed in the instructions for operating and cleaning...
... Cleaning Solution 1. We recommend using the provided cleaning solution. If any substances harmful to the appliance. 2. Ensure that the Power Switch is swallowed by a short circuit. 4 About the Appliance 1. Add solution as to repair the appliance except as indicated in the Product Operation section. Do not lay flat or lean the appliance so as instructed in the instructions for operating and cleaning...
Instruction Manual
Page 6
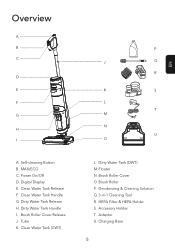
Power On/Off D. Dirty Water Tank Handle I A. Brush Roller Cover O. Brush Roller P. Accessory Holder T. Clean Water Tank Handle G. Floater N. MAX/ECO C. Adaptor U. Clean Water Tank (CWT) P J Q R K S L T M N U O L. Deodorizing & Cleaning Solution Q. 3-in-1 Cleaning Tool R. HEPA Filter & HEPA Holder S. Digital Display E. Overview A B C D E F G H I . Brush Roller Cover Release J. Tube K. Charging Base 5 EN Dirty Water Tank Release H. Dirty Water Tank (DWT) M. Clean Water Tank Release F. Self-cleaning Button B.
Power On/Off D. Dirty Water Tank Handle I A. Brush Roller Cover O. Brush Roller P. Accessory Holder T. Clean Water Tank Handle G. Floater N. MAX/ECO C. Adaptor U. Clean Water Tank (CWT) P J Q R K S L T M N U O L. Deodorizing & Cleaning Solution Q. 3-in-1 Cleaning Tool R. HEPA Filter & HEPA Holder S. Digital Display E. Overview A B C D E F G H I . Brush Roller Cover Release J. Tube K. Charging Base 5 EN Dirty Water Tank Release H. Dirty Water Tank (DWT) M. Clean Water Tank Release F. Self-cleaning Button B.
Instruction Manual
Page 8
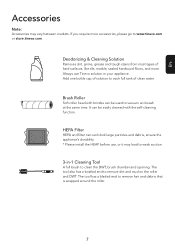
... the roller. 7 The tool has a bladed end to remove dirt and mud on the roller and DWT. It can block large particles and debris, ensure the appliance's durability. * Please install the HEAP before use Tineco solution in -1 Cleaning Tool A full brush to each full tank of solution to clean the DWT, brush chamber and opening. Always use , or it may vary between markets. HEPA Filter HEPA and filter net...
... the roller. 7 The tool has a bladed end to remove dirt and mud on the roller and DWT. It can block large particles and debris, ensure the appliance's durability. * Please install the HEAP before use Tineco solution in -1 Cleaning Tool A full brush to each full tank of solution to clean the DWT, brush chamber and opening. Always use , or it may vary between markets. HEPA Filter HEPA and filter net...

Instruction Manual
Page 9
Assembly How to Assemble/Disassemble Note: For water tank and brush assembly, please refer to release the handle with a tool (like a screwdriver) and lift the released handle from the appliance. 8 click EN To assemble the handle, insert it into the appliance until you hear a "Click". In the event that the product must be returned, please disassemble the handle. Press the spring to "Operation" and "Maintenance".
Assembly How to Assemble/Disassemble Note: For water tank and brush assembly, please refer to release the handle with a tool (like a screwdriver) and lift the released handle from the appliance. 8 click EN To assemble the handle, insert it into the appliance until you hear a "Click". In the event that the product must be returned, please disassemble the handle. Press the spring to "Operation" and "Maintenance".
Instruction Manual
Page 10
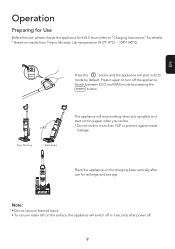
Switch between ECO and MAX mode by default. Lab temperature 39.2°F (4°C) ~ 104°F (40°C). Operation Preparing for Use Before first use, please charge the appliance for 4±0.5 hours (refer to turn off the appliance. EN MAX ECO Press the button and the appliance will start in ECO mode by pressing the MAX ECO button. Press it again to "Charging Instructions" for details). * Based on results from Tineco lab tests.
Switch between ECO and MAX mode by default. Lab temperature 39.2°F (4°C) ~ 104°F (40°C). Operation Preparing for Use Before first use, please charge the appliance for 4±0.5 hours (refer to turn off the appliance. EN MAX ECO Press the button and the appliance will start in ECO mode by pressing the MAX ECO button. Press it again to "Charging Instructions" for details). * Based on results from Tineco lab tests.
Instruction Manual
Page 11
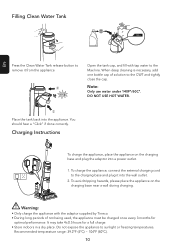
...dry place. Note: Only use water under 140F°/60C°. DO NOT USE HOT WATER. ① Place the tank back into a power outlet. 1. Charging Instructions To charge the appliance, place the appliance on the charging base near a wall during charging. To charge the appliance, connect the external charging cord to the charging base and plug...• Only charge the appliance with tap water to the Max line. Do not expose the appliance to sunlight or freezing temperatures. Filling Clean Water Tank MAX EN Press the Clean Water Tank release button to remove it into the wall outlet. 2. To...
...dry place. Note: Only use water under 140F°/60C°. DO NOT USE HOT WATER. ① Place the tank back into a power outlet. 1. Charging Instructions To charge the appliance, place the appliance on the charging base near a wall during charging. To charge the appliance, connect the external charging cord to the charging base and plug...• Only charge the appliance with tap water to the Max line. Do not expose the appliance to sunlight or freezing temperatures. Filling Clean Water Tank MAX EN Press the Clean Water Tank release button to remove it into the wall outlet. 2. To...
Instruction Manual
Page 12
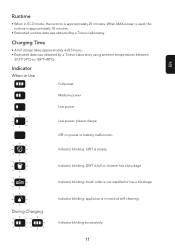
... was obtained by a Tineco Laboratory using ambient temperatures between 39.2°F (4°C) to 104°F (40°C). Indicator blinking: CWT is not installed or has a blockage. Indicator blinking successively. 11 Indicator blinking: brush roller is empty. EN Runtime • When in Use Full power Medium power Low power Low power, please charge. Indicator blinking: DWT is in need of self-cleaning. Indicator When in...
... was obtained by a Tineco Laboratory using ambient temperatures between 39.2°F (4°C) to 104°F (40°C). Indicator blinking: CWT is not installed or has a blockage. Indicator blinking successively. 11 Indicator blinking: brush roller is empty. EN Runtime • When in Use Full power Medium power Low power Low power, please charge. Indicator blinking: DWT is in need of self-cleaning. Indicator When in...
Instruction Manual
Page 13
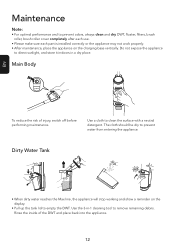
... will stop working and show a reminder on the display. • Pull up the tank lid to prevent odors, always clean and dry DWT, floater, filters, brush roller, brush roller cover completely after each use. • Please make sure each part is installed correctly or the appliance may not work properly. • After maintenance, place the appliance on the charging base vertically. Use the 3-in-1 cleaning tool to direct...
... will stop working and show a reminder on the display. • Pull up the tank lid to prevent odors, always clean and dry DWT, floater, filters, brush roller, brush roller cover completely after each use. • Please make sure each part is installed correctly or the appliance may not work properly. • After maintenance, place the appliance on the charging base vertically. Use the 3-in-1 cleaning tool to direct...

Instruction Manual
Page 14
... complete, the appliance will begin the process. 2. Brush Roller Self-cleaning AUTO MAX 1. Filter & Floater If the filter and the floater have been blocked, rinse with water. Rinse under running water and must be completely dry before recombining with your appliance for convenient replacement. HEPA EN Grasp recessed area on the charging base after cleaning completed. Note: • Ensure the charging base...
... complete, the appliance will begin the process. 2. Brush Roller Self-cleaning AUTO MAX 1. Filter & Floater If the filter and the floater have been blocked, rinse with water. Rinse under running water and must be completely dry before recombining with your appliance for convenient replacement. HEPA EN Grasp recessed area on the charging base after cleaning completed. Note: • Ensure the charging base...
Instruction Manual
Page 15
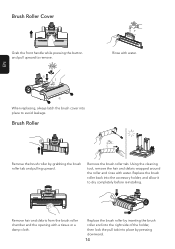
... it to remove. EN Brush Roller Cover Grab the front handle while pressing the button and pull upward to dry completely before reinstalling. Brush Roller Rinse with water. Using the cleaning tool, remove the hair and debris wrapped around the roller and rinse with water. Remove hair and debris from the brush roller chamber and the opening with a tissue or a damp cloth. Remove the brush roller tab. Replace the brush roller by inserting the brush roller end...
... it to remove. EN Brush Roller Cover Grab the front handle while pressing the button and pull upward to dry completely before reinstalling. Brush Roller Rinse with water. Using the cleaning tool, remove the hair and debris wrapped around the roller and rinse with water. Remove hair and debris from the brush roller chamber and the opening with a tissue or a damp cloth. Remove the brush roller tab. Replace the brush roller by inserting the brush roller end...
Instruction Manual
Page 16
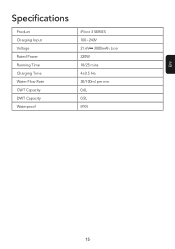
EN Specifications Product Charging Input Voltage Rated Power Running Time Charging Time Water Flow Rate CWT Capacity DWT Capacity Waterproof iFloor 3 SERIES 100~240V 21.6V 3000mAh Lion 220W 18/25 mins 4±0.5 hrs 30/100ml per min 0.6L 0.5L IPX4 15
EN Specifications Product Charging Input Voltage Rated Power Running Time Charging Time Water Flow Rate CWT Capacity DWT Capacity Waterproof iFloor 3 SERIES 100~240V 21.6V 3000mAh Lion 220W 18/25 mins 4±0.5 hrs 30/100ml per min 0.6L 0.5L IPX4 15
Instruction Manual
Page 17
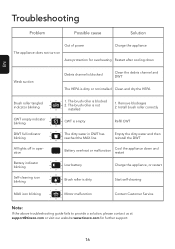
... restart Low battery Charge the appliance, or restart Brush roller is dirty Start self-cleaning MAX icon blinking Motor malfunction Contact Customer Service Note: If the above troubleshooting guide fails to provide a solution, please contact us at support@tineco.com or visit our website www.tineco.com for overheating Restart after cooling down Weak suction Debris channel is blocked Clean the debris channel and DWT The HEPA...
... restart Low battery Charge the appliance, or restart Brush roller is dirty Start self-cleaning MAX icon blinking Motor malfunction Contact Customer Service Note: If the above troubleshooting guide fails to provide a solution, please contact us at support@tineco.com or visit our website www.tineco.com for overheating Restart after cooling down Weak suction Debris channel is blocked Clean the debris channel and DWT The HEPA...
Instruction Manual
Page 18
... to ensure your appliance is in proper operating condition during the warranty period. • This warranty will only be liable for costs, damages or repairs incurred as clear bin, belt, filter, HEPA, brush bar, and power cord (or where external damage or abuse is diagnosed), carpet or floor damage due to use not in accordance with the Tineco Instruction Manual. • Use of the appliance other hazardous material...
... to ensure your appliance is in proper operating condition during the warranty period. • This warranty will only be liable for costs, damages or repairs incurred as clear bin, belt, filter, HEPA, brush bar, and power cord (or where external damage or abuse is diagnosed), carpet or floor damage due to use not in accordance with the Tineco Instruction Manual. • Use of the appliance other hazardous material...
Instruction Manual
Page 19
... Or email our Customer Service: support@tineco.com Visit Tineco Website: www.tineco.com 18 WARRANTY SERVICE Register: We highly recommend that upon purchase, you specific legal rights. All work will not extend the period of purchase. You may not apply in all cases, depending on it. If your warranty rights. Failure to Claim: Please retain your serial number and the original...
... Or email our Customer Service: support@tineco.com Visit Tineco Website: www.tineco.com 18 WARRANTY SERVICE Register: We highly recommend that upon purchase, you specific legal rights. All work will not extend the period of purchase. You may not apply in all cases, depending on it. If your warranty rights. Failure to Claim: Please retain your serial number and the original...
