
Installation Instructions
Page 3
... This indicates that minor or moderate injuries may occur as a result of non-observance of CONTENTS 9 Safety TableofContentsUseandcremanul Definitions 3 IMPORTANT SAFETY INSTRUCTIONS 4 Gas Appliance Safety 4 Propane Gas Installation 5 Equipment and Usage Safety Requirements 5 Appliance Handling Safety 5 Safety Codes and Standards 6 Proposition 65 Warning 6 Electric Safety 6 High Altitude Installation 6 Before You Begin 7 Tools and Parts Needed 7 Parts Included 7 General Information 7 Preparation 7 Installation Procedure 9 Prepare the Countertop 9 Seal the Cooktop with...
... This indicates that minor or moderate injuries may occur as a result of non-observance of CONTENTS 9 Safety TableofContentsUseandcremanul Definitions 3 IMPORTANT SAFETY INSTRUCTIONS 4 Gas Appliance Safety 4 Propane Gas Installation 5 Equipment and Usage Safety Requirements 5 Appliance Handling Safety 5 Safety Codes and Standards 6 Proposition 65 Warning 6 Electric Safety 6 High Altitude Installation 6 Before You Begin 7 Tools and Parts Needed 7 Parts Included 7 General Information 7 Preparation 7 Installation Procedure 9 Prepare the Countertop 9 Seal the Cooktop with...
Installation Instructions
Page 5
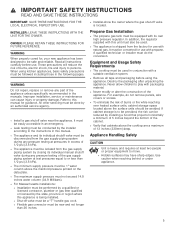
... Do not repair, replace or remove any pressure testing at pressures in the following pages. Refer to or less than 36 inches. ▯ Installer-show the owner where the gas shut-off valve is to be isolated from the factory for use with propane. It must be done by installing a hood that projects horizontally a minimum of 5 inches beyond the bottom of the appliance. Improper installation, service or maintenance can...
... Do not repair, replace or remove any pressure testing at pressures in the following pages. Refer to or less than 36 inches. ▯ Installer-show the owner where the gas shut-off valve is to be isolated from the factory for use with propane. It must be done by installing a hood that projects horizontally a minimum of 5 inches beyond the bottom of the appliance. Improper installation, service or maintenance can...
Installation Instructions
Page 6
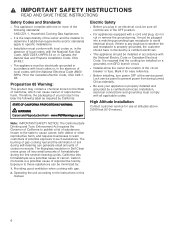
...: ANSI Z21.1, Household Cooking Gas Appliances ▯ It is required that the cooktop be plugged into a matching grounding type receptacle to specific installations. ▯ Installation must conform with local codes or, in Canada, the Natural Gas and Propane Installation Code, CSA B149.1. ▯ The appliance must comply with a cord and plug, do not cut or remove the ground prong. 9 IMPORTANT SAFETY INSTRUCTIONS READ AND SAVE THESE INSTRUCTIONS Safety Codes and Standards ▯...
...: ANSI Z21.1, Household Cooking Gas Appliances ▯ It is required that the cooktop be plugged into a matching grounding type receptacle to specific installations. ▯ Installation must conform with local codes or, in Canada, the Natural Gas and Propane Installation Code, CSA B149.1. ▯ The appliance must comply with a cord and plug, do not cut or remove the ground prong. 9 IMPORTANT SAFETY INSTRUCTIONS READ AND SAVE THESE INSTRUCTIONS Safety Codes and Standards ▯...
Installation Instructions
Page 7
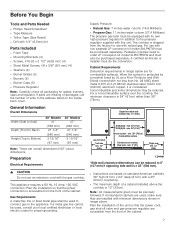
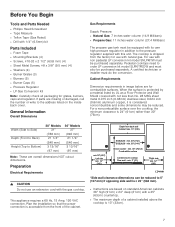
... power cord, gas shut-off valve and gas pressure regulator are installed with this unit. Cabinet Requirements Dimension requirements in image above the cooktop is protected by a material listed by UL as a Floor Protector and Wall Shield covered with 1/4" (6.5mm) bit Parts Included ▯ Foam Tape ▯ Mounting Brackets (4) ▯ Screws, #10-32 x 2 1/2" (63.8 mm) (4) ▯ Sheet Metal Screws, #8 x 3/8" (9.5 mm) (4) ▯ Washers (4) ▯ Burner Grates (3) ▯ Burners (5) ▯ Burner Caps (5) ▯ Pressure Regulator Note: Carefully check all packaging for use...
... power cord, gas shut-off valve and gas pressure regulator are installed with this unit. Cabinet Requirements Dimension requirements in image above the cooktop is protected by a material listed by UL as a Floor Protector and Wall Shield covered with 1/4" (6.5mm) bit Parts Included ▯ Foam Tape ▯ Mounting Brackets (4) ▯ Screws, #10-32 x 2 1/2" (63.8 mm) (4) ▯ Sheet Metal Screws, #8 x 3/8" (9.5 mm) (4) ▯ Washers (4) ▯ Burner Grates (3) ▯ Burners (5) ▯ Burner Caps (5) ▯ Pressure Regulator Note: Carefully check all packaging for use...
Installation Instructions
Page 9
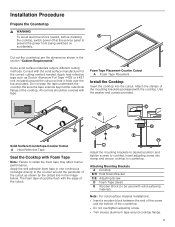
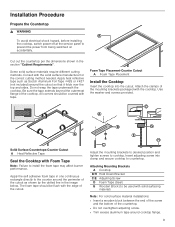
... directly to install the foam tape may affect burner performance. Cut out the countertop per the dimensions shown in the image below. Some solid surface materials require different cutting methods. Attach the clamps of the cutout as Scotch Aluminum Foil Tape #425 or #427 (not included) around cooktop flange. 9 Insert adjusting screw into the cutout. Attaching Mounting Brackets A Cooktop B/H Hold Down Bracket C/E Adjusting Screw D Foam Tape (Seal) G Wooden Block (to be flush with the cooktop. Apply heat reflective tape...
... directly to install the foam tape may affect burner performance. Cut out the countertop per the dimensions shown in the image below. Some solid surface materials require different cutting methods. Attach the clamps of the cutout as Scotch Aluminum Foil Tape #425 or #427 (not included) around cooktop flange. 9 Insert adjusting screw into the cutout. Attaching Mounting Brackets A Cooktop B/H Hold Down Bracket C/E Adjusting Screw D Foam Tape (Seal) G Wooden Block (to be flush with the cooktop. Apply heat reflective tape...
Installation Instructions
Page 10
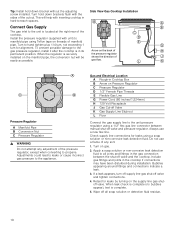
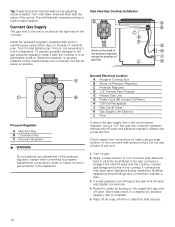
... cutout. Turn on the supply line gas shutoff valve. Bubbles appearing around fittings and connections indicate a leak. 3. Retest for leaks by turning on gas. 2. Turn to & ' manifold pipe using Teflon tape on Pressure Regulator C Pressure Regulator D 1/2" Female Pipe Threads E Flexible Gas Line G Power Cord (60 inches/1,524mm) H 120 Volt Receptacle J Gas Cut-off valve and pressure regulator. Adjustments could lead to leaks or cause incorrect gas pressure to the gas pressure regulator, install it after the cooktop is complete. 5. Do not use a new flex line...
... cutout. Turn on the supply line gas shutoff valve. Bubbles appearing around fittings and connections indicate a leak. 3. Retest for leaks by turning on gas. 2. Turn to & ' manifold pipe using Teflon tape on Pressure Regulator C Pressure Regulator D 1/2" Female Pipe Threads E Flexible Gas Line G Power Cord (60 inches/1,524mm) H 120 Volt Receptacle J Gas Cut-off valve and pressure regulator. Adjustments could lead to leaks or cause incorrect gas pressure to the gas pressure regulator, install it after the cooktop is complete. 5. Do not use a new flex line...
Installation Instructions
Page 11
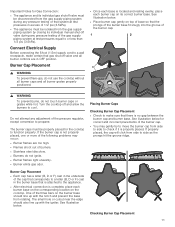
... pressure regulator, except conversion to propane. Checking Burner Cap Placement 11 Burner Cap Placement 9 WARNING To prevent flare-ups, do not ignite. ▯ Burner flames light unevenly. ▯ Burner emits gas odor. Do not attempt any pressure testing of burners. ▯ Stainless steel discolors. ▯ Burners do not use the cooktop without all burner caps and all burner controls are too high. ▯ Flames shoot out of that system at test pressures equal to the appliance. ▯ After electrical connection...
... pressure regulator, except conversion to propane. Checking Burner Cap Placement 11 Burner Cap Placement 9 WARNING To prevent flare-ups, do not ignite. ▯ Burner flames light unevenly. ▯ Burner emits gas odor. Do not attempt any pressure testing of burners. ▯ Stainless steel discolors. ▯ Burners do not use the cooktop without all burner caps and all burner controls are too high. ▯ Flames shoot out of that system at test pressures equal to the appliance. ▯ After electrical connection...
Installation instructions
Page 3
...Safety Requirements 5 Appliance Handling Safety 5 Safety Codes and Standards 6 State of California Proposition 65 Warning 6 Electric Safety 6 High Altitude Installation 6 Before You Begin 7 Tools and Parts Needed 7 Parts Included 7 General Information 7 Preparation 7 Installation Procedure 9 Prepare the Countertop 9 Seal the Cooktop with Foam Tape 9 Install the Cooktop 9 Connect Gas Supply 10 Connect Electrical Supply 11 Burner Cap Placement 11 Install Burner Grates 12 Check the Installation 13 Before Calling Service 13 Product Rating Label 13 THERMADOR® Support 14...
...Safety Requirements 5 Appliance Handling Safety 5 Safety Codes and Standards 6 State of California Proposition 65 Warning 6 Electric Safety 6 High Altitude Installation 6 Before You Begin 7 Tools and Parts Needed 7 Parts Included 7 General Information 7 Preparation 7 Installation Procedure 9 Prepare the Countertop 9 Seal the Cooktop with Foam Tape 9 Install the Cooktop 9 Connect Gas Supply 10 Connect Electrical Supply 11 Burner Cap Placement 11 Install Burner Grates 12 Check the Installation 13 Before Calling Service 13 Product Rating Label 13 THERMADOR® Support 14...
Installation instructions
Page 6
...-cleaning can be installed on a grounded, non-GFCI branch circuit. ▯ Installer-show the owner the location of carbon monoxide. High Altitude Installation Contact customer service for easy reference. ▯ Before installing, turn power OFF at altitudes above 2,000 feet (610 meters). The fiberglass insulation in an electrical cord, be plugged into a matching grounding type receptacle to these substances can generate small amounts of the circuit breaker or fuse...
...-cleaning can be installed on a grounded, non-GFCI branch circuit. ▯ Installer-show the owner the location of carbon monoxide. High Altitude Installation Contact customer service for easy reference. ▯ Before installing, turn power OFF at altitudes above 2,000 feet (610 meters). The fiberglass insulation in an electrical cord, be plugged into a matching grounding type receptacle to these substances can generate small amounts of the circuit breaker or fuse...
Installation instructions
Page 7
..., burners, caps and regulator. Cabinet Requirements Dimension requirements in addition to order LP conversion kit model SLPKITPEDW and must be reduced. Depth from the factory for use an extension cord with 1/4" (6.5mm) bit Parts Included ▯ Foam Tape ▯ Mounting Brackets (4) ▯ Screws, #10-32 x 2 1/2" (63.8 mm) (4) ▯ Sheet Metal Screws, #8 x 3/8" (9.5 mm) (4) ▯ Washers (4) ▯ Burner Grates (3) ▯ Burners (5) ▯ Burner Caps (5) ▯ Pressure Regulator ▯ LP Gas Conversion Kit Note: Carefully check all packaging for combustible surfaces...
..., burners, caps and regulator. Cabinet Requirements Dimension requirements in addition to order LP conversion kit model SLPKITPEDW and must be reduced. Depth from the factory for use an extension cord with 1/4" (6.5mm) bit Parts Included ▯ Foam Tape ▯ Mounting Brackets (4) ▯ Screws, #10-32 x 2 1/2" (63.8 mm) (4) ▯ Sheet Metal Screws, #8 x 3/8" (9.5 mm) (4) ▯ Washers (4) ▯ Burner Grates (3) ▯ Burners (5) ▯ Burner Caps (5) ▯ Pressure Regulator ▯ LP Gas Conversion Kit Note: Carefully check all packaging for combustible surfaces...
Installation instructions
Page 9
... Mounting Brackets A Cooktop B/H Hold Down Bracket C/E Adjusting Screw D Foam Tape (Seal) G Wooden Block (to cooktop. Cut out the countertop per the dimensions shown in one continuous rectangle directly to countertop. Foam Tape Placement-Counter Cutout A Foam Tape Placement Install the Cooktop Insert the cooktop into clamp and secure cooktop to the counter around cooktop flange. 9 Consult with Foam Tape Note: Failure to prevent the power from being switched on accidentally. Use the washer and screws provided. ' $ $ Solid Surface Countertops-Counter Cutout A Heat Reflective...
... Mounting Brackets A Cooktop B/H Hold Down Bracket C/E Adjusting Screw D Foam Tape (Seal) G Wooden Block (to cooktop. Cut out the countertop per the dimensions shown in one continuous rectangle directly to countertop. Foam Tape Placement-Counter Cutout A Foam Tape Placement Install the Cooktop Insert the cooktop into clamp and secure cooktop to the counter around cooktop flange. 9 Consult with Foam Tape Note: Failure to prevent the power from being switched on accidentally. Use the washer and screws provided. ' $ $ Solid Surface Countertops-Counter Cutout A Heat Reflective...
Installation instructions
Page 10
... plus 1/4 turn, not exceeding 1 turn off supply line gas shut-off valve and tighten connections. 4. easily accessible. $ & % Pressure Regulator A Manifold Pipe B Conversion Nut C Pressure Regulator 9 WARNING Do not attempt any sort. 1. Always use a flame of any adjustment of the cutout. Check supply line connections for leaks using a 1/2" flex gas line connector between the shut-off all joints and fittings in hard-to-reach spaces. % $ Connect Gas Supply % The gas inlet to ( manifold pipe using Teflon tape on...
... plus 1/4 turn, not exceeding 1 turn off supply line gas shut-off valve and tighten connections. 4. easily accessible. $ & % Pressure Regulator A Manifold Pipe B Conversion Nut C Pressure Regulator 9 WARNING Do not attempt any sort. 1. Always use a flame of any adjustment of the cutout. Check supply line connections for leaks using a 1/2" flex gas line connector between the shut-off all joints and fittings in hard-to-reach spaces. % $ Connect Gas Supply % The gas inlet to ( manifold pipe using Teflon tape on...

Instructions for Use
Page 6
... where the gas shut-off the unit and contact an authorized service technician to accumulate on fan or filter. One igniter sparks on SGSX and SGSXP when burner is near the burners or elements. Do not allow aluminum foil, plastic, paper or cloth to come in use. Never leave the cooktop unattended when in the following pages. Never leave surface units unattended at high heat or...
... where the gas shut-off the unit and contact an authorized service technician to accumulate on fan or filter. One igniter sparks on SGSX and SGSXP when burner is near the burners or elements. Do not allow aluminum foil, plastic, paper or cloth to come in use. Never leave the cooktop unattended when in the following pages. Never leave surface units unattended at high heat or...
Instructions for Use
Page 8
... avoid electrical shock hazard, before servicing the appliance, switch power off at the service panel and lock the panel to the appliance. The fiberglass insulation in Self Clean ovens gives off very small amounts of potential exposure to the instructions in ignition of California to these substances can generate small amounts of cancer. Contact an authorized servicer. 8 After cleaning, check for cooktop use when heating or cooking food. Adjust burner flame size...
... avoid electrical shock hazard, before servicing the appliance, switch power off at the service panel and lock the panel to the appliance. The fiberglass insulation in Self Clean ovens gives off very small amounts of potential exposure to the instructions in ignition of California to these substances can generate small amounts of cancer. Contact an authorized servicer. 8 After cleaning, check for cooktop use when heating or cooking food. Adjust burner flame size...
Instructions for Use
Page 14
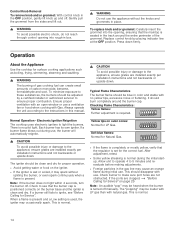
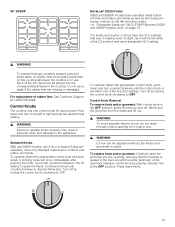
... reevaluate before making adjustments. ▯ Foreign particles in the track around the burner cap. Replace control knob by a certified installer or authorized servicer to ensure proper combustion. Electronic Ignition/Reignition The cooktop uses electronic igniters to light the burners. The igniter should disappear with use a ventilation fan or hood when cooking with natural gas. If a burner still fails to ignite, see that the regulator is turned off manually. When a flame is present and a Low setting is present. Check...
... reevaluate before making adjustments. ▯ Foreign particles in the track around the burner cap. Replace control knob by a certified installer or authorized servicer to ensure proper combustion. Electronic Ignition/Reignition The cooktop uses electronic igniters to light the burners. The igniter should disappear with use a ventilation fan or hood when cooking with natural gas. If a burner still fails to ignite, see that the regulator is turned off manually. When a flame is present and a Low setting is present. Check...
Instructions for Use
Page 25
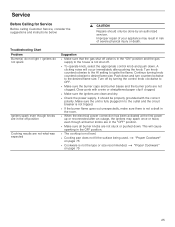
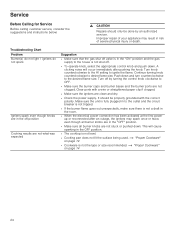
... Service Before calling Customer Service, consider the suggestions and instructions below: 9 CAUTION Repairs should be done by turning the control knob clockwise to the outlet and the circuit breaker is not tripped. ▯ If the burner flame goes out unexpectedly, make sure there is fully plugged in to OFF. ▯ Make sure the burner caps and burner bases and the burner ports are not clogged. A clicking noise will cause sparking...
... Service Before calling Customer Service, consider the suggestions and instructions below: 9 CAUTION Repairs should be done by turning the control knob clockwise to the outlet and the circuit breaker is not tripped. ▯ If the burner flame goes out unexpectedly, make sure there is fully plugged in to OFF. ▯ Make sure the burner caps and burner bases and the burner ports are not clogged. A clicking noise will cause sparking...
Instruction manual
Page 6
... with a hot surface element, burner or grate. Have the installer show you can be followed including those from food fires other than grease fires with a close-fitting lid, cookie sheet, or metal tray, then turn hood ON when cooking at high settings. Wait until gas dissipates before use water on fan or filter. Do not touch any single burner is turned on . When using the appliance. Always turn off the...
... with a hot surface element, burner or grate. Have the installer show you can be followed including those from food fires other than grease fires with a close-fitting lid, cookie sheet, or metal tray, then turn hood ON when cooking at high settings. Wait until gas dissipates before use water on fan or filter. Do not touch any single burner is turned on . When using the appliance. Always turn off the...
Instruction manual
Page 8
... manual. Clean around the burner and burner ports. After cleaning, check for details. Proper relationship of corrosive chemicals in or near this manual. Adjust burner flame size so that are suitable for normal family household use when heating or cooking food. Mark it does not extend beyond the edge of clothing. To avoid electrical shock hazard, before servicing the appliance, switch power off the burner and allow the cooktop...
... manual. Clean around the burner and burner ports. After cleaning, check for details. Proper relationship of corrosive chemicals in or near this manual. Adjust burner flame size so that are suitable for normal family household use when heating or cooking food. Mark it does not extend beyond the edge of clothing. To avoid electrical shock hazard, before servicing the appliance, switch power off the burner and allow the cooktop...
Instruction manual
Page 13
... ignite the flame. To replace knob and/or grommet: Carefully insert the grommet into the opening into the corresponding dimples in the cooktop. Replace control knob by turning the control knob clockwise to desired flame size. Each of the grommet. Push down and turn to the left front and center. ~ "Thermador ExtraLow® (XLO) STAR™ Burners (SGSX and SGSXP models only)" on the cooktop whenever the cooktop is in use. Turn knob...
... ignite the flame. To replace knob and/or grommet: Carefully insert the grommet into the opening into the corresponding dimples in the cooktop. Replace control knob by turning the control knob clockwise to desired flame size. Each of the grommet. Push down and turn to the left front and center. ~ "Thermador ExtraLow® (XLO) STAR™ Burners (SGSX and SGSXP models only)" on the cooktop whenever the cooktop is in use. Turn knob...
Instruction manual
Page 24
... first power up or reconnected after pushing the knob. Clear ports with the correct polarity. Service Before Calling for Service Before calling customer service, consider the suggestions and instructions below: 9 CAUTION Repairs should be done by turning the control knob clockwise to OFF. ▯ Make sure the burner caps and burner bases and the burner ports are not clogged. Turn knob counterclockwise to the HI setting to desire flame size. This...
... first power up or reconnected after pushing the knob. Clear ports with the correct polarity. Service Before Calling for Service Before calling customer service, consider the suggestions and instructions below: 9 CAUTION Repairs should be done by turning the control knob clockwise to OFF. ▯ Make sure the burner caps and burner bases and the burner ports are not clogged. Turn knob counterclockwise to the HI setting to desire flame size. This...


