
Instructions for Use
Page 2
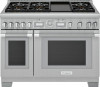
Use and care GUIDE Professional Series Pro Grand® Ranges Table of contents (English 4 Table de matières (Français 58 Índice de materias (Español 120 Models | Modèles | Modelos: PRD364WDGU/C PRD364WIGU/C PRD364WLGU/C PRD366WGU/C PRD484WCGU/C PRD486WDGU/C PRD486WIGU/C PRD486WLGU/C PRG364WDG PRG364WLG PRG366WG PRG486WDG PRG486WLG THERMADOR.COM
Use and care GUIDE Professional Series Pro Grand® Ranges Table of contents (English 4 Table de matières (Français 58 Índice de materias (Español 120 Models | Modèles | Modelos: PRD364WDGU/C PRD364WIGU/C PRD364WLGU/C PRD366WGU/C PRD484WCGU/C PRD486WDGU/C PRD486WIGU/C PRD486WLGU/C PRG364WDG PRG364WLG PRG366WG PRG486WDG PRG486WLG THERMADOR.COM

Instructions for Use
Page 3
Home ConnectTM user's information Wi-Fi® module FCC/IC statements Model: COM2 FCC ID: 2AHES-COM2 IC: 21152-COM2 The Home Connect module is a communication device designed to the following two conditions: (1) this device may not ...
Home ConnectTM user's information Wi-Fi® module FCC/IC statements Model: COM2 FCC ID: 2AHES-COM2 IC: 21152-COM2 The Home Connect module is a communication device designed to the following two conditions: (1) this device may not ...
Instructions for Use
Page 11
DO NOT store or use when heating or cooking food. Before selfcleaning the oven (select models), remove the broiler pan, oven racks, and any slots, holes or passages in a downward direction toward the appliance. WARNING This appliance should not be installed ...
DO NOT store or use when heating or cooking food. Before selfcleaning the oven (select models), remove the broiler pan, oven racks, and any slots, holes or passages in a downward direction toward the appliance. WARNING This appliance should not be installed ...
Instructions for Use
Page 12
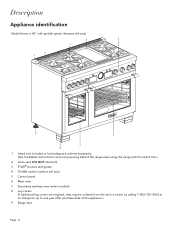
Description Appliance identification Model shown is 48'' with griddle option (features will vary). 4 5 3 2 1 9 6 7 8 1 Island trim included or low backguard ordered separately (See Installation Instructions concerning spacing behind the range ... island trim.) 2 Oven vent (DO NOT obstruct!) 3 STAR® burners and grates 4 Griddle option (options will vary) 5 Control panel 6 Main oven 7 Secondary auxiliary oven (select models) 8 Leg covers (If additional leg covers are required, they may be ordered from the service center by calling 1-800-735-4328 at no charge for...
Description Appliance identification Model shown is 48'' with griddle option (features will vary). 4 5 3 2 1 9 6 7 8 1 Island trim included or low backguard ordered separately (See Installation Instructions concerning spacing behind the range ... island trim.) 2 Oven vent (DO NOT obstruct!) 3 STAR® burners and grates 4 Griddle option (options will vary) 5 Control panel 6 Main oven 7 Secondary auxiliary oven (select models) 8 Leg covers (If additional leg covers are required, they may be ordered from the service center by calling 1-800-735-4328 at no charge for...

Instructions for Use
Page 14
ExtraLow® POWERBOOST® Standard Griddle Grill Oven temp selector Induction Oven digital display 1 06:30 2 TIMERS SETTINGS ENTER 3 4 5 6 1 Digital display screen 2 Left navigation buttons 3 Access multiple timers 4 Access user settings 5 Confirm an entry 6 Right navigation buttons Mode selector OFF OFF Oven light switch Oven temp gauge 350 300 400 250 450 200 100 500 BROIL CLEAN Page. 13 Control panel identification NOTE: Not all knobs, modes, and features are available to all models.
ExtraLow® POWERBOOST® Standard Griddle Grill Oven temp selector Induction Oven digital display 1 06:30 2 TIMERS SETTINGS ENTER 3 4 5 6 1 Digital display screen 2 Left navigation buttons 3 Access multiple timers 4 Access user settings 5 Confirm an entry 6 Right navigation buttons Mode selector OFF OFF Oven light switch Oven temp gauge 350 300 400 250 450 200 100 500 BROIL CLEAN Page. 13 Control panel identification NOTE: Not all knobs, modes, and features are available to all models.

Instructions for Use
Page 15
Top surface identification Model 364 with induction 1 3 5 2 4 Model 364 with grill 1 4 3 2 5 1 ExtraLow burner 2 ExtraLow and PowerBoost burner 3 Standard burner 4 Standard burner 5 Induction Natural 15000, LP 12000 BTU Natural... 2 ExtraLow and Natural 22000, LP 18000 BTU PowerBoost burner 3 Grill 815W x 2 4 Standard burner Natural 15000, LP 12000 BTU 5 Standard burner Natural 18000, LP 15000 BTU Model 366 Model 364 with griddle 1 3 5 1 4 3 2 5 2 4 6 1 ExtraLow burner Natural 15000, LP 12000 BTU 2 ExtraLow and Natural 22000, LP 18000 BTU PowerBoost burner 3 ...
Top surface identification Model 364 with induction 1 3 5 2 4 Model 364 with grill 1 4 3 2 5 1 ExtraLow burner 2 ExtraLow and PowerBoost burner 3 Standard burner 4 Standard burner 5 Induction Natural 15000, LP 12000 BTU Natural... 2 ExtraLow and Natural 22000, LP 18000 BTU PowerBoost burner 3 Grill 815W x 2 4 Standard burner Natural 15000, LP 12000 BTU 5 Standard burner Natural 18000, LP 15000 BTU Model 366 Model 364 with griddle 1 3 5 1 4 3 2 5 2 4 6 1 ExtraLow burner Natural 15000, LP 12000 BTU 2 ExtraLow and Natural 22000, LP 18000 BTU PowerBoost burner 3 ...

Instructions for Use
Page 16
Model 486 with induction 1 3 5 7 2 4 6 Model 486 with griddle 1 3 2 4 6 5 7 1 ExtraLow burner 2 ExtraLow and PowerBoost burner 3 Standard burner 4 Standard burner 5 Standard burner 6 Standard burner 7 Induction Natural 15000, LP 12000 ..., LP 18000 BTU Natural 15000, LP 12000 BTU Natural 18000, LP 15000 BTU 1,630W Natural 15000, LP 12000 BTU Natural 18000, LP 15000 BTU Model 486 with grill Model 486 with grill and griddle 1 3 2 4 6 5 7 1 3 5 6 2 4 1 ExtraLow® burner 2 ExtraLow and PowerBoost burner 3 Standard burner 4 Standard burner 5 Grill 6 Standard burner 7 ...
Model 486 with induction 1 3 5 7 2 4 6 Model 486 with griddle 1 3 2 4 6 5 7 1 ExtraLow burner 2 ExtraLow and PowerBoost burner 3 Standard burner 4 Standard burner 5 Standard burner 6 Standard burner 7 Induction Natural 15000, LP 12000 ..., LP 18000 BTU Natural 15000, LP 12000 BTU Natural 18000, LP 15000 BTU 1,630W Natural 15000, LP 12000 BTU Natural 18000, LP 15000 BTU Model 486 with grill Model 486 with grill and griddle 1 3 2 4 6 5 7 1 3 5 6 2 4 1 ExtraLow® burner 2 ExtraLow and PowerBoost burner 3 Standard burner 4 Standard burner 5 Grill 6 Standard burner 7 ...
Instructions for Use
Page 17
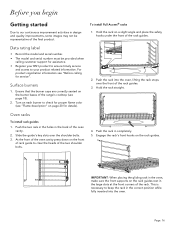
... corners of the two shoulder bolts. 4. This is necessary to clear the heads of the rack. Data rating label • Record the model and serial number. • The model and serial number must be representative of the oven cavity. 2. Hold the rack straight. IMPORTANT: When placing the gliding rack in the oven...
... corners of the two shoulder bolts. 4. This is necessary to clear the heads of the rack. Data rating label • Record the model and serial number. • The model and serial number must be representative of the oven cavity. 2. Hold the rack straight. IMPORTANT: When placing the gliding rack in the oven...

Instructions for Use
Page 18
... the oven racks • The correct rack position depends on the oven. The fan may be felt as it is normal to self-clean (select models). These odors or smoke comes from the vent before, during all cooking modes. then turn the broiler to broil for 20 to burn off . This...
... the oven racks • The correct rack position depends on the oven. The fan may be felt as it is normal to self-clean (select models). These odors or smoke comes from the vent before, during all cooking modes. then turn the broiler to broil for 20 to burn off . This...

Instructions for Use
Page 20
...the knob is normal to a rolling boil. Rotate the knob to quickly boil water, sear steaks, stir-fry vegetables, etc. LED panel light (select models) Positioned below the XLO setting, the flame will cycle on , the heat is too low to hold a simmer, bring food to stir food occasionally ...within the XLO range marked on the knob and turn on the control panel. After burner ignition, the igniter stops clicking. 2. POWERBOOST® (select models) The POWERBOOST, or XHI, offers the convenience to any flame setting between HI and LO. This is set just below the bullnose, the LED ...
...the knob is normal to a rolling boil. Rotate the knob to quickly boil water, sear steaks, stir-fry vegetables, etc. LED panel light (select models) Positioned below the XLO setting, the flame will cycle on , the heat is too low to hold a simmer, bring food to stir food occasionally ...within the XLO range marked on the knob and turn on the control panel. After burner ignition, the igniter stops clicking. 2. POWERBOOST® (select models) The POWERBOOST, or XHI, offers the convenience to any flame setting between HI and LO. This is set just below the bullnose, the LED ...
Instructions for Use
Page 23
...), with an 8'' to 11'' base (203 - 279 mm) and a 6½'' to 12'' depth (165 - 305 mm). The settings you use will vary depending on all models. Allow time for using two canners at the same time, use staggered burners. Standard size pressure canner • 8 to 22 quarts (7.6 to 20.9 liters), with...
...), with an 8'' to 11'' base (203 - 279 mm) and a 6½'' to 12'' depth (165 - 305 mm). The settings you use will vary depending on all models. Allow time for using two canners at the same time, use staggered burners. Standard size pressure canner • 8 to 22 quarts (7.6 to 20.9 liters), with...

Instructions for Use
Page 26
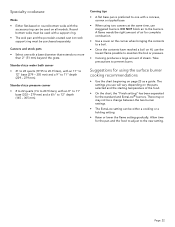
...is hot after use the griddle in a manner that is not prescribed by the Use and Care Guide. There are used. The 24'' griddle models have two heating elements that the surface is not considered a source of the griddle and another for the right side. Check the griddle plate adjustment... 500°F (66° - 260°C). The griddle may be made by pouring two tablespoons of the griddle plate. -- DO NOT cut directly on all models. NOTE: Having a properly installed ventilation hood is not gouged when utensils are no fixed settings on the back of water on the knob. Add butter...
...is hot after use the griddle in a manner that is not prescribed by the Use and Care Guide. There are used. The 24'' griddle models have two heating elements that the surface is not considered a source of the griddle and another for the right side. Check the griddle plate adjustment... 500°F (66° - 260°C). The griddle may be made by pouring two tablespoons of the griddle plate. -- DO NOT cut directly on all models. NOTE: Having a properly installed ventilation hood is not gouged when utensils are no fixed settings on the back of water on the knob. Add butter...

Instructions for Use
Page 29
... of the grill housing (1). (Drip tray is packaged in the large cardboard box that they begin to turn black. Arrange the ceramic briquettes (4) on all models. NOTE: Not available on the briquette basket (3), in the tray may cause a fire hazard. • If flames appear, grease should not contact the heating elements...
... of the grill housing (1). (Drip tray is packaged in the large cardboard box that they begin to turn black. Arrange the ceramic briquettes (4) on all models. NOTE: Not available on the briquette basket (3), in the tray may cause a fire hazard. • If flames appear, grease should not contact the heating elements...

Instructions for Use
Page 34
..., your appliance transmits the following categories of data to the Home Connect server (initial registration): • Unique appliance identification (consisting of the appliance on certain models. Turn the MODE knob to use these Home Connect functions for example. The temperature gauge will move toward the temperature setting. Setting the oven(s) Setting...
..., your appliance transmits the following categories of data to the Home Connect server (initial registration): • Unique appliance identification (consisting of the appliance on certain models. Turn the MODE knob to use these Home Connect functions for example. The temperature gauge will move toward the temperature setting. Setting the oven(s) Setting...
Instructions for Use
Page 35
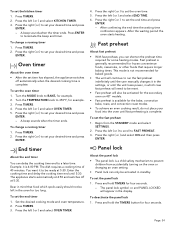
... STANDBY mode and select SETTINGS. 2. This mode is a child safety mechanism to set your desired time and press ENTER. - Begin from accidentally turning on 48'' models. • Fast preheat is 4:00 PM. Panel lock About the panel lock • The panel lock is not recommended for the bake, convection bake, roast...
... STANDBY mode and select SETTINGS. 2. This mode is a child safety mechanism to set your desired time and press ENTER. - Begin from accidentally turning on 48'' models. • Fast preheat is 4:00 PM. Panel lock About the panel lock • The panel lock is not recommended for the bake, convection bake, roast...
Instructions for Use
Page 39
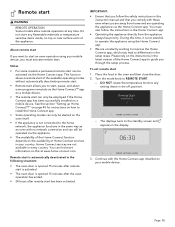
Notes • For some models a permanent remote start can only be activated via the appliance. • The availability of the Home Connect function depends on the availability of the available ... flammable materials or temperature sensitive items inside, on the instructions in the latest version of the appliance. To set remote start 9 WARNING REMOTE OPERATION Some models allow remote operation at www.home-connect.com Remote start is automatically deactivated in the display. Page. 38 Continue with no network connection and can...
Notes • For some models a permanent remote start can only be activated via the appliance. • The availability of the Home Connect function depends on the availability of the available ... flammable materials or temperature sensitive items inside, on the instructions in the latest version of the appliance. To set remote start 9 WARNING REMOTE OPERATION Some models allow remote operation at www.home-connect.com Remote start is automatically deactivated in the display. Page. 38 Continue with no network connection and can...

Instructions for Use
Page 40
Casserole dishes Secondary oven (48" models) Level Bake mode 1 -- If the item is tall, such as a prime rib of beef or a turkey. Preheating the oven • Most cooking times in recipes ...
Casserole dishes Secondary oven (48" models) Level Bake mode 1 -- If the item is tall, such as a prime rib of beef or a turkey. Preheating the oven • Most cooking times in recipes ...

Instructions for Use
Page 41
... directly above and below each pan. • Stagger bakeware so that you prefer: general information, cakes, cookies breads, etc. Secondary oven broil rack recommendations (48" models only) Levels 3, 4, or 5 - Getting the best broil results Tips: • Defrost food before starting to evaporate from the food during broiling. • It is recommended...
... directly above and below each pan. • Stagger bakeware so that you prefer: general information, cakes, cookies breads, etc. Secondary oven broil rack recommendations (48" models only) Levels 3, 4, or 5 - Getting the best broil results Tips: • Defrost food before starting to evaporate from the food during broiling. • It is recommended...

Instructions for Use
Page 48
... or unattended in an area where appliances are released that may be used in place. • Turn on 30'' dual fuel Harmony series models 1. Page. 47 Parts of the appliance may facilitate the emission of small amounts of your new range features pyrolytic self-cleaning. The amount...these individuals away during self-cleaning may become hotter than usual. Wipe this area clean. Self-clean Self-cleaning (select models) To set self-clean on dual fuel models with the instructions on until the oven has completed the self-clean cycle. Remove all utensils, racks, and rack guides...
... or unattended in an area where appliances are released that may be used in place. • Turn on 30'' dual fuel Harmony series models 1. Page. 47 Parts of the appliance may facilitate the emission of small amounts of your new range features pyrolytic self-cleaning. The amount...these individuals away during self-cleaning may become hotter than usual. Wipe this area clean. Self-clean Self-cleaning (select models) To set self-clean on dual fuel models with the instructions on until the oven has completed the self-clean cycle. Remove all utensils, racks, and rack guides...

Instructions for Use
Page 54
... to the bottom of glass. Remove the oven racks. 3. Press down to avoid breaking. a b c d 10. Call Thermador Customer Care Center at 1-800-735-4328 or your nearest Thermador dealer to determine the proper replacement bulb for appliance oven use a standard household light bulb in place when using the... the light bulb Use only 10W, 12V G4 light bulbs. Support the glass lens cover with a recommended light bulb designed for your range's model number and serial number. Turn on circuit breaker. It may cause the bulb to fail when it -yourself maintenance Oven light bulb replacement 9 ...
... to the bottom of glass. Remove the oven racks. 3. Press down to avoid breaking. a b c d 10. Call Thermador Customer Care Center at 1-800-735-4328 or your nearest Thermador dealer to determine the proper replacement bulb for appliance oven use a standard household light bulb in place when using the... the light bulb Use only 10W, 12V G4 light bulbs. Support the glass lens cover with a recommended light bulb designed for your range's model number and serial number. Turn on circuit breaker. It may cause the bulb to fail when it -yourself maintenance Oven light bulb replacement 9 ...


