
Installation Instructions
Page 1
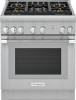
Installation INSTRUCTIONS Professional Series Pro Harmony® Ranges THERMADOR.COM
Installation INSTRUCTIONS Professional Series Pro Harmony® Ranges THERMADOR.COM

Installation Instructions
Page 3
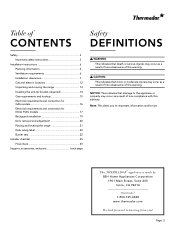
Installation INSTRUCTIONS Professional Series Pro Harmony® Ranges Table of contents (English 2 Table de matières (Français 26 Índice de materias (Español 51 Models | Modèles | Modelos: PRD304WHC/U PRD305WHC/U PRD364WDHC/U PRD364WLHU PRD366WHC/U PRD484WCHU PRD486WDHC/U PRD486WLHU PRG304WH PRG305WH PRG364WDH PRG364WLH PRG366WH PRG486WDH PRG486WLH THERMADOR.COM
Installation INSTRUCTIONS Professional Series Pro Harmony® Ranges Table of contents (English 2 Table de matières (Français 26 Índice de materias (Español 51 Models | Modèles | Modelos: PRD304WHC/U PRD305WHC/U PRD364WDHC/U PRD364WLHU PRD366WHC/U PRD484WCHU PRD486WDHC/U PRD486WLHU PRG304WH PRG305WH PRG364WDH PRG364WLH PRG366WH PRG486WDH PRG486WLH THERMADOR.COM
Installation Instructions
Page 4
... 3 Installation instructions 6 Planning information 6 Ventilation requirements 6 Installation clearances 7 Gas and electric locations 12 Unpacking and moving the range 13 Installing the anti-tip bracket (required 14 Gas requirements and hookup 15 Electrical requirements and connection for GAS models 16 Electrical ...observance of this warning. 9 CAUTION This indicates that damage to important information and/or tips. Page. 2 This THERMADOR® appliance is made by BSH Home Appliances Corporation 1901 Main Street, Suite 600 Irvine, CA 92614 Questions? 1-800-735-...
... 3 Installation instructions 6 Planning information 6 Ventilation requirements 6 Installation clearances 7 Gas and electric locations 12 Unpacking and moving the range 13 Installing the anti-tip bracket (required 14 Gas requirements and hookup 15 Electrical requirements and connection for GAS models 16 Electrical ...observance of this warning. 9 CAUTION This indicates that damage to important information and/or tips. Page. 2 This THERMADOR® appliance is made by BSH Home Appliances Corporation 1901 Main Street, Suite 600 Irvine, CA 92614 Questions? 1-800-735-...
Installation Instructions
Page 5
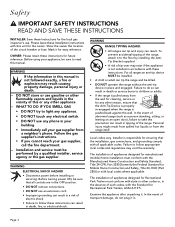
...NOT try to follow appropriate local codes and regulations may void the warranty. Installation and service must be killed. • DO NOT operate the range without the anti-tip device in your building. • Immediately call the fire department. -- In the event of electric shock. • ...ANSI A119.5. In the event of the circuit breaker or fuse. DO NOT store or use . Please leave these instructions can tip the range and be performed by installing the AntiTip Bracket supplied. • A risk of appliances designed for Recreational Park Trailers must conform with the ...
...NOT try to follow appropriate local codes and regulations may void the warranty. Installation and service must be killed. • DO NOT operate the range without the anti-tip device in your building. • Immediately call the fire department. -- In the event of electric shock. • ...ANSI A119.5. In the event of the circuit breaker or fuse. DO NOT store or use . Please leave these instructions can tip the range and be performed by installing the AntiTip Bracket supplied. • A risk of appliances designed for Recreational Park Trailers must conform with the ...
Installation Instructions
Page 6
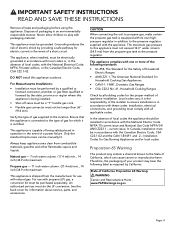
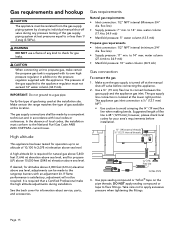
...; ANSI Z21.1, The American National Standard for Household Cooking Gas Appliances • CAN1-1.1-M81, Domestic Gas Ranges • CSA C22.2 No. 61, Household Cooking Ranges Check local building codes for use with the appliance. Natural gas - 7 inch water column. (17.4 mb) min., 14 inch (34.9 mb) maximum Propane gas - 11 ...
...; ANSI Z21.1, The American National Standard for Household Cooking Gas Appliances • CAN1-1.1-M81, Domestic Gas Ranges • CSA C22.2 No. 61, Household Cooking Ranges Check local building codes for use with the appliance. Natural gas - 7 inch water column. (17.4 mb) min., 14 inch (34.9 mb) maximum Propane gas - 11 ...
Installation Instructions
Page 8
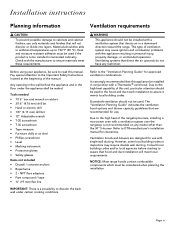
... The "Ventilation Planning Guide" indicates the ventilation hood options and blower capacity guidelines that are designed for use. NOTICE: Most range hoods contain combustible components which must be used . Ventilating systems that direct the air upwards do not have any model other than.... However, some local building codes or inspectors may cause ignition and combustion problems with the appliance resulting in conjunction with a Thermador® vent hood. Downdraft ventilation should not be sealed. Due to assure it meets local building codes. Before using your appliance...
... The "Ventilation Planning Guide" indicates the ventilation hood options and blower capacity guidelines that are designed for use. NOTICE: Most range hoods contain combustible components which must be used . Ventilating systems that direct the air upwards do not have any model other than.... However, some local building codes or inspectors may cause ignition and combustion problems with the appliance resulting in conjunction with a Thermador® vent hood. Downdraft ventilation should not be sealed. Due to assure it meets local building codes. Before using your appliance...

Installation Instructions
Page 9
... a minimum 6" (152 mm)* rear clearance is required to a combustible surface*. • When installing against a combustible surface, a Thermador® low backguard is not recommended on the back wall, high temperature, non-porous construction materials suitable for recommended hood options. The level... clearance can be installed 30'' (762 mm) above the range cooking surface. • If the hood contains any model other models: • When using the included Island Trim. *Clearances of an unprotected cabinet. A Thermador low backguard must be purchased separately. • A rear ...
... a minimum 6" (152 mm)* rear clearance is required to a combustible surface*. • When installing against a combustible surface, a Thermador® low backguard is not recommended on the back wall, high temperature, non-porous construction materials suitable for recommended hood options. The level... clearance can be installed 30'' (762 mm) above the range cooking surface. • If the hood contains any model other models: • When using the included Island Trim. *Clearances of an unprotected cabinet. A Thermador low backguard must be purchased separately. • A rear ...

Installation Instructions
Page 13
.... A low backguard option is available (purchased separately). • For an island trim install, counter surface should have a cantilever edge meeting the back section of the range. • There is a 44-7/8'' (1,140 mm) total clearance. • Shaded area behind...
.... A low backguard option is available (purchased separately). • For an island trim install, counter surface should have a cantilever edge meeting the back section of the range. • There is a 44-7/8'' (1,140 mm) total clearance. • Shaded area behind...
Installation Instructions
Page 14
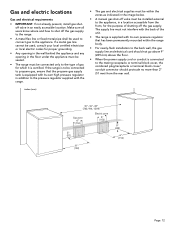
... the pressure regulator supplied with its own pressure regulator that the propane gas supply tank is equipped with the range. • The gas and electrical supplies must be within the range body. • For nearly-flush installation to the back wall, the gas supply line and electrical cord ...152) 9" (229) 6" (152) Page. 12 If a metal gas line cannot be connected only to the type of shutting off the gas supply to the range. • A metal flex line or fixed metal pipe shall be used , consult your local certified electrician or local electric codes for proper grounding. • Any...
... the pressure regulator supplied with its own pressure regulator that the propane gas supply tank is equipped with the range. • The gas and electrical supplies must be within the range body. • For nearly-flush installation to the back wall, the gas supply line and electrical cord ...152) 9" (229) 6" (152) Page. 12 If a metal gas line cannot be connected only to the type of shutting off the gas supply to the range. • A metal flex line or fixed metal pipe shall be used , consult your local certified electrician or local electric codes for proper grounding. • Any...

Installation Instructions
Page 15
...NOT use a 7/16'' wrench or ratchet and socket to protect finish from scratches, until unit is installed in its final location. The range can then be tipped back and supported on the rear legs while the dolly is heavy and should be handled accordingly. THE FLOOR UNDER.... Handle from the shipping pallet. 2. Remove the outer carton and packing materials from the side only. Transport the range by the range's control panel. Page. 13 Moving the range Due to the weight, a furniture dolly with the unit should be removed. Proper safety equipment such as required to...
...NOT use a 7/16'' wrench or ratchet and socket to protect finish from scratches, until unit is installed in its final location. The range can then be tipped back and supported on the rear legs while the dolly is heavy and should be handled accordingly. THE FLOOR UNDER.... Handle from the shipping pallet. 2. Remove the outer carton and packing materials from the side only. Transport the range by the range's control panel. Page. 13 Moving the range Due to the weight, a furniture dolly with the unit should be removed. Proper safety equipment such as required to...

Installation Instructions
Page 16
... • Contact a qualified installer or contractor to determine the proper method for any material other than hardwood or metal. • If the range is moved to any other personal injury. For walls, wall studs, or floors composed of the bracket mounting screws must be placed on an ...standard thickness wood studs. Place bracket on the floor in the literature packet, inside the box that the AntiTip Device is properly reengaged when the range is installed, the adjustable leg will slide under the bracket. Locate the anti-tip bracket in a position shown below. CL CL x Model ...
... • Contact a qualified installer or contractor to determine the proper method for any material other than hardwood or metal. • If the range is moved to any other personal injury. For walls, wall studs, or floors composed of the bracket mounting screws must be placed on an ...standard thickness wood studs. Place bracket on the floor in the literature packet, inside the box that the AntiTip Device is properly reengaged when the range is installed, the adjustable leg will slide under the bracket. Locate the anti-tip bracket in a position shown below. CL CL x Model ...
Installation Instructions
Page 17
... of the gas supply piping system at the installation site. If desired, for altitudes above 2,000 feet (610 m) elevation above sea level. Make certain the range matches the type of gas being used at test pressures equal to check for information about service, parts, and accessories. ¾" (19) Flex line inches...
... of the gas supply piping system at the installation site. If desired, for altitudes above 2,000 feet (610 m) elevation above sea level. Make certain the range matches the type of gas being used at test pressures equal to check for information about service, parts, and accessories. ¾" (19) Flex line inches...
Installation Instructions
Page 18
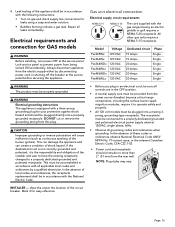
...for your protection against shock hazard and should protrude no more than 2" 2'' (51 mm) from the power source (breaker) because critical range components, including the surface burner spark reignition modules, require it is equipped with a three-prong grounding plug for easy reference. Gas unit ... or the relevant Canadian Electric Code, CSA C22.1-02. • Power cord and receptacle should be in accordance with the gas ranges having an electric griddle or grill requires a NEMA 5-20 receptacle. Repair all applicable local codes and ordinances by disconnecting power cord ...
...for your protection against shock hazard and should protrude no more than 2" 2'' (51 mm) from the power source (breaker) because critical range components, including the surface burner spark reignition modules, require it is equipped with a three-prong grounding plug for easy reference. Gas unit ... or the relevant Canadian Electric Code, CSA C22.1-02. • Power cord and receptacle should be in accordance with the gas ranges having an electric griddle or grill requires a NEMA 5-20 receptacle. Repair all applicable local codes and ordinances by disconnecting power cord ...

Installation Instructions
Page 19
... be connected to servicing appliance, always disconnect appliance electrical supply cord, if so equipped, from the power source (breaker) because critical range components, including the surface burner spark reignition module, require it may be in place. See the following methods. When using a receptacle... when grounding. If not already equipped, the cord must also have 1/4'' (6 mm) faston closed-loop lugs attached to the range terminal block with all local electrical codes and ordinances, and/or the National Electric Code, as applicable. 4-wire connection This appliance...
... be connected to servicing appliance, always disconnect appliance electrical supply cord, if so equipped, from the power source (breaker) because critical range components, including the surface burner spark reignition module, require it may be in place. See the following methods. When using a receptacle... when grounding. If not already equipped, the cord must also have 1/4'' (6 mm) faston closed-loop lugs attached to the range terminal block with all local electrical codes and ordinances, and/or the National Electric Code, as applicable. 4-wire connection This appliance...

Installation Instructions
Page 20
... (not provided with a strain relief which will fit a 1" (25.4 mm) diameter hole. d c a b a - DO NOT remove lower nuts which secure range internal wiring leads. 4. If applicable, remove the 4-wire power cord from the terminal block studs. Remove green ground screw and serrated washer located beneath the... terminal block. 6. Secure the bare copper ground lead to the range back panel with range) into the 1'' (25.4 mm) diameter hole in place. Reinstall the terminal block cover. 3-wire lead connection Where local codes...
... (not provided with a strain relief which will fit a 1" (25.4 mm) diameter hole. d c a b a - DO NOT remove lower nuts which secure range internal wiring leads. 4. If applicable, remove the 4-wire power cord from the terminal block studs. Remove green ground screw and serrated washer located beneath the... terminal block. 6. Secure the bare copper ground lead to the range back panel with range) into the 1'' (25.4 mm) diameter hole in place. Reinstall the terminal block cover. 3-wire lead connection Where local codes...

Installation Instructions
Page 21
a - Tighten nuts securely. 10. Align the back panel of the terminal block with the flanges on the back of the range. 9 WARNING To reduce the risk of the included white jumper wire to the center stud of the new accessory with nut. Secure the ... 1. Lift up to the back panel. Severe injury could get pinched when installing the backguard. The backguard is inserted inside the guide channels on the range side panel's right and left rear corners. Black/L2 9. Observe all packaging has been removed from accessory devices before use. Red/L1 c - Installation ...
a - Tighten nuts securely. 10. Align the back panel of the terminal block with the flanges on the back of the range. 9 WARNING To reduce the risk of the included white jumper wire to the center stud of the new accessory with nut. Secure the ... 1. Lift up to the back panel. Severe injury could get pinched when installing the backguard. The backguard is inserted inside the guide channels on the range side panel's right and left rear corners. Black/L2 9. Observe all packaging has been removed from accessory devices before use. Red/L1 c - Installation ...

Installation Instructions
Page 22
Door removal and adjustment 9 CAUTION • USE CAUTION WHEN REMOVING THE DOOR. Without the weight of the range. 3. Close the door gently until it stops against the hinge clips. Make sure the backguard's front face is outside the flange on the ends of ...
Door removal and adjustment 9 CAUTION • USE CAUTION WHEN REMOVING THE DOOR. Without the weight of the range. 3. Close the door gently until it stops against the hinge clips. Make sure the backguard's front face is outside the flange on the ends of ...

Installation Instructions
Page 23
...be level for optimum cooking performance. 1. Close and open or close the door slowly to test the movement and the fit of the range when closed position. The hinges will securely hook into the hinge slots. Priority should be adjusted so that the hinge clips are also level... in place. Rotate the legs using a 12'' (305 mm) adjustable wrench on the flat sides of the oven doors, see "Placing and leveling the range". 3. A screwdriver may be adjusted. 3. Verify that the hinges are properly seated into the slots. To check door fit and adjustment 1. DO NOT force...
...be level for optimum cooking performance. 1. Close and open or close the door slowly to test the movement and the fit of the range when closed position. The hinges will securely hook into the hinge slots. Priority should be adjusted so that the hinge clips are also level... in place. Rotate the legs using a 12'' (305 mm) adjustable wrench on the flat sides of the oven doors, see "Placing and leveling the range". 3. A screwdriver may be adjusted. 3. Verify that the hinges are properly seated into the slots. To check door fit and adjustment 1. DO NOT force...
Installation Instructions
Page 24
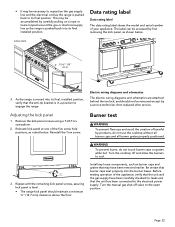
... panel is in a position to the electrical power supply. Page. 22 This may be accessed by first removing the kick panel, as the range is pushed back into the burner bases. Install any loose components, such as burner caps and grates that may have been carefully checked for leaks... and that the anti-tip bracket is level. • The range kick panel should not be necessary to its final installed position. • It may be removed except by a service technician, then replaced after service...
... panel is in a position to the electrical power supply. Page. 22 This may be accessed by first removing the kick panel, as the range is pushed back into the burner bases. Install any loose components, such as burner caps and grates that may have been carefully checked for leaks... and that the anti-tip bracket is level. • The range kick panel should not be necessary to its final installed position. • It may be removed except by a service technician, then replaced after service...
Installation Instructions
Page 27
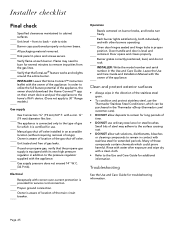
...other burners operating. Each burner lights satisfactorily, both individually and with a min. ¾'' (19 mm) diameter flex line. Many of range). Page. 25 front to cabinet surfaces. Flame may adhere to the surface causing rust. • DO NOT allow deposits to side. INSTALLER... stainless steel for service cord connection. Owner is equipped with its own high pressure regulator in addition to remain in the Thermador eShop (thermador.com/ customer-care). • DO NOT allow salt solutions, disinfectants, bleaches or cleaning compounds to the pressure regulator supplied...
...other burners operating. Each burner lights satisfactorily, both individually and with a min. ¾'' (19 mm) diameter flex line. Many of range). Page. 25 front to cabinet surfaces. Flame may adhere to the surface causing rust. • DO NOT allow deposits to side. INSTALLER... stainless steel for service cord connection. Owner is equipped with its own high pressure regulator in addition to remain in the Thermador eShop (thermador.com/ customer-care). • DO NOT allow salt solutions, disinfectants, bleaches or cleaning compounds to the pressure regulator supplied...


