Installation Manual
Page 14
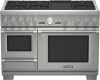
... range itself. Tools Needed for drilling holes through the wall or floor material (such as there may result in electrical shock or other personal injury. THERMADOR Service Part No. Qty 415078 4 655355 1 Description Screw, Phillips, #10 x 11/2" (38.1mm) Anti-Tip Bracket English 12 PROPERTY DAMAGE: • Contact a qualified installer or contractor...
... range itself. Tools Needed for drilling holes through the wall or floor material (such as there may result in electrical shock or other personal injury. THERMADOR Service Part No. Qty 415078 4 655355 1 Description Screw, Phillips, #10 x 11/2" (38.1mm) Anti-Tip Bracket English 12 PROPERTY DAMAGE: • Contact a qualified installer or contractor...
Installation Manual
Page 21
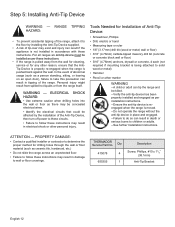
... and bottom of the backsplash (see Figure 16). Per each wall stud, use (2) of the provided screws to make sure all local codes and ordinances. 1. Parts Included Tools Needed (10) 1" (25.4mm) Phillips screwdriver or screws drill 30", 36", 48" (760mm, 913mm, 1218mm) (1) Backsplash Tape measure 42" (1070mm) (1) Installation Guide Pencil...
... and bottom of the backsplash (see Figure 16). Per each wall stud, use (2) of the provided screws to make sure all local codes and ordinances. 1. Parts Included Tools Needed (10) 1" (25.4mm) Phillips screwdriver or screws drill 30", 36", 48" (760mm, 913mm, 1218mm) (1) Backsplash Tape measure 42" (1070mm) (1) Installation Guide Pencil...
Installation Manual
Page 25
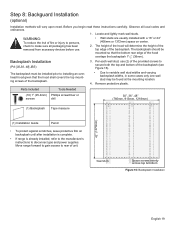
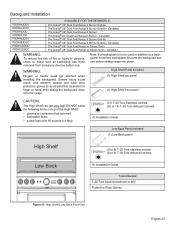
... over 30 pounds (13.6kg) (13) T-20 Torx Stainless screws (16 or 14) T-20 Torx drill point screws (1) Installation Guide Low Back Parts Included (1) Low Back panel High Shelf (9 or 8) T-20 Torx stainless screws (8 or 6) T-20 Torx drill point screws Low Back (1) Installation Guide...or drill Protective Work Gloves Figure 21: High Shelf & Low Back Front View English 23 Backguard Installation PRD364JDGU PRD364JDGC PRD366JGU PRD366JGC PRD486JDGU PRD486JDGC PRD48JDSGU PRD48JDSGC AVAILABLE FOR THESE MODELS: Pro Grand® 36" Dual Fuel Range 4 Burner Griddle Pro Grand® 36" Dual Fuel ...
... over 30 pounds (13.6kg) (13) T-20 Torx Stainless screws (16 or 14) T-20 Torx drill point screws (1) Installation Guide Low Back Parts Included (1) Low Back panel High Shelf (9 or 8) T-20 Torx stainless screws (8 or 6) T-20 Torx drill point screws Low Back (1) Installation Guide...or drill Protective Work Gloves Figure 21: High Shelf & Low Back Front View English 23 Backguard Installation PRD364JDGU PRD364JDGC PRD366JGU PRD366JGC PRD486JDGU PRD486JDGC PRD48JDSGU PRD48JDSGC AVAILABLE FOR THESE MODELS: Pro Grand® 36" Dual Fuel Range 4 Burner Griddle Pro Grand® 36" Dual Fuel ...
Installation Manual
Page 29
... the Oven Door(s) ("Step 4: Door Removal and Reinstallation" on the floor. If not, adjust the (2) screws under the back of the griddle plate. The mating part has dimples (that you know that the burner caps are correctly seated on the back of the griddle plate.
... the Oven Door(s) ("Step 4: Door Removal and Reinstallation" on the floor. If not, adjust the (2) screws under the back of the griddle plate. The mating part has dimples (that you know that the burner caps are correctly seated on the back of the griddle plate.
Installation Manual
Page 30
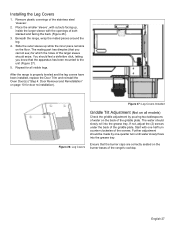
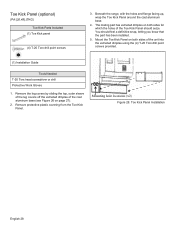
Toe Kick Panel (optional) (PA [36,48] JTKG) Toe Kick Parts Included (1) Toe Kick panel (4) T-20 Torx drill point screws 3. Remove the leg covers by sliding the top, outer sleeve of the leg covers off the ...extruded dimples of the Toe Kick Panel should feel a definitive snap, letting you know that the part has been installed. 5. Remove protective plastic covering from the Toe Kick Panel. The mating part has extruded dimples on page 27). 2. Beneath the range, with the holes and flange facing up, wrap the...
Toe Kick Panel (optional) (PA [36,48] JTKG) Toe Kick Parts Included (1) Toe Kick panel (4) T-20 Torx drill point screws 3. Remove the leg covers by sliding the top, outer sleeve of the leg covers off the ...extruded dimples of the Toe Kick Panel should feel a definitive snap, letting you know that the part has been installed. 5. Remove protective plastic covering from the Toe Kick Panel. The mating part has extruded dimples on page 27). 2. Beneath the range, with the holes and flange facing up, wrap the...
Installation Manual
Page 97
...hacer los recortes en la cubierta. Nos reservamos el derecho de modificar las especificaciones o el diseño sin previo aviso. Thermador Support Service We realize that you . Specifications are transported from the U.S. Check with a heating and ventilating engineer for planning... a considerable investment in the Thermador eShop or by phone. THERMADOR® is ready to making counter opening. Thermador n'est pas responsable des produits transportés des États-Unis pour être utilisés au Canada. Parts & Accessories Parts, filters, descalers, stainless steel...
...hacer los recortes en la cubierta. Nos reservamos el derecho de modificar las especificaciones o el diseño sin previo aviso. Thermador Support Service We realize that you . Specifications are transported from the U.S. Check with a heating and ventilating engineer for planning... a considerable investment in the Thermador eShop or by phone. THERMADOR® is ready to making counter opening. Thermador n'est pas responsable des produits transportés des États-Unis pour être utilisés au Canada. Parts & Accessories Parts, filters, descalers, stainless steel...
Use and Care Manual
Page 3
Huntington Beach, CA 92649 Questions? 1-800-735-4328 www.thermador.com We look forward to Avoid Personal Injury 5 Getting Started with Your Range 11 Introduction 13 Model and Parts Identification 13 Before You Begin 15 Using The Cooktop 19 Using the STAR® Burners 19 Cookware Recommendations ... Maintenance 86 Steam Oven Cleaning and Maintenance 88 Before Calling For Service 90 Statement of Limited Product Warranty 91 THERMADOR® Support 93 This THERMADOR® appliance is made by BSH Home Appliances Corporation 5551 McFadden Ave. Table of Contents Welcome to Your...
Huntington Beach, CA 92649 Questions? 1-800-735-4328 www.thermador.com We look forward to Avoid Personal Injury 5 Getting Started with Your Range 11 Introduction 13 Model and Parts Identification 13 Before You Begin 15 Using The Cooktop 19 Using the STAR® Burners 19 Cookware Recommendations ... Maintenance 86 Steam Oven Cleaning and Maintenance 88 Before Calling For Service 90 Statement of Limited Product Warranty 91 THERMADOR® Support 93 This THERMADOR® appliance is made by BSH Home Appliances Corporation 5551 McFadden Ave. Table of Contents Welcome to Your...
Use and Care Manual
Page 8
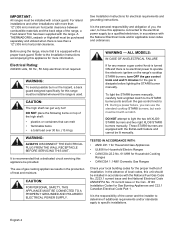
See Installation Instructions for Gas Burning Appliances and C22.1 Canadian Electrical Code Part 1. TESTED IN ACCORDANCE WITH: • ANSI Z21.1 for Household Gas Appliances • UL858 for Household Electric Ranges • CAN/CSA-22.2 No. 61-...ELECTRICAL FAILURE If for the gas to the electrical power supply by a qualified electrician, in the production of installation. DO NOT attempt to HI. A THERMADOR® Lowback or Highshelf must be provided. WARNING: ALWAYS DISCONNECT THE ELECTRICAL PLUG FROM THE WALL RECEPTACLE BEFORE SERVICING THIS UNIT. It is recommended that...
See Installation Instructions for Gas Burning Appliances and C22.1 Canadian Electrical Code Part 1. TESTED IN ACCORDANCE WITH: • ANSI Z21.1 for Household Gas Appliances • UL858 for Household Electric Ranges • CAN/CSA-22.2 No. 61-...ELECTRICAL FAILURE If for the gas to the electrical power supply by a qualified electrician, in the production of installation. DO NOT attempt to HI. A THERMADOR® Lowback or Highshelf must be provided. WARNING: ALWAYS DISCONNECT THE ELECTRICAL PLUG FROM THE WALL RECEPTACLE BEFORE SERVICING THIS UNIT. It is recommended that...
Use and Care Manual
Page 9
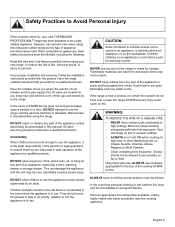
... and easily accessible near the kitchen. Follow the installation instructions provided with this Use and Care Manual carefully before using your new THERMADOR PROFESSIONAL® range has been designed to be certain the curtains do not blow over , potentially causing severe injury. DO NOT...Suzette, Cherries Jubilee, Peppercorn Beef Flambé). • Clean ventilating fans frequently. If the range is in this manual. NEVER use any part of the appliance unless specifically recommended in use . WARNING: TO REDUCE THE RISK OF A GREASE FIRE: • NEVER leave surface units ...
... and easily accessible near the kitchen. Follow the installation instructions provided with this Use and Care Manual carefully before using your new THERMADOR PROFESSIONAL® range has been designed to be certain the curtains do not blow over , potentially causing severe injury. DO NOT...Suzette, Cherries Jubilee, Peppercorn Beef Flambé). • Clean ventilating fans frequently. If the range is in this manual. NEVER use any part of the appliance unless specifically recommended in use . WARNING: TO REDUCE THE RISK OF A GREASE FIRE: • NEVER leave surface units ...

Use and Care Manual
Page 10
...until it started. • The fire department is being called. • You can damage the finish of the range. Areas adjacent to any part of potholders. Be careful to heat or warm the room. a violent steam explosion will be worn while using this appliance as aluminum foil. ...result in the area where it has cooled. RANGE TIPPING HAZARD: • All ranges can tip and injury can damage the cooktop or oven parts. However, DO NOT reach through the ovens. Fabric may ignite. Some synthetic fabrics are smothered with spillage, unburned gas will upset the cooking...
...until it started. • The fire department is being called. • You can damage the finish of the range. Areas adjacent to any part of potholders. Be careful to heat or warm the room. a violent steam explosion will be worn while using this appliance as aluminum foil. ...result in the area where it has cooled. RANGE TIPPING HAZARD: • All ranges can tip and injury can damage the cooktop or oven parts. However, DO NOT reach through the ovens. Fabric may ignite. Some synthetic fabrics are smothered with spillage, unburned gas will upset the cooking...

Use and Care Manual
Page 11
...extend over or when the STAR® burner does not light even though the electronic igniters activate. Use caution to insure that drafts like those parts indicated in poor combustion that produces the spraying action could expose a portion of the flame and may cause the container to clean the range....or remove the door gasket. Protect the self-cleaning feature. Build-up of pressure may result in the presence of heat, ignite or cause metal parts to cover the STAR® burner. During cooking, set the STAR® burner control so that have flat bottoms large enough to corrode. The ...
...extend over or when the STAR® burner does not light even though the electronic igniters activate. Use caution to insure that drafts like those parts indicated in poor combustion that produces the spraying action could expose a portion of the flame and may cause the container to clean the range....or remove the door gasket. Protect the self-cleaning feature. Build-up of pressure may result in the presence of heat, ignite or cause metal parts to cover the STAR® burner. During cooking, set the STAR® burner control so that have flat bottoms large enough to corrode. The ...
Use and Care Manual
Page 17
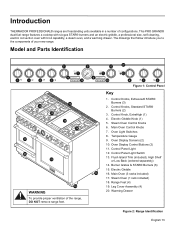
...13. Main Oven (3 racks included) 17. Leg Cover Assembly (4) 20. Control Knobs, ExtraLow® STAR® Burners (3) 2. Temperature Gauge 9. Model and Parts Identification 1 1 2 2 5 8 6 OVEN LIGHT 7 350 300 400 250 450 200 100 500 BROIL CLEAN 9 > Kitchen Timer Cook Timer ENTER - ...Steam Oven (1 rack included) 18. Oven Light Switches 8. Main Oven Control Knobs 7. Oven Display Control Buttons (2) 11. Introduction THERMADOR PROFESSIONAL® ranges are freestanding units available in a number of the range, DO NOT remove range feet. Control Knob, ExtraHigh ...
...13. Main Oven (3 racks included) 17. Leg Cover Assembly (4) 20. Control Knobs, ExtraLow® STAR® Burners (3) 2. Temperature Gauge 9. Model and Parts Identification 1 1 2 2 5 8 6 OVEN LIGHT 7 350 300 400 250 450 200 100 500 BROIL CLEAN 9 > Kitchen Timer Cook Timer ENTER - ...Steam Oven (1 rack included) 18. Oven Light Switches 8. Main Oven Control Knobs 7. Oven Display Control Buttons (2) 11. Introduction THERMADOR PROFESSIONAL® ranges are freestanding units available in a number of the range, DO NOT remove range feet. Control Knob, ExtraHigh ...
Use and Care Manual
Page 18
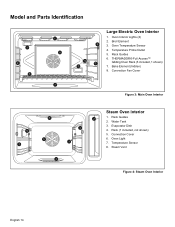
Broil Element 4 3. Oven Light 7. Oven Interior Lights (2) 2. Temperature Probe Outlet 5. Temperature Sensor 8. Rack (1 included, not shown) 5. Rack Guides 6. THERMADOR® Full Access™ 5 Gliding Oven Rack (3 included, 1 shown) 7. Bake Element (hidden) 8. Model and Parts Identification 1 5 6 2 8 7 3 1 Large Electric Oven Interior 1. Convection Fan Cover Figure 3: Main Oven Interior 6 1 8 5 1 7 3 Steam Oven Interior 1. Water Tank 3. Steam Vent...
Broil Element 4 3. Oven Light 7. Oven Interior Lights (2) 2. Temperature Probe Outlet 5. Temperature Sensor 8. Rack (1 included, not shown) 5. Rack Guides 6. THERMADOR® Full Access™ 5 Gliding Oven Rack (3 included, 1 shown) 7. Bake Element (hidden) 8. Model and Parts Identification 1 5 6 2 8 7 3 1 Large Electric Oven Interior 1. Convection Fan Cover Figure 3: Main Oven Interior 6 1 8 5 1 7 3 Steam Oven Interior 1. Water Tank 3. Steam Vent...
Use and Care Manual
Page 19
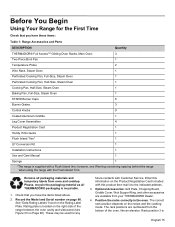
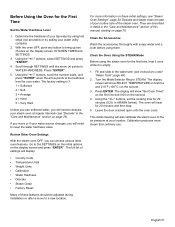
... Labels" found on the Product Registration Card included with a Flush Island trim; The rack positions are available from your THERMADOR® Dealer. 4. Remove all THERMADOR® packaging is supplied with this information on the Rating Label Plate. Record the Model and Serial number on Page... 90). however, see Figure 33 on page 90. Check that you have these items: Table 1: Range Accessories and Parts DESCRIPTION Quantity THERMADOR® Full Access™ Gliding Oven Racks, Main Oven 3 Two-Piece Broil Pan 1 Temperature Probe 2 Wire Rack, Steam Oven...
... Labels" found on the Product Registration Card included with a Flush Island trim; The rack positions are available from your THERMADOR® Dealer. 4. Remove all THERMADOR® packaging is supplied with this information on the Rating Label Plate. Record the Model and Serial number on Page... 90). however, see Figure 33 on page 90. Check that you have these items: Table 1: Range Accessories and Parts DESCRIPTION Quantity THERMADOR® Full Access™ Gliding Oven Racks, Main Oven 3 Two-Piece Broil Pan 1 Temperature Probe 2 Wire Rack, Steam Oven...
Use and Care Manual
Page 39
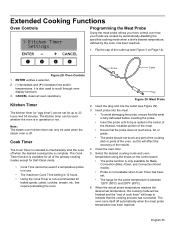
... avoid damaging the probe, ensure that the probe does not touch bone, fat, or gristle. • The probe should not touch any part of the cooking dish or parts of the oven, as this will beep to mechanically shut the oven off when the desired cooking time is between 120ºF (50...
... avoid damaging the probe, ensure that the probe does not touch bone, fat, or gristle. • The probe should not touch any part of the cooking dish or parts of the oven, as this will beep to mechanically shut the oven off when the desired cooking time is between 120ºF (50...

Use and Care Manual
Page 52
... Operates as a convection oven, with the STEAM, DEFROST, or PROOF modes because the oven is in between the rack levels. CAUTION: DO NOT slide any part of the oven, especially the cavity bottom. The rack levels are displayed on the cavity bottom. CAUTION: DO NOT cover the evaporator dish. Note: The...
... Operates as a convection oven, with the STEAM, DEFROST, or PROOF modes because the oven is in between the rack levels. CAUTION: DO NOT slide any part of the oven, especially the cavity bottom. The rack levels are displayed on the cavity bottom. CAUTION: DO NOT cover the evaporator dish. Note: The...
Use and Care Manual
Page 53
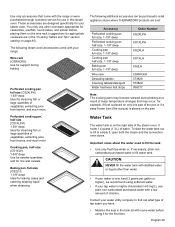
... for casseroles, soufflés, round cakes, and similar dishes, placing them on the wire rack (suggestions for appropriate cookware are in retail appliance stores where THERMADOR® products are designed specifically for your water utility company to find out what type of tap water you have. • Moisten the seal in... The water tank is on the right side of water. Use only accessories that may occur, for example, if food is placed on only one part of the pan or if a deep frozen item (like a pizza) is placed on the pan. To slide the water tank out to fill water tank...
... for casseroles, soufflés, round cakes, and similar dishes, placing them on the wire rack (suggestions for appropriate cookware are in retail appliance stores where THERMADOR® products are designed specifically for your water utility company to find out what type of tap water you have. • Moisten the seal in... The water tank is on the right side of water. Use only accessories that may occur, for example, if food is placed on only one part of the pan or if a deep frozen item (like a pizza) is placed on the pan. To slide the water tank out to fill water tank...
Use and Care Manual
Page 55
... soapy water and a cloth before using the steam oven for 20 minutes (0:20, in the "Care and Maintenance" section of the steam oven. They are part of these initial settings, see instructions under "Water Tank", page 49). 2. Using the "+/-" buttons, scroll the number scale, and press "ENTER" when the arrow points...
... soapy water and a cloth before using the steam oven for 20 minutes (0:20, in the "Care and Maintenance" section of the steam oven. They are part of these initial settings, see instructions under "Water Tank", page 49). 2. Using the "+/-" buttons, scroll the number scale, and press "ENTER" when the arrow points...

Use and Care Manual
Page 64
...: DO NOT use two pans in risk of the appliance, especially the oven bottom. This will cook unevenly. You can steam up to line any part of electric shock or fire. If the food is better to use aluminum foil or protective liners to 14 lbs. (6.4 kg) of the food also...
...: DO NOT use two pans in risk of the appliance, especially the oven bottom. This will cook unevenly. You can steam up to line any part of electric shock or fire. If the food is better to use aluminum foil or protective liners to 14 lbs. (6.4 kg) of the food also...

Use and Care Manual
Page 73
..., but is cooked through it on the sides. After baking, carefully remove the cake from the pan using your recipe, stick a toothpick into the highest part of the springform or cake pan. Next time, set oven temperature 20˚F (10˚C) lower. Sprinkle crust with juicy/runny fillings. Set the temperature...
..., but is cooked through it on the sides. After baking, carefully remove the cake from the pan using your recipe, stick a toothpick into the highest part of the springform or cake pan. Next time, set oven temperature 20˚F (10˚C) lower. Sprinkle crust with juicy/runny fillings. Set the temperature...
