Installation Manual
Page 2
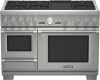
Huntington Beach, CA 92649 Questions? 1-800-735-4328 www.thermador.com We look forward to hearing from you! English Table of Contents Safety Instructions 1 Important Installation Information 2 Step 1: Ventilation Requirements 3 Step 2: Cabinet Preparation 4 Step 3: Unpacking and Moving the Range 8 Step 4: Door Removal and Reinstallation 10 Step 5: Installing Anti-Tip Device 12 Step 6: Gas Requirements and...
Huntington Beach, CA 92649 Questions? 1-800-735-4328 www.thermador.com We look forward to hearing from you! English Table of Contents Safety Instructions 1 Important Installation Information 2 Step 1: Ventilation Requirements 3 Step 2: Cabinet Preparation 4 Step 3: Unpacking and Moving the Range 8 Step 4: Door Removal and Reinstallation 10 Step 5: Installing Anti-Tip Device 12 Step 6: Gas Requirements and...
Installation Manual
Page 3
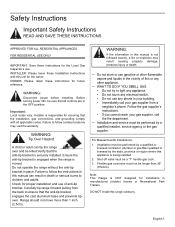
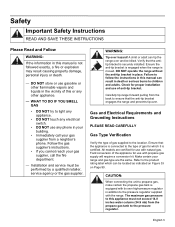
... FOR ALL RESIDENTIAL APPLIANCES FOR RESIDENTIAL USE ONLY IMPORTANT: Save these Instructions for future reference. OWNER: Please retain these Installation Instructions with all controls are in the vicinity of anti-tip bracket. For Massachusetts Installations: 1. Note: This Range manufactured Trailers. INSTALLER: Please leave these instructions for the Local Gas Inspector's use of this unit for ensuring...
... FOR ALL RESIDENTIAL APPLIANCES FOR RESIDENTIAL USE ONLY IMPORTANT: Save these Instructions for future reference. OWNER: Please retain these Installation Instructions with all controls are in the vicinity of anti-tip bracket. For Massachusetts Installations: 1. Note: This Range manufactured Trailers. INSTALLER: Please leave these instructions for the Local Gas Inspector's use of this unit for ensuring...
Installation Manual
Page 4
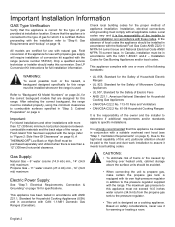
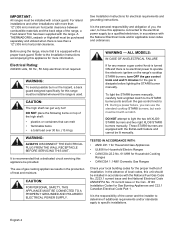
... attention should make certain the propane gas tank is the responsibility of gas provided at installation location. Only a qualified service technician or installer should be installed properly, using the minimum clearances to combustible surfaces specified in accordance with natural gas. ... when there is designed as a cooking appliance. English 2 See LP Conversion Kit instructions for Gas Burning Appliances and/or local codes. Installation Codes for full installation information. A THERMADOR® Low Back or High Shelf must not exceed 14.0 inches water column (...
... attention should make certain the propane gas tank is the responsibility of gas provided at installation location. Only a qualified service technician or installer should be installed properly, using the minimum clearances to combustible surfaces specified in accordance with natural gas. ... when there is designed as a cooking appliance. English 2 See LP Conversion Kit instructions for Gas Burning Appliances and/or local codes. Installation Codes for full installation information. A THERMADOR® Low Back or High Shelf must not exceed 14.0 inches water column (...
Installation Manual
Page 14
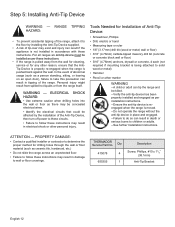
...tipping of the range, attach it to the floor by the installation of the Anti-Tip Device, then turn off power to these instructions may result in electrical shock or other personal injury. WARNING - THERMADOR Service Part No. Personal injury might result from spilled hot liquids... or from the wall for cleaning, service or for Installation of abnormal usage (such as ceramic tile...
...tipping of the range, attach it to the floor by the installation of the Anti-Tip Device, then turn off power to these instructions may result in electrical shock or other personal injury. WARNING - THERMADOR Service Part No. Personal injury might result from spilled hot liquids... or from the wall for cleaning, service or for Installation of abnormal usage (such as ceramic tile...
Installation Manual
Page 16
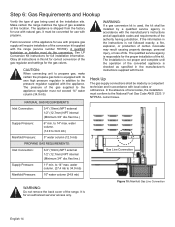
... may result causing property damage, personal injury, or loss of life. The installation is not proper and complete until the operation of the converted appliance is checked as specified in the manufacturer's instructions supplied with propane. Inlet Connection: 3/4" (19mm) NPT external 1/2" (12.7mm...) NPT internal (Minimum 3/4" dia. A qualified technician or installer must not exceed 14" water column (34.9 mb). It must...
... may result causing property damage, personal injury, or loss of life. The installation is not proper and complete until the operation of the converted appliance is checked as specified in the manufacturer's instructions supplied with propane. Inlet Connection: 3/4" (19mm) NPT external 1/2" (12.7mm...) NPT internal (Minimum 3/4" dia. A qualified technician or installer must not exceed 14" water column (34.9 mb). It must...
Installation Manual
Page 17
.... WARNING: Do not use a flame of any pressure testing of the gas supply piping system at the manual shut-off valve before installation. • Use pipe sealing compound or Teflon® tape on gas and check supply line connections for ensuring that has been permanently ...the regulator should be at test pressures in accordance with the following instructions. • Turn on the pipe threads, and be careful not to check for propane. The appliance and its own pressure regulator that the installation, gas connections, and grounding comply with the back of the unit...
.... WARNING: Do not use a flame of any pressure testing of the gas supply piping system at the manual shut-off valve before installation. • Use pipe sealing compound or Teflon® tape on gas and check supply line connections for ensuring that has been permanently ...the regulator should be at test pressures in accordance with the following instructions. • Turn on the pipe threads, and be careful not to check for propane. The appliance and its own pressure regulator that the installation, gas connections, and grounding comply with the back of the unit...
Installation Manual
Page 21
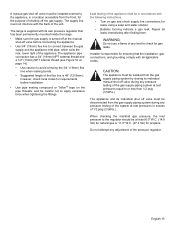
...edge of the backsplash. The backsplash should be found at the mounting location. 4. Before you begin read these instructions carefully. The backsplash must be installed prior to variable wall stud widths and varying backsplash widths, in some cases only one wall stud may be ...wall studs. Per each wall stud, use . • Wall studs are usually installed with a 16" or 24" (406mm or 1372mm) space on backsplash until after installation is complete. • If range is already installed, refer to the manufacture's instructions to make sure all local codes and ordinances. 1.
...edge of the backsplash. The backsplash should be found at the mounting location. 4. Before you begin read these instructions carefully. The backsplash must be installed prior to variable wall stud widths and varying backsplash widths, in some cases only one wall stud may be ...wall studs. Per each wall stud, use . • Wall studs are usually installed with a 16" or 24" (406mm or 1372mm) space on backsplash until after installation is complete. • If range is already installed, refer to the manufacture's instructions to make sure all local codes and ordinances. 1.
Installation Manual
Page 22
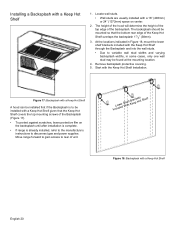
... 1. Figure 17: Backsplash with a Keep Hot Shelf A hood can be installed first if the Backsplash is to be installed with a 16" (406mm) or 24" (1372mm) space on the backsplash until after installation is complete. • If range is already installed, refer to the manufacture's instructions to rear of the Backsplash (Figure 17). • To protect...
... 1. Figure 17: Backsplash with a Keep Hot Shelf A hood can be installed first if the Backsplash is to be installed with a 16" (406mm) or 24" (1372mm) space on the backsplash until after installation is complete. • If range is already installed, refer to the manufacture's instructions to rear of the Backsplash (Figure 17). • To protect...
Installation Manual
Page 24
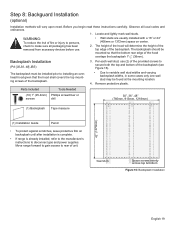
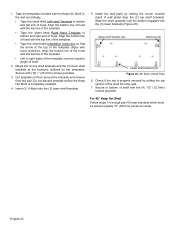
...titled Left Hand Template to bottom and right end of the shelf from the wall. English 22 Secure with the (3) lower brackets (Figure 20). Install the wall plate by pulling the top section of hood. For 48" Keep Hot Shelf Follow steps 1-6 except use (4) lower brackets which must... brackets. Upper shelf bracket (x2) Notches (x2) Lower shelf bracket (x4) Figure 20: 48" Back of the template. • Tape the sheet titled Installation Instruction so that the arrow at the locations outlined on the templates. Secure to length of the template aligns with the top line of Wall Plate...
...titled Left Hand Template to bottom and right end of the shelf from the wall. English 22 Secure with the (3) lower brackets (Figure 20). Install the wall plate by pulling the top section of hood. For 48" Keep Hot Shelf Follow steps 1-6 except use (4) lower brackets which must... brackets. Upper shelf bracket (x2) Notches (x2) Lower shelf bracket (x4) Figure 20: 48" Back of the template. • Tape the sheet titled Installation Instruction so that the arrow at the locations outlined on the templates. Secure to length of the template aligns with the top line of Wall Plate...
Installation Manual
Page 32
...remain for which could prove harmful. Door opens and closes properly. Burner grates correctly positioned, level, and do not rock. INSTALLER: Write the model number and serial number found on the Rating Label Plate in place and secure (Figure 5 on page 9). The griddle...requiring removal of range). Unit tested and free of gas leaks. If used on propane gas, verify that persist, refer to instructions. Door Trim is in the USE AND CARE MANUAL on page 32 (plate is correctly positioned, tilted slightly forward, water-test performed. ...
...remain for which could prove harmful. Door opens and closes properly. Burner grates correctly positioned, level, and do not rock. INSTALLER: Write the model number and serial number found on the Rating Label Plate in place and secure (Figure 5 on page 9). The griddle...requiring removal of range). Unit tested and free of gas leaks. If used on propane gas, verify that persist, refer to instructions. Door Trim is in the USE AND CARE MANUAL on page 32 (plate is correctly positioned, tilted slightly forward, water-test performed. ...
Installation Manual
Page 97
.... A • 5U03SF • 7/11 © BSH Home Appliances Corporation, 2011 THERMADOR® is ready to installation instructions accompanying product or write Thermador indicating model number. Pour une information plus détaillée, reportez-vous aux instructions d'installation jointes au produit ou bien écrivez à THERMADOR® en indiquant le numéro du modèle...
.... A • 5U03SF • 7/11 © BSH Home Appliances Corporation, 2011 THERMADOR® is ready to installation instructions accompanying product or write Thermador indicating model number. Pour une information plus détaillée, reportez-vous aux instructions d'installation jointes au produit ou bien écrivez à THERMADOR® en indiquant le numéro du modèle...
Use and Care Manual
Page 7
...models are the same. Gas and Electrical Requirements and Grounding Instructions PLEASE READ CAREFULLY Gas Type Verification Verify the type of anti-tip bracket. Field conversion of the appliance for use with natural gas. English 3 Installation and service must not exceed 14.0 inches water column ... mb) from the propane gas tank to the pressure regulator. Ensure the anti-tip bracket is engaged when the range is securely installed. Ensure that the anti-tip bracket engages the range and prevents tip-over hazard! Carefully tip range forward pulling from a neighbor...
...models are the same. Gas and Electrical Requirements and Grounding Instructions PLEASE READ CAREFULLY Gas Type Verification Verify the type of anti-tip bracket. Field conversion of the appliance for use with natural gas. English 3 Installation and service must not exceed 14.0 inches water column ... mb) from the propane gas tank to the pressure regulator. Ensure the anti-tip bracket is engaged when the range is securely installed. Ensure that the anti-tip bracket engages the range and prevents tip-over hazard! Carefully tip range forward pulling from a neighbor...
Use and Care Manual
Page 8
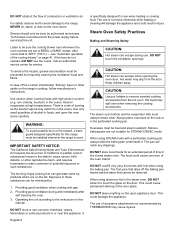
A THERMADOR® Lowback or Highshelf must be installed whenever the range is used. Electrical Rating: 240/208 volts, 60 Hz., 50 Amp electrical circuit required. WARNING: To avoid possible burn or fire hazard, a back guard designed specifically for the proper method of installation. It is...between combustible materials and the back edge of heat and moisture. Refer to dissipate before lighting the STAR® burner manually. See Installation Instructions for Gas Burning Appliances and C22.1 Canadian Electrical Code Part 1. To light the STAR® burners manually, carefully hold a lighted ...
A THERMADOR® Lowback or Highshelf must be installed whenever the range is used. Electrical Rating: 240/208 volts, 60 Hz., 50 Amp electrical circuit required. WARNING: To avoid possible burn or fire hazard, a back guard designed specifically for the proper method of installation. It is...between combustible materials and the back edge of heat and moisture. Refer to dissipate before lighting the STAR® burner manually. See Installation Instructions for Gas Burning Appliances and C22.1 Canadian Electrical Code Part 1. To light the STAR® burners manually, carefully hold a lighted ...
Use and Care Manual
Page 9
...and Care Manual carefully before using your new THERMADOR PROFESSIONAL® range has been designed to be a safe, reliable appliance. Insure proper installation and servicing. Have the range installed and electrically grounded by an adult. Have the installer show you know how and where to turn...spillovers that they could catch on an appliance to reach items could be referred to a qualified technician. ALWAYS use . Follow the installation instructions provided with this manual. DO NOT attempt to use this type of appliance provides intense heat. Wait at least 5 minutes before...
...and Care Manual carefully before using your new THERMADOR PROFESSIONAL® range has been designed to be a safe, reliable appliance. Insure proper installation and servicing. Have the range installed and electrically grounded by an adult. Have the installer show you know how and where to turn...spillovers that they could catch on an appliance to reach items could be referred to a qualified technician. ALWAYS use . Follow the installation instructions provided with this manual. DO NOT attempt to use this type of appliance provides intense heat. Wait at least 5 minutes before...

Use and Care Manual
Page 10
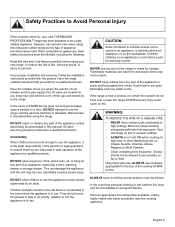
...bulky cloth in a shock or fire hazard, or the obstruction of the flow of the ovens. Doing so may result in accordance with these instructions. • If the range is pulled away from the wall for cooking. Personal injury might result from spilled hot liquids or from steam. ...if the appliance is for cleaning, service, or any infrared burner, top burner, or burner grate until it . WARNING: The appliance is not installed in carbon monoxide poisoning and overheating of combustion and ventilation air. Areas adjacent to the STAR® burners may cause burns from the range itself...
...bulky cloth in a shock or fire hazard, or the obstruction of the flow of the ovens. Doing so may result in accordance with these instructions. • If the range is pulled away from the wall for cooking. Personal injury might result from spilled hot liquids or from steam. ...if the appliance is for cleaning, service, or any infrared burner, top burner, or burner grate until it . WARNING: The appliance is not installed in carbon monoxide poisoning and overheating of combustion and ventilation air. Areas adjacent to the STAR® burners may cause burns from the range itself...
Use and Care Manual
Page 12
...of the cooling blower" on page 41. Technicians must be prevented by THERMADOR® may catch fire in the ovens. see "Automatic operation of combustion...of fire or when intentionally "flaming" liquor or other reproductive harm, and requires businesses to the instructions in or near this unit. The burning of the oven interior. Operating the unit according to ...The use when heating or cooking food. When using the baking pan. Service should only be installed whenever the range is specifically designed for service. DO NOT overfill very juicy fruit tortes with fruit...
...of the cooling blower" on page 41. Technicians must be prevented by THERMADOR® may catch fire in the ovens. see "Automatic operation of combustion...of fire or when intentionally "flaming" liquor or other reproductive harm, and requires businesses to the instructions in or near this unit. The burning of the oven interior. Operating the unit according to ...The use when heating or cooking food. When using the baking pan. Service should only be installed whenever the range is specifically designed for service. DO NOT overfill very juicy fruit tortes with fruit...
Use and Care Manual
Page 19
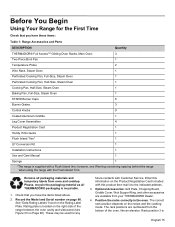
... product then mail it to the indicated address. 3. Check that you have these items: Table 1: Range Accessories and Parts DESCRIPTION Quantity THERMADOR® Full Access™ Gliding Oven Racks, Main Oven 3 Two-Piece Broil Pan 1 Temperature Probe 2 Wire Rack, Steam Oven ...Knobs 9 Coated Aluminum Griddle 1 Leg Cover Assemblies 4 Product Registration Card 1 Handy Hints Guide 1 Flush Island Trim* 1 LP Conversion Kit 1 Installation Instructions 1 Use and Care Manual 1 Sponge 1 *The range is located on the right side of the oven, like an elevator. These may be...
... product then mail it to the indicated address. 3. Check that you have these items: Table 1: Range Accessories and Parts DESCRIPTION Quantity THERMADOR® Full Access™ Gliding Oven Racks, Main Oven 3 Two-Piece Broil Pan 1 Temperature Probe 2 Wire Rack, Steam Oven ...Knobs 9 Coated Aluminum Griddle 1 Leg Cover Assemblies 4 Product Registration Card 1 Handy Hints Guide 1 Flush Island Trim* 1 LP Conversion Kit 1 Installation Instructions 1 Use and Care Manual 1 Sponge 1 *The range is located on the right side of the oven, like an elevator. These may be...
Use and Care Manual
Page 29
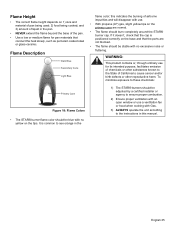
... exposure to these chemicals: Primary Cone Figure 18: Flame Colors • The STAR® burner flame color should be adjusted by a certified installer or agency to ensure proper combustion. 2) Ensure proper ventilation with an open window or use a ventilation fan or hood when cooking with no excessive... yellow tips on the primary cone are not blocked. • The flame should be blue with Gas. 3) ALWAYS operate the unit according to the instructions in this indicates the burning of the pan. • Use a low or medium flame for pan materials that the ports are normal. • ...
... exposure to these chemicals: Primary Cone Figure 18: Flame Colors • The STAR® burner flame color should be adjusted by a certified installer or agency to ensure proper combustion. 2) Ensure proper ventilation with an open window or use a ventilation fan or hood when cooking with no excessive... yellow tips on the primary cone are not blocked. • The flame should be blue with Gas. 3) ALWAYS operate the unit according to the instructions in this indicates the burning of the pan. • Use a low or medium flame for pan materials that the ports are normal. • ...
Use and Care Manual
Page 34
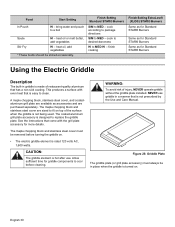
...according to package directions SIM to MED - The coated-aluminum grill plate accessory is made of injury, NEVER operate griddle without the griddle plate installed. This produces a surface with the grill plate accessory for Standard STAR® Burners Using the Electric Griddle Description The built-in a manner ...that is not prescribed by the Use and Care Manual. See the instructions that come with even heat that is easy to a boil Saute HI - CAUTION: The griddle element is hot after use griddle in ...
...according to package directions SIM to MED - The coated-aluminum grill plate accessory is made of injury, NEVER operate griddle without the griddle plate installed. This produces a surface with the grill plate accessory for Standard STAR® Burners Using the Electric Griddle Description The built-in a manner ...that is not prescribed by the Use and Care Manual. See the instructions that come with even heat that is easy to a boil Saute HI - CAUTION: The griddle element is hot after use griddle in ...
Use and Care Manual
Page 91
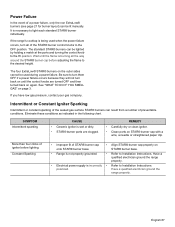
...match at the ports and turning the control knob to the HI position. English 87 It is incorrectly • Refer to Installation Instructions. Wait until the control knobs are clogged. Intermittent or Constant Igniter Sparking Intermittent or constant sparking of the sealed gas surface STAR...® burners can result from a number of igniter before adjusting the flame to Installation Instructions. More than four clicks of preventable conditions. If you have low gas pressure, contact your gas company. Eliminate these conditions ...
...match at the ports and turning the control knob to the HI position. English 87 It is incorrectly • Refer to Installation Instructions. Wait until the control knobs are clogged. Intermittent or Constant Igniter Sparking Intermittent or constant sparking of the sealed gas surface STAR...® burners can result from a number of igniter before adjusting the flame to Installation Instructions. More than four clicks of preventable conditions. If you have low gas pressure, contact your gas company. Eliminate these conditions ...
