Installation Manual
Page 5
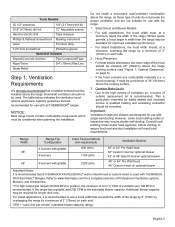
... Wall Hood 36" Custom Insert w/ optional blower 42" or 48" Island Hood w/ optional blower 48" 6 burners with griddle 1200 (cfm) 48" or 54" Pro Wall Hood 48" Custom Insert w/ optional blower Important Notes: It is recommended that a THERMADOR PROFESSIONAL® wall or island hood or custom insert is recommended..., a hood larger in width than the range may require double wall ducting. If the range has a griddle, add 200 CFM to www.thermador.com for use with single wall ducting. a wood covering), it is used . Select Hood and Blower Models: • For wall installations,...
... Wall Hood 36" Custom Insert w/ optional blower 42" or 48" Island Hood w/ optional blower 48" 6 burners with griddle 1200 (cfm) 48" or 54" Pro Wall Hood 48" Custom Insert w/ optional blower Important Notes: It is recommended that a THERMADOR PROFESSIONAL® wall or island hood or custom insert is recommended..., a hood larger in width than the range may require double wall ducting. If the range has a griddle, add 200 CFM to www.thermador.com for use with single wall ducting. a wood covering), it is used . Select Hood and Blower Models: • For wall installations,...
Installation Manual
Page 7
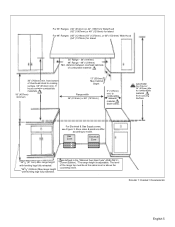
...36" Ranges {36" (914mm) or 42" (1067mm) Wide Hood {42" (1067mm) or 48" (1219mm) for Island For 48" Ranges {48" (1219mm) 54" (1372mm), or 60" (1524mm) Wide Hood {54" (1372mm) for Island 36" Range - 36" (914mm) 48" Range - 48" (1219mm) Min. If hood contains combustible materials. 18" (457mm) minimum 13" (330mm) Max... Cabinet Depth Range width 36" (914mm) or 48" (1219mm) 5" (127mm) min. to model. range height with leveling legs fully retracted. *363/4" (933mm) Max range height with leveling legs fully ...
...36" Ranges {36" (914mm) or 42" (1067mm) Wide Hood {42" (1067mm) or 48" (1219mm) for Island For 48" Ranges {48" (1219mm) 54" (1372mm), or 60" (1524mm) Wide Hood {54" (1372mm) for Island 36" Range - 36" (914mm) 48" Range - 48" (1219mm) Min. If hood contains combustible materials. 18" (457mm) minimum 13" (330mm) Max... Cabinet Depth Range width 36" (914mm) or 48" (1219mm) 5" (127mm) min. to model. range height with leveling legs fully retracted. *363/4" (933mm) Max range height with leveling legs fully ...
Installation Manual
Page 9
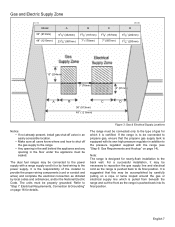
... pushed back into its final position. For a successful installation, it is pushed back to its final position. Gas and Electric Supply Zone Model 36" (913mm) 48" (1219mm) A 91/8" (232mm) 231/8" (587mm) B 73/8" (187mm) 7" (178mm) C 73/8" (187mm) 7" (587mm) D 91/8" (232mm) 77/8" (200mm) 10" (254mm)... 3" (76mm) 2" (51mm) A B C D 36" (913mm) 48" (1219mm) Notice: • If not already present, install gas shut-off valve in an easily accessible location. • Make sure all users know where and ...
... pushed back into its final position. For a successful installation, it is pushed back to its final position. Gas and Electric Supply Zone Model 36" (913mm) 48" (1219mm) A 91/8" (232mm) 231/8" (587mm) B 73/8" (187mm) 7" (178mm) C 73/8" (187mm) 7" (587mm) D 91/8" (232mm) 77/8" (200mm) 10" (254mm)... 3" (76mm) 2" (51mm) A B C D 36" (913mm) 48" (1219mm) Notice: • If not already present, install gas shut-off valve in an easily accessible location. • Make sure all users know where and ...
Installation Manual
Page 10
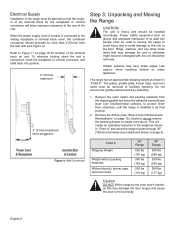
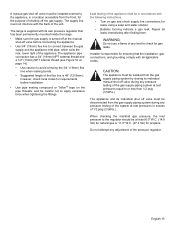
... Weight without packing materials Without door(s), burner caps, and oven racks 36" Range 420 lbs (191 kg) 360 lbs (163 kg) 260 lbs (118 kg) 48" Range 590 lbs (268 kg) 530 lbs (240 kg) 390 lbs (177 kg) Caution DO NOT lift the range by the oven door's handle, as...
... Weight without packing materials Without door(s), burner caps, and oven racks 36" Range 420 lbs (191 kg) 360 lbs (163 kg) 260 lbs (118 kg) 48" Range 590 lbs (268 kg) 530 lbs (240 kg) 390 lbs (177 kg) Caution DO NOT lift the range by the oven door's handle, as...
Installation Manual
Page 17
... indicate a gas leak. however, check local codes for the purpose of the system at test pressures equal to or less than 1/2 psig (3.5kPa.). Installer is 48" (1219mm); The supply line must not interfere with all leaks immediately after finding them. WARNING: Do not use a flame of any pressure testing of the...
... indicate a gas leak. however, check local codes for the purpose of the system at test pressures equal to or less than 1/2 psig (3.5kPa.). Installer is 48" (1219mm); The supply line must not interfere with all leaks immediately after finding them. WARNING: Do not use a flame of any pressure testing of the...
Installation Manual
Page 18
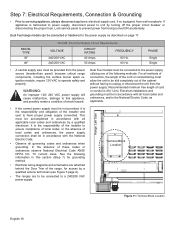
MODEL TYPE 36" 48" Chart B: Electrical Supply Circuit Requirements VOLTAGE 240/208 VAC 240/208 VAC CIRCUIT RATING 40 Amps 50 Amps FREQUENCY 60 Hz. 60 Hz. PHASE Single ...
MODEL TYPE 36" 48" Chart B: Electrical Supply Circuit Requirements VOLTAGE 240/208 VAC 240/208 VAC CIRCUIT RATING 40 Amps 50 Amps FREQUENCY 60 Hz. 60 Hz. PHASE Single ...
Installation Manual
Page 21
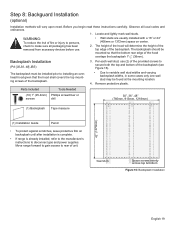
The height of the hood will vary upon need. Backsplash Installation (PA [30,36, 48] JBS) 3. Step 8: Backguard Installation (optional) Installation methods will determine the height of the top edge of the backsplash. Before you begin read... or injury to persons, check to disconnect gas and power supplies. Parts Included Tools Needed (10) 1" (25.4mm) Phillips screwdriver or screws drill 30", 36", 48" (760mm, 913mm, 1218mm) (1) Backsplash Tape measure 42" (1070mm) (1) Installation Guide Pencil • To protect against scratches, leave protective film on center. 2. ...
The height of the hood will vary upon need. Backsplash Installation (PA [30,36, 48] JBS) 3. Step 8: Backguard Installation (optional) Installation methods will determine the height of the top edge of the backsplash. Before you begin read... or injury to persons, check to disconnect gas and power supplies. Parts Included Tools Needed (10) 1" (25.4mm) Phillips screwdriver or screws drill 30", 36", 48" (760mm, 913mm, 1218mm) (1) Backsplash Tape measure 42" (1070mm) (1) Installation Guide Pencil • To protect against scratches, leave protective film on center. 2. ...
Installation Manual
Page 23
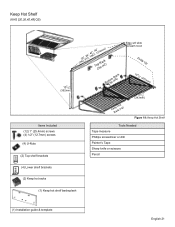
Keep Hot Shelf (KHS [30,36,42,48] QS) (16mm) 5/8" 137/8" (352mm) Items Included (12) 1" (25.4mm) screws (4) 1/2" (12.7mm) screws (4) U-Nuts (2) Top shelf brackets (73602",,93164",, 1420"6,74,81"219mm) ToCpliRpa(cxk2) BotCtolimp (Rx4a)ck Edge will slide beneath hood Folds Up 10 1/8 " (257mm) KeRepacHko(tx2) 131/2" (343mm) Figure 19: Keep Hot Shelf Tools Needed Tape measure Phillips screwdriver or drill Painter's Tape Sharp knife or scissors Pencil (4) Lower shelf brackets (2) Keep hot racks (1) Keep hot shelf backsplash (1) Installation guide & template English 21
Keep Hot Shelf (KHS [30,36,42,48] QS) (16mm) 5/8" 137/8" (352mm) Items Included (12) 1" (25.4mm) screws (4) 1/2" (12.7mm) screws (4) U-Nuts (2) Top shelf brackets (73602",,93164",, 1420"6,74,81"219mm) ToCpliRpa(cxk2) BotCtolimp (Rx4a)ck Edge will slide beneath hood Folds Up 10 1/8 " (257mm) KeRepacHko(tx2) 131/2" (343mm) Figure 19: Keep Hot Shelf Tools Needed Tape measure Phillips screwdriver or drill Painter's Tape Sharp knife or scissors Pencil (4) Lower shelf brackets (2) Keep hot racks (1) Keep hot shelf backsplash (1) Installation guide & template English 21
Installation Manual
Page 24
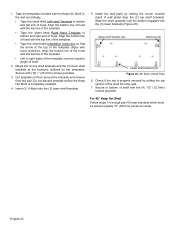
... aligns with the (4) 1/2" (12.7mm) screws provided. Upper shelf bracket (x2) Notches (x2) Lower shelf bracket (x4) Figure 20: 48" Back of hood. Check if the top is completely installed. 4. For 48" Keep Hot Shelf Follow steps 1-6 except use (4) lower brackets which must be spaced equally 15" (381mm) center-to-center. Install...
... aligns with the (4) 1/2" (12.7mm) screws provided. Upper shelf bracket (x2) Notches (x2) Lower shelf bracket (x4) Figure 20: 48" Back of hood. Check if the top is completely installed. 4. For 48" Keep Hot Shelf Follow steps 1-6 except use (4) lower brackets which must be spaced equally 15" (381mm) center-to-center. Install...
Installation Manual
Page 25
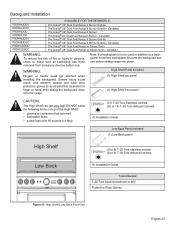
...injury could get very hot! Canadian Pro Grand® 48" Dual Fuel Range 6 Burner Griddle Pro Grand® 48" Dual Fuel Range 6 Burner Griddle - Canadian Pro Grand® 48" Dual Fuel Range w/ Steam Oven Pro Grand® 48" Dual Fuel Range w/ Steam Oven - Use extreme...Dual Fuel Range 6 Burner - WARNING: High Shelf Parts Included Fingers or hands could result. Backguard Installation PRD364JDGU PRD364JDGC PRD366JGU PRD366JGC PRD486JDGU PRD486JDGC PRD48JDSGU PRD48JDSGC AVAILABLE FOR THESE MODELS: Pro Grand® 36" Dual Fuel Range 4 Burner Griddle Pro Grand® 36" Dual Fuel Range 4...
...injury could get very hot! Canadian Pro Grand® 48" Dual Fuel Range 6 Burner Griddle Pro Grand® 48" Dual Fuel Range 6 Burner Griddle - Canadian Pro Grand® 48" Dual Fuel Range w/ Steam Oven Pro Grand® 48" Dual Fuel Range w/ Steam Oven - Use extreme...Dual Fuel Range 6 Burner - WARNING: High Shelf Parts Included Fingers or hands could result. Backguard Installation PRD364JDGU PRD364JDGC PRD366JGU PRD366JGC PRD486JDGU PRD486JDGC PRD48JDSGU PRD48JDSGC AVAILABLE FOR THESE MODELS: Pro Grand® 36" Dual Fuel Range 4 Burner Griddle Pro Grand® 36" Dual Fuel Range 4...
Installation Manual
Page 26
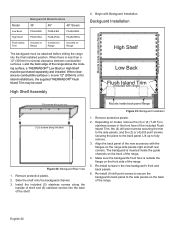
...edge of the range. 4. Mounts inside side panel flange Model Low Back High Shelf Flush Island Trim Backguard Kit Model Numbers 36" 48" 48" Steam PA36JLBG PA48JLBG PA48JLBSG PA36JHSG PA48JHSG PA48JHSSG Included on Range Included on Range Included on the front side of the included Flush Island ... rear corners. Remove protective plastic. 2. Lift up to the side panels on the back of the range above the cooking surface, a THERMADOR® Low Back or High Shelf must be used. Backguard Installation High Shelf Low Back Flush Island Trim (Included with the flanges on model...
...edge of the range. 4. Mounts inside side panel flange Model Low Back High Shelf Flush Island Trim Backguard Kit Model Numbers 36" 48" 48" Steam PA36JLBG PA48JLBG PA48JLBSG PA36JHSG PA48JHSG PA48JHSSG Included on Range Included on Range Included on the front side of the included Flush Island ... rear corners. Remove protective plastic. 2. Lift up to the side panels on the back of the range above the cooking surface, a THERMADOR® Low Back or High Shelf must be used. Backguard Installation High Shelf Low Back Flush Island Trim (Included with the flanges on model...
Installation Manual
Page 30
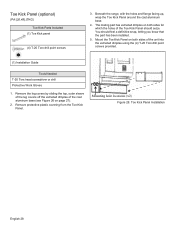
... Toe Kick Panel should feel a definitive snap, letting you know that the part has been installed. 5. You should seize. Toe Kick Panel (optional) (PA [36,48] JTKG) Toe Kick Parts Included (1) Toe Kick panel (4) T-20 Torx drill point screws 3.
... Toe Kick Panel should feel a definitive snap, letting you know that the part has been installed. 5. You should seize. Toe Kick Panel (optional) (PA [36,48] JTKG) Toe Kick Parts Included (1) Toe Kick panel (4) T-20 Torx drill point screws 3.

Use and Care Manual
Page 41
... of the crust is the preferred rack. Bake Rack Positions Two-Rack Baking Rack levels #2 and #4 may affect the baking time. • The 36" and 48" (914 mm and 1219 mm) ovens will hold a full-sized commercial baking sheet (18" x 26") (457 mm x 660 mm). Oven Functions Tips for Bake Mode...
... of the crust is the preferred rack. Bake Rack Positions Two-Rack Baking Rack levels #2 and #4 may affect the baking time. • The 36" and 48" (914 mm and 1219 mm) ovens will hold a full-sized commercial baking sheet (18" x 26") (457 mm x 660 mm). Oven Functions Tips for Bake Mode...

Use and Care Manual
Page 42
... - + CANCEL 350 300 400 250 450 200 100 500 BROIL CLEAN electronic control OVEN LIGHT > Kitchen Timer Cook Timer ENTER - + CANCEL PANEL LIGHT Figure 31: 48" Dual Fuel Control Panel To Set the Oven 1. Set the Temperature Selector Knob to move to 250°F (120°C), the number of preheating bars...
... - + CANCEL 350 300 400 250 450 200 100 500 BROIL CLEAN electronic control OVEN LIGHT > Kitchen Timer Cook Timer ENTER - + CANCEL PANEL LIGHT Figure 31: 48" Dual Fuel Control Panel To Set the Oven 1. Set the Temperature Selector Knob to move to 250°F (120°C), the number of preheating bars...

Use and Care Manual
Page 52
..., which is in between the rack levels. CAUTION: DO NOT cover the evaporator dish. CAUTION: DO NOT slide any accessories in the vertical position. English 48 Slowly roasts meats so they remain very tender Proof (raises) yeast dough and sourdough Combines steam and convection oven modes Steams vegetables, fish, and side...
..., which is in between the rack levels. CAUTION: DO NOT cover the evaporator dish. CAUTION: DO NOT slide any accessories in the vertical position. English 48 Slowly roasts meats so they remain very tender Proof (raises) yeast dough and sourdough Combines steam and convection oven modes Steams vegetables, fish, and side...