Installation Instructions
Page 1
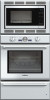
INSTALLATION MANUAL Built-in Ovens Models: M301 ME271 ME301 ME302 MED272 MED302 MEMC301 MEMCW271 MEMCW301 POD301 PODC302 PODM301 PODMW301
INSTALLATION MANUAL Built-in Ovens Models: M301 ME271 ME301 ME302 MED272 MED302 MEMC301 MEMCW271 MEMCW301 POD301 PODC302 PODM301 PODMW301
Installation Instructions
Page 3
...appliance. Never allow children to move. Never modify or alter the construction of the circuit breaker or fuse. See instructions in the manuals. show the owner the location of the appliance. Related Equipment Safety Remove all controls are in the OFF position. If required by ...repair or replace any part of the appliance unless specifically recommended in Use and Care Manual. Safety Important Safety Instructions READ AND SAVE THESE INSTRUCTIONS WARNING: If the information in this manual is not followed exactly, fire or shock may have sharp edges. Hidden surfaces may ...
...appliance. Never allow children to move. Never modify or alter the construction of the circuit breaker or fuse. See instructions in the manuals. show the owner the location of the appliance. Related Equipment Safety Remove all controls are in the OFF position. If required by ...repair or replace any part of the appliance unless specifically recommended in Use and Care Manual. Safety Important Safety Instructions READ AND SAVE THESE INSTRUCTIONS WARNING: If the information in this manual is not followed exactly, fire or shock may have sharp edges. Hidden surfaces may ...
Installation Instructions
Page 16
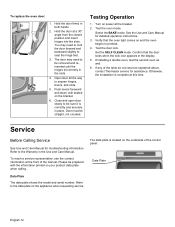
...Push levers foreward and down until the hinges sit correctly in the slots. 4. Select the BAKE mode. See the Use and Care Manual for troubleshooting information. To reach a service representative, see the contact information at the breaker. 2. Please be removed and reinserted until ...6. Testing Operation 1. Test the oven mode. Set the SELF CLEAN mode. If any of the manual. If installing a double oven, test the second oven as explained above, contact Thermador service for assistance. Otherwise, the installation is complete at a 30º angle from the closed ...
...Push levers foreward and down until the hinges sit correctly in the slots. 4. Select the BAKE mode. See the Use and Care Manual for troubleshooting information. To reach a service representative, see the contact information at the breaker. 2. Please be removed and reinserted until ...6. Testing Operation 1. Test the oven mode. Set the SELF CLEAN mode. If any of the manual. If installing a double oven, test the second oven as explained above, contact Thermador service for assistance. Otherwise, the installation is complete at a 30º angle from the closed ...
User Manual
Page 1
USE AND CARE MANUAL Built-in Ovens Model: ME271 ME301 ME272 ME302 MED272 MED302 MEW301 MEM271 MEM301 MEMC301 MEMW271 MEMW301 MEMCW301
USE AND CARE MANUAL Built-in Ovens Model: ME271 ME301 ME272 ME302 MED272 MED302 MEW301 MEM271 MEM301 MEMC301 MEMW271 MEMW301 MEMCW301
User Manual
Page 3
About This Manual 5 How This Manual is Organized 5 Safety 6 Getting Started 9 Parts and Accessories 9 Parts ...9 Accessories 10 Inserting Rack 11 Control 13 Before Using the Oven for the First Time 14 ...
About This Manual 5 How This Manual is Organized 5 Safety 6 Getting Started 9 Parts and Accessories 9 Parts ...9 Accessories 10 Inserting Rack 11 Control 13 Before Using the Oven for the First Time 14 ...
User Manual
Page 5
... you with several bakeware and preparation tips. • "Cleaning and Maintenance" provides you with the appropriate oven mode, temperature, rack position and bake time. The manual consists of the following sections: • The "Safety" section provides information on how to safely operate your oven. • "Getting Started" introduces you to the... and do-it-yourself troubleshooting tips. • Pay special attention to end. This way you can get to know your new oven by reading this manual from beginning to the important safety instructions in the "Safety" section. 5
... you with several bakeware and preparation tips. • "Cleaning and Maintenance" provides you with the appropriate oven mode, temperature, rack position and bake time. The manual consists of the following sections: • The "Safety" section provides information on how to safely operate your oven. • "Getting Started" introduces you to the... and do-it-yourself troubleshooting tips. • Pay special attention to end. This way you can get to know your new oven by reading this manual from beginning to the important safety instructions in the "Safety" section. 5
User Manual
Page 6
... for normal family household use aluminum foil or protective liners to the Installation Instructions for use . This appliance is not working smoke detector near this manual. See the Warranty. Mark it is intended for warming or heating the room. Do not use only. Do not operate this...
... for normal family household use aluminum foil or protective liners to the Installation Instructions for use . This appliance is not working smoke detector near this manual. See the Warranty. Mark it is intended for warming or heating the room. Do not use only. Do not operate this...
User Manual
Page 8
... Cleaning Safety Cookware Safety Do not allow children to climb, stand, lean, sit, or hang on oven bottom. Do not allow anyone to use this manual. Keep pet birds out of the kitchen or other reproductive harm, and requires businesses to warn customers of an appliance, especially a door, warming drawer or...
... Cleaning Safety Cookware Safety Do not allow children to climb, stand, lean, sit, or hang on oven bottom. Do not allow anyone to use this manual. Keep pet birds out of the kitchen or other reproductive harm, and requires businesses to warn customers of an appliance, especially a door, warming drawer or...
User Manual
Page 14
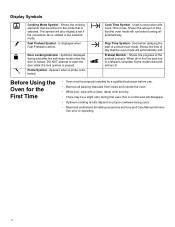
... before use. • Remove all packing materials from inside and outside the oven. • While cool, wipe with all safety precautions and Use and Care Manual informa- Symbol is displayed during first uses; Shows the cooking elements that is present. Is displayed when Fast Preheat is locked. Cook Time Symbol - Used...
... before use. • Remove all packing materials from inside and outside the oven. • While cool, wipe with all safety precautions and Use and Care Manual informa- Symbol is displayed during first uses; Shows the cooking elements that is present. Is displayed when Fast Preheat is locked. Cook Time Symbol - Used...
User Manual
Page 15
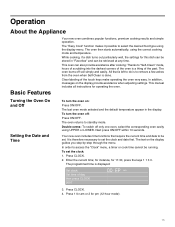
.... To set . Enter the current time; Operation About the Appliance Basic Features Your new oven combines popular functions, premium cooking results and simple operation. This manual includes all instructions for 11:30, press the keys 1 1 3 0. Turning the Oven On and Off Setting the Date and Time To turn the oven off...
.... To set . Enter the current time; Operation About the Appliance Basic Features Your new oven combines popular functions, premium cooking results and simple operation. This manual includes all instructions for 11:30, press the keys 1 1 3 0. Turning the Oven On and Off Setting the Date and Time To turn the oven off...
User Manual
Page 22
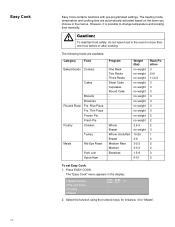
... are available: Category Food Baked Goods Cookies Cakes Pie and Pizza Poultry Biscuits Brownies Frz. However, it is possible to change temperature and cooking time manually. for instance, 4 for more than one hour before or after cooking. Whole Breast Whole Unstuffed Breast Medium Rare Medium Boneless Weight (lbs) no weight no...
... are available: Category Food Baked Goods Cookies Cakes Pie and Pizza Poultry Biscuits Brownies Frz. However, it is possible to change temperature and cooking time manually. for instance, 4 for more than one hour before or after cooking. Whole Breast Whole Unstuffed Breast Medium Rare Medium Boneless Weight (lbs) no weight no...
User Manual
Page 24
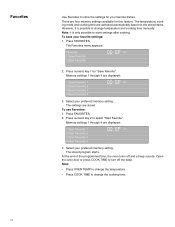
... save your preferred memory setting. Press numeric key 1 for this feature. Open the oven door or press COOK TIME to change temperature and cooking time manually. Select your favorite dishes. The temperature, cooking mode and cooking time are displayed: 1 Save Favorite 1 2 Save Favorite 2 3 Save Favorite 3 4 Save Favorite 4 QQ: EP am 2. To...
... save your preferred memory setting. Press numeric key 1 for this feature. Open the oven door or press COOK TIME to change temperature and cooking time manually. Select your favorite dishes. The temperature, cooking mode and cooking time are displayed: 1 Save Favorite 1 2 Save Favorite 2 3 Save Favorite 3 4 Save Favorite 4 QQ: EP am 2. To...
User Manual
Page 46
... applicable) and to your finger. Use the flat part of the touch key. Refer to cool before running self-clean. However, the temperature can be manually reduced by 25 ºF. See "Oven Temperature Offset" under "User Settings". Allow the oven to cooking charts for the maximum self-clean time. If oven...
... applicable) and to your finger. Use the flat part of the touch key. Refer to cool before running self-clean. However, the temperature can be manually reduced by 25 ºF. See "Oven Temperature Offset" under "User Settings". Allow the oven to cooking charts for the maximum self-clean time. If oven...
User Manual
Page 47
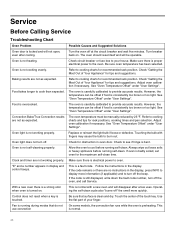
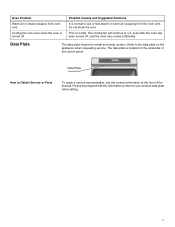
... Suggested Solutions It is located on the underside of the control panel: Data Plate How to see the contact information at the front of the manual. Do not block the vent. Data Plate The data plate shows the model and serial number. Please be prepared with the information printed on the...
... Suggested Solutions It is located on the underside of the control panel: Data Plate How to see the contact information at the front of the manual. Do not block the vent. Data Plate The data plate shows the model and serial number. Please be prepared with the information printed on the...
Design Guide
Page 6
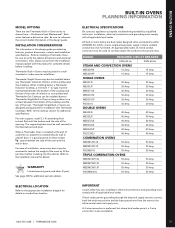
...rated, designed to be well secured to the installation manual for details. Also, always consult with the installation manual packed with the product for complete details before installing into the cabinet. When installing below any Thermador Induction, Electric or Non-professional Gas Cooktop. The supporting... OVENS MEDMCW71JS 50 Amp 50 Amp MEDMCW31JS 50 Amp 50 Amp MEDMCW31JP 50 Amp 50 Amp PODMW301J 50 Amp 50 Amp IMPORTANT Local Codes may also be installed below a Thermador Induction Cooktop, a minimum 1" air gap must comply with all applicable local codes. MODEL ...
...rated, designed to be well secured to the installation manual for details. Also, always consult with the installation manual packed with the product for complete details before installing into the cabinet. When installing below any Thermador Induction, Electric or Non-professional Gas Cooktop. The supporting... OVENS MEDMCW71JS 50 Amp 50 Amp MEDMCW31JS 50 Amp 50 Amp MEDMCW31JP 50 Amp 50 Amp PODMW301J 50 Amp 50 Amp IMPORTANT Local Codes may also be installed below a Thermador Induction Cooktop, a minimum 1" air gap must comply with all applicable local codes. MODEL ...
