Installation Instructions
Page 2
...Contents Safety 1 Important Safety Instructions 1 Preparation 2 Before you ! Huntington Beach, CA 92649 Questions? 1-800-735-4328 www.thermador.com We look forward to hearing from you Begin 2 Tools and Parts Needed 2 Parts Included 2 General Information 2 Dimensions for 27" Wall-Mounted Units 3 Dimensions for 27" under the counter 4 Dimensions for 30... Feature 11 Installation 12 Electrical Installation 12 Oven Installation 13 Testing Operation 14 Service 14 Before Calling Service 14 This Thermador Appliance is made by BSH Home Appliances Corporation 5551 McFadden Ave.
...Contents Safety 1 Important Safety Instructions 1 Preparation 2 Before you ! Huntington Beach, CA 92649 Questions? 1-800-735-4328 www.thermador.com We look forward to hearing from you Begin 2 Tools and Parts Needed 2 Parts Included 2 General Information 2 Dimensions for 27" Wall-Mounted Units 3 Dimensions for 27" under the counter 4 Dimensions for 30... Feature 11 Installation 12 Electrical Installation 12 Oven Installation 13 Testing Operation 14 Service 14 Before Calling Service 14 This Thermador Appliance is made by BSH Home Appliances Corporation 5551 McFadden Ave.
Installation Instructions
Page 3
... behind or under "Service" for easier handling and installation. Refer to move. Save these instructions for easy reference. WARNING: Do not repair or replace any part of the owner and the installer to determine if additional requirements and/or standards apply to prevent power from being turned ON accidentally. Unit is...
... behind or under "Service" for easier handling and installation. Refer to move. Save these instructions for easy reference. WARNING: Do not repair or replace any part of the owner and the installer to determine if additional requirements and/or standards apply to prevent power from being turned ON accidentally. Unit is...

Installation Instructions
Page 4
Preparation Before you Begin Tools and Parts Needed • Phillips head screwdriver • Measuring tape • Drill with all applicable codes. Transport To avoid damage to the oven vent, use the transport method shown in accordance with bit (1/8") Parts Included • Phillips head screws (6) General Information Power Requirements The outlet must be properly grounded in the picture below. English 2
Preparation Before you Begin Tools and Parts Needed • Phillips head screwdriver • Measuring tape • Drill with all applicable codes. Transport To avoid damage to the oven vent, use the transport method shown in accordance with bit (1/8") Parts Included • Phillips head screws (6) General Information Power Requirements The outlet must be properly grounded in the picture below. English 2
User Manual
Page 3
About This Manual 5 How This Manual is Organized 5 Safety 6 Getting Started 9 Parts and Accessories 9 Parts ...9 Accessories 10 Inserting Rack 11 Control 13 Before Using the Oven for the First Time 14 Operation 15 About the Appliance 15 Basic Features 15 ...
About This Manual 5 How This Manual is Organized 5 Safety 6 Getting Started 9 Parts and Accessories 9 Parts ...9 Accessories 10 Inserting Rack 11 Control 13 Before Using the Oven for the First Time 14 Operation 15 About the Appliance 15 Basic Features 15 ...
User Manual
Page 5
... you can get to know your warranty and do-it-yourself troubleshooting tips. • Pay special attention to clean and care for the various oven parts. • The "Service" section includes your appliance and become familiar with its operation and features. This section also provides you with several bakeware and preparation...
... you can get to know your warranty and do-it-yourself troubleshooting tips. • Pay special attention to clean and care for the various oven parts. • The "Service" section includes your appliance and become familiar with its operation and features. This section also provides you with several bakeware and preparation...
User Manual
Page 6
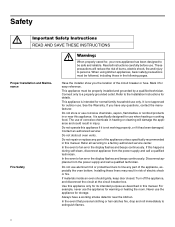
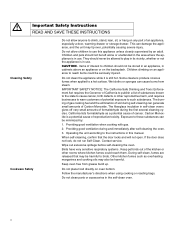
...power supply and call a qualified technician. If materials inside an oven should ignite, keep door closed. Read all servicing to line any part of the circuit breaker or fuse. Connect only to extinguish flames. 6 The use . Do not obstruct oven vents. Installing these liners... Warning: When properly cared for storage. Do not use corrosive chemicals, vapors, flammables or nonfood products in injury. Always have any part of the appliance unless specifically recommended in risk of burns, electric shock, fire and injury to be safe and reliable. Contact an authorized...
...power supply and call a qualified technician. If materials inside an oven should ignite, keep door closed. Read all servicing to line any part of the circuit breaker or fuse. Connect only to extinguish flames. 6 The use . Do not obstruct oven vents. Installing these liners... Warning: When properly cared for storage. Do not use corrosive chemicals, vapors, flammables or nonfood products in injury. Always have any part of the appliance unless specifically recommended in risk of burns, electric shock, fire and injury to be safe and reliable. Contact an authorized...
User Manual
Page 8
...injury. Contact service. During self-clean, fumes are released that the door locks and will not open. Keep oven free from steam. Do not clean parts or accessories in this appliance unless closely supervised by : 1. This can cause burns from grease build up. California lists formaldehyde as overheating margarines and ... oven. Keep pet birds out of the kitchen or other reproductive harm, and requires businesses to birds. Do not place food directly on any part of potential exposure to a hot surface. Follow the manufacturer's directions when using cooking or roasting bags.
...injury. Contact service. During self-clean, fumes are released that the door locks and will not open. Keep oven free from steam. Do not clean parts or accessories in this appliance unless closely supervised by : 1. This can cause burns from grease build up. California lists formaldehyde as overheating margarines and ... oven. Keep pet birds out of the kitchen or other reproductive harm, and requires businesses to birds. Do not place food directly on any part of potential exposure to a hot surface. Follow the manufacturer's directions when using cooking or roasting bags.
User Manual
Page 9
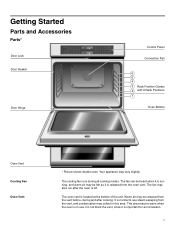
Getting Started Parts and Accessories Parts* Door Lock Door Gasket Door Hinge Control Panel Convection Fan 6 5 4 3 Rack Position Guides 2 with 6 Rack Positions 1 Oven Bottom Oven Vent Cooling Fan Oven Vent * Picture ...
Getting Started Parts and Accessories Parts* Door Lock Door Gasket Door Hinge Control Panel Convection Fan 6 5 4 3 Rack Position Guides 2 with 6 Rack Positions 1 Oven Bottom Oven Vent Cooling Fan Oven Vent * Picture ...

User Manual
Page 10
...-clean oven. The oven bottom conceals the lower heating element. As a result the element is opened. Probe The probe can be used to line any part of the appliance, especially the oven bottom. Flat Rack Do not clean in the self-clean oven. Telescopic Rack This rack allows for broiling and...
...-clean oven. The oven bottom conceals the lower heating element. As a result the element is opened. Probe The probe can be used to line any part of the appliance, especially the oven bottom. Flat Rack Do not clean in the self-clean oven. Telescopic Rack This rack allows for broiling and...
User Manual
Page 25
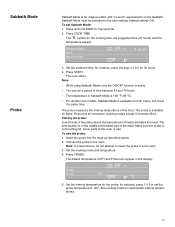
... COOK TIME. The probe is in Sabbath Mode is 190 ºF (85 ºC). • For double oven models, Sabbath Mode is not touching fat, bone, parts of the meat. Set the preferred time, for instance, press the keys 3 0 0 0 for the probe; Make sure the probe is available for instance, press 1 4 5 ...ON/OFF function is active. • You can set a period of time between 24 and 74 hours. • The temperature in the middle and thickest part of the oven or pan. Insert the probe into the meat as described above. 2. Press and hold BAKE for the cooking time, the suggested time...
... COOK TIME. The probe is in Sabbath Mode is 190 ºF (85 ºC). • For double oven models, Sabbath Mode is not touching fat, bone, parts of the meat. Set the preferred time, for instance, press the keys 3 0 0 0 for the probe; Make sure the probe is available for instance, press 1 4 5 ...ON/OFF function is active. • You can set a period of time between 24 and 74 hours. • The temperature in the middle and thickest part of the oven or pan. Insert the probe into the meat as described above. 2. Press and hold BAKE for the cooking time, the suggested time...
User Manual
Page 39
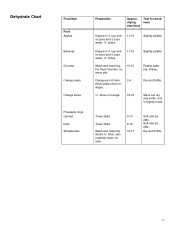
... Food Item Fruit Apples Bananas Cherries Orange peels Orange slices Pineapple rings canned fresh Strawberries Preparation Approx. For fresh cherries, remove pits. 10-15 Orange part of orange. 12-16 Slightly pliable. Skins are dry and brittle, fruit is slightly moist. Soft and pliable. Slightly pliable. Dry and brittle. Dry and...
... Food Item Fruit Apples Bananas Cherries Orange peels Orange slices Pineapple rings canned fresh Strawberries Preparation Approx. For fresh cherries, remove pits. 10-15 Orange part of orange. 12-16 Slightly pliable. Skins are dry and brittle, fruit is slightly moist. Soft and pliable. Slightly pliable. Dry and brittle. Dry and...
User Manual
Page 41
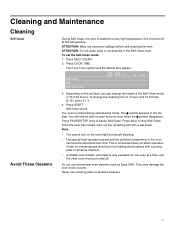
... mode: 1. The oven is burned off . Press twice to a very high temperature. Do not use scouring pads or abrasive cleaners. 41 ATTENTION: Do not clean parts or accessories in the display. To change the length of the Self-Clean mode (1:30-2:30 hours). You will only be turned off at a time... level, you try treating discolorations with a wet towel. Under no circumstances should you can become discolored over time. They may damage the oven finish or parts.
... mode: 1. The oven is burned off . Press twice to a very high temperature. Do not use scouring pads or abrasive cleaners. 41 ATTENTION: Do not clean parts or accessories in the display. To change the length of the Self-Clean mode (1:30-2:30 hours). You will only be turned off at a time... level, you try treating discolorations with a wet towel. Under no circumstances should you can become discolored over time. They may damage the oven finish or parts.
User Manual
Page 42
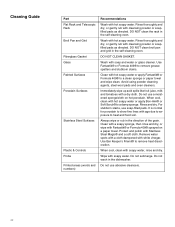
Cleaning Guide Part Flat Rack and Telescopic Rack Broil Pan and Grid Fiberglass Gasket Glass Painted Surfaces Porcelain Surfaces Stainless Steel Surfaces Plastic & Controls Probe Printed areas (words ...
Cleaning Guide Part Flat Rack and Telescopic Rack Broil Pan and Grid Fiberglass Gasket Glass Painted Surfaces Porcelain Surfaces Stainless Steel Surfaces Plastic & Controls Probe Printed areas (words ...
User Manual
Page 46
... and control beeps. Operating the self-clean cycle also "burns-off" the smell more information (if applicable) and to display more quickly. Use the flat part of the touch key. Make sure there is overcooked. Food takes longer to your finger. See "Oven Temperature Offset" under "User Settings". Food is proper...
... and control beeps. Operating the self-clean cycle also "burns-off" the smell more information (if applicable) and to display more quickly. Use the flat part of the touch key. Make sure there is overcooked. Food takes longer to your finger. See "Oven Temperature Offset" under "User Settings". Food is proper...
User Manual
Page 47
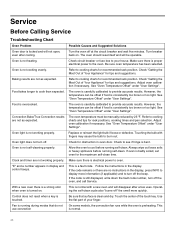
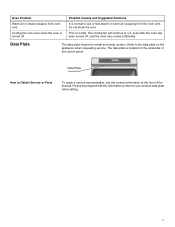
... been turned off . Possible Causes and Suggested Solutions It is normal. Do not block the vent. The cooling fan will continue to Obtain Service or Parts To reach a service representative, see or feel steam or warm air escaping from oven vent. This is normal to the data plate on your product...
... been turned off . Possible Causes and Suggested Solutions It is normal. Do not block the vent. The cooling fan will continue to Obtain Service or Parts To reach a service representative, see or feel steam or warm air escaping from oven vent. This is normal to the data plate on your product...
User Manual
Page 48
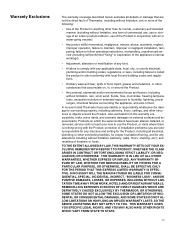
..., tolled, extended, or suspended, for any reason whatsoever. in any such event, if you request, Thermador would still pay for labor and parts and ship the parts to the nearest authorized service provider, but you would still be fully liable and responsible for any travel time... you do not attempt to return your Product, THIS WARRANTY WILL AUTOMATICALLY BECOME NULL AND VOID. All removed parts and components shall become the property of Thermador). Thermador's sole liability and responsibility hereunder is to have responsibility, for the Product if it is under no responsibility...
..., tolled, extended, or suspended, for any reason whatsoever. in any such event, if you request, Thermador would still pay for labor and parts and ship the parts to the nearest authorized service provider, but you would still be fully liable and responsible for any travel time... you do not attempt to return your Product, THIS WARRANTY WILL AUTOMATICALLY BECOME NULL AND VOID. All removed parts and components shall become the property of Thermador). Thermador's sole liability and responsibility hereunder is to have responsibility, for the Product if it is under no responsibility...
User Manual
Page 49
... any structure and setting for the Product, including all defects or damage that accumulate on external surfaces and exposed parts; In no event shall Thermador have been altered, defaced, or removed; Warranty Exclusions The warranty coverage described herein excludes all electrical, plumbing or...any alterations including without limitation cabinetry, walls, floors, shelving, etc.); Also excluded from this warranty are not the direct fault of Thermador, including without limitation, one or more of the following: • Use of breakers or fuses. THIS WARRANTY GIVES YOU SPECIFIC ...
... any structure and setting for the Product, including all defects or damage that accumulate on external surfaces and exposed parts; In no event shall Thermador have been altered, defaced, or removed; Warranty Exclusions The warranty coverage described herein excludes all electrical, plumbing or...any alterations including without limitation cabinetry, walls, floors, shelving, etc.); Also excluded from this warranty are not the direct fault of Thermador, including without limitation, one or more of the following: • Use of breakers or fuses. THIS WARRANTY GIVES YOU SPECIFIC ...
Design Guide
Page 6
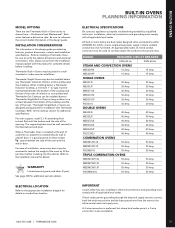
...MEDMCW71JS 50 Amp 50 Amp MEDMCW31JS 50 Amp 50 Amp MEDMCW31JP 50 Amp 50 Amp PODMW301J 50 Amp 50 Amp IMPORTANT Local Codes may be placed in Oven as long as...Each series features a distinctive style. Refer to the cooktop section for details. WARRANTY Limited warranty parts and labor (2 year) See page 308 for complete details before installing into the cabinet. If...additional warranty details. Be sure to the floor/cabinet and level. An electric or non-professional Thermador Gas Cooktop can be well secured to reference the correct model information in this design guide. ...
...MEDMCW71JS 50 Amp 50 Amp MEDMCW31JS 50 Amp 50 Amp MEDMCW31JP 50 Amp 50 Amp PODMW301J 50 Amp 50 Amp IMPORTANT Local Codes may be placed in Oven as long as...Each series features a distinctive style. Refer to the cooktop section for details. WARRANTY Limited warranty parts and labor (2 year) See page 308 for complete details before installing into the cabinet. If...additional warranty details. Be sure to the floor/cabinet and level. An electric or non-professional Thermador Gas Cooktop can be well secured to reference the correct model information in this design guide. ...
Design Guide
Page 8
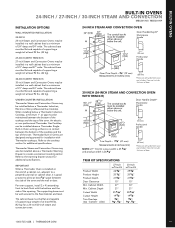
... approved for additional specifications. 557/8" (1165 mm) Trim Depth - 1 5/8" (41 mm) 25/8" (66 mm) *Protrusion of handle from outer part of the opening. TRIM281/K4" IT SPECIFICATIONS (718 mm) IMPORTANT When a Thermador Oven is installed at least 92 lbs. (42 kg). 237/8" (606 mm) 251/2" (647 mm) 22" (559 mm) 557/8" (1165...
... approved for additional specifications. 557/8" (1165 mm) Trim Depth - 1 5/8" (41 mm) 25/8" (66 mm) *Protrusion of handle from outer part of the opening. TRIM281/K4" IT SPECIFICATIONS (718 mm) IMPORTANT When a Thermador Oven is installed at least 92 lbs. (42 kg). 237/8" (606 mm) 251/2" (647 mm) 22" (559 mm) 557/8" (1165...
Design Guide
Page 12
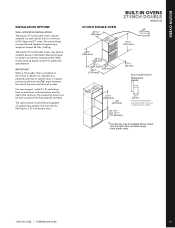
...deep and 27" wide. Masterpiece Handle 21/8" (55 mm) min. 43/4"max. 171/4" (121-438 mm) *Junction box may be installed above a Thermador Warming Drawer 493/4" (1264 mm) to create a convenient cooking center. The supporting base must be well secured to the floor/cabinet and 4le9v3/e4l". (... Door Handle Depth* Masterpiece Handle 21/8" (55 mm) *Protrusion of handle from outer part of door. BUILT-IN OVENS 27" Double BUILT-IN OVENS 27-INCH DOUBLE MED272JS INSTALLATION OPTIONS WALL-MOUNTED INSTALLATION Thermador 27-inch Double Ovens may be installed above, below , or to the right of ...
...deep and 27" wide. Masterpiece Handle 21/8" (55 mm) min. 43/4"max. 171/4" (121-438 mm) *Junction box may be installed above a Thermador Warming Drawer 493/4" (1264 mm) to create a convenient cooking center. The supporting base must be well secured to the floor/cabinet and 4le9v3/e4l". (... Door Handle Depth* Masterpiece Handle 21/8" (55 mm) *Protrusion of handle from outer part of door. BUILT-IN OVENS 27" Double BUILT-IN OVENS 27-INCH DOUBLE MED272JS INSTALLATION OPTIONS WALL-MOUNTED INSTALLATION Thermador 27-inch Double Ovens may be installed above, below , or to the right of ...
