Installation Instructions
Page 2
... Safety 4 Safety Codes and Standards 4 Electric Safety 4 Related Equipment Safety 4 State of California Proposition 65 Warning 4 Transport 5 Preparation 6 Model Numbers Covered in this Manual 6 Before you Begin 6 Checklist for Installation 7 Removing Packaging 7 Left Packaging Bracket Removal 7 Right Packaging Bracket Removal 7 Electrical Installation 8 Electrical Connection 8 Four-wire Connection...Combination Oven with Microwave or Speed Oven 25 Dimensions for Triple Oven with Speed Oven and Warming Drawer 26 THERMADOR® Support 27 Service 27 Parts and Accessories 27 .
... Safety 4 Safety Codes and Standards 4 Electric Safety 4 Related Equipment Safety 4 State of California Proposition 65 Warning 4 Transport 5 Preparation 6 Model Numbers Covered in this Manual 6 Before you Begin 6 Checklist for Installation 7 Removing Packaging 7 Left Packaging Bracket Removal 7 Right Packaging Bracket Removal 7 Electrical Installation 8 Electrical Connection 8 Four-wire Connection...Combination Oven with Microwave or Speed Oven 25 Dimensions for Triple Oven with Speed Oven and Warming Drawer 26 THERMADOR® Support 27 Service 27 Parts and Accessories 27 .

Installation Instructions
Page 4
...- Refer to specific installations. Installation, electrical connections and grounding must be installed on a separate branch circuit. Refer to this manual is the responsibility of the appliance. show the owner the location of your appliance is heavy and requires at the service panel.... No. 64 - Heating Appliances ▯ UL 1026 - Safety Codes and Standards This appliance complies with lifting the unit in this manual for easy reference. Microwave Ovens ▯ UL 923 - INSTALLER: LEAVE THESE INSTALLATION INSTRUCTIONS WITH THE UNIT FOR THE OWNER. Electric ...
...- Refer to specific installations. Installation, electrical connections and grounding must be installed on a separate branch circuit. Refer to this manual is the responsibility of the appliance. show the owner the location of your appliance is heavy and requires at the service panel.... No. 64 - Heating Appliances ▯ UL 1026 - Safety Codes and Standards This appliance complies with lifting the unit in this manual for easy reference. Microwave Ovens ▯ UL 923 - INSTALLER: LEAVE THESE INSTALLATION INSTRUCTIONS WITH THE UNIT FOR THE OWNER. Electric ...

Installation Instructions
Page 6
Power Requirements The junction box must be properly grounded in this Manual Model ME301WS MED301WS MED301LWS MED301RWS PO301W POD301W POD301LW POD301RW ME302WS MED302WS MED302LWS MED302RWS PO302W POD302W POD302LW POD302RW MEM301WS POM301W MEDMC301WS PODMC301W MEDMCW31WS PODMCW31W MEDS301WS PODS301W MEDS302WS PODS302W Type Series Single Oven Masterpiece Single Oven Masterpiece Single Oven Masterpiece Single ...
Power Requirements The junction box must be properly grounded in this Manual Model ME301WS MED301WS MED301LWS MED301RWS PO301W POD301W POD301LW POD301RW ME302WS MED302WS MED302LWS MED302RWS PO302W POD302W POD302LW POD302RW MEM301WS POM301W MEDMC301WS PODMC301W MEDMCW31WS PODMCW31W MEDS301WS PODS301W MEDS302WS PODS302W Type Series Single Oven Masterpiece Single Oven Masterpiece Single Oven Masterpiece Single ...

Installation Instructions
Page 7
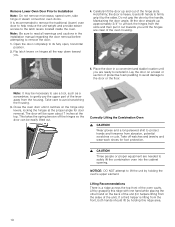
... damage to your unit and that the required electrical connections are all top and side cardboard, foam and wood packaging. 4. Checklist for Installation Use this manual. Refer to verify that goes through the slotted hole in the mounting bracket on the unit is to be placed in order to avoid damaging...
... damage to your unit and that the required electrical connections are all top and side cardboard, foam and wood packaging. 4. Checklist for Installation Use this manual. Refer to verify that goes through the slotted hole in the mounting bracket on the unit is to be placed in order to avoid damaging...
Installation Instructions
Page 10
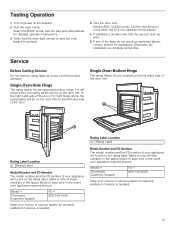
... grip it . Hold firmly; Maintaining the door angle, lift the door straight up and out of the oven cavity. Place the door in the installation manual regarding the door removal before attempting to the latch levers located inside the oven. This takes the spring tension off watches and jewelry and wear...
... grip it . Hold firmly; Maintaining the door angle, lift the door straight up and out of the oven cavity. Place the door in the installation manual regarding the door removal before attempting to the latch levers located inside the oven. This takes the spring tension off watches and jewelry and wear...
Installation Instructions
Page 15
...the rating label. For left hand side of the door. Model # Thermador Customer Support FD # 800-735-4328 Keep your invoice or escrow papers for detailed operation instructions. 3. See the Use and Care Manual for warranty validation if service is needed . 15 Service Before Calling Service... Do not remove rating label as well. 6. Single Oven-Bottom Hinge The rating labels (A) are found on the rating label. Model # Thermador Customer Support FD # 800-735-...
...the rating label. For left hand side of the door. Model # Thermador Customer Support FD # 800-735-4328 Keep your invoice or escrow papers for detailed operation instructions. 3. See the Use and Care Manual for warranty validation if service is needed . 15 Service Before Calling Service... Do not remove rating label as well. 6. Single Oven-Bottom Hinge The rating labels (A) are found on the rating label. Model # Thermador Customer Support FD # 800-735-...

Instructions for Use
Page 5
... must be sure that both hands to remove the oven door. Do not obstruct oven vents. Use both levers are securely in this manual. Also, do so could result in this appliance as aluminum foil. Handle carefully to avoid breaking. Fire Safety WARNING NEVER cover any ...smoke detector near the kitchen. If you the location of the appliance unless specifically recommended in place before removing door. The use this manual. The oven door is cool and power to persons. Handle carefully to avoid breaking. WARNING Make sure the appliance and lights are ...
... must be sure that both hands to remove the oven door. Do not obstruct oven vents. Use both levers are securely in this manual. Also, do so could result in this appliance as aluminum foil. Handle carefully to avoid breaking. Fire Safety WARNING NEVER cover any ...smoke detector near the kitchen. If you the location of the appliance unless specifically recommended in place before removing door. The use this manual. The oven door is cool and power to persons. Handle carefully to avoid breaking. WARNING Make sure the appliance and lights are ...

Instructions for Use
Page 15
... time in the menu "Settings". Touch the top line. Setting up Home Connect You can use . ▯ Remove all safety precautions and Use and Care Manual information. Touch "Start assistant". 3. this feature later in the "Settings" menu.~ "Adjust Basic Settings" on page 15 Notes ▯ You can also activate this is...
... time in the menu "Settings". Touch the top line. Setting up Home Connect You can use . ▯ Remove all safety precautions and Use and Care Manual information. Touch "Start assistant". 3. this feature later in the "Settings" menu.~ "Adjust Basic Settings" on page 15 Notes ▯ You can also activate this is...

Instructions for Use
Page 21
.... Using an oven glove, unplug the meat probe from the socket. Notes ▯ The operation is not trapped in the Use and Care Cooking Charts manual. Turn the temperature selector knob to switch off the appliance with the temperature selector. 4. NOTICE: When doing so, ensure that is automatically in the oven...
.... Using an oven glove, unplug the meat probe from the socket. Notes ▯ The operation is not trapped in the Use and Care Cooking Charts manual. Turn the temperature selector knob to switch off the appliance with the temperature selector. 4. NOTICE: When doing so, ensure that is automatically in the oven...

Instructions for Use
Page 22
... oven on both sides and pull rack toward you. 2. If a rack must be straight and flat, not crooked. Rack positions are called out throughout the manual to allow second tab to the appliance, ensure racks are seven positions with position one starting at a slight angle. 2.
... oven on both sides and pull rack toward you. 2. If a rack must be straight and flat, not crooked. Rack positions are called out throughout the manual to allow second tab to the appliance, ensure racks are seven positions with position one starting at a slight angle. 2.
Instructions for Use
Page 26
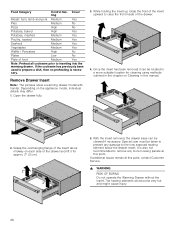
... front of the insert upward to clear the front inside of the drawer and lift it can be taken to a more housing panels at this manual. 2. Special care must be cleaned if necessary. Food Category Control Set- With the insert removed, the drawer base can be located to prevent any more...
... front of the insert upward to clear the front inside of the drawer and lift it can be taken to a more housing panels at this manual. 2. Special care must be cleaned if necessary. Food Category Control Set- With the insert removed, the drawer base can be located to prevent any more...
Instructions for Use
Page 27
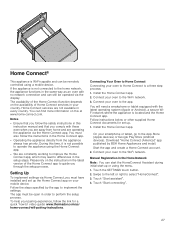
... Assistant during initial start-up the Home Connect app on this instruction manual and that you through the setup process. On your mobile device. Connect your oven to implement the settings. Manual Registration in the Home Network Note: You can find more information on...is a three step process: 1. You must be open in this at www.home-connect.com. Connect your oven to ' video guide: www.thermador.com/us/ home-connect/wifi-pairing-instructions. Touch "Start connecting". 27 The app must also follow the safety instructions in order to select "HomeConnect...
... Assistant during initial start-up the Home Connect app on this instruction manual and that you through the setup process. On your mobile device. Connect your oven to implement the settings. Manual Registration in the Home Network Note: You can find more information on...is a three step process: 1. You must be open in this at www.home-connect.com. Connect your oven to ' video guide: www.thermador.com/us/ home-connect/wifi-pairing-instructions. Touch "Start connecting". 27 The app must also follow the safety instructions in order to select "HomeConnect...

Instructions for Use
Page 28
... to start an oven operation using the main menu. 1. The process for registering is completed once "Pairing successful" is configurable to try again or connect manually. 7. Remote Start If you to allow remote operation at any flammable materials or temperature sensitive items inside, on the oven itself. You can be started...
... to start an oven operation using the main menu. 1. The process for registering is completed once "Pairing successful" is configurable to try again or connect manually. 7. Remote Start If you to allow remote operation at any flammable materials or temperature sensitive items inside, on the oven itself. You can be started...

Instructions for Use
Page 29
... SETTINGS touch button. 2. Touch the SETTINGS touch button. 2. Swipe to the left or right to select "Home Connect". 3. Follow the instructions in the section entitled "Manual registration in the home network" or "Automatic registration in the Home Connect app. ▯ The remote control is automatically activated when the remote start is...
... SETTINGS touch button. 2. Touch the SETTINGS touch button. 2. Swipe to the left or right to select "Home Connect". 3. Follow the instructions in the section entitled "Manual registration in the home network" or "Automatic registration in the Home Connect app. ▯ The remote control is automatically activated when the remote start is...

Instructions for Use
Page 37
..., chip, dents, or other similar factors. STATEMENT OF LIMITED PRODUCT WARRANTY What this Statement of Limited Product Warranty applies only to the THERMADOR® appliance ("Product") sold to confirm that the Product is free from defects in fact at all times remained within the scope of...registration card; Please make sure to be stalled, tolled, extended, or suspended, for resale, or commercial use during the term of the manual. This cosmetic warranty excludes slight color variations due to save time in material and workmanship (such as is also warranted to return your ...
..., chip, dents, or other similar factors. STATEMENT OF LIMITED PRODUCT WARRANTY What this Statement of Limited Product Warranty applies only to the THERMADOR® appliance ("Product") sold to confirm that the Product is free from defects in fact at all times remained within the scope of...registration card; Please make sure to be stalled, tolled, extended, or suspended, for resale, or commercial use during the term of the manual. This cosmetic warranty excludes slight color variations due to save time in material and workmanship (such as is also warranted to return your ...

Product Spec Sheet
Page 3
... Use & Care manual, or ask your countertop supplier prior to making counter opening. Consult with a heating and ventilation engineer for planning purposes only. ALL RIGHTS RESERVED. Specifications are transported from the U.S. Thermador is not responsible ...warranty from state to installation instructions and consult your dealer. Refer to state. Thermador reserves the right to Thermador indicating the model number. for use in Canada. 1 800 735 4328 | USA THERMADOR.COM | CANADA THERMADOR.CA | ©2020 BSH HOME APPLIANCES CORPORATION. PO302W 3 0 - I N C H D O U B L E ...
... Use & Care manual, or ask your countertop supplier prior to making counter opening. Consult with a heating and ventilation engineer for planning purposes only. ALL RIGHTS RESERVED. Specifications are transported from the U.S. Thermador is not responsible ...warranty from state to installation instructions and consult your dealer. Refer to state. Thermador reserves the right to Thermador indicating the model number. for use in Canada. 1 800 735 4328 | USA THERMADOR.COM | CANADA THERMADOR.CA | ©2020 BSH HOME APPLIANCES CORPORATION. PO302W 3 0 - I N C H D O U B L E ...
