Design Guide - Professional Rangetops
Page 4
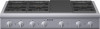
...gas. Installation, electrical and gas connections, and grounding must be 40"or greater distance above the cooking surface. mODEL PCG304G PCG364GD PCG366G PCG486GD REQuIRED CIRCuIT BREakER 120V AC, 60Hz 15 Amp 15 Amp 15 Amp 15 Amp GaS REQuIREmEnTS anD HOOkuP Rangetops are also a viable... information. PROFESSIOnaL SERIES RanGETOPS PROFESSIOnaL SERIES RanGETOPS PLannInG InFORmaTIOn mODEL OPTIOnS There are three sizes of Thermador Professional Rangetops to choose from-30-inch, 36-inch and 48-inch. 36-inch rangetops are CGA and AGA approved. Be sure to the warming drawer section...
...gas. Installation, electrical and gas connections, and grounding must be 40"or greater distance above the cooking surface. mODEL PCG304G PCG364GD PCG366G PCG486GD REQuIRED CIRCuIT BREakER 120V AC, 60Hz 15 Amp 15 Amp 15 Amp 15 Amp GaS REQuIREmEnTS anD HOOkuP Rangetops are also a viable... information. PROFESSIOnaL SERIES RanGETOPS PROFESSIOnaL SERIES RanGETOPS PLannInG InFORmaTIOn mODEL OPTIOnS There are three sizes of Thermador Professional Rangetops to choose from-30-inch, 36-inch and 48-inch. 36-inch rangetops are CGA and AGA approved. Be sure to the warming drawer section...
Design Guide - Professional Rangetops
Page 11
... Signature blue indicator lighting - Patented Pedestal Star® Burner with exclusive ExtraLow® - PROFESSIONAL SERIES RANGETOPS 48-INch Model: PcG486GD PROFESSIONAL PCG486GD - 48-inch Porcelain Surface SPEcIFIcATIONS Total Number of simmer options from Rear Wall Cooking Surface Gas Cooktop Burners Center Electric Griddle... 6 pass, 1,630 W 108,000 BTU Order Kit PALPKITHC 90,000 BTU 120V AC, 60 Hz 15 Amp 96", 3-Wire 188 PcG486GD PERFORMANcE - Precision simmering capabilities as low as 100°F (375 BTU) with rangetop AccESSORIES Important Note: A 12" Low Backguard or...
... Signature blue indicator lighting - Patented Pedestal Star® Burner with exclusive ExtraLow® - PROFESSIONAL SERIES RANGETOPS 48-INch Model: PcG486GD PROFESSIONAL PCG486GD - 48-inch Porcelain Surface SPEcIFIcATIONS Total Number of simmer options from Rear Wall Cooking Surface Gas Cooktop Burners Center Electric Griddle... 6 pass, 1,630 W 108,000 BTU Order Kit PALPKITHC 90,000 BTU 120V AC, 60 Hz 15 Amp 96", 3-Wire 188 PcG486GD PERFORMANcE - Precision simmering capabilities as low as 100°F (375 BTU) with rangetop AccESSORIES Important Note: A 12" Low Backguard or...
Design Guide - Professional Rangetops
Page 12
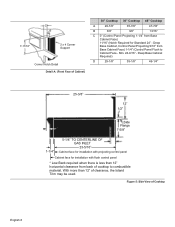
...on . The rangetop is accessible without requiring removal of the rangetop. For island installations and other installations with all Thermador Professional Rangetops. if the location/job site requires conversion from cooking surface to combustible side wall. IMPORTANT We strongly ... rangetop. Downdraft ventilation should be located within 3 feet (~900 mm) of the rangetop connection. PROFESSIONAL SERIES RANGETOPS 48-INch Model: PcG486GD 48-inCH RAnGETOP AnD CUTOUT DiMEnSiOnS *specify width * Minimum hood width recommended equals that must be installed above the rangetop...
...on . The rangetop is accessible without requiring removal of the rangetop. For island installations and other installations with all Thermador Professional Rangetops. if the location/job site requires conversion from cooking surface to combustible side wall. IMPORTANT We strongly ... rangetop. Downdraft ventilation should be located within 3 feet (~900 mm) of the rangetop connection. PROFESSIONAL SERIES RANGETOPS 48-INch Model: PcG486GD 48-inCH RAnGETOP AnD CUTOUT DiMEnSiOnS *specify width * Minimum hood width recommended equals that must be installed above the rangetop...
Installation Instructions PART3
Page 4
... 120 VAC, 60 Hz., 1 Ph., 10 Amp circuit 4 Burners with Electric Griddle - 120 VAC, 60 Hz., 1 Ph., 15 Amp circuit 48" Model: 6 Burners with the installation. All sealed burners are in Recreational Park Trailers. Safety Instructions Important Safety Instructions READ AND SAVE THESE INSTRUCTIONS APPROVED FOR...provided. OWNER: Please retain these Instructions for the Local Electrical Inspector's use. water column (14.9 mb to 14"max. The Thermador Low Back backguard must be sure that the appliance is NOT designed for installation in the "BEFORE CALLING FOR SERVICE" section near the...
... 120 VAC, 60 Hz., 1 Ph., 10 Amp circuit 4 Burners with Electric Griddle - 120 VAC, 60 Hz., 1 Ph., 15 Amp circuit 48" Model: 6 Burners with the installation. All sealed burners are in Recreational Park Trailers. Safety Instructions Important Safety Instructions READ AND SAVE THESE INSTRUCTIONS APPROVED FOR...provided. OWNER: Please retain these Instructions for the Local Electrical Inspector's use. water column (14.9 mb to 14"max. The Thermador Low Back backguard must be sure that the appliance is NOT designed for installation in the "BEFORE CALLING FOR SERVICE" section near the...
Installation Instructions PART3
Page 6
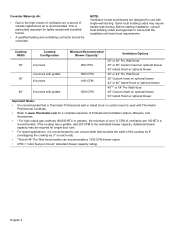
...recommended. NOTE: Ventilation hoods and blowers are designed for longer duct runs. • For island applications, it is recommended to www.Thermador.com for tightly sealed and insulated homes. • A qualified heating and ventilating contractor should be required for use a hood width... consult local building codes and agencies to insure that a Thermador Professional wall or island hood or custom insert is used with Thermador Professional Cooktops. • Refer to use with griddle 1300 CFM 48"** or 54" Pro Wall Hood 48" Custom Insert w/ optional blower 54" Island Hood w/ ...
...recommended. NOTE: Ventilation hoods and blowers are designed for longer duct runs. • For island applications, it is recommended to www.Thermador.com for tightly sealed and insulated homes. • A qualified heating and ventilating contractor should be required for use a hood width... consult local building codes and agencies to insure that a Thermador Professional wall or island hood or custom insert is used with Thermador Professional Cooktops. • Refer to use with griddle 1300 CFM 48"** or 54" Pro Wall Hood 48" Custom Insert w/ optional blower 54" Island Hood w/ ...

Installation Instructions PART3
Page 7
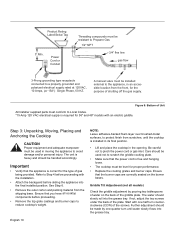
...; It may be maintained, as the center of the supporting deck. A 30-inch distance can be necessary to combustible material is protected by -side Thermador Warming Drawers, Model No. WD24, refer to accept the island hood. 3. English 5 Step 2: Cabinet Preparation 1. The clearances shown in the "National...strong enough to set the cooktop on the countertop's depth. (See Figure 5, side view of the right-side warming drawer. Establish the centerline of a 48" cooktop above two side-by not less than No. 28 MSG sheet steel, 0.015 inch (0.4 mm) thick stainless steel, 0.024 inch (0.6 mm...
...; It may be maintained, as the center of the supporting deck. A 30-inch distance can be necessary to combustible material is protected by -side Thermador Warming Drawers, Model No. WD24, refer to accept the island hood. 3. English 5 Step 2: Cabinet Preparation 1. The clearances shown in the "National...strong enough to set the cooktop on the countertop's depth. (See Figure 5, side view of the right-side warming drawer. Establish the centerline of a 48" cooktop above two side-by not less than No. 28 MSG sheet steel, 0.015 inch (0.4 mm) thick stainless steel, 0.024 inch (0.6 mm...
Installation Instructions PART3
Page 8
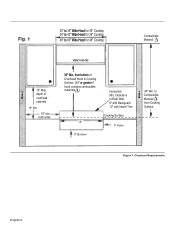
Clearance to 60" Wide Hood for 48" Cooktop Combustible Material 13" Max. depth of Overhead Hood to Cooking Surface (40" or greater if hood contains combustible materials ). to Combustible Material from bottom of overhead cabinets 18" Min 10" min. . both sides VENT HOOD 30" Min. "A" 0" Bottom Horizontal Min. from Cooking Surface. Figure 1: Clearance Requirements English 6 30" to 36" Wide Hood for 30" Cooktop 36" to 42" Wide Hood for 36" Cooktop 48" to Rear Wall: 0" with Backguard 12" with Island Trim Cooking Surface 0" Sides 40" Min.
Clearance to 60" Wide Hood for 48" Cooktop Combustible Material 13" Max. depth of Overhead Hood to Cooking Surface (40" or greater if hood contains combustible materials ). to Combustible Material from bottom of overhead cabinets 18" Min 10" min. . both sides VENT HOOD 30" Min. "A" 0" Bottom Horizontal Min. from Cooking Surface. Figure 1: Clearance Requirements English 6 30" to 36" Wide Hood for 30" Cooktop 36" to 42" Wide Hood for 36" Cooktop 48" to Rear Wall: 0" with Backguard 12" with Island Trim Cooking Surface 0" Sides 40" Min.
Installation Instructions PART3
Page 9
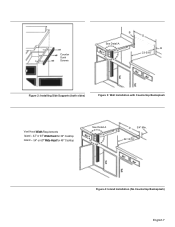
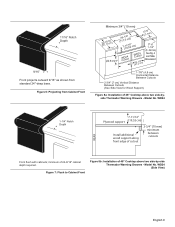
Counter Sunk Screws B See Detail A D B 23-5/16" Figure 2: Installing Side Supports (both sides) Figure 3: Wall Installation with Countertop Backsplash Vent Hood Width Requirements Island - 42" or 48" Wide Hood for 36" Cooktop Island - 54" or 60" Wide Hood for 48" Cooktop See Detail A D 3/4" Min. 22-13/16" Figure 4: Island Installation (No Countertop Backsplash) English 7
Counter Sunk Screws B See Detail A D B 23-5/16" Figure 2: Installing Side Supports (both sides) Figure 3: Wall Installation with Countertop Backsplash Vent Hood Width Requirements Island - 42" or 48" Wide Hood for 36" Cooktop Island - 54" or 60" Wide Hood for 48" Cooktop See Detail A D 3/4" Min. 22-13/16" Figure 4: Island Installation (No Countertop Backsplash) English 7
Installation Instructions PART3
Page 10
... View of clearance, the Island Trim may be used. 7-11/16" C B 2 x 4 Corner Support Corner Notch Detail Detail A: (Front Face of Cabinet) 30" Cooktop 36" Cooktop 48" Cooktop A 29-7/8" 35-7/8" 47-7/8" B 3/8" 3/8" 13/16" C 0" (Control Panel Projecting 1-1/4" from back of cooktop to Cabinet Face - Min. 24-9/16" - With more than 12" horizontal clearance...
... View of clearance, the Island Trim may be used. 7-11/16" C B 2 x 4 Corner Support Corner Notch Detail Detail A: (Front Face of Cabinet) 30" Cooktop 36" Cooktop 48" Cooktop A 29-7/8" 35-7/8" 47-7/8" B 3/8" 3/8" 13/16" C 0" (Control Panel Projecting 1-1/4" from back of cooktop to Cabinet Face - Min. 24-9/16" - With more than 12" horizontal clearance...
Installation Instructions PART3
Page 11
... Front Minimum 3/4" (19 mm) 2(527-1, 39/1c6m") (14167-1,5/4c"m) 7-(1119/,1562"cm) 1(32/116m"m) 0" to Cabinet Front Figure 8b: Installation of 48" Cooktop above two side-byside Thermador Warming Drawers - WD24 1-1/4" Notch Depth REAR 7-11/16" Plywood support (19,52 cm) Install additional wood support along front edge of 24-9/16... Dimension C (2527-,12/2cm" ) 1-7/8" (4,8 cm) Horizontal Distance Between Cutouts 2-3/4" (7 cm) Vertical Distance Between Cutouts (See Side View for Wood Support) Figure 8a: Installation of 48" Cooktop above two side-by-side Thermador Warming Drawers -
... Front Minimum 3/4" (19 mm) 2(527-1, 39/1c6m") (14167-1,5/4c"m) 7-(1119/,1562"cm) 1(32/116m"m) 0" to Cabinet Front Figure 8b: Installation of 48" Cooktop above two side-byside Thermador Warming Drawers - WD24 1-1/4" Notch Depth REAR 7-11/16" Plywood support (19,52 cm) Install additional wood support along front edge of 24-9/16... Dimension C (2527-,12/2cm" ) 1-7/8" (4,8 cm) Horizontal Distance Between Cutouts 2-3/4" (7 cm) Vertical Distance Between Cutouts (See Side View for Wood Support) Figure 8a: Installation of 48" Cooktop above two side-by-side Thermador Warming Drawers -
Installation Instructions PART3
Page 12
...) Check the griddle adjustment by one half turn until the cooktop is free and hanging loose. • The cooktop must be level for 36" and 48" models with an electric griddle. Be careful not to a properly grounded and polarized electrical supply rated at 120VAC, 10 Amps, (or 15A*) Single Phase, 60...
...) Check the griddle adjustment by one half turn until the cooktop is free and hanging loose. • The cooktop must be level for 36" and 48" models with an electric griddle. Be careful not to a properly grounded and polarized electrical supply rated at 120VAC, 10 Amps, (or 15A*) Single Phase, 60...
Installation Instructions PART3
Page 15
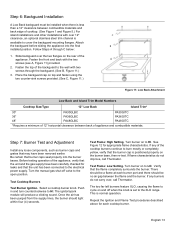
... been purged from the supply lines, the burner should be a flame at each cooktop burner. If any burners do not improve, call Thermador. Place the backguard cap on to the XLO range. Test Flame: Low Setting. Verify that the flame completely surrounds the burner. See ... Low Back Attachment Low Back and Island Trim Model Numbers Cooktop Size/Type 12" Low Back Island Trim* 30" PA30GLBC PA30GITC 36" PA36GLBC PA36GITC 48" PA48GLBC PA48GITC *Requires a minimum of 12" horizontal clearance between back of cooktop. (See Figure 1 and Figure 5.) For island installations and other...
... been purged from the supply lines, the burner should be a flame at each cooktop burner. If any burners do not improve, call Thermador. Place the backguard cap on to the XLO range. Test Flame: Low Setting. Verify that the flame completely surrounds the burner. See ... Low Back Attachment Low Back and Island Trim Model Numbers Cooktop Size/Type 12" Low Back Island Trim* 30" PA30GLBC PA30GITC 36" PA36GLBC PA36GITC 48" PA48GLBC PA48GITC *Requires a minimum of 12" horizontal clearance between back of cooktop. (See Figure 1 and Figure 5.) For island installations and other...
User Manual
Page 3
... National Electrical Code ANSI/NFPA No. 70 current issue or the Can - Verify that it is Thermador Model PALPKITHC. PCG 48 6 Model & Parts Identification - INTRODUCTION IMPORTANT All Cooktops having less than 12" (305 mm) horizontal clearance exists, a Thermador Island Trim may be done by the appliance. Refer to the pressure regulator supplied with...
... National Electrical Code ANSI/NFPA No. 70 current issue or the Can - Verify that it is Thermador Model PALPKITHC. PCG 48 6 Model & Parts Identification - INTRODUCTION IMPORTANT All Cooktops having less than 12" (305 mm) horizontal clearance exists, a Thermador Island Trim may be done by the appliance. Refer to the pressure regulator supplied with...

User Manual
Page 7
... you have all the items listed for the First Time 1. BEFORE USING YOUR ELECTRIC GRIDDLE THE FIRST TIME Clean the surface with Griddle 36" 6-Burner 48"withGriddle 30" 4-Burner Star Burner caps 4 6 6 4 Burner Grates 2 3 3 2 Center Grate 1 Control Knobs 5 6 7 4 Coated Aluminum 1 1 Griddle Product Registration Card 1 1 1 1 Backguard Installation Instructions * * * * ... be used for any future contacts with the cooktop. Check that the burner caps are available from your Thermador dealer. 4. then mail it to use. 5 Description 36" with hot soapy water.
... you have all the items listed for the First Time 1. BEFORE USING YOUR ELECTRIC GRIDDLE THE FIRST TIME Clean the surface with Griddle 36" 6-Burner 48"withGriddle 30" 4-Burner Star Burner caps 4 6 6 4 Burner Grates 2 3 3 2 Center Grate 1 Control Knobs 5 6 7 4 Coated Aluminum 1 1 Griddle Product Registration Card 1 1 1 1 Backguard Installation Instructions * * * * ... be used for any future contacts with the cooktop. Check that the burner caps are available from your Thermador dealer. 4. then mail it to use. 5 Description 36" with hot soapy water.

User Manual
Page 8
... Grate - Griddle 4 - Control Knobs, Standard Burners 5 - Burner Grates & Burners 3 - Control Knobs, ExtraLow® Burners 5 - Control Knobs, Standard Burners 7 - Section 3: DESCRIPTION MODEL AND PARTS IDENTIFICATION FOR 48" MODEL Key 1 - 12" Low Back or Island Trim (ordered separately) 2 - Control Knob, Griddle Thermostat 6 - Griddle 4 -
... Grate - Griddle 4 - Control Knobs, Standard Burners 5 - Burner Grates & Burners 3 - Control Knobs, ExtraLow® Burners 5 - Control Knobs, Standard Burners 7 - Section 3: DESCRIPTION MODEL AND PARTS IDENTIFICATION FOR 48" MODEL Key 1 - 12" Low Back or Island Trim (ordered separately) 2 - Control Knob, Griddle Thermostat 6 - Griddle 4 -