Design Guide - Professional Rangetops
Page 4
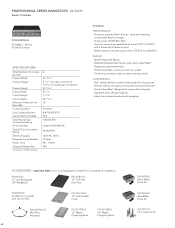
... guide. WaRRanTy Limited warranty parts and labor (1 year) See page 294 for further information. A dedicated circuit breaker is recommended. Please refer to verify the cutout dimensions and electrical/gas connections. The supply line must , at a minimum, overhang the appliance cooking surface by qualified service personnel only. WIDTH COnFIGuRaTIOn VEnTILaTIOn OPTIOnS 30" or 36" Pro Wall Hood 30" 4 Burners 30" or 36" Custom Insert w/optional blower 42" Island Hood w/optional blower 4 Burners w/Grill...
... guide. WaRRanTy Limited warranty parts and labor (1 year) See page 294 for further information. A dedicated circuit breaker is recommended. Please refer to verify the cutout dimensions and electrical/gas connections. The supply line must , at a minimum, overhang the appliance cooking surface by qualified service personnel only. WIDTH COnFIGuRaTIOn VEnTILaTIOn OPTIOnS 30" or 36" Pro Wall Hood 30" 4 Burners 30" or 36" Custom Insert w/optional blower 42" Island Hood w/optional blower 4 Burners w/Grill...
Design Guide - Professional Rangetops
Page 5
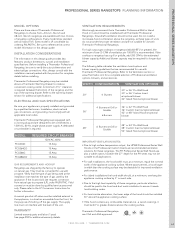
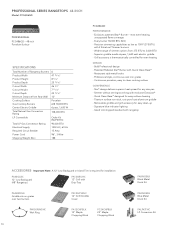
... (30" Rangetop) PA12GRILhC 12" Grill Accessory with 2 ExtraLow® Simmer burners - Star® design delivers superior heat spread for any size pan - PROFESSIONAL SERIES RANGETOPS 30-INCh model: PCG304G PROFESSIONAL PCG304G - 30-Inch Porcelain Surface SPECIFICATIONS Total Number of simmer options from Rear Wall Cooking Surface Gas Cooktop Burners Center Front Burner Center Back Burner Center Electric Griddle Total Natural Gas Connection Rating LP Convertible Total LP Gas Connection Rating Electrical Supply Required Circuit Breaker Power Cord Shipping Weight (lbs.) 29...
... (30" Rangetop) PA12GRILhC 12" Grill Accessory with 2 ExtraLow® Simmer burners - Star® design delivers superior heat spread for any size pan - PROFESSIONAL SERIES RANGETOPS 30-INCh model: PCG304G PROFESSIONAL PCG304G - 30-Inch Porcelain Surface SPECIFICATIONS Total Number of simmer options from Rear Wall Cooking Surface Gas Cooktop Burners Center Front Burner Center Back Burner Center Electric Griddle Total Natural Gas Connection Rating LP Convertible Total LP Gas Connection Rating Electrical Supply Required Circuit Breaker Power Cord Shipping Weight (lbs.) 29...

Design Guide - Professional Rangetops
Page 6
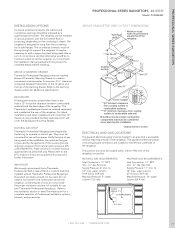
... install a microwave-hood combination above a Thermador Warming Drawer to 34.9 mb) Manifold Pressure: 10" water column (24.9 mb) 1.800.735.4328 | THERMADOR.COM 65 If the location/job site requires conversion from cooking surface to support the rangetop. The appliance electrical power cord and gas pipe connection are shipped by qualified service personnel only. to propane (LP), order PALPKITHC. A minimum 2 3/4" clearance is less than 12" clearance, the provided stainless steel...
... install a microwave-hood combination above a Thermador Warming Drawer to 34.9 mb) Manifold Pressure: 10" water column (24.9 mb) 1.800.735.4328 | THERMADOR.COM 65 If the location/job site requires conversion from cooking surface to support the rangetop. The appliance electrical power cord and gas pipe connection are shipped by qualified service personnel only. to propane (LP), order PALPKITHC. A minimum 2 3/4" clearance is less than 12" clearance, the provided stainless steel...
Design Guide - Professional Rangetops
Page 7
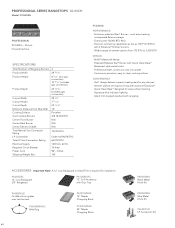
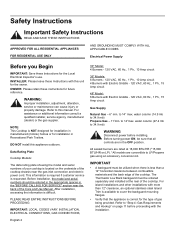
... Note: A 12" Low Backguard or Island Trim is required for installation PA36GLBC 12" Low Backguard (36" Rangetop) PA12GRILhC 12" Grill with 2 ExtraLow® Simmer burners - PROFESSIONAL SERIES RANGETOPS 36-INCh model: PCG364GD PROFESSIONAL PCG364GD - 36-Inch Porcelain Surface SPECIFICATIONS Total Number of simmer options from Rear Wall Cooking Surface Gas Cooktop Burners Center Front Burner Center Back Burner Center Electric Griddle Total Natural Gas Connection Rating LP Convertible Total LP Gas Connection Rating Electrical Supply Required Circuit Breaker Power Cord Shipping Weight (lbs...
... Note: A 12" Low Backguard or Island Trim is required for installation PA36GLBC 12" Low Backguard (36" Rangetop) PA12GRILhC 12" Grill with 2 ExtraLow® Simmer burners - PROFESSIONAL SERIES RANGETOPS 36-INCh model: PCG364GD PROFESSIONAL PCG364GD - 36-Inch Porcelain Surface SPECIFICATIONS Total Number of simmer options from Rear Wall Cooking Surface Gas Cooktop Burners Center Front Burner Center Back Burner Center Electric Griddle Total Natural Gas Connection Rating LP Convertible Total LP Gas Connection Rating Electrical Supply Required Circuit Breaker Power Cord Shipping Weight (lbs...

Design Guide - Professional Rangetops
Page 8
... not install a microwave-hood combination above a Thermador Warming Drawer to propane (LP), order PALPKITHC. measurement in inches ELECTRICaL anD GaS LOCaTIOnS The gas and electrical supply must be ordered separately and installed at the installation site matches the type of the rangetop. The rangetop can be installed in an area that of the warming drawer. A minimum 2 3/4" clearance is less than 12" clearance, the provided stainless steel island trim will cover the backguard mounting...
... not install a microwave-hood combination above a Thermador Warming Drawer to propane (LP), order PALPKITHC. measurement in inches ELECTRICaL anD GaS LOCaTIOnS The gas and electrical supply must be ordered separately and installed at the installation site matches the type of the rangetop. The rangetop can be installed in an area that of the warming drawer. A minimum 2 3/4" clearance is less than 12" clearance, the provided stainless steel island trim will cover the backguard mounting...
Design Guide - Professional Rangetops
Page 9
... burners PA12GcvRhc 12" Grill/Griddle Cover PWOKRINGhc Wok Ring Accessory PA12chPBLK 12" Maple Chopping Block Pc24chPBLK 24" Maple Chopping Block 68 PAKNOBLK Black Metal Knob Kit PAKNOBLU Blue Metal Knob Kit PALPKIThc LP Conversion Kit PROFESSIONAL SERIES RANGETOPS 36-INch Model: PcG366G PROFESSIONAL PCG366G - 36-Inch Porcelain Surface SPEcIFIcATIONS Total Number of simmer options from Rear Wall Cooking Surface Gas Cooktop Burners Center Electric Griddle Total Natural Gas Connection Rating LP Convertible Total LP Gas Connection Rating Electrical Supply Required Circuit Breaker Power...
... burners PA12GcvRhc 12" Grill/Griddle Cover PWOKRINGhc Wok Ring Accessory PA12chPBLK 12" Maple Chopping Block Pc24chPBLK 24" Maple Chopping Block 68 PAKNOBLK Black Metal Knob Kit PAKNOBLU Blue Metal Knob Kit PALPKIThc LP Conversion Kit PROFESSIONAL SERIES RANGETOPS 36-INch Model: PcG366G PROFESSIONAL PCG366G - 36-Inch Porcelain Surface SPEcIFIcATIONS Total Number of simmer options from Rear Wall Cooking Surface Gas Cooktop Burners Center Electric Griddle Total Natural Gas Connection Rating LP Convertible Total LP Gas Connection Rating Electrical Supply Required Circuit Breaker Power...

Design Guide - Professional Rangetops
Page 10
... 36-INCH RANGETOP AND CuTOuT DIMENSIONS *specify width * Minimum hood width recommended equals that a Thermador Professional Wall or Island Hood or Custom Insert be necessary to support the rangetop. naTuRaL GaS REQuIREmEnTS: Inlet Connection: 1/2" NPT (min. 3/4" dia. flex line) Supply Pressure: 6" min. The countertop however, must be considered when planning the installation. BaCkGuaRD A backguard must be done by the factory to combustible side wall. If the location/job site requires conversion from cooking surface...
... 36-INCH RANGETOP AND CuTOuT DIMENSIONS *specify width * Minimum hood width recommended equals that a Thermador Professional Wall or Island Hood or Custom Insert be necessary to support the rangetop. naTuRaL GaS REQuIREmEnTS: Inlet Connection: 1/2" NPT (min. 3/4" dia. flex line) Supply Pressure: 6" min. The countertop however, must be considered when planning the installation. BaCkGuaRD A backguard must be done by the factory to combustible side wall. If the location/job site requires conversion from cooking surface...
Design Guide - Professional Rangetops
Page 11
... Quick Clean Base™ - Superior griddle results-6 pass, 1,630 watt electric griddle - Star® design delivers superior heat spread for easy surface cleaning - Removable griddle and grill accessory for even heating DESIGN - PROFESSIONAL SERIES RANGETOPS 48-INch Model: PcG486GD PROFESSIONAL PCG486GD - 48-inch Porcelain Surface SPEcIFIcATIONS Total Number of simmer options from Rear Wall Cooking Surface Gas Cooktop Burners Center Electric Griddle Total Natural Gas Connection Rating LP Convertible Total LP Gas Connection Rating Electrical Supply Required Circuit Breaker Power...
... Quick Clean Base™ - Superior griddle results-6 pass, 1,630 watt electric griddle - Star® design delivers superior heat spread for easy surface cleaning - Removable griddle and grill accessory for even heating DESIGN - PROFESSIONAL SERIES RANGETOPS 48-INch Model: PcG486GD PROFESSIONAL PCG486GD - 48-inch Porcelain Surface SPEcIFIcATIONS Total Number of simmer options from Rear Wall Cooking Surface Gas Cooktop Burners Center Electric Griddle Total Natural Gas Connection Rating LP Convertible Total LP Gas Connection Rating Electrical Supply Required Circuit Breaker Power...
Design Guide - Professional Rangetops
Page 12
... when planning the installation. Another alternative would be to construct a deck to the LP Conversion instructions packed with all Thermador Professional Rangetops. The rangetop can be located within 3 feet (~900 mm) of the rangetop. A minimum 2 3/4" clearance is accessible without requiring removal of the rangetop connection. PROFESSIONAL SERIES RANGETOPS 48-INch Model: PcG486GD 48-inCH RAnGETOP AnD CUTOUT DiMEnSiOnS *specify width * Minimum hood width recommended equals that a Thermador Professional Wall or island Hood or Custom insert be...
... when planning the installation. Another alternative would be to construct a deck to the LP Conversion instructions packed with all Thermador Professional Rangetops. The rangetop can be located within 3 feet (~900 mm) of the rangetop. A minimum 2 3/4" clearance is accessible without requiring removal of the rangetop connection. PROFESSIONAL SERIES RANGETOPS 48-INch Model: PcG486GD 48-inCH RAnGETOP AnD CUTOUT DiMEnSiOnS *specify width * Minimum hood width recommended equals that a Thermador Professional Wall or island Hood or Custom insert be...
Installation Instructions PART3
Page 4
... mounting flanges. • Verify that all controls are convertible to LP/Propane gas using an accessory conversion kit. water column (14.9 mb to 34.9 mb) WARNING Disconnect power before proceeding with this unit for the Local Electrical Inspector's use. Before turning power ON, be utilized when there is less than 12" clearance, an optional stainless steel Island Trim is correct for installation in the OFF position. All sealed burners are rated...
... mounting flanges. • Verify that all controls are convertible to LP/Propane gas using an accessory conversion kit. water column (14.9 mb to 34.9 mb) WARNING Disconnect power before proceeding with this unit for the Local Electrical Inspector's use. Before turning power ON, be utilized when there is less than 12" clearance, an optional stainless steel Island Trim is correct for installation in the OFF position. All sealed burners are rated...

Installation Instructions PART3
Page 5
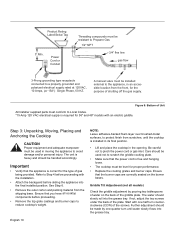
... a suitable exhaust hood be installed above the appliance. The maximum gas pressure to this appliance be installed in accordance with the cooktop. Hood Placement: • For best smoke elimination, the lower edge of the cooktop burners, installing a microwave oven with a suitable overhead vent hood. (See "Step 1: Ventilation Requirements".) Check local building codes for warming or heating a room. In Canada, installation must be installed a minimum of 40" above the appliance cooking surface. (See Figure...
... a suitable exhaust hood be installed above the appliance. The maximum gas pressure to this appliance be installed in accordance with the cooktop. Hood Placement: • For best smoke elimination, the lower edge of the cooktop burners, installing a microwave oven with a suitable overhead vent hood. (See "Step 1: Ventilation Requirements".) Check local building codes for warming or heating a room. In Canada, installation must be installed a minimum of 40" above the appliance cooking surface. (See Figure...

Installation Instructions PART3
Page 7
... installation, see Figure 3, Figure 4, Figure 6 and Figure 7 for the gas inlet and power cord, while also allowing viewing of the product rating label. • Always keep appliance area clean and free from the countertop by 8" cutout in Figure 5 and Figure 9. 6. If different alignment is less than a 12" horizontal clearance between the cooking surface of the cooktop and the bottom of a flame retardant material covered...
... installation, see Figure 3, Figure 4, Figure 6 and Figure 7 for the gas inlet and power cord, while also allowing viewing of the product rating label. • Always keep appliance area clean and free from the countertop by 8" cutout in Figure 5 and Figure 9. 6. If different alignment is less than a 12" horizontal clearance between the cooking surface of the cooktop and the bottom of a flame retardant material covered...
Installation Instructions PART3
Page 12
... location from the front, for 36" and 48" models with one -quarter turn counterclockwise (CCW) of the griddle plate. A manual valve must be installed external to the appliance, in moving the appliance to reduce cooktop's weight. Important • Verify that the power cord is correct for proper performance. • Replace the cooking grates and burner caps. NOTE: Leave adhesive-backed foam layer over brushed-metal surfaces...
... location from the front, for 36" and 48" models with one -quarter turn counterclockwise (CCW) of the griddle plate. A manual valve must be installed external to the appliance, in moving the appliance to reduce cooktop's weight. Important • Verify that the power cord is correct for proper performance. • Replace the cooking grates and burner caps. NOTE: Leave adhesive-backed foam layer over brushed-metal surfaces...
Installation Instructions PART3
Page 13
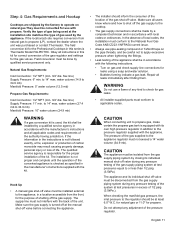
... adjustment of the pressure regulator. When checking the manifold gas pressure, the inlet pressure to the regulator should be at the manual shut-off valve before connecting the appliance. • The installer should inform the consumer of the location of the gas shut-off at least 6.0" W.C. Verify the type of gas being used by qualified service personnel only. flex line) Supply Pressure: 11" min. Make sure the gas supply is responsible for use a flame...
... adjustment of the pressure regulator. When checking the manifold gas pressure, the inlet pressure to the regulator should be at the manual shut-off valve before connecting the appliance. • The installer should inform the consumer of the location of the gas shut-off at least 6.0" W.C. Verify the type of gas being used by qualified service personnel only. flex line) Supply Pressure: 11" min. Make sure the gas supply is responsible for use a flame...
Installation Instructions PART3
Page 15
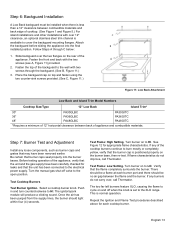
... 1 and Figure 5.) For island installations and other installations with over , call Thermador. Place the backguard cap on to the open position. Test Flame: High Setting. Turn burner on and off valve to HI. The ignitor/spark module will produce a clicking sound. See Figure 12 for leaks and that the unit and the gas supply have been removed earlier. Repeat the Ignition and Flame Test procedures described above for...
... 1 and Figure 5.) For island installations and other installations with over , call Thermador. Place the backguard cap on to the open position. Test Flame: High Setting. Turn burner on and off valve to HI. The ignitor/spark module will produce a clicking sound. See Figure 12 for leaks and that the unit and the gas supply have been removed earlier. Repeat the Ignition and Flame Test procedures described above for...
Installation Instructions PART3
Page 16
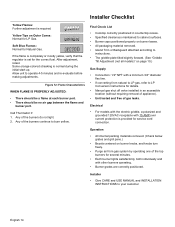
... Connection: 1/2" NPT with other burners operating. • Burner grates are correctly positioned. After adjustment, retest. Soft Blue Flames: Normal for details. • Manual gas shut off valve installed in countertop recess. • Specified clearances maintained to cabinet surfaces. • Burner caps positioned properly on burner bases. • All packaging material removed. • Island Trim or Backguard attached according to LP Conversion Instructions for Natural Gas. Any of the burners do not light. 2. Installer Checklist Yellow Flames: Further adjustment...
... Connection: 1/2" NPT with other burners operating. • Burner grates are correctly positioned. After adjustment, retest. Soft Blue Flames: Normal for details. • Manual gas shut off valve installed in countertop recess. • Specified clearances maintained to cabinet surfaces. • Burner caps positioned properly on burner bases. • All packaging material removed. • Island Trim or Backguard attached according to LP Conversion Instructions for Natural Gas. Any of the burners do not light. 2. Installer Checklist Yellow Flames: Further adjustment...
User Manual
Page 3
... or Island Trim. It is Thermador Model PALPKITHC. Before using the Cooktop, insure that the type of gas being used at the installation site matches the type of gas used instead of installation. PCG 30 6 SECTION FOUR: Using the Cooktop Sealed Burners 7 ExtraLow® Burners 8 Electronic Igniter 9 Burner Cap Placement 9 Flame Setting Guidelines 10 Cookware Recommendations 11 Specialty Cookware 12 Surface Burner Cooking Recommendations . 13 - 14 Using the Griddle 15 - 16 Griddle Cooking Recommendations 16 SECTION FIVE: Care and Maintenance Cooktop Cleaning Recommendations...
... or Island Trim. It is Thermador Model PALPKITHC. Before using the Cooktop, insure that the type of gas being used at the installation site matches the type of gas used instead of installation. PCG 30 6 SECTION FOUR: Using the Cooktop Sealed Burners 7 ExtraLow® Burners 8 Electronic Igniter 9 Burner Cap Placement 9 Flame Setting Guidelines 10 Cookware Recommendations 11 Specialty Cookware 12 Surface Burner Cooking Recommendations . 13 - 14 Using the Griddle 15 - 16 Griddle Cooking Recommendations 16 SECTION FIVE: Care and Maintenance Cooktop Cleaning Recommendations...
User Manual
Page 4
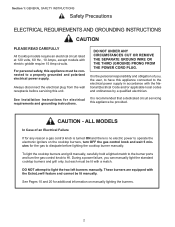
... FROM THE POWER CORD PLUG. See Installation Instructions for additional information on the cooktop burners, turn the gas control knob to dissipate before servicing this appliance must be lit with the ExtraLow® feature and cannot be lit manually. DO NOT attempt to a properly grounded and polarized electrical power supply. Section 1: GENERAL SAFETY INSTRUCTIONS Safety Precautions ELECTRICAL REQUIREMENTS AND GROUNDING INSTRUCTIONS CAUTION PLEASE READ CAREFULLY All Cooktop models require an electrical circuit rated at 120 volts...
... FROM THE POWER CORD PLUG. See Installation Instructions for additional information on the cooktop burners, turn the gas control knob to dissipate before servicing this appliance must be lit with the ExtraLow® feature and cannot be lit manually. DO NOT attempt to a properly grounded and polarized electrical power supply. Section 1: GENERAL SAFETY INSTRUCTIONS Safety Precautions ELECTRICAL REQUIREMENTS AND GROUNDING INSTRUCTIONS CAUTION PLEASE READ CAREFULLY All Cooktop models require an electrical circuit rated at 120 volts...
User Manual
Page 5
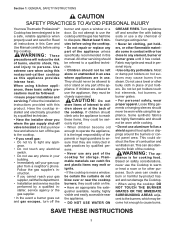
... by a qualified installer, service agency or the gas supplier. • In the event a burner goes out and gas escapes, turn off the burner and open a window or a door. Section 1: GENERAL SAFETY INSTRUCTIONS CAUTION SAFETY PRACTICES TO AVOID PERSONAL INJURY Your new Thermador Professional® Cooktop has been designed to be a safe, reliable appliance when properly used and cared for cooking food. Use extreme care when using this product.
... by a qualified installer, service agency or the gas supplier. • In the event a burner goes out and gas escapes, turn off the burner and open a window or a door. Section 1: GENERAL SAFETY INSTRUCTIONS CAUTION SAFETY PRACTICES TO AVOID PERSONAL INJURY Your new Thermador Professional® Cooktop has been designed to be a safe, reliable appliance when properly used and cared for cooking food. Use extreme care when using this product.
User Manual
Page 6
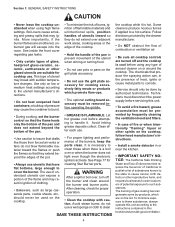
... air vents or fans do not blow flammable material toward the flames or push the flames so that they do not use pots or pans on the cooktop, follow hood manufacturer's instructions. • Install a smoke detector in the presence of heat, ignite or cause metal parts to cover the burner. Boil-overs cause smoking and greasy spills that have flat bottoms, large enough to corrode. • Service...
... air vents or fans do not blow flammable material toward the flames or push the flames so that they do not use pots or pans on the cooktop, follow hood manufacturer's instructions. • Install a smoke detector in the presence of heat, ignite or cause metal parts to cover the burner. Boil-overs cause smoking and greasy spills that have flat bottoms, large enough to corrode. • Service...


